The Great Pumpkin - '71 Duster
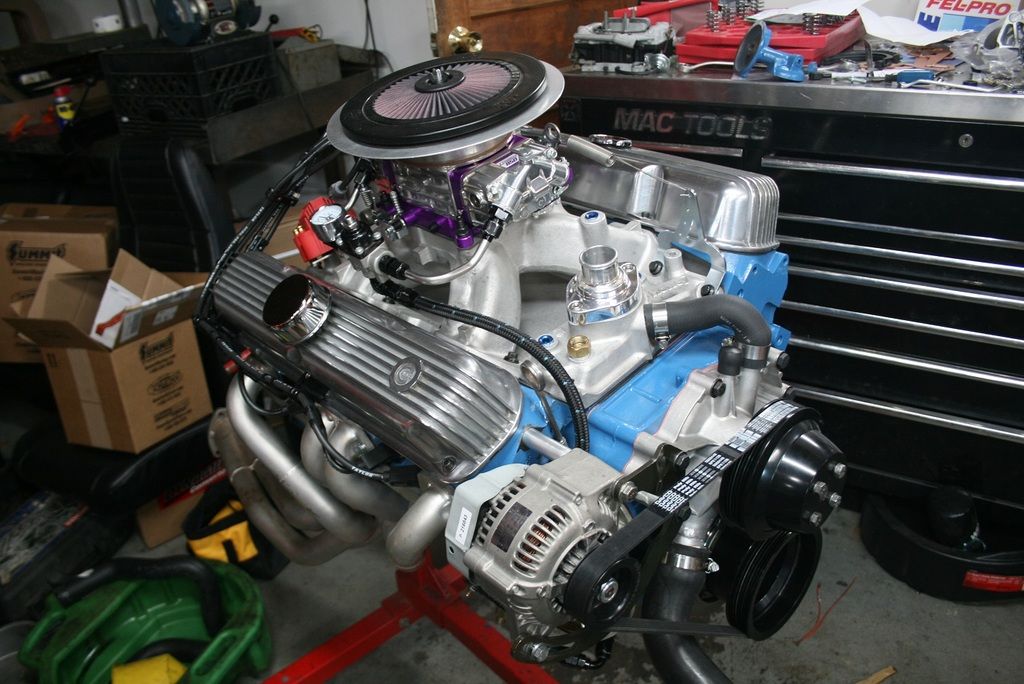
Got the engine all done!! Been working on this thing for over a year and it's finally finished!
I made a pretty good push to get this point over the last few weeks - plug wires, fuel line, accessories, valve covers, exhaust and a few other things, all of which involved some sort of problem/hurdle/b.s. I kept my head down and kept at it though and got it all done. Per my usual style, I'll describe all this stuff in great detail. Grab a beverage and get comfy, this is gonna be a long one. Guess I'll start with the plug wires.
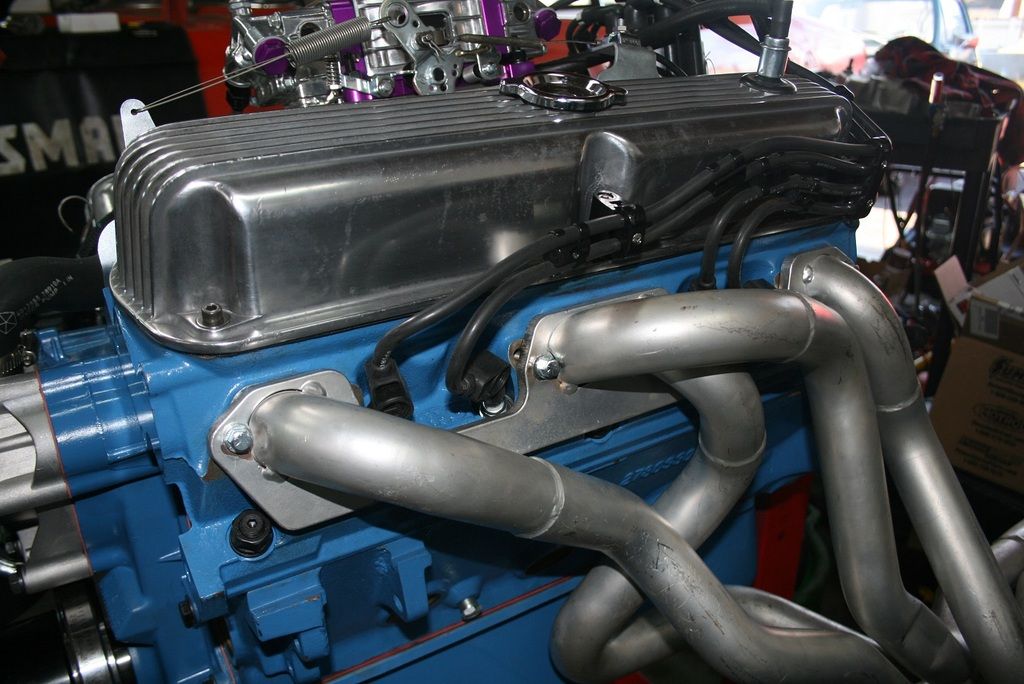
Making plug wires is something I don't mind doing because it lets me decide where to put the wires. I was not a big fan of my last set of wires for various reasons. This time I went with Taylor 8mm with the molded 135* boots. The molded boots clip onto the plug really well with an affirmative 'click' and the 135* boots allow for clever routing options. My goal was to make them as tight as possible without having to stretch them. I can't stand when stuff is flopping around out in the breeze.
I used Made-For-You Products Smoothie wire looms which bolt to the valve covers. I also got a set of MSD wire separators which helped to make things sanitary. I'm happy with the way they came out, it's pretty much what I envisioned when I started. Plugs are NGK FR5 BTW.
Here's the driver's side. The 135* boots are great on the #5 and 7 cylinders since those wires cross and are close in the firing order. You can clock the boots forward and kind of double them back.
Passenger side.
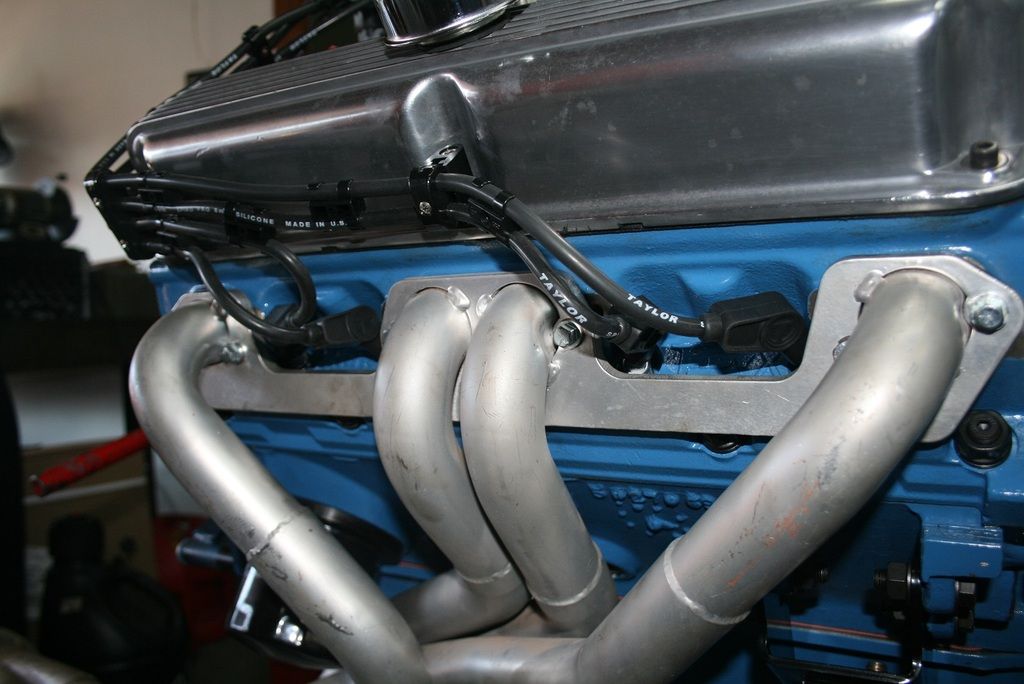
From the back. I tired to keep the wires tight against the valve covers. The looms come with 4 wire separator blocks that hold the long parts of wires in place nicely.
So the front accessories kind of kicked my ***. Yeah, it sounds stupid but it was a ***** trying to get the pulleys to line up. I have the AR/Toyota/Denso alternator setup but with a serp belt pulley from a circle track supply place. I started off with the AR bracket that comes with the conversion kit but the pulley ended up too far back. When I modifed my water pump inlet it ended up putting the hose right up against the fan belt. This required pulley spacers to move the belts forward to clear the hose. This is why the alt. bracket ended up too far back.
I went through a bunch of different configurations trying to make do with what I had but nothing worked without some major flaw. I must have taken the alternator and associated bracketry on and off 100 times. Plus all the back and forth to the hardware store to get all sorts of crap for making spacers etc.
I did a lot of looking around for brackets and found AR offers a kit to mount a 'race' Powermaster alternator to a small block. That kit uses a different bracket with an offset in it. I actually PM'd Andy about it to ask if there would be any issues using it with a different alternator. His reply was "Why, the bracket that comes with the Denso kits works." Not in my situation! I ordered the other bracket kit and it worked like it was meant to be. Couple extra washers and spacers and it was dead nuts. Aftermarket stuff can drive you batty sometimes trying to fit it all together in ways that were never intended.
Here's the alt. mounted up with the Powermaster bracket. Notice the offset in the bracket. The one that comes with the Denso kit is straight across which did not work.
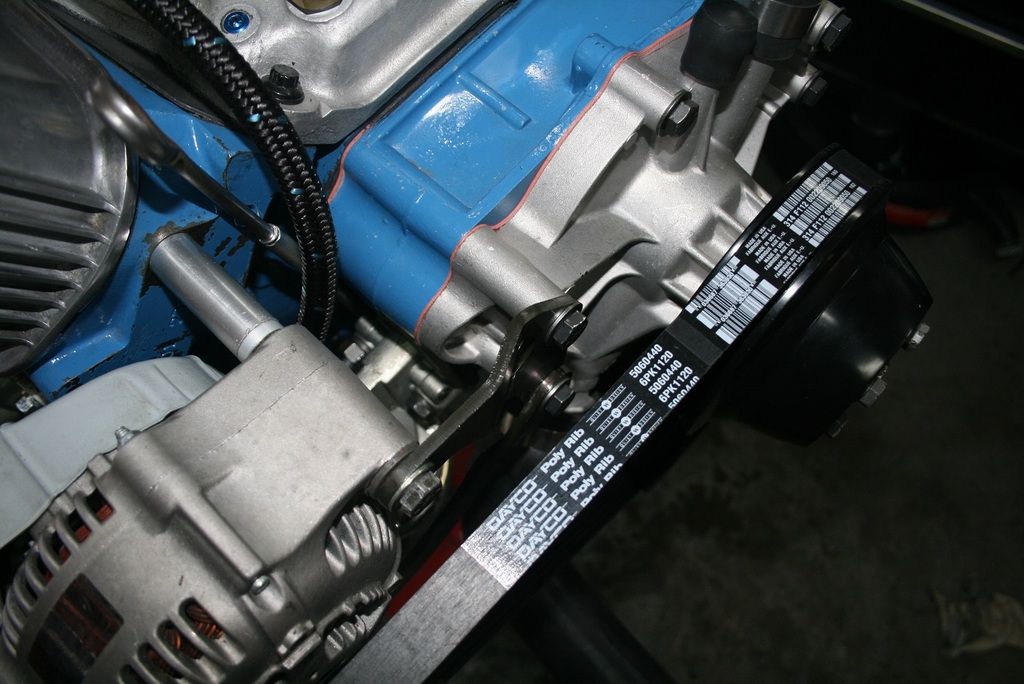
Here's the front accessories all set up. The powder coating on the March pulleys flaked off pretty bad after minimal use and the long hole in the crank pulley was actually kinda trashed. I filed it down, it's all good now but it's a little disconcerting.
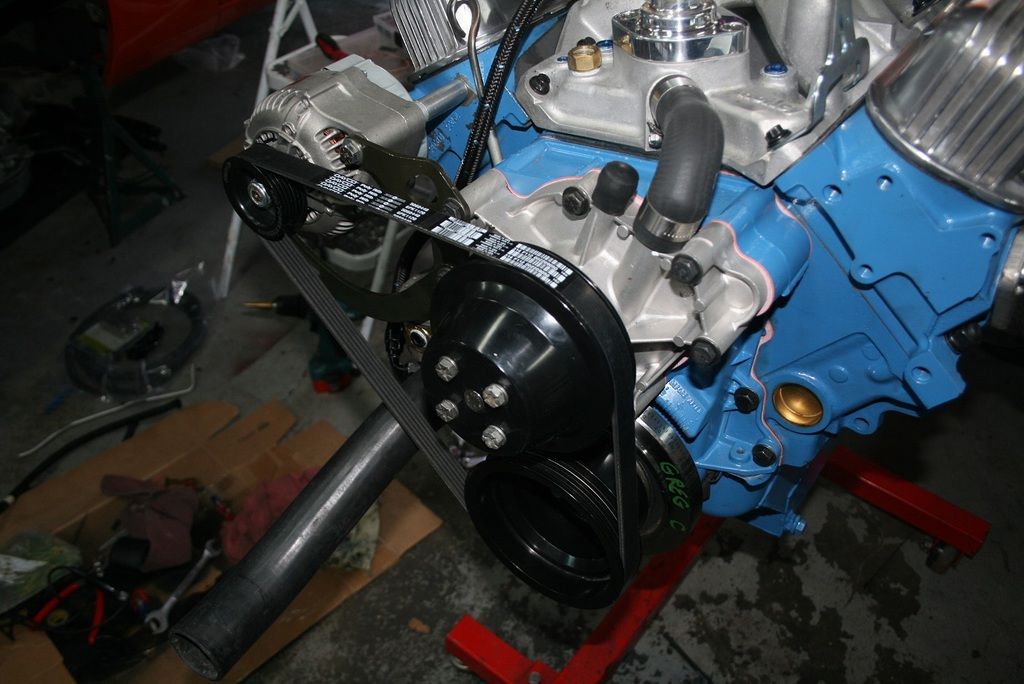
The fuel pump was probably the biggest hassle. I am using a giant Clay Smith 6 vane mechanical pump so I won't go into the aggravation this thing caused me again except to say it's the one thing that led to having to deal with all this other crap. Next time I will just cave in and go to an electric pump like everyone else.
The pump is in though and the accessories seem to fit. The belt is pretty close to the lower rad hose but it's not touching. I can always go to a flex hose and twist it a little to get more clearance but I won't know until the motor goes in the car.
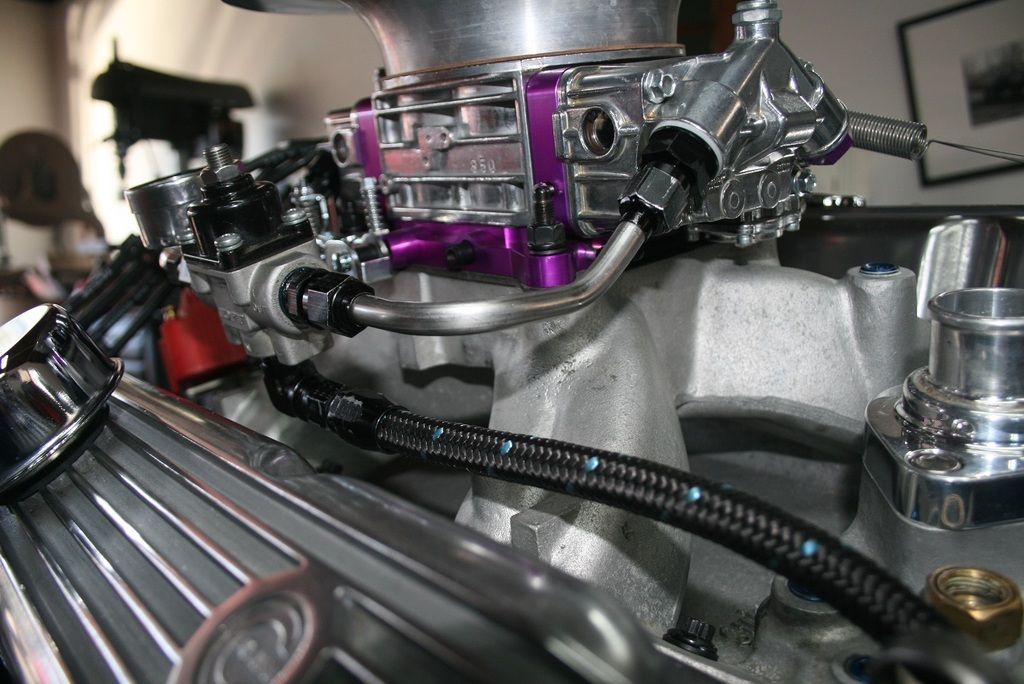
Next fuel pump related item is the pump to carb line. I had basically the same setup on my last combo. This time I made the line with less sharp bends and used a 90* free low hose end coming out of the adapter. I found a clip in my junk bolt box from my dealership days to hold the line in place.
I made the bowl feed lines two years ago so I just re-used 'em. (The CS pump needs a regulator.) The new line just re-connected to the old setup and that was done. Check out my new Proform 850 bling.
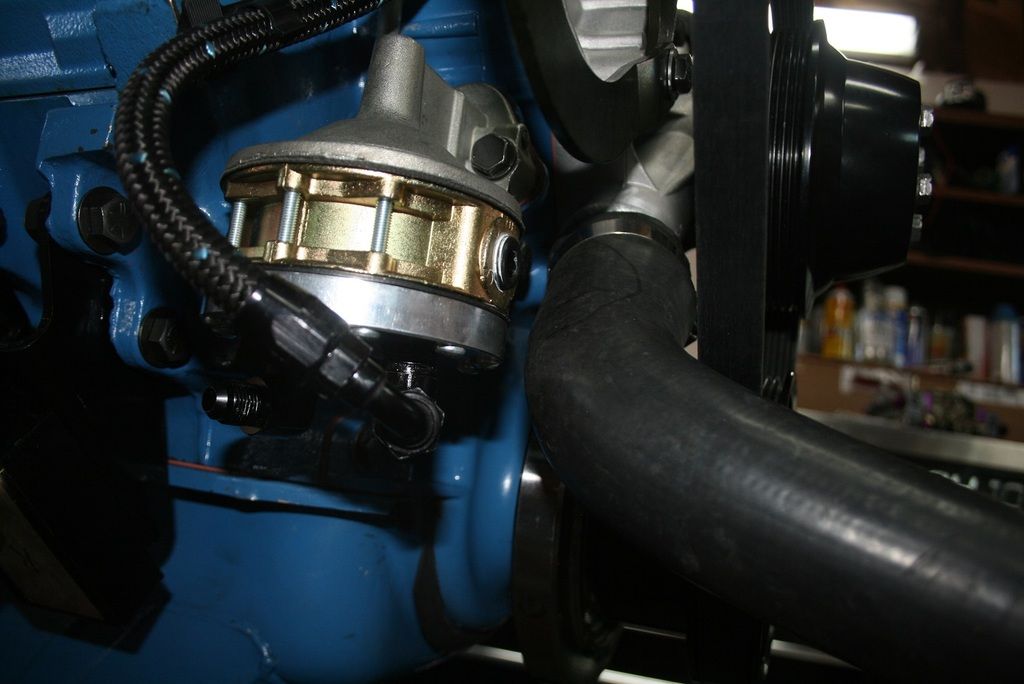
Got the dipstick tube into place as well which doesn't sound like much but believe me, it took some effort. Dipstick always sounds dumb but you gotta have one in some form on an engine that has oil in it. Hughes sells a kit that locks the tube in place with a compression fitting. I liked the idea because I've had dipsticks break off in the block and pop out. When I had the block at the machine shop they tapped it for the fitting. (1/8" NPT)
Getting the thing in there with that ridiculous fuel pump was a P.I.T.A. I left the pump installed purposely because I needed to gauge how much room I had and where to bend the tube to clear the pump. Let's just say I got it to work and it ain't coming out.
You can see the brass fitting behind the pump in the center of the picture. There's a compression fitting at the base of the tube which locks it in place. I could unscrew it and cap it if I wanted but I'll the leave it for now.
Next ***-kicking involved the headers. Everyone knows headers suck to deal with no matter how you slice it. Since this is my project, naturally I had to deal with another hurdle.
I'm re-using my headers from the old W2 combo. They're TTi 1 5/8" to 1 3/4" step headers with the W2 exhaust bolt pattern. Luckily, the RHS heads are drilled for both the W2 and regular LA exhaust so no problem re-using what I had.. Saved me a bunch of money.
They actually went on OK except for the #5 cylinder. Previously, there was a stud in that location and the nut was seized to the stud. When I pulled the old motor, the stud was stuck in the flange but it somehow came out OK without damaging anything. I was able to get the stud off easily but now I had to figure out how to get the headers back on. There is an indentation right off the flange to make room for the bolt but it's very small. A 1" bolt does not go in AT ALL. I hogged out the bolt hole in the flange to gain a little more clearance but the bolt head was still getting hung up on the tube.
So, out came the hammer. I used body hammers - I put the flat face of one up against the point where it was sticking out too far and gave it a couple whacks - we got clearance Clarencce! Just hope we don't have an exhaust leak from weakened metal. I shortened the bolt up a few threads too which helped with threading the bolt in.
I might be getting new headers anyway, the ones I have are kind of beat. They work OK though nd TTi does not want you to break in a new motor with new headers so I'm stuck with these for now. Hopefully they'll be OK.
Here's the culprit, the #5 bolt.No gaskets yet.
Couple more things, stay with me!
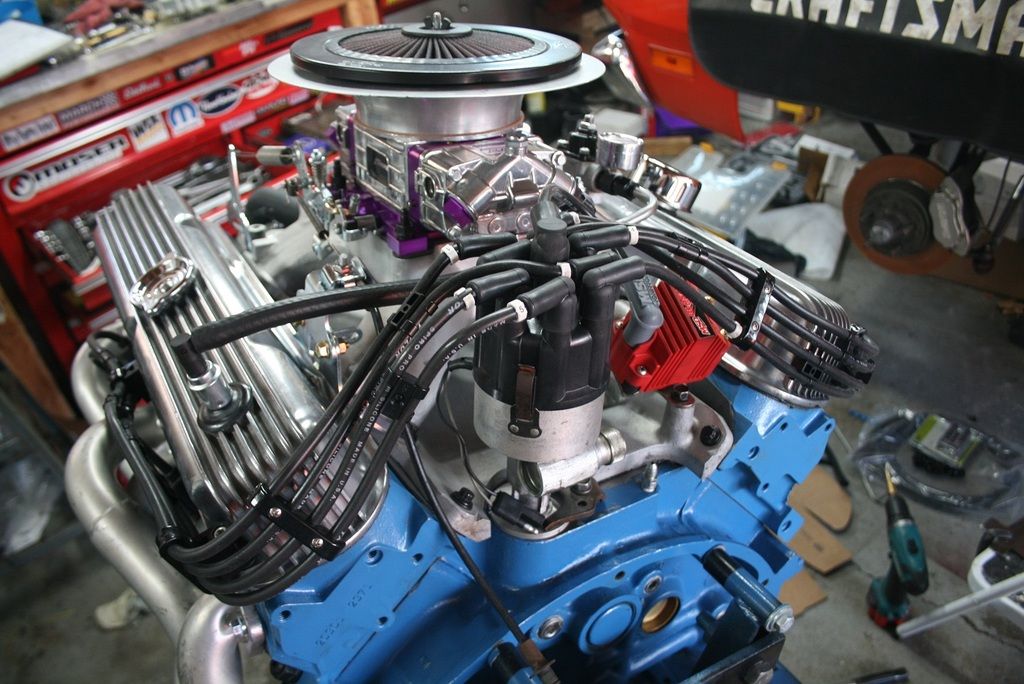
I decided to finally use my old Mopar Performance tach drive distributor. This is an NOS Prestolite unit from the '80s. It's actually a really nice distributor. The reluctor is different than the regular electronic units and seems to be phased correctly since it lines up where I need it to when I checked the timing. I'm using one super light spring and a more medium one along with an FBO limiter plate thing. I set the initial to 20. I can't remember what I set the total to, maybe 34? I have to look.
So using one of these tach drive distributors means I get to finally use one of my cool-guy mechanical tachometers. I have a few that I am considering using though sourcing a cable has proven to be a little tough (naturally). I found a company out in Nebraska that seems to know what I need so I will be ordering one up from them this week. I need to get a right angle adapter for it though since the cables don't like to be bent sharply. The adapter is 3 times more expensive than the cable itself! I'm not too swift sometimes.
So here's the business end of the tach drive on the distributor. It's a 5/8" thread with a .152" tang. Try finding a cable with that end and an end for a Stewart Warner 535AH or 424 EX tach!
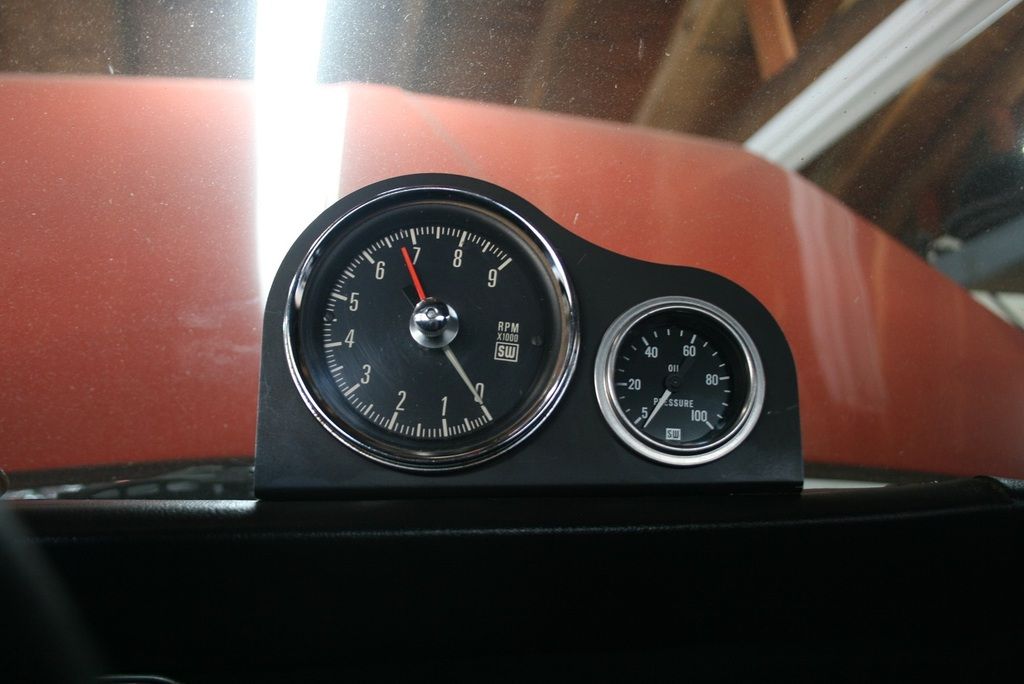
So here are the tachs I am considering using; a Jones Motrola/Moroso from the early '70s, a Stewart Warner 535AH from the early '70s (Sox & Martin used that one) and a Stewart Warner 424EX a la Don Carlton in the wire car. Leaning towards the SW 535 right now, just seems to look the best and I can get a cable for it easily.
Moroso
SW 535AH
SW 424EX

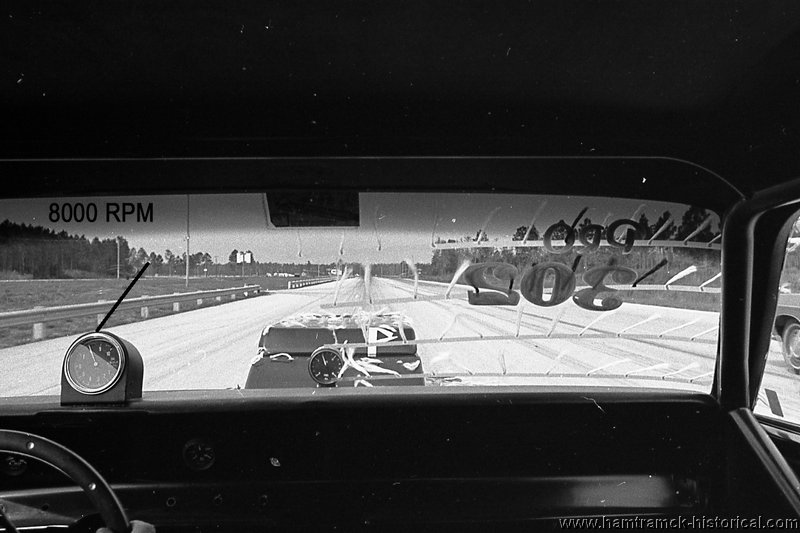
Here's the same tach in the Wire Car. In this pic, they were doing aero testing and wanted pics of what things looked like from inside the car. At the same time, they ran past a car in the other lane that was filming to see what it looked like at speed. Cool! Never really seen one of these tachs before. Saw one on Ebay recently and I grabbed it, got it fairly cheap too! They are kind of oddball though, tach cable is unique and basically obsolete.
I did a lot of work to install a tach adapter and such for my electronic tachometer, all for naught!
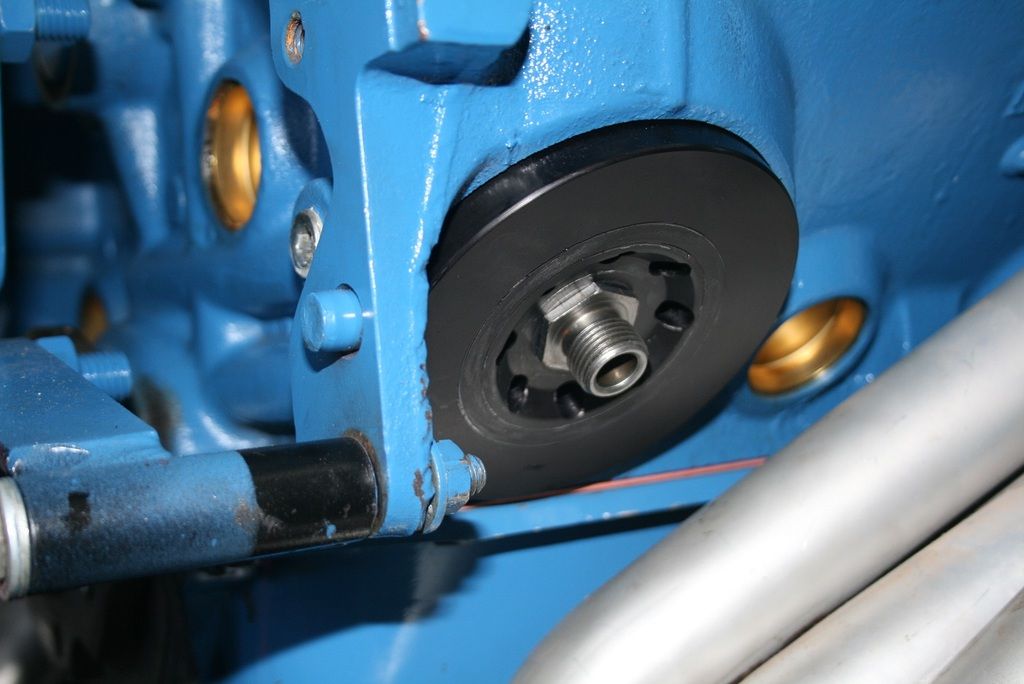
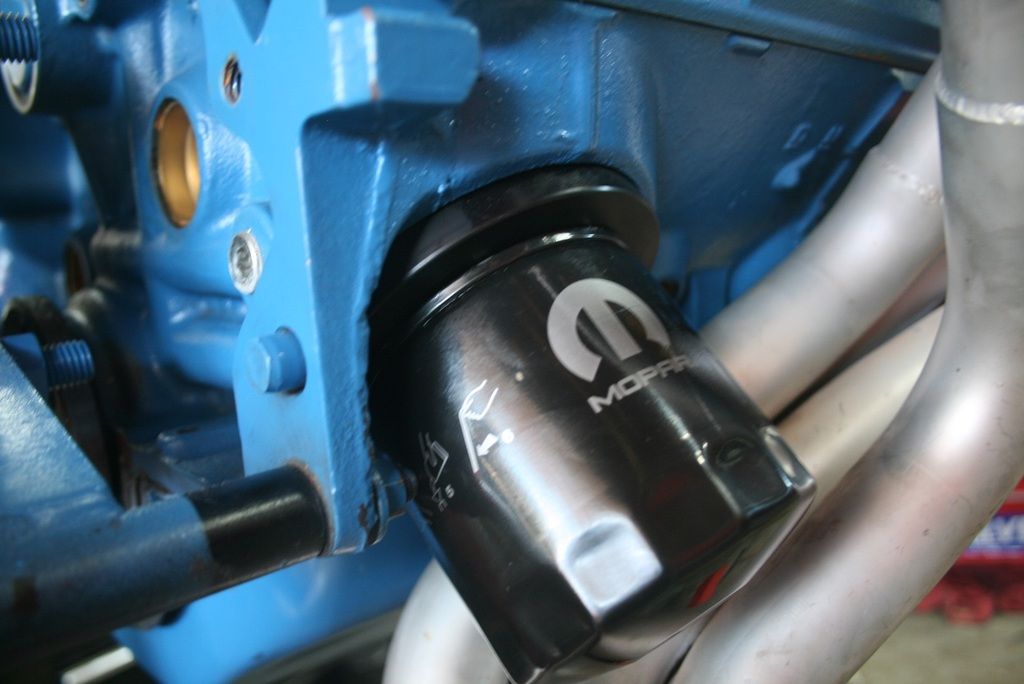
OK, last thing was the oil filter adapter. I went with a Canton Racing billet oil filter adapter plate and ditched the unnecessary 90* adapter. The C.R. plate has an o-ring to seal it to the block which does away with the 'leak prone' regular gasket. It's a thick billet piece with extra holes drilled in the plate to allow more oil flow into the filter. I am able to re-use the OE threaded filter adapter with it. I lubed the o-ring (which you are supposed to do with all o-rings) and screwed the threaded adapter on, easy peasy. I can use up my filters I snagged from work but I will have to start buying them again when I run out. Maybe I can go back and snag some more at some point.
Canton Racing filter plate installed.
With late model factory 1090 filter.
Couple last things, I promise.
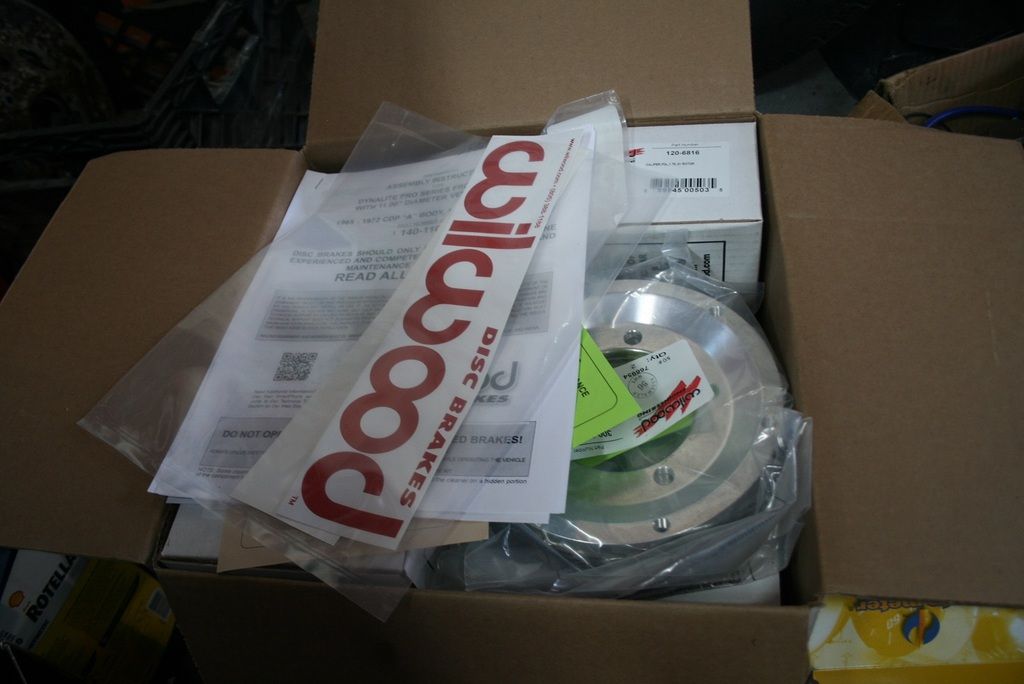
Here's the Wilwood brake kit I mentioned in the last post. Not sure if I want to install them before I get the motor in the car. It's a lot to be aware of during a first drive - new motor and trans and new brakes. I might wait until after things are in and running just to make sure I'm not making too much work for myself at one time.
Box O' brakes.
Lastly, I just wanted to show off my NOS Fenton Gyro center cap. Bummer I only have one though. Hope I can find another one!
I will be calling the dyno shop to set up an appointment, hopefully they can get me in soon.
At this point in our program, I would like to give a shout out to Rob/Rumblefish. He PM'ed me the other day asking what was up with the Duster. We exchanged a few messages but it got me thinking - I need to finish the damn thing! I have to say it lit a fire under my ***. I blew off all kinds of crap this weekend to get the motor done and I'm really psyched about it. No, not the finishing the motor, but blowing **** off! Thanks Rob!
Whew, that was a lot! If you read all that, I thank you for sticking it out.
More to come.
Got the engine all done!! Been working on this thing for over a year and it's finally finished!
I made a pretty good push to get this point over the last few weeks - plug wires, fuel line, accessories, valve covers, exhaust and a few other things, all of which involved some sort of problem/hurdle/b.s. I kept my head down and kept at it though and got it all done. Per my usual style, I'll describe all this stuff in great detail. Grab a beverage and get comfy, this is gonna be a long one. Guess I'll start with the plug wires.
Making plug wires is something I don't mind doing because it lets me decide where to put the wires. I was not a big fan of my last set of wires for various reasons. This time I went with Taylor 8mm with the molded 135* boots. The molded boots clip onto the plug really well with an affirmative 'click' and the 135* boots allow for clever routing options. My goal was to make them as tight as possible without having to stretch them. I can't stand when stuff is flopping around out in the breeze.
I used Made-For-You Products Smoothie wire looms which bolt to the valve covers. I also got a set of MSD wire separators which helped to make things sanitary. I'm happy with the way they came out, it's pretty much what I envisioned when I started. Plugs are NGK FR5 BTW.
Here's the driver's side. The 135* boots are great on the #5 and 7 cylinders since those wires cross and are close in the firing order. You can clock the boots forward and kind of double them back.
Passenger side.
From the back. I tired to keep the wires tight against the valve covers. The looms come with 4 wire separator blocks that hold the long parts of wires in place nicely.
So the front accessories kind of kicked my ***. Yeah, it sounds stupid but it was a ***** trying to get the pulleys to line up. I have the AR/Toyota/Denso alternator setup but with a serp belt pulley from a circle track supply place. I started off with the AR bracket that comes with the conversion kit but the pulley ended up too far back. When I modifed my water pump inlet it ended up putting the hose right up against the fan belt. This required pulley spacers to move the belts forward to clear the hose. This is why the alt. bracket ended up too far back.
I went through a bunch of different configurations trying to make do with what I had but nothing worked without some major flaw. I must have taken the alternator and associated bracketry on and off 100 times. Plus all the back and forth to the hardware store to get all sorts of crap for making spacers etc.
I did a lot of looking around for brackets and found AR offers a kit to mount a 'race' Powermaster alternator to a small block. That kit uses a different bracket with an offset in it. I actually PM'd Andy about it to ask if there would be any issues using it with a different alternator. His reply was "Why, the bracket that comes with the Denso kits works." Not in my situation! I ordered the other bracket kit and it worked like it was meant to be. Couple extra washers and spacers and it was dead nuts. Aftermarket stuff can drive you batty sometimes trying to fit it all together in ways that were never intended.
Here's the alt. mounted up with the Powermaster bracket. Notice the offset in the bracket. The one that comes with the Denso kit is straight across which did not work.
Here's the front accessories all set up. The powder coating on the March pulleys flaked off pretty bad after minimal use and the long hole in the crank pulley was actually kinda trashed. I filed it down, it's all good now but it's a little disconcerting.
The fuel pump was probably the biggest hassle. I am using a giant Clay Smith 6 vane mechanical pump so I won't go into the aggravation this thing caused me again except to say it's the one thing that led to having to deal with all this other crap. Next time I will just cave in and go to an electric pump like everyone else.
The pump is in though and the accessories seem to fit. The belt is pretty close to the lower rad hose but it's not touching. I can always go to a flex hose and twist it a little to get more clearance but I won't know until the motor goes in the car.
Next fuel pump related item is the pump to carb line. I had basically the same setup on my last combo. This time I made the line with less sharp bends and used a 90* free low hose end coming out of the adapter. I found a clip in my junk bolt box from my dealership days to hold the line in place.
I made the bowl feed lines two years ago so I just re-used 'em. (The CS pump needs a regulator.) The new line just re-connected to the old setup and that was done. Check out my new Proform 850 bling.
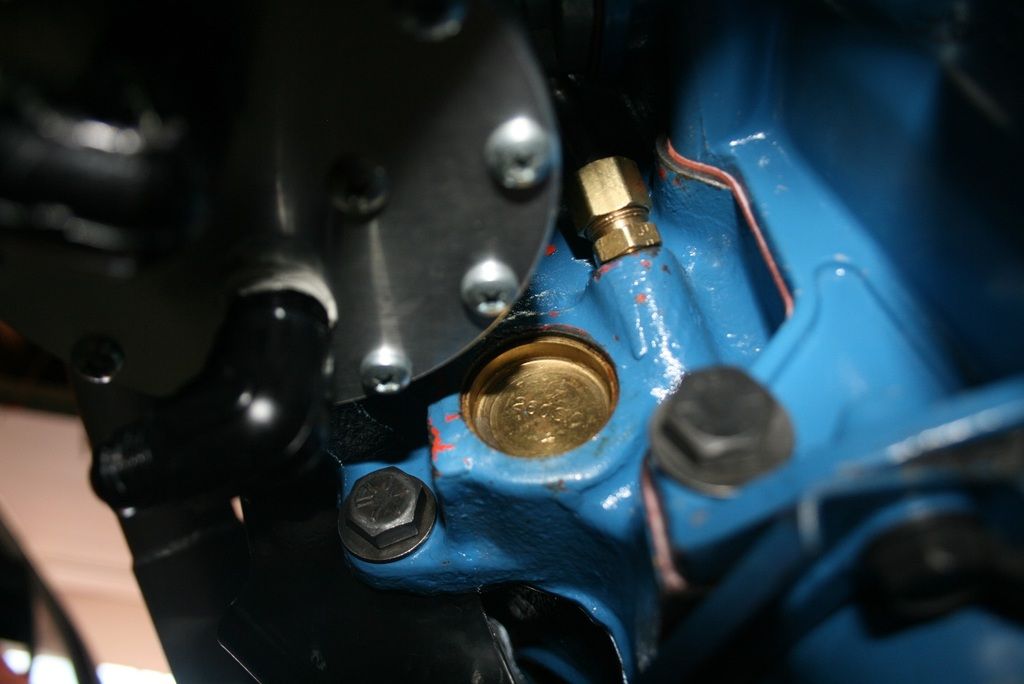
Got the dipstick tube into place as well which doesn't sound like much but believe me, it took some effort. Dipstick always sounds dumb but you gotta have one in some form on an engine that has oil in it. Hughes sells a kit that locks the tube in place with a compression fitting. I liked the idea because I've had dipsticks break off in the block and pop out. When I had the block at the machine shop they tapped it for the fitting. (1/8" NPT)
Getting the thing in there with that ridiculous fuel pump was a P.I.T.A. I left the pump installed purposely because I needed to gauge how much room I had and where to bend the tube to clear the pump. Let's just say I got it to work and it ain't coming out.
You can see the brass fitting behind the pump in the center of the picture. There's a compression fitting at the base of the tube which locks it in place. I could unscrew it and cap it if I wanted but I'll the leave it for now.
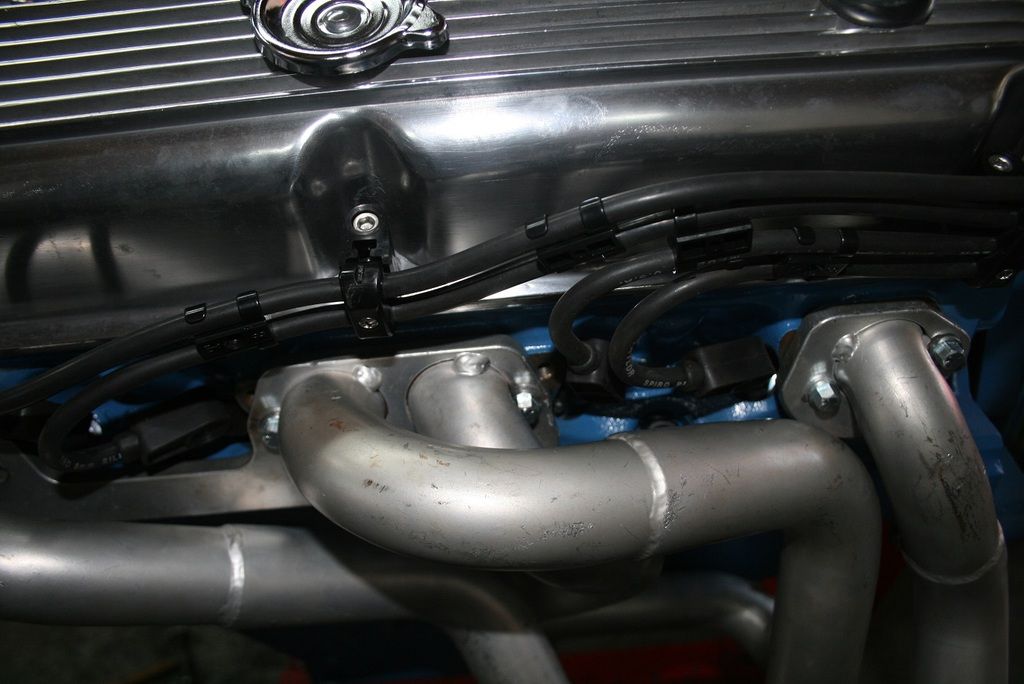
Next ***-kicking involved the headers. Everyone knows headers suck to deal with no matter how you slice it. Since this is my project, naturally I had to deal with another hurdle.
I'm re-using my headers from the old W2 combo. They're TTi 1 5/8" to 1 3/4" step headers with the W2 exhaust bolt pattern. Luckily, the RHS heads are drilled for both the W2 and regular LA exhaust so no problem re-using what I had.. Saved me a bunch of money.
They actually went on OK except for the #5 cylinder. Previously, there was a stud in that location and the nut was seized to the stud. When I pulled the old motor, the stud was stuck in the flange but it somehow came out OK without damaging anything. I was able to get the stud off easily but now I had to figure out how to get the headers back on. There is an indentation right off the flange to make room for the bolt but it's very small. A 1" bolt does not go in AT ALL. I hogged out the bolt hole in the flange to gain a little more clearance but the bolt head was still getting hung up on the tube.
So, out came the hammer. I used body hammers - I put the flat face of one up against the point where it was sticking out too far and gave it a couple whacks - we got clearance Clarencce! Just hope we don't have an exhaust leak from weakened metal. I shortened the bolt up a few threads too which helped with threading the bolt in.
I might be getting new headers anyway, the ones I have are kind of beat. They work OK though nd TTi does not want you to break in a new motor with new headers so I'm stuck with these for now. Hopefully they'll be OK.
Here's the culprit, the #5 bolt.No gaskets yet.
Couple more things, stay with me!
I decided to finally use my old Mopar Performance tach drive distributor. This is an NOS Prestolite unit from the '80s. It's actually a really nice distributor. The reluctor is different than the regular electronic units and seems to be phased correctly since it lines up where I need it to when I checked the timing. I'm using one super light spring and a more medium one along with an FBO limiter plate thing. I set the initial to 20. I can't remember what I set the total to, maybe 34? I have to look.
So using one of these tach drive distributors means I get to finally use one of my cool-guy mechanical tachometers. I have a few that I am considering using though sourcing a cable has proven to be a little tough (naturally). I found a company out in Nebraska that seems to know what I need so I will be ordering one up from them this week. I need to get a right angle adapter for it though since the cables don't like to be bent sharply. The adapter is 3 times more expensive than the cable itself! I'm not too swift sometimes.
So here's the business end of the tach drive on the distributor. It's a 5/8" thread with a .152" tang. Try finding a cable with that end and an end for a Stewart Warner 535AH or 424 EX tach!
So here are the tachs I am considering using; a Jones Motrola/Moroso from the early '70s, a Stewart Warner 535AH from the early '70s (Sox & Martin used that one) and a Stewart Warner 424EX a la Don Carlton in the wire car. Leaning towards the SW 535 right now, just seems to look the best and I can get a cable for it easily.
Moroso
SW 535AH
SW 424EX
Here's the same tach in the Wire Car. In this pic, they were doing aero testing and wanted pics of what things looked like from inside the car. At the same time, they ran past a car in the other lane that was filming to see what it looked like at speed. Cool! Never really seen one of these tachs before. Saw one on Ebay recently and I grabbed it, got it fairly cheap too! They are kind of oddball though, tach cable is unique and basically obsolete.
I did a lot of work to install a tach adapter and such for my electronic tachometer, all for naught!
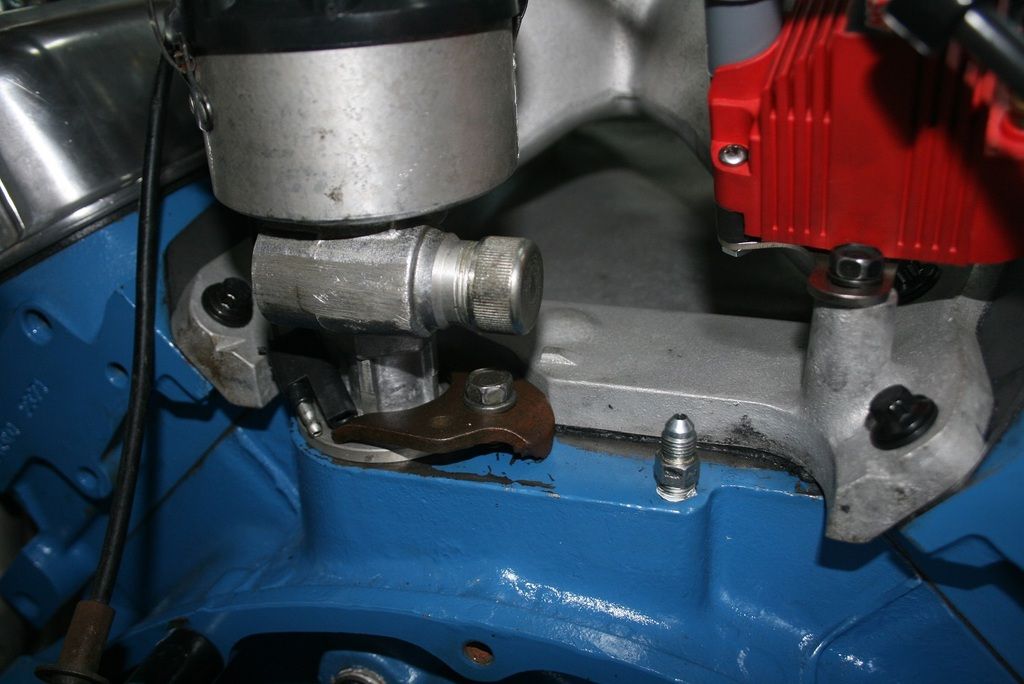
OK, last thing was the oil filter adapter. I went with a Canton Racing billet oil filter adapter plate and ditched the unnecessary 90* adapter. The C.R. plate has an o-ring to seal it to the block which does away with the 'leak prone' regular gasket. It's a thick billet piece with extra holes drilled in the plate to allow more oil flow into the filter. I am able to re-use the OE threaded filter adapter with it. I lubed the o-ring (which you are supposed to do with all o-rings) and screwed the threaded adapter on, easy peasy. I can use up my filters I snagged from work but I will have to start buying them again when I run out. Maybe I can go back and snag some more at some point.
Canton Racing filter plate installed.
With late model factory 1090 filter.
Couple last things, I promise.
Here's the Wilwood brake kit I mentioned in the last post. Not sure if I want to install them before I get the motor in the car. It's a lot to be aware of during a first drive - new motor and trans and new brakes. I might wait until after things are in and running just to make sure I'm not making too much work for myself at one time.
Box O' brakes.
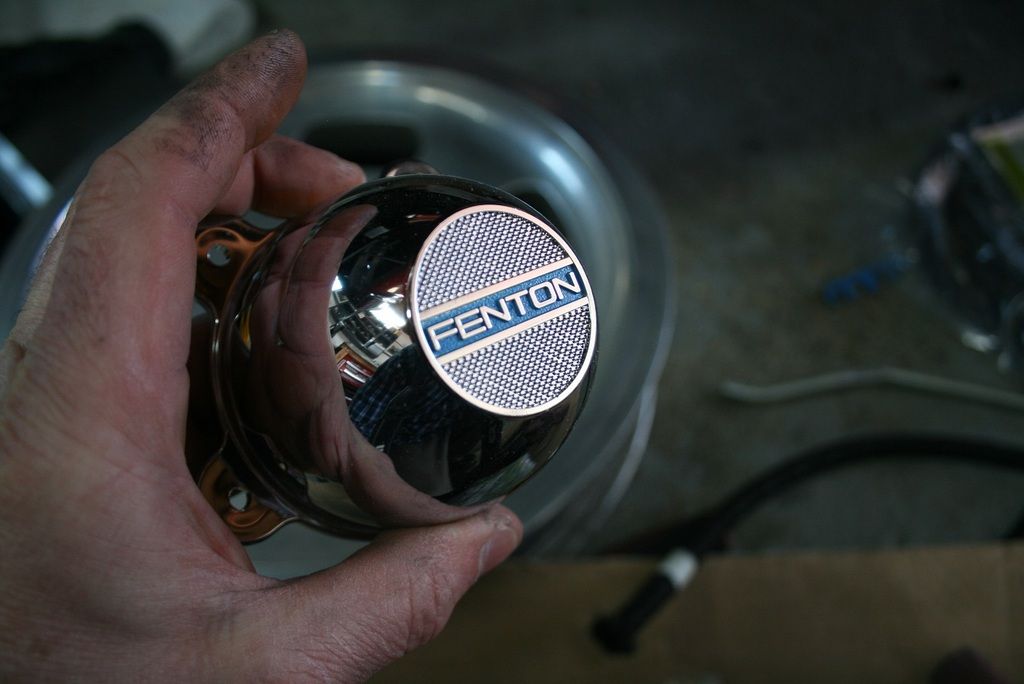
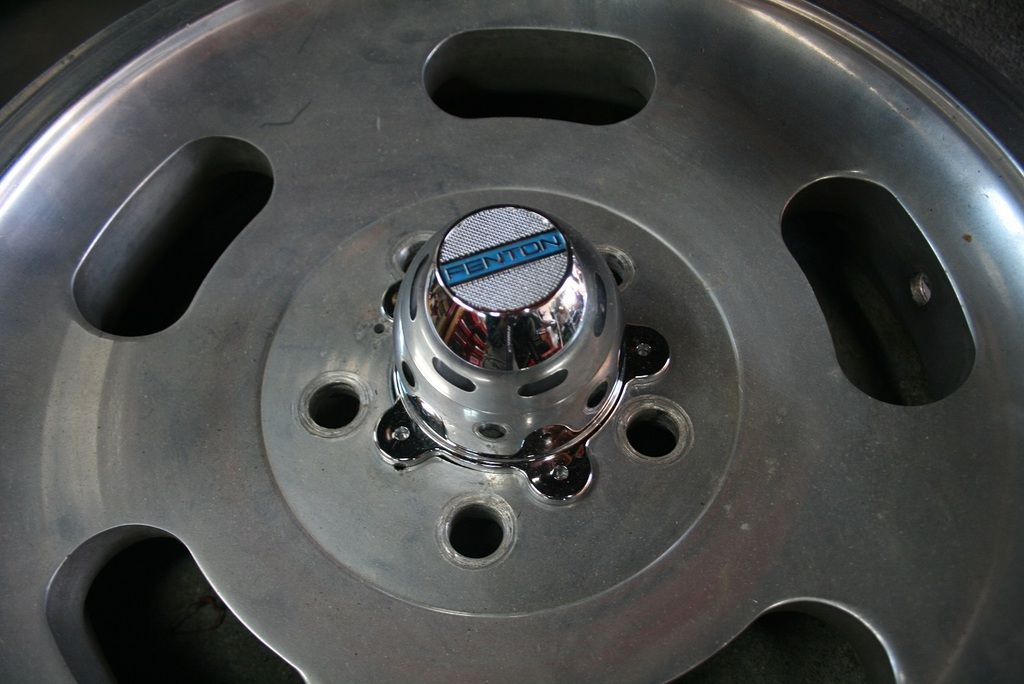
Lastly, I just wanted to show off my NOS Fenton Gyro center cap. Bummer I only have one though. Hope I can find another one!
I will be calling the dyno shop to set up an appointment, hopefully they can get me in soon.
At this point in our program, I would like to give a shout out to Rob/Rumblefish. He PM'ed me the other day asking what was up with the Duster. We exchanged a few messages but it got me thinking - I need to finish the damn thing! I have to say it lit a fire under my ***. I blew off all kinds of crap this weekend to get the motor done and I'm really psyched about it. No, not the finishing the motor, but blowing **** off! Thanks Rob!
Whew, that was a lot! If you read all that, I thank you for sticking it out.
More to come.