68 GT convertible project

-
I think your dash looks great!!! You've taken a lot of time and detail pain on it, and it shows. Don't be too hard on yourself, about it not being perfect. At 20 feet and 20 mph (20/20) your the only one who will notice. Awsome work!!
Martin
 
Don't be too hard on yourself

I know...it's just frustrating when I end up doing most things twice.


Everything I've read says there is going to be a lot of flex in a convertible. I want to stiffen things up, but I don't want to do anything that can't be reversed. I decided to add the fender to cowl braces found on the 74+ cars. Any time you can triangulate something, it should make it stronger. I'm going to have to make some mounting brackets for the pinch weld. The factory widened the pinch weld when these braces were installed.
I set them in place just to make sure they were going to work. I thought there might be some interference on the DS with the washer bottle. That wasn't the case though.
DSCN2229_zps55e90644.jpg
 
Last edited:
Nice build, looking forward to the progress as you go.
 
Thanks to member "momoparman" for sending me the layout file that he made for his radio. I can't believe I didn't think of doing this. It will really compliment the gauges and the rest of the white interior.

I modified his file and printed out some test pages to get the spacing right. I found a scrap piece of vinyl from the gauge overlays and actually got it to feed into the printer. The ink however didn't dry and it wiped right off...even after sitting over night. I'm going to try to find some adhesive backed photo paper next.
DSCN2232_zps033ab6f1.jpg
 
Last edited:
I started modifying the console to accept an aftermarket shifter. I've always liked the Pro Stick shifter but it doesn't lend itself easily to being used with a console. I've come up with a few different ideas but scrapped them. My latest idea should work but it requires removing a lot of material from the top plate. Modifying the original pitted top plate is easy...grinding on a brand new $350 part will be a little more stressfull.
Here's what I started with...a well used and pitted automatic top plate. I think that's a 20 year old piece of gum sitting there.
DSCN2233_zpsdca4c83c.jpg


First I started by cutting off the center divider. I also removed quite a bit of material on the bottom side so the shifter cover can sit up tight to the bottom of the top plate. Then I cut a notch in the center recessed groove for the reverse lockout lever. Once everything else is fitted, I will be making an extension for the reverse lockout lever. I made the first rough template for the shifter cover out of cardboard. (The rough notch in the side of the template is just temporary. It allows me to slide the template on and off the shifter easily. I'll have to remove the lever from the shift arm in order to slide the final piece onto the shifter.) So far so good. I think it will look good when it's done. I just hope I don't destroy a brand new top plate when it comes time to modify it.
DSCN2235_zps8351b56f.jpg
 
Last edited:
Still working on the shifter.

I cut the factory bracket off the floor because I needed to make a new shorter bracket.
DSCN2242_zps57193fe2.jpg


I used a steel plate and some wood to mock up the location I needed the shifter to be in. I decided to move the shifter over to the passengers side about an 1/8" from where I originally had planned to put it. This will allow me to bolt on an extension to the side of the reverse lockout lever...instead of trying to weld an extension onto the top of it. All I needed to do was take a little material off of the top of the lever so it would clear the bottom of the console top plate.
DSCN2244_zps9f077f0b.jpg


After I got my measurements I started making a template using a CAD system.(cardboard aided design)
DSCN2253_zpscafbb11c.jpg


I reinforced the template so it would support the weight of the shifter. Everything seemed to be fitting OK so I went ahead and started making the bracket out of metal.
DSCN2254_zpsbf7e32a8.jpg


I cut open the template and transferred it to some 18 gauge sheet metal. My father-in-law gave me a small 30" sheet metal brake a few months ago but I hadn't had a chance to try it out. I bolted it to the work bench and gave it a shot. I think the bracket turned out nice for being my first time making something like this.
DSCN2255_zpsd7b51a99.jpg
 
Last edited:
Darren,
I really think your on to something, with the aftermarket shifter in the console. I had some similar ideas, but scraped them early in my build. Good Luck, looking good so far,
Martin
 
I did some grinding on the bracket to take a little height off of it. I think it's ready to weld up the sides and tack it in place. After looking at things further, I think it's possible to use an unmodified top plate. The shifter gets close to the side of the bracket I made but it would still fit. I'd still have to add a slot for the reverse lockout lever. I'd also have to put at least a 1/2" spacer between the existing lever and the new one so it comes through the console in that center groove. I don't think the shift indicator would work though. At least it would look more stock and I wouldn't have to heavily modify the top plate.

Hey, Martin...did you get a new top plate for your build or was yours nice enough to reuse? I think I need to find another unmodified top plate and see if I can get that to work.
 
I did some poking around last night and the car will need front floor pans. I'll wait until that's addressed until worrying about the shifter bracket. I don't want to tack that in place only to find out that the front tunnel section needs to be replaced.

I sent the radio in to Ward's Classic Radio Repair for a cosmetic restoration and FM conversion.

I got a call from the interior shop this morning and my seats are done. I'll pick them up tonight after work.
 
Here's an update on the seats.

The car sat with the top down for a long time. The seat frames were badly rusted and mice had eaten the seat foam. There was no way I was going to store them inside my house so I went ahead and had them redone right away.
DSCN1814_zps344aa20e.jpg
DSCN1800_zps686acf6f.jpg
DSCN1811_zps87f57817.jpg


I had the upholstery shop strip the seats down. One of the seat back springs basically fell apart while they were disassembling it. They had some spring material on hand and replaced it. The seat frames then went to the powder coater. I had him do some rust repair on the frames before he coated them.
DSCN2058_zps5cec3d14.jpg


The rear frames were in good shape. They just needed to be blasted and coated.
DSCN2057_zps97a129e0.jpg


The frames turned out nice. The upholstery shop wraps the springs in a material that really stiffens them up. They did the same thing to my Challenger seats. It really makes them feel new.
DSCN2258_zpsa2950963.jpg
DSCN2256_zpse1b9ee41.jpg
DSCN2266_zpsd93cbe3c.jpg
DSCN2265_zpsd9fd4999.jpg

DSCN2268_zps87f3d4df.jpg
DSCN2269_zpse16f61ea.jpg


I still need to buy to new hinge covers since two of mine are junk. I also have to restore the seat tracks and buy new seat back cardboard panels. I was missing one seat medallion but I found one online. The original ones had some slight pitting on the inside recesses. What I ended up doing is spraying them with SEM Trim Black. Then I used laquer thinner to wipe off the paint from the outside of the medallion. That left black paint on the inside which hides the minor pitting.
DSCN2260_zpsb26661f7.jpg
 
Last edited:
I wasn't happy with how the gauge cluster turned out. The gloss vinyl overlays didn't stick very well to the raised sections of the cluster. The worst part was the large upper panel. I ended up machining off all the letters/numbers from that upper panel so I could install new vinyl on a flat surface.

Here the letters/numbers have been machined off and I spread some filler over the area to hide the machining marks.
DSCN2252_zps16e4b30a.jpg


I sprayed the panel with flat white paint.
DSCN2262_zps3171edf4.jpg


Here is the new overlay installed. I went with a matte vinyl this time. I also had the wording changed a little to reflect the custom oil gauge I installed. The "OIL" wording was moved over to where the "ALT" wording used to be. Then I had "WARNING" placed over the idiot light.
DSCN2263_zps0c8983db.jpg


Here is the gauge cluster finished again. Everything is now matte white instead of gloss. There are imperfections over the raised sections but the matte material hides them a lot better then the gloss material. I really should have machined off the raised sections from every single piece. I also ground off the "D" and "C" from the amp gauge face and smoothed it out. Then I had a "0" and a "100" put in their place for the oil gauge.
DSCN2264_zps82ab7280.jpg


Finally, I bought new bulb holders and some LEDs for the dash. I hooked up the dash lights to battery power and took a picture. They aren't as bright in person as they look in the picture. They should look a little dimmer once the dash bezel is installed too.
DSCN2271_zpsf9c30dfd.jpg
 
Last edited:
Nice work. Love the shifter idea,maybe a potential sales item there. Just a thought.
 
I ordered a front spoiler from "Spoilers by Randy". It showed up today.
DSCN2275_zps61a9bc24.jpg
 
Last edited:
Here's the link to the 67-69 Dart page.
spoilersbyrandy

I held it in place just to see how it gets mounted. It looks super simple. Just three fasteners and it's on. One through the hood latch bracket in front of the radiator and one up into the inner bumper bracket on each side.
 
Last edited:
I ordered the rest of the parts to finish up the dash. They should be here next week. Then I'll just be waiting on the radio to come back from Ward's. I've been working on the dash too long. I need to get it done and move on to something else. Engine/trans are probably next on the list.
 
I met with a body shop owner on Saturday. He said as soon as I get the rest of the car torn down, he can get it in and start sand blasting and fixing a few rust issues. Then it will come back home so I can test fit the engine ,suspension and measure for wheels/tires.

So, on Sunday morning I started disassembling what little there was yet on the body. The rear end came out as well as the brake/fuel lines and the front E-brake cable. The body stands I made for the Challenger will work on the Dart. The rear stands bolted right up without any modifications. The front stands will require new holes to line up with the bumper mounts. Once I get the side glass out and remove the convertible top mechanism, it will be ready to go. The body shop owner suggested I look for a new hood. The front is beat up quite a bit. How do the new AMD GTS hoods fit?
DSCN2286_zps9f6c017a.jpg


I also started making brackets to mount the fender braces to the firewall pinch weld. I was surprised how good a wood blade in a reciprocating saw cuts aluminum. I did use WD40 as a lube. You could tell when it needed another shot of lubricant because the blade would start bouncing. As soon as it was lubed again, it cut through it really nice. This is just a rough outline of the bracket. I still have to drill some holes and machine some material off the bottom side.
DSCN2288_zpse8ecd751.jpg


The radio is done. As soon as it arrives, I can get the dash finished...
 
Last edited:
I got the radio back yesterday. The dash is finally done. Now I can move on to the engine/transmission.

Radio before...
DSCN2247_zps38ee7dea.jpg


after...
DSCN2303_zpscd92e0df.jpg


The dash bezels are from BE&A. I had to redrill some of the holes in the dash frame for the radio bezel but everything fit together pretty good. The original ones didn't even fit perfectly...these fit as well as the original ones did I think. I painted the back of the gauge bezel white to match the gauges. It was just chrome with black overspray before. Now everything is white behind the lense.
DSCN2278_zps0b9a18cf.jpg


DSCN2279_zps13010a53.jpg


DSCN2281_zps6ef96f6a.jpg


before...
dart140_zpsc093f259.jpg


after...
DSCN2306_zpsbc592679.jpg


before...
dart130_zps231ad3fb.jpg


after...
DSCN2304_zpsdc19b820.jpg


I put a white overlay on the radio face and installed a toggle switch inplace of the lighter. The toggle will run the running/parking lights.

before...
dart131_zps9adebf51.jpg


after...
DSCN2305_zps35ee4cec.jpg


finished...
DSCN2307_zpsd18b25f1.jpg
DSCN2308_zpsfc7845f4.jpg
 
Last edited:
I met with a body shop owner on Saturday. He said as soon as I get the rest of the car torn down, he can get it in and start sand blasting and fixing a few rust issues. Then it will come back home so I can test fit the engine ,suspension and measure for wheels/tires.

So, on Sunday morning I started disassembling what little there was yet on the body. The rear end came out as well as the brake/fuel lines and the front E-brake cable. The body stands I made for the Challenger will work on the Dart. The rear stands bolted right up without any modifications. The front stands will require new holes to line up with the bumper mounts. Once I get the side glass out and remove the convertible top mechanism, it will be ready to go. The body shop owner suggested I look for a new hood. The front is beat up quite a bit. How do the new AMD GTS hoods fit?

[URL="http://i137.photobucket.com/albums/q229/burdar/68DartGT/DSCN2286_zps9f6c017a.jpg"]
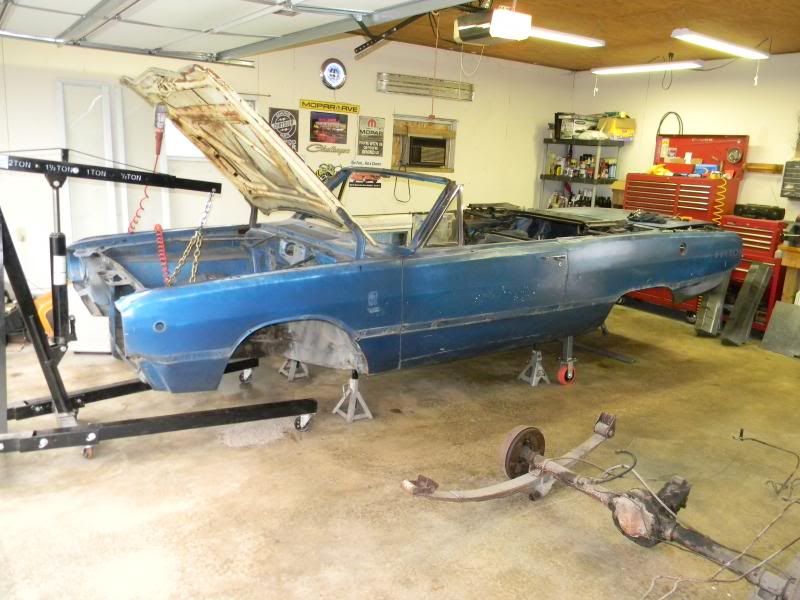
[/URL]

I also started making brackets to mount the fender braces to the firewall pinch weld. I was surprised how good a wood blade in a reciprocating saw cuts aluminum. I did use WD40 as a lube. You could tell when it needed another shot of lubricant because the blade would start bouncing. As soon as it was lubed again, it cut through it really nice. This is just a rough outline of the bracket. I still have to drill some holes and machine some material off the bottom side.
[URL="http://i137.photobucket.com/albums/q229/burdar/68DartGT/DSCN2288_zpse8ecd751.jpg"]
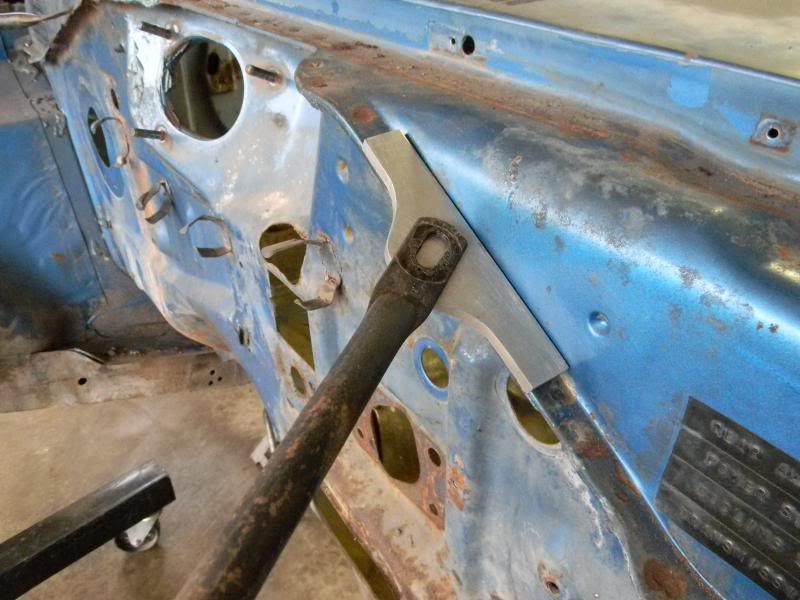
[/URL]

The radio is done. As soon as it arrives, I can get the dash finished...
Darren,
I have an AMD GTS hood on my dart. The hood looks great, but I did have drill some spot welds out and lift the skin up on the rear corners next to the cowl and fenders. It was pretty low in these areas. The quality of the hood is other wise fantastic. By the way, your dash is AWSOME!!!
Martin
 
You're really moving along on this build. I'm impressed with the work you've don so far. I'm subscribed!
 
Wow, you do some very nice work!!! I love these old a-body convertibles. Mines a '68, but it's a daily driver that looks good from 15 feet (50 feet is even better, LOL) with several performance enhancing mods, but you have a great show car coming together there!!! Thanks for the wonderful job on the posts!
 

Attachments

  • Misc 053 (Large).jpg
    41.8 KB · Views: 248
-
Back
Top