Edie: The Dart

-

Woods74

Broke Senior
Joined
Aug 21, 2010
Messages
6,003
Reaction score
484
Location
Seattle, WA
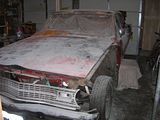
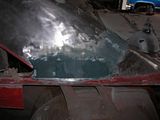
Hi all. I've decided its time to post up a build up for my other girlfriend, Edie the 74.

xxxdart.jpg


That's me on the right.

I've lurked on this forum for awhile, reading lots and lots of posts on others builds, technical posts, enough pages to rival the Starr report it seems... It's been a interesting and challenging build, but its rounding a corner. I'm on to the body work and not just doing boring bolt-in's. I think its a good time to start a post up now that its into the artistic phase.

Because the mechanical parts of this project have been done, there will be hindsight, so bear with me.


Here is the general way I'm going to do this:

*Introduction to how she came about.
*Goal for her.
*List of things I've done.
*What I'm doing now.
*Finishing it off.
*Summer track video (YEAH!) :burnout:
 
The Genesis:


Almost a couple years ago, a good friend and I got to talking one day about our mutual affinity for Plymouth a-bodies. As time went on, we committed to a plan to build one as a team type of deal. Being a guy his 20's, ready for anything, mechanically inclined person that I am, (and lack of employment at the time) I thought it could be fun to do a car the full way. Get into rebuilding several aspects, and learn a whole hell of a lot in the process. (Don't tell anyone, but I was a GM guy originally, and I've got most of my old car experiences with their trucks, first rod was a 67/69 4x4.)


The car was a Alaskan grandma's car, driven down to Everett, WA. Driven by her gangster wannabe grandson. Bought it little less than 2 years ago.


I wish I had some original pictures the process I did on the mechanical portions. But it's not necessary, every one here has seen a dart. (Camera got misplaced, and one of the reasons I postponed and poo-pooed a restoration post.) It was a decent running 225 slant, with the usual trunk rot due to leaky window seal, and and floor rot due to leaky front window sealing. Had driver side 1/4 right by the door impacted pretty good. Although the frame is great, the car is solid for the most part, and all of the interior and exterior was intact and original. Got it for 900 bones.


So, after driving it around for a few weeks, we set off working at his parents ranch in the barn. One weekend Stripping the trunk out, the next installing new shocks and a 1-1/8 front sway bar to start the party off right. And as the weeks progressed and the mechanical portions of the car we're coming to a close, his interest wayned, and by the time I baught the 360 magnum and rebuilt, and dropped it in, he called uncle unfortunately. He decided it was too intense for him, and bailed on a 1/3 finished car. Ouch.. The show must go on.
 
Goals:

My goal for this project have morphed from getting it running and and solid to drive it around. To a daily driver nice street rod done the best way I can.


The Bucket list of things I've Done:

I've kept a metal log of things Ive done to the car so far, written a rough estimate on hours put in, and I did all the work by myself, or with my friend. Nothing farmed out accept the drive shaft being shortened and the cam being reground:

(Close to sequence.)

KYB shocks
1 1/8 sway bar
PS box replaced with 16:1 unit
Trunk floor
Ford 8.8 rear end chopped, LSD rebuilt. and custom mounted.
Sub floor connector
Magnum 360 w Indy X heads .525 cam the works.
Customized engine mounts
Customized mounted radiator
A904 build
Drive shaft loop
H pipe install
Floor repairs
New heater core/suitcase rebuild
New 225/70R14 BFG Radial T/A.
Alignment


I'll take pictures and add a anecdote at the bottom of each photo as the project goes on.
 
So for the past few weeks I've been working pretty diligently on body work. I have to say, it's time consuming but rewarding.

The game plan:

Strip off the goodies.
Take out the glass.
Work from the top down to the hood, the fenders, the doors (passenger side replacement), the trunk, and finally quarter panel skin replacement.

Stripped & in plastic:

th_DSCN0753.jpg


Roof dent cut out, fixed, re-installed.

Before:


In the process:


After


It doesn't look like much, but it had a decent sympathetic pull on the area. I could have filled it, but I decided to take the high road and fix it. The affected area was a inch or two beyond what I cut out. I floated the body line in best I could, Its not perfect but what panel is? The roof side portion is very close, and the line now is about 1/16 or less in a mild curve. It is nice and even when I feel the roof, no stiff areas.


As for the curve? That's what filler is for!


Next is sail panel area, nothing too magical here, I cleaned out all the old filler, which was not very well finished and looked crappy.


Both sides were close to being the same alignment, I was concerned on the drivers side because there was a big belly about mid-way along the sail upper area shown below, but after relief cutting, tapping around on it, then re-welding it I got it close. Now filled in, it looks great.


I used everglass to fill in the seam, its nice stuff, easy to sand, but even with a mask I got a horse voice from it.


Filled in on both sides.

th_DSCN0707.jpg


Finishing it up with body filler, both sides have been quite tedious to finish, it looks good though!


A little finishing, and a little floating and I'll be done. More next week.
 
Allright, not too much action in the last week, up to some house maintenece.

So I finished up sculpting the sail panels, that was a bunch of work, something like 4 days for both of them.

Finished prep the top, 1st coat primer time, YEAH. I'll 2nd coat and block the next pass.


Did final cleaning on drip rails, and both window fences. Primer time.


Moving on to the fenders..
 
Ok, I've been working the fenders for the majority of the week here what I've got so far..

I started by taking out the headlight assembly after finding some rust when I started prepring the paint around that area, It wasn't up to par.. So I took the dremel carbide cutter with the round bit and cut them out...


Both sides


That cutter works awesome. You just have to wear goggles, jacket and gloves because it sprays a fine mist of metal shards, a-kin to short strand fiberglass. I controlled them by keeping it wet with PB blaster. Also helps keep it cool and lubed as I cut.

Caught it just in time.. Feel good, I stripped the rust off, next week I'll paint em' and weld them back in.

The passenger fender skin was kinda beat up, had lots of bondo on it.


Welded the side marker and trim holes up.


After 3-4 hours of pounding, I got it close enough for a skim coat of filler.


I also had some rust going on the rear fender support. Both sides. So I chopped out the spot welds, and found again, I caught it just in time..


The top portion was nice and crusty too. Chop chop.


Bam.


So I set the whole lot up soaking the rust in PB blaster for the weekend, when I get cracking on it, I'll take a nice stiff wire brush to all of it.


Paint it up, weld it back together. Do a little filler work, prime and move to my next section.. The hood.

Have a great weekend!
 
nice work-- thanks for posting the process. Car could not be in better hands! Lawrence
 
Hi, so I've done a little bit this week, well a lot actually though it does't look it.

It was a nice sunny day on Monday so I decided to prep some fenders. I sanded and scrubbed all the problem areas, got them clean, then rolled into playing with some paint on the light assembly. Worked 10hrs. Time flies, I was beat!


I was dog tired on Tuesday, and the weather took a turn for the worse. I did get a couple hours later in the day. Welding and flush grinding of pin holes, fender lip holes, and back sides of trim holes. Yehaw.


After consideration Wendsday, I decided I would skip the hood because I need to take the engine out for a final check anyway. I finished cleaning and preping the nooks and crannies of the fenders, applied some filler, then took out the dash for my next magic trick...


Oh, oh baby, just like that.


Separated some rusty pinch welds for cleaning.. Yum.


Speaking of which. I'm going to cut a access hole on the inside to get inside the inner a pillar on both sides, and the surrounding 6" of metal towards the windshield, and the rear. As you can see through that hole, it's nice and crunchy, thanks to a leaky windshield gasket, for what looks like a few years...


I'll use the handy dandy factory lower access hole, thanks Ma!


The plan is to scrub the inside with a wire brush on a rod, the kind you get in a gun cleaning kit the best I can. Then a liberal coat of rust converter, with a tube extension, top coat it in the same manner. Then finally, pinch weld prime the cut, then weld the cut out back in.

Should be at least a couple days of fun.. :wack:


Thursday I spent about 2 on the drivers, 5 on the passenger side, blocking and filling the fenders so they are just right, the work paid off because they look good!


Friday was paint day. I got as far as working the primer and undercoating top coat on the inside of the passenger side fender, and around the light assembly area on the drivers side before I ran out of undercoating.


So, you may be wondering what kind of paint is around the pinch weld holes. Its a trick I picked up off another forum: Hi-temp Bar-b-que paint!


I've used it on my headers, and it works nice, I do know that much...

It should do the trick, and not have the down sides traditional pinch weld primer has like: questionable adhesion, lack of flow into the weld, loss of sleep, etc.


Finished product after 1 coat, I think I'll leave it.


Later.
 
Hi there, here we go...

Monday was fender prep, cleaning and laying the first coat of undercoating on the other fender, and 2nd coating my light assemblies, and misc fender parts. Not much for pics. It's coming along slowly. Got to let it cure.


Tuesday was moving on to the a pillars, I got to chop out the access holes, and my idea went off without a hitch, that converter is awesome for what it is... Seems it's another instance of catching this ride right in the nick of time.

Moisture was coming in from the angle in the pinch welds for the roof, thanks vinyl top...


Made some access holes in front, yummy.


Looks like a little rusty rat was living in my passenger side...


So I brushed what I could, which was very little, and then sprayed it with converter, and let it sit for a few days..


Wednsday, I started off by tackling the rear window fence rust, separated the pinch welds in the area, and rifled some converter in there, it was able to permeate and drip down.


After a little rusty metal primer.


I also started to do a little cleaning in the trunk area, some bright light bulb decided it would be a good idea to put window sealer underneath the leak.


Didn't get it all yet, it looks good under there, good thing they missed!


Then I figured since I was in the area, I would tackle the boo-boo I made when I first started this quest.. I beat the s*** out of the regulator panel trying to straighten the quarter pane using it as a telegraph, you can see where all that spinning wheel lead... I chopped out the worst at a earlier date, and spent the rest of the day cutting and tacking the new piece in..


Thursday was dolly day, it took a little bit more than I thought it might, the whole panel was kind of twisted, I had to set it up a straight edge and clamp it down. It turned out nice and flat. 5 hours leaning over was enough for me.


Minus drilling a hole for the arm rest mount, and of course painting it, finished!


Today I figured I'd catch up on paint, more working of the fender assemblies and front nose that pictures can't really do justice for about 4 hours, and then layed the top coat in the a pillar areas, I think I'm gonna go for one more coat in some of the tight areas just for safe measure. I got the lower areas via the strip sealer mounting holes.


Decided as a bonus round, I'd strip the dash components out, and give it a quick tooth brush job to show up any thing I may need to take into consideration, looks o.k. minus the surface rust from all the damn leaks..

Rusty and dusty..


Let's see her stripped! :0


That about does it, enjoy your weekend.
 
Hi here is another weekly edition of Edie, thanks for the kudos everyone.

I kicked the week off with 2nd coating, and fixing boo-boo's on the fender and a-pillar sub assemblies and separated the pinch welds and rust converted the dash, about half the day.

The next half the day I took the drivers side door off, and taught myself how to peel the skin off, the door skin pliers I got off e-bay were a life saver.

Looking due for a rebuild.


Tuesday I felt like doing a little house keeping, taking out the trash turned into a half day ordeal cleaning out the trunk and organizing parts into my storage, taking the seats and lower seatbelts off, then taking off the back bumper and did a sweep now it's clean and happy.


For the next half of the day, I took the passenger side door off, then grabbed my replacement door, peeled the skin off and chiseled some undercoating off.


Wednsday wasn't spent on the dart, accept the last hour cleaning doing a little weight reduction on the driver side door. ;)


Thursday was 6 beautiful hours cutting off the 5 layers of paint and bondo 1/4 over the whole passenger side, after that, drivers was a snap!


Here is the paint and filler I was able to catch off flat surfaces...


Friday was dolly work, man that passenger side was rough... Someone just caved, and paved! I had to cut out the 1/2 deep bad spots out that they left with a hammer. The rest is gonna work, thankfully the cave that was around the door handle I was able to dolly out.

Thanks for the rust, filler..


I was able to get the majority of the panels smooth, a little touch up and patching and it will be good as new.

As a bonus, I learned a new way to work the hammer and dolly. I tap the spots with the square part of the hammer, move a circle with the dolly on the underside, and work in a line, works quickly, and unbelievably well.


Have a good one!
 
Hi there, its been a few weeks since my last post, progress has been slow as far as eye candy, but I've done a bunch of work.

Door skins came out well, still working the passenger skin, the original skin I botched after not taking the right approach. So I got a good "clean" skin, only to found out, it needs a patch too! Grrr... The great thing about it is, I finally learned the system, I do it in rounds of 6-8 tack and dolly every weld. It's coming out clean, its time consuming, but looks good!

Drivers:


Passenger:


Door frames sanded, ready to be cleaned and painted:


Did the hinges and 'S' springs:


Last week I ordered some new Sherman quarters for Jeg's. Motivated, I jumped to the trunk and quarter area, did a bunch of demo work.


Now I can see what I'm up against for this area. Crossing fingers that the inside of those rockers look decent...

So breaking work down roughly in this area:

*Replace the wheel houses instead of fab a lip all the way around, paint what I can inside rockers, if needed. Might as well mini-tub while I'm there.
*A little fab patch work around certain areas such as the tail panel sides, floor leading up to the shock mount.
*Fab up a trunk floor and extensions.
*Brush out rust in top underside of trunk area.
*A little stripping and dolly work on the upper trunk/quarter to window panel, sand and paint.
*Hang quarters.

Starting tomorrow, I'll finish cleaning up the edges of the work I cut out last week, then probably do the passenger side door skin metal work off and on, might paint some innder skins and door panels if I feel frisky.... Then move into the rest of it. BOOM.

Enjoy!
 
Hey there, last week I spent drilling out spot welds for the package tray supports, door posts, and cleaning up the previous weeks quarter panel removal. Didn't feel a need for pics here. Spot welds are spot welds...

This week, I got a wild hair and jumped in the trunk, cleared out the various parts and pieces, and preped the hell out of it. I figured I'd hit the hard work head on. Now I've got some work to show off...

Before:


After:


Have a good weekend!
 
So I wanted to pop in for a update, progress has been off and on. I've got the internal body panels stripped off and dismantled, next week I'll start cleaning them up for paint.

Gas tank and shock mount panel, nice and torn:


Window regulator panels, and new wheel wells, thanks crackedback!


Door pillars and backing:


Rocker panels:


Bonus, the front seat/inner rocker reinforcement brackets:


Glad I'm done, drilling out spot welds are good fun!
 
Looks like you have been having serious fun, well worth it though. Also, thanks for the tips on my project!
 
Your welcome, updates will be coming soon all those parts are now clean. Got sidetracked helping close friends tighten up some projects before the rains come in around here...
 
Hey all, 'tis been awhile since the last update. This work took me pretty much the better of 2 months since last update, 4-6 hours a day, 5 days a week to complete. Lot of nights of tired arms, chemical burns, and sore back.

Last month was devoted to helping close friends button up their cars for winter.

I figured a big update would help to understand the scope. Here are some pics of parts that I've stripped, cleaned, prep-sanded inside and out; car side, and piece side well enough to be very helpful for the next step, and provide a solid base to build on.

Thank you aircraft stripper, drill and wire wheel.

I tried not to go OCD, some may say "Wow, that's too much, this guy is crazy!"

To that I say: some parts I really didn't want to remove, and I really had to talk myself into removing them. In the end, I'm glad I did because every piece needed some TLC in some way. There was more than enough rust to cause major issues down the road.If I didn't go this deep, a couple years from now I would have to redo it.


I don't have a masochistic side so I've only got one shot.


Pictures begin back to front, passenger to driver. Enjoy.


Pshew! I think i broke a sweat just uploading the pictures! For what is left minus the engine bay, I can easily take a paint stripping disc to and be done in minutes flat. Close enough to move onto the enjoyable part.


Fabrication!!! :axe:
 
So, If you were slick enough to happen to catch the wheel well about midway down in the last post, you can see I've started doing the good 'ol minitub. Started mid-last week.

Here are a few pics of the passenger side, which minus a few tack welds and some paint is done.


Fixed a 16" boo-boo down the broadside:


Added a couple inch extension to the rear of the filler piece:


Installed in it's glory:


If you want to see all of the details here is the album:

http://s1244.photobucket.com/albums/gg567/woodpic85/Dart minitub/?start=0


Have a good one.
 
Been busy as a beaver.


Had a couple pieces I needed to fab up, here is how it went.


Lay it in:


In the end, like everything else, it isn't hard, just very time consuming. Making the basic shapes is easy, but after you massage them, weld them, grind them down. You can have 10-15 hours in a panel in a instant. It's taking me on average, 3 days working 6-7 hours a day to finish a panel, If you wanted to know the math.

Stopped for a bit, tossed some legs on my sawhorses, took some time to engineer the right working height, and made a proper table out of them. I'm tired of bending down to work all the time, my back has been screaming at me, that must be a sign. :D


Almost forgot, I got the minitub in!


Sexy!


Tomorrow is the trip to the steel yard to get my supplies for the next episode:

The horrible shock panel....


Ehh... Goodbye sad panel!
 
Thanks for the kind words Bomber. It was a slow week, had to rest up for a bit.

Made a little progress in the past couple days:

Out with the old:


Bent up new piece. I like the radius look better, plus it's easier to make.


Tabs welded on for backing, used jet line to keep em' straight. The old shock mount spot welds cleaned up and plug welded in preparation for the new shock mount, inspired by those who use coil overs:


In place:


The shock holes I'll fill with tabs off the main piece, and tab the wheel well gaps as well. Once satisfied, I'll do the supporting primer work, tack it in, and move on.
 
Decided to pop in for an update, here's whats been going on:

Trunk floor mocked up, bent up:


Trunk drop off's laid out, this took a while to get right. Matching to new quarters makes it a little tougher to get your bearings:


Here is something different I decided to do, and it should work out well.


*Gives me 22 gallons of fuel.
*Shares the same ohm range as the stock sender.
*It cost me $125 for the tank and sender, shipped.


Did you solve what is it yet? It's the 1970 mustang fuel tank!!


I'll install it tight to the floor pan, with sound deadener on top of it.


The filler neck is offset 3/4" towards the passenger side, made the frame out of 5/8" square tube:


Minus a quick 1/4" trim on the drivers flange, it does fit between the frame rails like it was made for it, and it clears my exhaust with ease.

It would clear a leaf spring relocation, using rear sliders, as well.


I could leave it as a trunk fill deal, but I'm going the distance here:

Next is to mock/bend up the filler neck hole/mount in the tail panel, and make the cut I need in the floor pan. I've always liked the rear fill. Should be rad when it's all done. :D


After that, I've got something in mind to delete those horrible 5mph bumper shocks, and give myself something to hang a receiver hitch off of...


Enjoy!
 
-
Back
Top