How-to: Mounting an Alternator with an electric water pump SBM
Hello All,
I had a thread on this a while back, and having found a solution that works for us on our 7,000+ RPM smallblock 408, I wanted to pass along a “How-To". That would help those of you out that wish to run an electric water pump, but don’t necessarily want to abandon your stock style Chrysler alternator.
Parts Lists.
Chrysler Square back alternator.

TUF8509RFSP
Ours is a tuff stuff, 100 amp, powdercoated version.
Electric, Block Mount Water Pump

SB 35 GPH Proform unit
Cut to Fit, Alternator Tube Spacer (x2)

Proform spacer 66179
Stock Style Alternator Bracket

(you’re going to smash it flat in a vice…so we’ll keep it inexpensive)
trans dapt 9546
OPTIONAL
Moroso Crank Pulley.
This is a big benefit for higher RPM guys. It slows the rotation of the alternator, and prevents belt walking and throwing. And alternator is only effective up to a certain RPM…I’m not positive what it is..but I’m sure It’s less than 7K. With this pulley we still show a nice charge idling through the pits with from our tuff stuff alternator, with the fans, fuel pump, and water pump on.

64700 moroso
Onto the step by step!
1. Remove your water pump, alternator, bolts, and existing brackets from the engine, so you’re down to the timing cover.

2. The backing Plate gets installed. Leave the top passenger bolt out, as that’s our new alternator bracket bolt location.


3. Water pump gets bolted on next. Again leave that top bolt hole location open, the other three can go in.
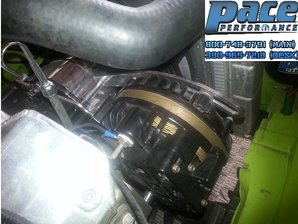
4. Onto how to mount the alternator. The pivot point is moved down to the lower head bolt. This is a “measure twice-cut once” part of the install. You’ll have to measure and cut the proform spacers to ensure you have your North/South Alignment. Note in the images below, the lowest point on the head is the new pivot bolt. The alternator is also clocked about 45 degrees to put the adjustment/tension bolt in the right location.
5. Again the pivot bolt is moved to the lower head bolt. You’ll install your spacer, and go ahead and mount the alternator to the head. Be careful, as it is now top heavy, and we haven’t secured the adjustment bracket yet.

6. We took our curved adjustment bracket, and straightened it out in a vice. You may choose to leave the ear at an angle, but for us, it worked better flat. The bracket is otherwise unmodified.

7. Before you bolt this on with your spacer, and mount the alternator upward, there’s a good chance that if you have the stock alternator eyelet in place, you’ll need to snip it off, and crimp on a new charging post eyelet. Trust me, it’s easier to do this before the adjustment bracket is mounted to the alternator J
Ours looked somewhat like this…it was far too “fat” to fit between the head and alternator.

8. Now you can finish mounting the spacer, adjustment arm, and bolt on the top passenger bolt hole on the WP. You can measure for your belt, and you’re off to the races!
9. Finished images, where you can see how it all came together.
Top Down View

View from the bottom showing lower pivot bolt, and lower spacer.

Another top view showing lower spacer and location.


Alternator clocked position, and stock adjustment bracket re-use.

New alternator post terminal

Looks slightly crooked, but the camera is playing tricks. Surprisingly straight in person, and belts staying on through 7000 rpm.

Note: We did end up using grade 8, hardware store bolts in various lengths. I can provide some ballpark lengths in a PM if needed.


Hello All,
I had a thread on this a while back, and having found a solution that works for us on our 7,000+ RPM smallblock 408, I wanted to pass along a “How-To". That would help those of you out that wish to run an electric water pump, but don’t necessarily want to abandon your stock style Chrysler alternator.
Parts Lists.
Chrysler Square back alternator.
TUF8509RFSP
Ours is a tuff stuff, 100 amp, powdercoated version.
Electric, Block Mount Water Pump
SB 35 GPH Proform unit
Cut to Fit, Alternator Tube Spacer (x2)
Proform spacer 66179
Stock Style Alternator Bracket
(you’re going to smash it flat in a vice…so we’ll keep it inexpensive)
trans dapt 9546
OPTIONAL
Moroso Crank Pulley.
This is a big benefit for higher RPM guys. It slows the rotation of the alternator, and prevents belt walking and throwing. And alternator is only effective up to a certain RPM…I’m not positive what it is..but I’m sure It’s less than 7K. With this pulley we still show a nice charge idling through the pits with from our tuff stuff alternator, with the fans, fuel pump, and water pump on.
64700 moroso
Onto the step by step!
1. Remove your water pump, alternator, bolts, and existing brackets from the engine, so you’re down to the timing cover.
2. The backing Plate gets installed. Leave the top passenger bolt out, as that’s our new alternator bracket bolt location.
3. Water pump gets bolted on next. Again leave that top bolt hole location open, the other three can go in.
4. Onto how to mount the alternator. The pivot point is moved down to the lower head bolt. This is a “measure twice-cut once” part of the install. You’ll have to measure and cut the proform spacers to ensure you have your North/South Alignment. Note in the images below, the lowest point on the head is the new pivot bolt. The alternator is also clocked about 45 degrees to put the adjustment/tension bolt in the right location.
5. Again the pivot bolt is moved to the lower head bolt. You’ll install your spacer, and go ahead and mount the alternator to the head. Be careful, as it is now top heavy, and we haven’t secured the adjustment bracket yet.
6. We took our curved adjustment bracket, and straightened it out in a vice. You may choose to leave the ear at an angle, but for us, it worked better flat. The bracket is otherwise unmodified.
7. Before you bolt this on with your spacer, and mount the alternator upward, there’s a good chance that if you have the stock alternator eyelet in place, you’ll need to snip it off, and crimp on a new charging post eyelet. Trust me, it’s easier to do this before the adjustment bracket is mounted to the alternator J
Ours looked somewhat like this…it was far too “fat” to fit between the head and alternator.
8. Now you can finish mounting the spacer, adjustment arm, and bolt on the top passenger bolt hole on the WP. You can measure for your belt, and you’re off to the races!
9. Finished images, where you can see how it all came together.
Top Down View
View from the bottom showing lower pivot bolt, and lower spacer.
Another top view showing lower spacer and location.
Alternator clocked position, and stock adjustment bracket re-use.
New alternator post terminal
Looks slightly crooked, but the camera is playing tricks. Surprisingly straight in person, and belts staying on through 7000 rpm.
Note: We did end up using grade 8, hardware store bolts in various lengths. I can provide some ballpark lengths in a PM if needed.