Restoring Commando Valve covers

-

gts1

Well-Known Member
Joined
Apr 29, 2009
Messages
73
Reaction score
1
I have a set of commando valve covers I would like to restore anyone have any tips on how to do this What paint to use it looks like a wrinkle finish, is it gloss black or semi gloss? Can you remove the stainless fins & can you refinish them? Any helps or tips would be greatly appreciated.
Thanks
Sal
 
Send them to Leanna :cheers:

Leanna does awesome work and has restored some 273 Commando covers and they look great! :toothy10:

Click on the link for several pics of her work, there are also pics of some Commando covers she has done.

Leanna ~ The CudaChick
1968 Barracuda Fastback 340

Owner / Operator
PHOENIX SPECIALTY COATINGS
Where Your Parts Are Reborn
Professional Custom Powder Coating
731-613-9192 (10-9 central time daily)
http://phoenixspecialtycoatings.com


Customize your ride at your own pace
and save money at the same time! See my
Summer Reservation Program thread.
 
The finned inserts are aluminum and are glued on. Sometimes they come off easy, sometimes they don't. Usually I just mask them off and repaint with some semigloss black krinkle. If the aluminum needs refinishing or you need to bead blast the valve covers, you'll want to remove the inserts first. Be carefull you don't bend them. I've used a couple of thin putty knives with pretty good success.
 
Leanna

100_4066.jpg


spring break09 011.jpg
 
For a "complete " set of pics go to member restos and check out "The Humble Bee". There is NO WAY to put into text how pleased I am with the artistry of Phoenix Speciality Coatings !!!!!
 
I've had 3 or 4 sets done by Leanna that looked like Toolmanmike's (or worse) when I sent them to her. Just received my last set the other day and the difference was amazing. Lining up the proper oil fill cap and PCV for it now. Send them to her - you won't regret it!
 
Leanna just finished some of mine and has a few more to do. The first ones looked perfect. She also can powder coat the aluminum fins and they look phenomenal!
 
On mine I brushed on some paint stripper to remove the old black paint, then washed them down and painted them 2 heavy even coats of VHT wrinkle spray paint. I did this over the winter so I used a hair dryer to speed up the wrinkle process but leaving it out in the hot sun works better. My fins were nice so I left them alone. Here are a couple of pics :toothy10:

Picture 282.jpg


Picture 305.jpg
 
Whats the turnaround time & approx cost?
 
From what I have found, the best way to repaint the crinkle small block valve cover is to...
1. Remove all existing paint. Sand or stripe to bear metal.
2. Remove any oil that is stuck on the inside. (Trust me on this one. This is an important step.)
3. Use an metal etch so that the metal will except a paint.
4. Find a can or 2 of black crinkle spray paint.
5. Tape off any areas on the cover that you don't want painted like the aluminum fins.

The directions on the can tell you to apply 3 thick coats is 20 minute intervals. This did not work for me, even in the Texas sun.

6. Preheat your house hold oven to 300 degrees.
7. Apply 2 or 3 thin coats of paint.
8. Place it oven for 10 to 20 minutes or until all paint is crinkled.

If you apply to much paint on the cover the paint will run during the oven process.
 
I agree with hellfish. Do it in the oven like he said above. I did this and mine look factory correct.
 
You can easily remove the fins by applying a torch to the underside, the glue they used will soften. Use epoxy to re-attach. I had no problem with the wrinkle paint from Eastman, no tricks but follow instructions. Mine were no better than toolmanmikes above.
engine-aircleaner.jpg
 
First off, thank you for all the recommendations coming from past and current customers. :-D

Secondly, you guys who are heating up VHT in your kitchen oven are asking for trouble (the fumes not only can ruin your oven but could be deadly if it's gas operated, and if your wife comes home early and busts you you're gonna pay even more. LOL).

The best I can remember without manually going through invoices, I've prepped and coated somewhere between 24 and 27 sets of HP273 Commando valve covers through the years, and most of those belong to members here and on the Barracuda Owners Group.

The aluminum fins aren't glued on; they're secured with 2 or 3 [usually very sloppy] dabs of RTV black silicone. You can use your heat gun on the interior of the valve cover or put them in your dedicated shop oven for a few minutes to warm up the silicone and the fins will come right off without any damage, prying or scratching when you try to slide a screwdriver underneath them.

gts1, though every job is quoted individually to be fair to everyone, a set of Commandos usually runs about $160 for a full factory style restoration before your FABO discount is applied. You can choose the style of finish on the fins (either fully polished or 2-tone with the polishing on the rib tops). I recently added the final touch of plastic dip on the wire harness retainers too.

You can look through my website Gallery to see a couple dozen examples ... the '64, '65 and '66 model valve covers are all featured throughout. The "Before & After Slideshow" also has a few Commando transformations.

Turn around time always depends on my current workload. At this writing, I'm about 6 weeks out with 23 jobs here at the moment -- it's a record!!! :-D -- so my butt should actually be in the shop right now instead of sitting here typing.

Give me a call if you have other questions or want to discuss details. I'm off to work!
 
I removed the aluminum fins with a putty knife. Had the covers bead blasted which didn't harm the rubber coated bits ( 67 model ) The areas where the fins mount were taped out after primer coat. The Eastman wrinkle finish paint worked very good for me.
Fins are reattached with trim tape between clean raw aluminum and epoxy primer that was sanded for improved bond.
 
... you guys who are heating up VHT in your kitchen oven are asking for trouble (the fumes not only can ruin your oven but could be deadly if it's gas operated, and if your wife comes home early and busts you you're gonna pay even more. LOL).

X2

LMAO A commercial oven is not required, but using your KITCHEN oven is asking for trouble in so many ways. The smell of paint, or oil from a VC that is not completely cleaned, is impossible to get rid of in short period of time.

If you're married, your name may be on the deed, but the house is hers. Mess it up at your peril.
 
Does anyone know where to get the wire separators that go on these covers?

The individual round insulaters seen on some are available at Year One.
The white plastic ones that cap each fin for 2 wires are harder to find.
I paid 21.00 shipped for a set of 4 on ebay a couple of years ago.
I've seen them for much less since them but can't recall where. RT Specialties maybe ? Good luck
 
Leanna, are those aluminum finned pieces in your pic sand blasted? How do you get the original look back?
 
I don't like my Mopar Performance chrome valve covers (they was on the car when I bought it) ... to much work to keep them clean. I had a set of MP black wrinkle finish on another car I had and I don't think I ever had to wipe them off. I thinking of getting another set for my car. I like the Commando valve covers also.
 
Leanna, are those aluminum finned pieces in your pic sand blasted? How do you get the original look back?

I'm not real keen on revealing trade secrets, but in the interest of this being a DIY forum where we all learn from each other, I'll offer this.

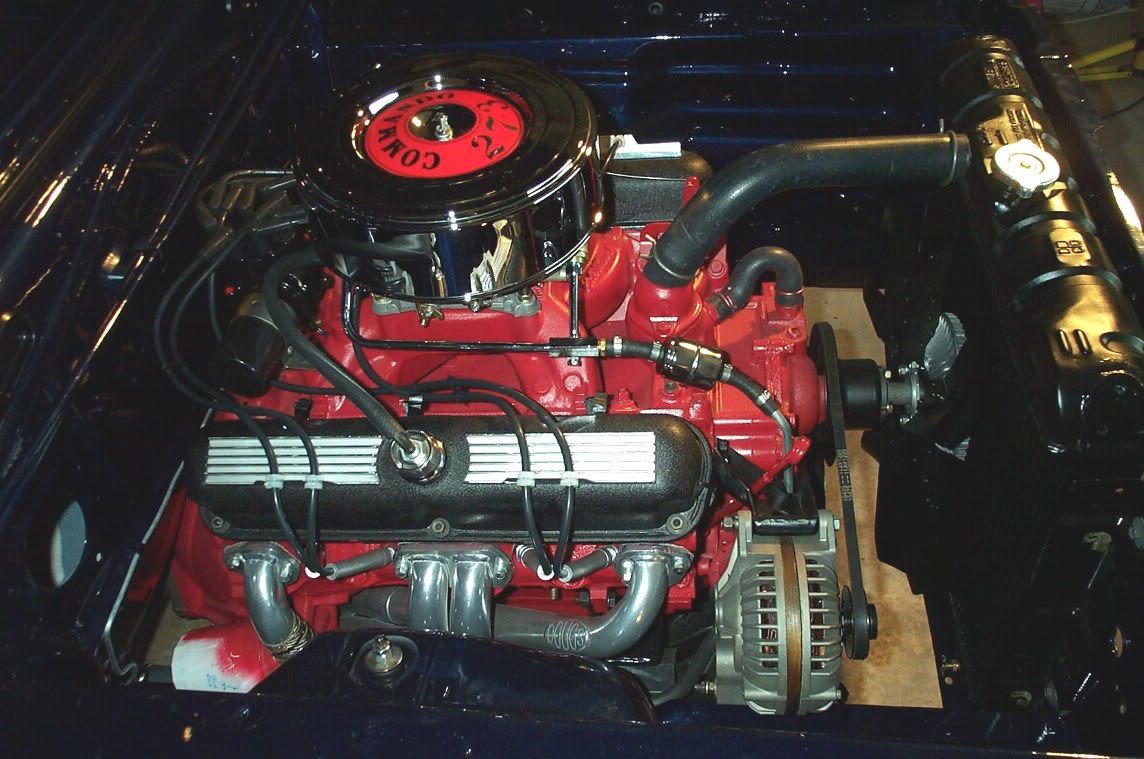
Yes, they are media blasted. I do any necessary repairs (straightening, filing rough edges, etc.) immediately. Then, depending on how bad they are when I take them off the valve covers, they get blasted at anywhere from 40 to 80 psi.

I can restore your fins to either of the two factory finishes, fully polished or the 2-tone style (argent recesses with the remainder polished). Some customers choose; others decide to mimick what the factory did with theirs originally. Out of [I think] 28 sets of these valve covers that I've brought back to life, probably 3/4 of them had the 2-tone from the factory.

Although I have a 1 3/4 hp commercial buffer, I rarely use it on the fins in favor of hand-polishing each one individually ... it's honestly easier than spending hours trying to get the buffing compounds out of all those little crevices. (Also taken into consideration is the fact that powerful Baldor can fling a little piece of metal about five hundred yards if ya catch an edge wrong LOL)

I go through a lot of sandpaper and wet-n-dry restoring a set of fins ... from 80 grit all the way through 2500. When all the polishing is done, I clear the fins so you don't have to worry about keeping them up in the future.

Considering these valve covers are around 45 years old and are pretty beat up by the time they get to me, it's easy to see that they're a TON of work. But the results speak for themselves.

Before ...
Copy of IM005741.jpg

and After ...
IM005841.jpg

Copy of IM005741.jpg


IM005841.jpg
 
You do nice work.....money well spent if you are not sure of your skills.

No disrespect to us do it yourselfers but some things are worth spending a few more $$$$ for guaranteed quality.

Cudo's to you Leannea

Mop
 
-
Back
Top