My 1967 Cuda Restoration

-
Dodgenut64 said:
Looks good. Is your TTI exhaust set up for exhuast manifolds or headers? Im wanting to run stock exhaust manifolds on my 5.7 hemi thats goig in my 64 dart and i was wondering if i could order an entire exhaust setup from them bent for my 64, with ends bent for the 5.7 hemi stock exhaust manifolds.


It's for exhaust manifolds

http://www.ttiexhaust.com/PDF/Mfd casting nos list.pdf

Above is a listing that might help you
 
flyboy01 said:
I love that scoop, did it come gell coated black? Is the front edge finished or is it bare fiber? I am probably going to order one next week. How long did it take you to get it from AAR?


It came in black....will need to be painted even if you keep it black. Front edge needs sanded prior to painting.

Took 2 to 3 weeks
 
cudaspaz said:
Good timing!
I am about to do the same thing to my hemi scoop on my 67.

Now I know where to get the pins, and I have an idea of what my orange dash will look like.

Man, your dash looks phenominal like that, much better than the standard black.

I'm so glad I had mine painted body color, and I hope it looks half as good as your all put together, but I am going with custom gauges in the factory cluster.

Here's my bolt on hood from glasstek with an add on hemi scoop, looks like the same scoop you have.
cuda30.gif


I have to go to black on my dash. I could not find any paint to match the
red on the dash. The dash is back at the powder coaters at this time.

Getting the inside of the doors and interior trim to match was a problem.
Saw a pic of one with white interior and the only thing white was the
seats, door panels and sun visors.So.........mine will have red seats, door
panels and sun visors and the rest will be black. With my red line tires and
black exterior I believe it will be just fine.

I think your glasstek scoop is the same......very good scoops. I have a
$59.00 scoop on my Mini Van and it's a piece of crap compared to the AAR.
You get what you pay for!
 
Got my rotating assembly re-balanced today with the new
B & M flexplate. This way I can change the converter out if necessary and
not have to worry about the balance for the rest of the parts.


Getting the weights ready

bal08.jpg


The new flexplate

bal07.jpg


Afterward we installed the new 2800-3200 converter to see how
good it was out of the box

bal04.jpg


bal03.jpg


As you can see it was pretty good

bal02.jpg


Now we can start putting the engine together
That will be handeled by:

http://www.wedanperformance.com/
.
.
.
.
 
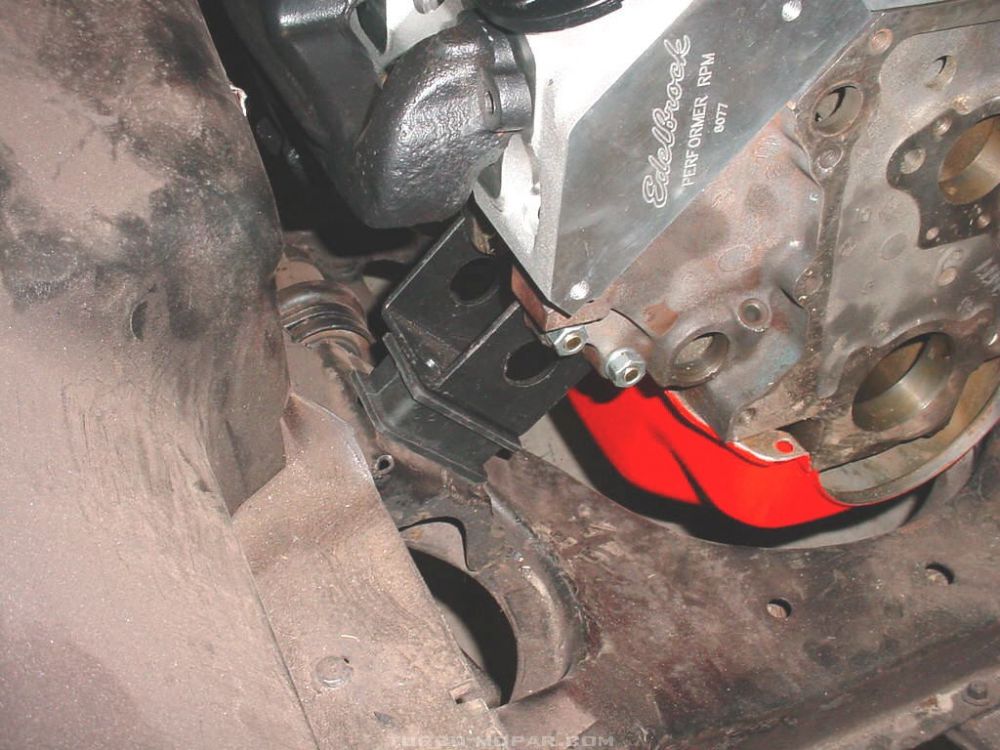
Update on my restoration. I picked up my block and some of the
parts to do a test fit in the car as it was a /6 from the factory.
I'm still using the /6 k-member. It does have a V8 center link...
must have been added before I purchased the car.

I didn't want to have an oops! some where down the road.

Also it looks like the radiator and fan shroud from the Dodge Polara
will fit just fine. Pic's on this later after I get it recored with some
new "stuff".

36006.jpg


.060 over

36001.jpg


Conversion mounts work just fine (around $75.00) can't remember
where I got them

36002.jpg


36003.jpg


36004.jpg


Here is the driver side manifold.
It is from a 1972 Dodge Polara 360 with the large ports
It fits great and the tti exhaust pipes mount up very nicely.
Of course the car has NO power steering or power brakes.
If the car had power it probably would not fit.


36005.jpg


The manifold is part number 3418621-1

360_manifold.jpg


The passenger side manifold was a match to this one.
Part number was 3418623
 
wow that manifold fits very nice compaired to my unit, but i have ps and it has to wrap around that, man that hurts performance, i love the pics keep us posted :thumbup:
 
Had a guy over an hour ago looking at the progress on the 'Cuda. He's and old
Mopar guy that just built a 1965 Coronet 2dr hardtop 440 drag car. He looked
at the front of my engine and asked me how I was going to get the oil pan
off in the future if I needed to. I said....hadn't thought about it.


36003.jpg


as you can see the pan hangs over the K-member. He suggested I pull
the K-member, take it to the local welding shop and have it cut out
and boxed in. After looking at it....made sense to me.

Anybody run into this problem before?
 
Tony Fields said:
Had a guy over an hour ago looking at the progress on the 'Cuda. He's and old
Mopar guy that just built a 1965 Coronet 2dr hardtop 440 drag car. He looked
at the front of my engine and asked me how I was going to get the oil pan
off in the future if I needed to. I said....hadn't thought about it.


36003.jpg


as you can see the pan hangs over the K-member. He suggested I pull
the K-member, take it to the local welding shop and have it cut out
and boxed in. After looking at it....made sense to me.

Anybody run into this problem before?

My oil pan sticks over the k-member and is a rear sump pan looks just like yours in your picture. The oil pan gasket was leaking bad and I needed to change it back in February. I had to drop the steering cross link in order to remove the oil pan,and jack the car up in the front a reasonable amount but that was all it was to remove the pan. Is there something else that I'm missing that he is talking about? It wasn't the simplest job removing it but I got it done. Matter of fact looks like you have plenty of room between the front of the oil pan and the k-member opposed to mine.
 
mullinax95 said:
My oil pan sticks over the k-member and is a rear sump pan looks just like yours in your picture. The oil pan gasket was leaking bad and I needed to change it back in February. I had to drop the steering cross link in order to remove the oil pan,and jack the car up in the front a reasonable amount but that was all it was to remove the pan. Is there something else that I'm missing that he is talking about? It wasn't the simplest job removing it but I got it done. Matter of fact looks like you have plenty of room between the front of the oil pan and the k-member opposed to mine.


Mine is a center sump and it is a /6 K-member. That might be the difference.
He said he had done three of them that way.
 
I love the dash. I know that was a pretty penny. I may check them out. I was looking at Mr. G for replating my dash.
 
wow that dash looks amazing :thumbup: i would concider doing that to mine(even though now its done) but mines has already been hacked, nice pictures
 
I love the dash. I know that was a pretty penny. I may check them out. I was looking at Mr. G for replating my dash.


From what I have been told by guys that have used Mr. G's.......they do
not send back the parts you sent them. You just trade your parts in.

Talked to a couple of friends the other night that have used them and
they said never again. FYI

Total cost was $676.71 and that included removing and polishing
the lens and the centers ($90.00), re-chroming the arm rest bases ($121.00)
Glove box trim re-chromed and detailed $85.00)

Instrument bezel was ($300.00)
Fixing damage was ($54.00)

And you get the parts back that you sent them!


To reply to the other post, CV received the parts from me
April 30,2007 and I got them back 2 days ago.
 
Where are you from in Indiana?

I am in Greenfield In.just east of indy. I work a little bit of everywhere in In.,curr. doing a job in Franklin. This is the first mopar I have totaly tore down to restore. Always been a big mopar fan. My 67 cuda came from Texas and was pretty much rust free so was a big plus. Judging by your car I'm sure I could pick up a few good tips from you!! Ted
 
Looks like this car is going together right and some nice reconditioned work.

I lived in bunkerhill Indiana when i was a youngin.
 
Talked to my paint and body man a couple of days ago
and he wants to do my 'Cuda over the winter. I was planning sometime around next May.
Sooooo I have been spending a lot more time at the garage.

Here ars some new pics:

BTW the 1988 Dodge Daytona hood springs
work great. Had to cut off 3 coils on the front spring on the
radiator support also.

Test fitting the hood and splash shields:

a05.jpg


a04.jpg


a01.jpg


Restoration of the Console Plate:

Before:

a16.jpg


During:

a14.jpg


After:

I still have to re-do the black console surround.

a03.jpg


Making brackets to mount the Console as this car did not come with one.


a07.jpg


Looks straight from here!

a02.jpg


The paint I used on the console plate was Argent wheel paint.
Mopar Perf. part no. P4529876 at $8.00 per can. Thanks to
360scamp for supplying the part no. awhile back.

a05.jpg


a05.jpg


a04.jpg


a04.jpg


a01.jpg


a01.jpg


a16.jpg


a16.jpg


a14.jpg


a14.jpg


a03.jpg


a03.jpg


a07.jpg


a07.jpg


a02.jpg


a02.jpg
 
The console plate turned out great, nice job. Will the black part of the console become red or were they all black regardless of interior color?
Bob
 
The console plate turned out great, nice job. Will the black part of the console become red or were they all black regardless of interior color?
Bob

Bob,

I'm going to re-do mine black as I will have black carpet. The only
red in my car will be the seats, door panels and sun visors and the
red line tires. If it doesn't turn out the way I think it will,
I'll probably switch over to black seats and panels some time
in the future. Saw one in a mag with a white interior and
the only thing white was the seats, panels and visors. the
rest was black and it looked great.

I believe the console surrounds were color keyed to the interior
color. I just bought one on eBag and it was a tan color.
 
console looks good. yep they color keyed the interiors into primary- seats, door panels and secondary-usually dash, headliner, upper door frame paint, console and carpet. cant wait to see it all together. show some pics of those hood hinges installed. that sounds interesting.
 
console looks good. yep they color keyed the interiors into primary- seats, door panels and secondary-usually dash, headliner, upper door frame paint, console and carpet. cant wait to see it all together. show some pics of those hood hinges installed. that sounds interesting.

I'll get some pics redfastback, but they look like the origionals, only they
are weaker.
 
console looks good. yep they color keyed the interiors into primary- seats, door panels and secondary-usually dash, headliner, upper door frame paint, console and carpet. cant wait to see it all together. show some pics of those hood hinges installed. that sounds interesting.


redfastback here are the pics of the Daytona springs and the front spring
I had to cut off.

Note: the stock hinges were used...only changed the springs.

passenger side:

a23.jpg


driver side:

a19.jpg


The clamps are added for insurance...retaining clips are also in place.


Here's the front spring I had to cut off as it was too strong for the hood.
It was pushing up on the driver's side of the hood.

a22.jpg


As you can see, I only have 6 coils left....I may have to take it down to 5.

a23.jpg


a23.jpg


a19.jpg


a19.jpg


a22.jpg


a22.jpg
 
Tony, I live in Shirley, In right out side of Greenfield, I will be looking for a body guy soon, would your guy be interested in another 67 barracuda to do? Your 67 looks like mine, black on red. Looks good cant wait to see more pics.

Dale
 
-
Back
Top