The Great Pumpkin - '71 Duster
Like a few other parts of this build, I didn't plan on going as far as I have but things tend to snowball and the wiring is no different. The electrical system in the car was fine but there definitely were some things I did not like - yellow parts store insulated ring terminals, taped together splices etc. The wires from the cheesy tach and shift light were sort of half tucked under the back of the dash pad. It looked like multicolored spaghetti was oozing out of the back of the dash pad. Whoever wired it previously liked to just coil and zip tie excess wires and there was a lot of it. Overall a passable but sloppy job and nowhere near my sanitary standards.
While doing the wiring, I planned to upgrade the ignition. Again, it was all coming out anyway so if ever there was a time to tackle it, it was now. The car had Ye Olde Mopar Chrome Box which I dumped for an MSD. My initial plan was to run my MP tach drive distributor with a Moroso mechanical tach but the distributor that was in the car worked good, had a quick advance and no vacuum to deal with. The tach drives have a really quick advance curve and since this is a street car, I wanted to retain some part throttle drivability. Would it have worked? Probably but looking at everything else, I decided to hold off on that for now and stick with what I had.
I did get some new parts for the ignition system though. I already had a Firecore male terminal cap I got from Rick at Carlisle last year. I ordered a new rotor and new Firecore male terminal plug wires from him to replace the old gray parts store cap and Taylor wires. I need new plugs but that's no problem. I'm finally getting to use the MSD 6AL I've had sitting on the shelf for years.
After doing some research on coils, I decided to just go down to the parts store and get a Ford TFI type coil. I didn't feel the extra expense of buying an MSD coil was necessary since the Car Quest one will get the job done. I was stoked to replace the rusty chrome canister coil that was haphazardly stuck up on the firewall with a strap. I made a bracket to mount it vertically to the intake.
I wanted the MSD box out of sight. When I removed the radio, I took out the speaker from under the dash. I looked at the bracket on the bench and it occurred to me that's where the MSD should go. The wires willl reach everything, it will have plenty of air and won't be exposed to excess vibrations or heat like if it was in the engine bay. Initially I made an thin aluminum plate that mirrored the shape of the speaker bracket and I screwed the MSD to that. It wasn't necessary to do that though because I ended up bolting the box right to the speaker bracket. I used larger screws for the bracket to hold the extra weight of the box but that really wasn't necessary either. That speaker magnet was kinda heavy actually!
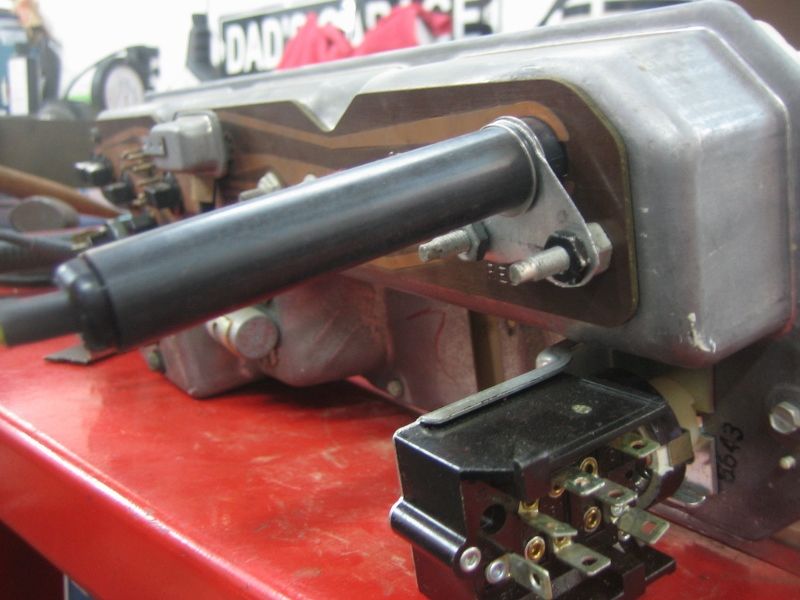
I also finally figured out a use for my little MSD programmable shift light. Since the ammeter was now gone, I took the bulb socket out of the back of the circuit board and installed the shift light. The ammeter wire studs were in perfect position for it so I made a bracket to hold the light to the back of the board. I have yet to see if it works but it should. I don't need a super nova flash to tell me when to shift.
During my wiring research, I kept running into info from Mad Electrical. I thought his ideas were pretty sound so I decided to give them a try. I did the ammeter bypass thing by splicing the gauge wires together. I bought his trunk battery and relay kits. And just to make things more complicated for myself, I also bought an AR Engineering/Denso 60 amp 'one wire' alternator kit from Mancini. I'm still working on the wiring for all that and it's proving to be a little tough. I tend to over think stuff so that's most of my issue. I'll get it done.
As an aside, I bought a '71 A body/small block forward engine wiring harness at Carlisle a few years back. I won't say who I got it from but let's just say it was total crap. Before I even went to install it, a few of the wires had pulled out of the connectors. I ended up taking the whole thing apart, harness wrap and all to basically harvest the wires, terminals and connectors. The OE harness was dirty but passable so I decided to stick with it and change what needed to be changed or fixed. I removed all the unnecessary/unused wires from the harness.
The bulkhead connector and fuse box in this car are in surprisingly good shape, nothing melted or hacked. The Mad ammeter bypass involves drilling larger holes in the B.H. connector to pass the spliced main dash feed wires through. I decided to skip that. My plan is to run them back to my cut off switch in the back to kill power to the ignition switch. Not going to get into it here though but that's the plan.
The battery cable from the trunk was originally under the car. It was in the way in a couple places and I was fighting with it. Again using the Mad Electrical ideas, I added more complexity by adding a remote 'Ford' starter solenoid in the trunk but now the battery cable is able to be run safely inside the car. I laid it in the driver's side wiring trough. Its 'only hot when cranking' as the saying goes so there's little/less chance of a short on a 1/0 gauge wire.
So as I mentioned earlier, I dumped the chintzy Auto Gauge tach and gauges. I got a really cool tach/oil pressure gauge bracket from SS/AFX out in Arizona that they use on their Hemi Dart/Cuda restorations. I wanted a vintage looking deal and I wound up with Stewart Warner Deluxe gauges and an 8,000 rpm tach. I really dig the look with the chrome bezels and simple graphics, totally old school. The oil pressure gauge is mechanical and plumed with Aeroquip PTFE hose - total overkill. The rest of the gauges are SW too, a mechanical water temp gauge and a voltmeter, all 2 1/16 with an Autometer 3 hole panel.
And then there's the Innovate LM1. I was into the idea of an analog fuel gauge and decided on the LMI. It seemed to have the best features and most capability of the basic tuning aids. It was a little more pricey than some of the other choices but I think its gonna be a good thing once its sorted out.
Luckily, there was already an 02 bung welded in the exhaust. There was an old spark plug in it that was almost seized in there but I got it out without any drama. To get the wiring into the passenger compartment, I drilled a fairly large hole in the spot on the trans tunnel where its flat to feed the wiring through. Found a grommet for it too. The 02 bung is right underneath it so it worked out well. The plan is to have the module come up through the carpet and rest under the seat but I need to put the carpet in and see how it lays out.
I think I'm forgetting some things but I'm sure there will be more long-winded and wordy posts to fill in the details.
These electrical pics are gonna be a little vague and/or boring here but it's what I have at the moment. Not the sexiest subject but its all part of it.
Here's the OE ammeter wires. The cluster has been removed already.
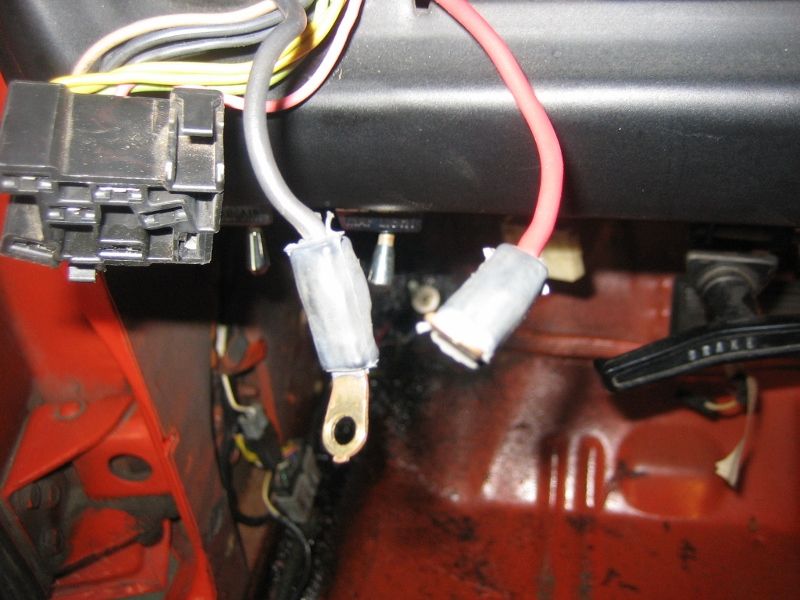
Crimped, soldered and shrink wrapped.
Here's the shift lite and bracket where the ammeter bulb used to be.
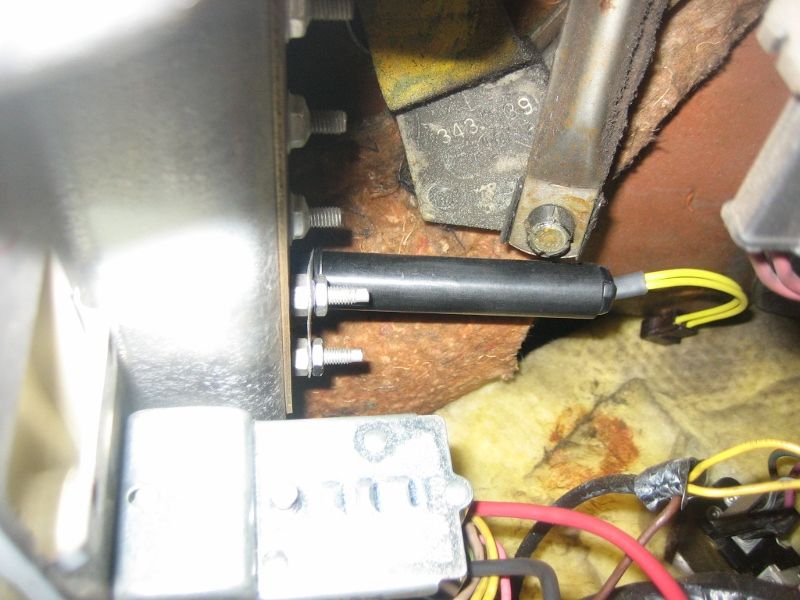
With cluster installed, looking up from the floor. Plenty of room.
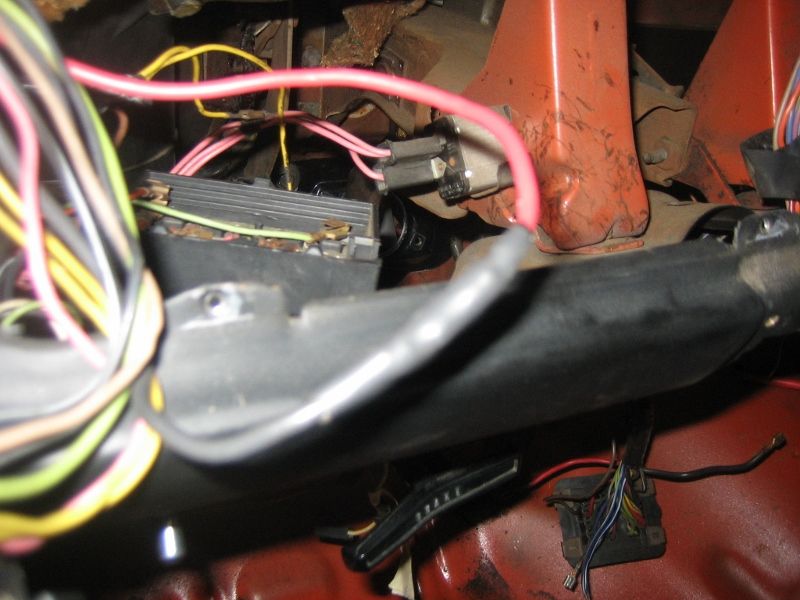
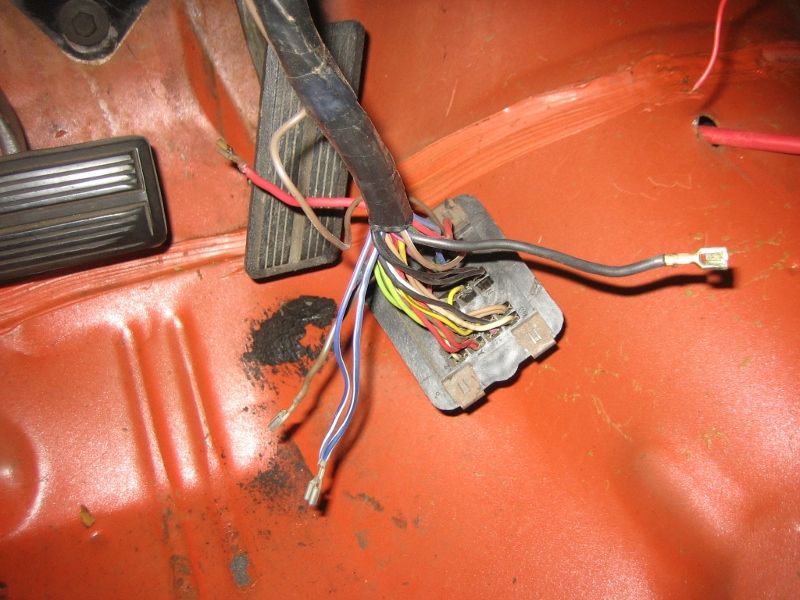
Not sure why i took this pic but its the bulkhead connector removed from its home, I think I was getting ready to splice the ignition 1 + 2 (brown and blue wires) circuits to the red MSD signal wire here. The MSD happened to come with a handy dandy pre-made splice for this express purpose. Works good. The red and black wires are from the dash main feed that will run back to the switch. After I made the splice, I checked continuity with a meter and its good.
More to come.
Like a few other parts of this build, I didn't plan on going as far as I have but things tend to snowball and the wiring is no different. The electrical system in the car was fine but there definitely were some things I did not like - yellow parts store insulated ring terminals, taped together splices etc. The wires from the cheesy tach and shift light were sort of half tucked under the back of the dash pad. It looked like multicolored spaghetti was oozing out of the back of the dash pad. Whoever wired it previously liked to just coil and zip tie excess wires and there was a lot of it. Overall a passable but sloppy job and nowhere near my sanitary standards.
While doing the wiring, I planned to upgrade the ignition. Again, it was all coming out anyway so if ever there was a time to tackle it, it was now. The car had Ye Olde Mopar Chrome Box which I dumped for an MSD. My initial plan was to run my MP tach drive distributor with a Moroso mechanical tach but the distributor that was in the car worked good, had a quick advance and no vacuum to deal with. The tach drives have a really quick advance curve and since this is a street car, I wanted to retain some part throttle drivability. Would it have worked? Probably but looking at everything else, I decided to hold off on that for now and stick with what I had.
I did get some new parts for the ignition system though. I already had a Firecore male terminal cap I got from Rick at Carlisle last year. I ordered a new rotor and new Firecore male terminal plug wires from him to replace the old gray parts store cap and Taylor wires. I need new plugs but that's no problem. I'm finally getting to use the MSD 6AL I've had sitting on the shelf for years.
After doing some research on coils, I decided to just go down to the parts store and get a Ford TFI type coil. I didn't feel the extra expense of buying an MSD coil was necessary since the Car Quest one will get the job done. I was stoked to replace the rusty chrome canister coil that was haphazardly stuck up on the firewall with a strap. I made a bracket to mount it vertically to the intake.
I wanted the MSD box out of sight. When I removed the radio, I took out the speaker from under the dash. I looked at the bracket on the bench and it occurred to me that's where the MSD should go. The wires willl reach everything, it will have plenty of air and won't be exposed to excess vibrations or heat like if it was in the engine bay. Initially I made an thin aluminum plate that mirrored the shape of the speaker bracket and I screwed the MSD to that. It wasn't necessary to do that though because I ended up bolting the box right to the speaker bracket. I used larger screws for the bracket to hold the extra weight of the box but that really wasn't necessary either. That speaker magnet was kinda heavy actually!
I also finally figured out a use for my little MSD programmable shift light. Since the ammeter was now gone, I took the bulb socket out of the back of the circuit board and installed the shift light. The ammeter wire studs were in perfect position for it so I made a bracket to hold the light to the back of the board. I have yet to see if it works but it should. I don't need a super nova flash to tell me when to shift.
During my wiring research, I kept running into info from Mad Electrical. I thought his ideas were pretty sound so I decided to give them a try. I did the ammeter bypass thing by splicing the gauge wires together. I bought his trunk battery and relay kits. And just to make things more complicated for myself, I also bought an AR Engineering/Denso 60 amp 'one wire' alternator kit from Mancini. I'm still working on the wiring for all that and it's proving to be a little tough. I tend to over think stuff so that's most of my issue. I'll get it done.
As an aside, I bought a '71 A body/small block forward engine wiring harness at Carlisle a few years back. I won't say who I got it from but let's just say it was total crap. Before I even went to install it, a few of the wires had pulled out of the connectors. I ended up taking the whole thing apart, harness wrap and all to basically harvest the wires, terminals and connectors. The OE harness was dirty but passable so I decided to stick with it and change what needed to be changed or fixed. I removed all the unnecessary/unused wires from the harness.
The bulkhead connector and fuse box in this car are in surprisingly good shape, nothing melted or hacked. The Mad ammeter bypass involves drilling larger holes in the B.H. connector to pass the spliced main dash feed wires through. I decided to skip that. My plan is to run them back to my cut off switch in the back to kill power to the ignition switch. Not going to get into it here though but that's the plan.
The battery cable from the trunk was originally under the car. It was in the way in a couple places and I was fighting with it. Again using the Mad Electrical ideas, I added more complexity by adding a remote 'Ford' starter solenoid in the trunk but now the battery cable is able to be run safely inside the car. I laid it in the driver's side wiring trough. Its 'only hot when cranking' as the saying goes so there's little/less chance of a short on a 1/0 gauge wire.
So as I mentioned earlier, I dumped the chintzy Auto Gauge tach and gauges. I got a really cool tach/oil pressure gauge bracket from SS/AFX out in Arizona that they use on their Hemi Dart/Cuda restorations. I wanted a vintage looking deal and I wound up with Stewart Warner Deluxe gauges and an 8,000 rpm tach. I really dig the look with the chrome bezels and simple graphics, totally old school. The oil pressure gauge is mechanical and plumed with Aeroquip PTFE hose - total overkill. The rest of the gauges are SW too, a mechanical water temp gauge and a voltmeter, all 2 1/16 with an Autometer 3 hole panel.
And then there's the Innovate LM1. I was into the idea of an analog fuel gauge and decided on the LMI. It seemed to have the best features and most capability of the basic tuning aids. It was a little more pricey than some of the other choices but I think its gonna be a good thing once its sorted out.
Luckily, there was already an 02 bung welded in the exhaust. There was an old spark plug in it that was almost seized in there but I got it out without any drama. To get the wiring into the passenger compartment, I drilled a fairly large hole in the spot on the trans tunnel where its flat to feed the wiring through. Found a grommet for it too. The 02 bung is right underneath it so it worked out well. The plan is to have the module come up through the carpet and rest under the seat but I need to put the carpet in and see how it lays out.
I think I'm forgetting some things but I'm sure there will be more long-winded and wordy posts to fill in the details.
These electrical pics are gonna be a little vague and/or boring here but it's what I have at the moment. Not the sexiest subject but its all part of it.
Here's the OE ammeter wires. The cluster has been removed already.
Crimped, soldered and shrink wrapped.
Here's the shift lite and bracket where the ammeter bulb used to be.
With cluster installed, looking up from the floor. Plenty of room.
Not sure why i took this pic but its the bulkhead connector removed from its home, I think I was getting ready to splice the ignition 1 + 2 (brown and blue wires) circuits to the red MSD signal wire here. The MSD happened to come with a handy dandy pre-made splice for this express purpose. Works good. The red and black wires are from the dash main feed that will run back to the switch. After I made the splice, I checked continuity with a meter and its good.
More to come.