The Great Pumpkin - '71 Duster
Cleared two pretty big hurdles today. I finally got my driver's seat mounted and POR 15'd the floors and trunk.
Feels like I've been trying to figure out the seat situation for months. During the spring, I decided to ditch the big and heavy old bench seat. That behemoth literally weighs 100lbs so I'm stoked to be rid of all that dead weight. I had two sets of seats to choose from but I'll give the story on the ones I picked first. My old boss (the owner of the dealership I used to work at) drove around a beat up, old '85 Jeep Scrambler. He had taken the OE seats out for some more modern ones and left the old ones sitting in the prep area. They caught my eye one day and I did a double take because they look really similar to Dodge A100 van seats (except for the high back of course). I asked what he was doing with them and he told me I could take 'em. So I did.
I got the seats some time last year, can't remember exactly when. I didn't know what I was going to do with them but I liked 'em. The other seats I have are a set of NOS A100 van seats. I've had them for a long time, since the 90s. So now the bench seat is out and I keep looking at both these seats side by side and thinking that I wanted to use one or the other in the Duster. After a lot of going back and forth trying to decide which ones to use (yeah, I got uptown problems) I ended up picking the Jeep seats.
There were a few reasons I didn't go with the van seats. First, they're uncomfortable. Not in a luxury sense but the just do not feel natural. Whenever I'd sit in them, it felt like I was crunched up. For whatever reason, the Jeep seats just felt better to me. Second, the van seats don't really belong in a 70s car. They're clearly an early 60s design and in my mind don't fit aesthetically. You could also argue that the Jeep seats don't look 'correct' either but they look more right to me. I am a stickler for historical details but for whatever reason, putting in seats from an '80s Jeep didn't bother me as much as putting a square 60s seat in a 70s car. Maybe its the fact that the A100 seats are more sacred and probably deserve to be in the right car. Since the two seats are in fact so similar, I did wind up using a set of repro. A990 seat brackets to mount the Jeep seats. Best of both worlds I guess. Or worst.
What's surprising is how similar the Jeep seats are to the A100s. Save for the high back of the Jeep seats, they're almost dimensionally the same. Both are fixed back and curiously the Jeep seats actually weigh less. When I got them, they still had the original, faded, weather-resistant type upholstery on so that had to go. I found a company on Ebay that makes reproduction seat covers in black vinyl that would be a close enough match to my existing interior so I ordered a set.
The main issue I had to resolve is the difference in mounting points between the bottom of the seat, the brackets and the floor pan. I wanted to use the original mounting points if possible but it wasn't gonna happen using components that were never designed to be used in a '71 Duster.
The Jeep seat frames are about two inches wider than the van seat frames but the seats are still basically the same width. To make it work, I had to drill and tap two new holes in the bottom of the Jeep seat frame to mount the seat to the brackets. Then, I drilled extra holes in the tops of the brackets to facilitate mounting them to the floor because the position of the original holes put the bottoms of the brackets too far apart. There is an offset between the top and bottom mounting holes on the brackets which complicates things further. Today seemed to be the day though so I hunkered down and got it done. Took a lot of measuring and head scratching but I'm happy with how it came out.
The seats are now non-adjustable when mounted to the A100 seat brackets. After it was all bolted down, I put the steering wheel in place to make sure the position of the seat was good. I read up on proper positioning and I did pretty well with it.
Next, I put the shifter in to see if it would end up in the same place but it looks like I'm going to have to move it back from where it was. I may make a simpler bracket to replace the big, clunky aluminum box that's under it now. Not sure yet.
After the shifter, I will need to do the passenger side seat. There's a little more offset in the floor from the trans tunnel to the sill as opposed to the left side so I hope it doesn't turn into another project to get it in the right position. It's not as critical as the driver's seat though.Next steps are new upholstery and deciding whether to weld in some braces for the floor or not.
The second thing I got finished over the weekend was sealing the floor pans and trunk with POR 15. The floors and trunk in this car are really solid but I want to keep it that way going forward. I slathered on the POR 15 to seal up the metal for good. Not that the car is going to be out in the rain or snow all the time but moisture has a way of getting into places its not supposed to here on the east coast. I plan to keep this car so whatever I can do to stave off the tin worm is worthwhile and POR 15 is cheap insurance.
When the seats come back out for the new covers, I'm gonna put down some Thermo Tec sound deadener/heat shield stuff and install the new carpet I got at Carlisle last year. Plus, I have to finish up the remainder of the wiring under the dash for the gauges and it will be much easier to do without the front seats in the way.
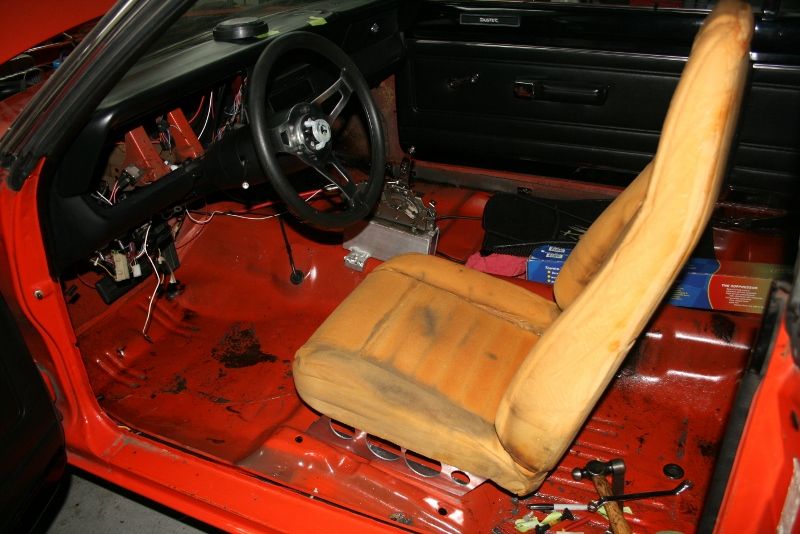
So here's the seat after being mocked up. I checked the driver position with the steering wheel on and stuck the shifter where I thought it should be. I also checked how well I could reach and actuate the the pedals in relation to the seat and it seems good. There is plenty of room overhead.
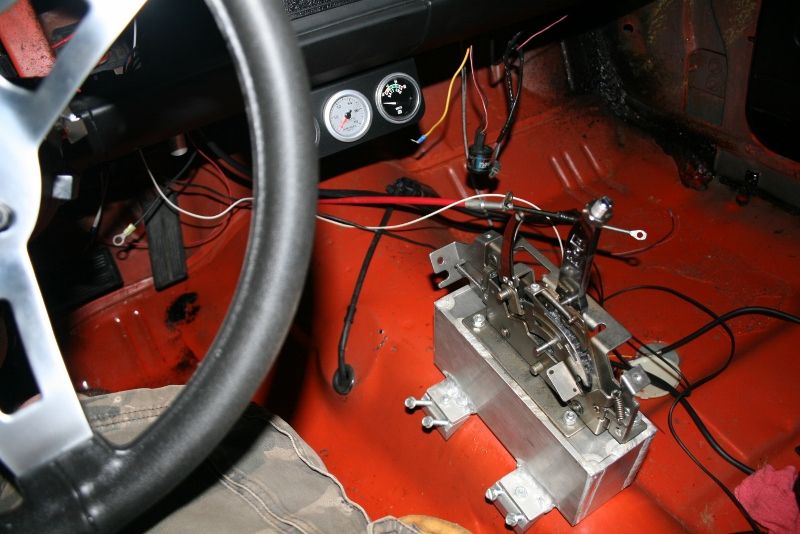
Here's a a pic of where the shifter will end up. Its slightly farther back from where it was, I hope the cable is long enough. There used to be a bench seat in this car. Before it got the heave-ho, the back of the shifter was jammed up to the front of the bench.
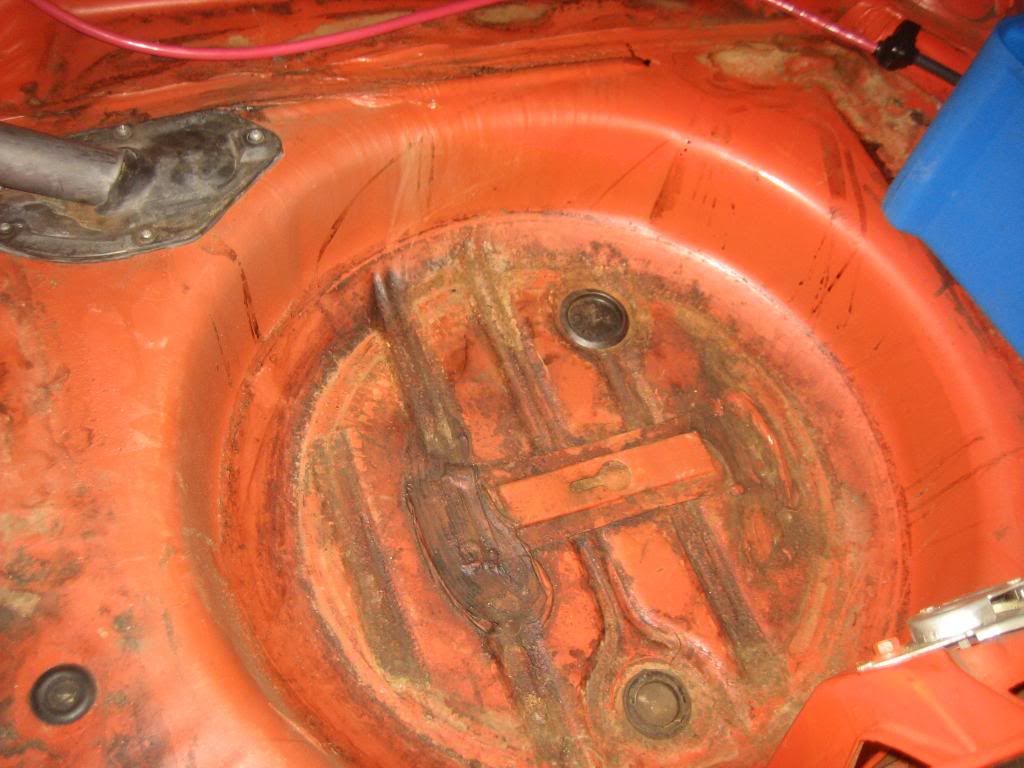
Here's are a before and after shot of the spare tire well in the trunk. There was some surface scale but not rot through. It was a PITA to clean up back there. Something sticky spilled and was rolling around leaving black, sticky trails and drips all over the trunk. I used POR 15 Marine Clean and a soft brush to get the gunk off, then POR 15 Metal Ready before I laid down the paint. It's a little glossy but I'm not real concerned. Looks better than it did with all the sticky crap.
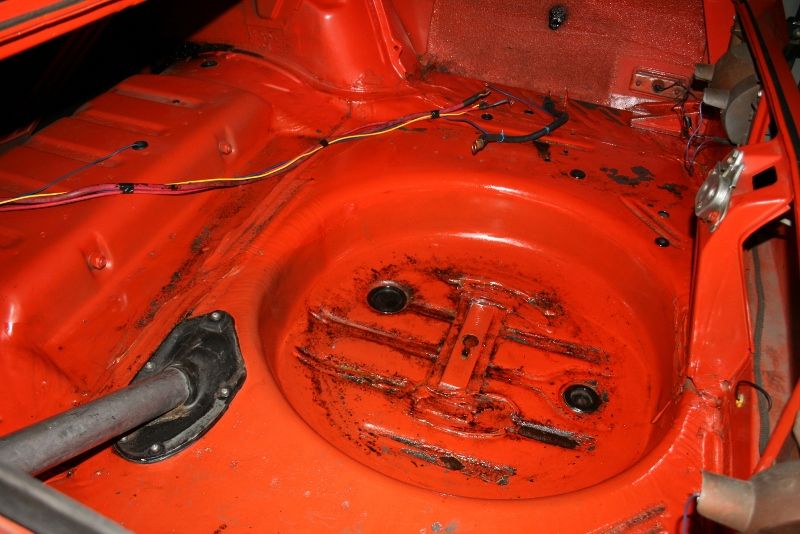
This is after a lot of cleaning and the POR 15 treatment. My hands are still wrinkled.
More to come.
Cleared two pretty big hurdles today. I finally got my driver's seat mounted and POR 15'd the floors and trunk.
Feels like I've been trying to figure out the seat situation for months. During the spring, I decided to ditch the big and heavy old bench seat. That behemoth literally weighs 100lbs so I'm stoked to be rid of all that dead weight. I had two sets of seats to choose from but I'll give the story on the ones I picked first. My old boss (the owner of the dealership I used to work at) drove around a beat up, old '85 Jeep Scrambler. He had taken the OE seats out for some more modern ones and left the old ones sitting in the prep area. They caught my eye one day and I did a double take because they look really similar to Dodge A100 van seats (except for the high back of course). I asked what he was doing with them and he told me I could take 'em. So I did.
I got the seats some time last year, can't remember exactly when. I didn't know what I was going to do with them but I liked 'em. The other seats I have are a set of NOS A100 van seats. I've had them for a long time, since the 90s. So now the bench seat is out and I keep looking at both these seats side by side and thinking that I wanted to use one or the other in the Duster. After a lot of going back and forth trying to decide which ones to use (yeah, I got uptown problems) I ended up picking the Jeep seats.
There were a few reasons I didn't go with the van seats. First, they're uncomfortable. Not in a luxury sense but the just do not feel natural. Whenever I'd sit in them, it felt like I was crunched up. For whatever reason, the Jeep seats just felt better to me. Second, the van seats don't really belong in a 70s car. They're clearly an early 60s design and in my mind don't fit aesthetically. You could also argue that the Jeep seats don't look 'correct' either but they look more right to me. I am a stickler for historical details but for whatever reason, putting in seats from an '80s Jeep didn't bother me as much as putting a square 60s seat in a 70s car. Maybe its the fact that the A100 seats are more sacred and probably deserve to be in the right car. Since the two seats are in fact so similar, I did wind up using a set of repro. A990 seat brackets to mount the Jeep seats. Best of both worlds I guess. Or worst.
What's surprising is how similar the Jeep seats are to the A100s. Save for the high back of the Jeep seats, they're almost dimensionally the same. Both are fixed back and curiously the Jeep seats actually weigh less. When I got them, they still had the original, faded, weather-resistant type upholstery on so that had to go. I found a company on Ebay that makes reproduction seat covers in black vinyl that would be a close enough match to my existing interior so I ordered a set.
The main issue I had to resolve is the difference in mounting points between the bottom of the seat, the brackets and the floor pan. I wanted to use the original mounting points if possible but it wasn't gonna happen using components that were never designed to be used in a '71 Duster.
The Jeep seat frames are about two inches wider than the van seat frames but the seats are still basically the same width. To make it work, I had to drill and tap two new holes in the bottom of the Jeep seat frame to mount the seat to the brackets. Then, I drilled extra holes in the tops of the brackets to facilitate mounting them to the floor because the position of the original holes put the bottoms of the brackets too far apart. There is an offset between the top and bottom mounting holes on the brackets which complicates things further. Today seemed to be the day though so I hunkered down and got it done. Took a lot of measuring and head scratching but I'm happy with how it came out.
The seats are now non-adjustable when mounted to the A100 seat brackets. After it was all bolted down, I put the steering wheel in place to make sure the position of the seat was good. I read up on proper positioning and I did pretty well with it.
Next, I put the shifter in to see if it would end up in the same place but it looks like I'm going to have to move it back from where it was. I may make a simpler bracket to replace the big, clunky aluminum box that's under it now. Not sure yet.
After the shifter, I will need to do the passenger side seat. There's a little more offset in the floor from the trans tunnel to the sill as opposed to the left side so I hope it doesn't turn into another project to get it in the right position. It's not as critical as the driver's seat though.Next steps are new upholstery and deciding whether to weld in some braces for the floor or not.
The second thing I got finished over the weekend was sealing the floor pans and trunk with POR 15. The floors and trunk in this car are really solid but I want to keep it that way going forward. I slathered on the POR 15 to seal up the metal for good. Not that the car is going to be out in the rain or snow all the time but moisture has a way of getting into places its not supposed to here on the east coast. I plan to keep this car so whatever I can do to stave off the tin worm is worthwhile and POR 15 is cheap insurance.
When the seats come back out for the new covers, I'm gonna put down some Thermo Tec sound deadener/heat shield stuff and install the new carpet I got at Carlisle last year. Plus, I have to finish up the remainder of the wiring under the dash for the gauges and it will be much easier to do without the front seats in the way.
So here's the seat after being mocked up. I checked the driver position with the steering wheel on and stuck the shifter where I thought it should be. I also checked how well I could reach and actuate the the pedals in relation to the seat and it seems good. There is plenty of room overhead.
Here's a a pic of where the shifter will end up. Its slightly farther back from where it was, I hope the cable is long enough. There used to be a bench seat in this car. Before it got the heave-ho, the back of the shifter was jammed up to the front of the bench.
Here's are a before and after shot of the spare tire well in the trunk. There was some surface scale but not rot through. It was a PITA to clean up back there. Something sticky spilled and was rolling around leaving black, sticky trails and drips all over the trunk. I used POR 15 Marine Clean and a soft brush to get the gunk off, then POR 15 Metal Ready before I laid down the paint. It's a little glossy but I'm not real concerned. Looks better than it did with all the sticky crap.
This is after a lot of cleaning and the POR 15 treatment. My hands are still wrinkled.
More to come.