AlV 69 Dodge GTS project
This was about the time I needed to shift gears a little bit and decided to take a stab at rebuilding the original A727. With the help of the awesome folks here on FABO I did Just that. Here is the link to the thread I started in the transmission and drive train tech section.
A727 Rebuild kits redux - Rebuild kits everywhere (62-70 vs 71+)
http://www.forabodiesonly.com/mopar/showthread.php?t=245164
I've decided to pull the rebuild portion into this thread... starting now... lol
Some points before I begin.
* The Video and handbook are valuable resources (a must have for any beginner).
* FABO members are very knowledgeable and have provided very solid advice
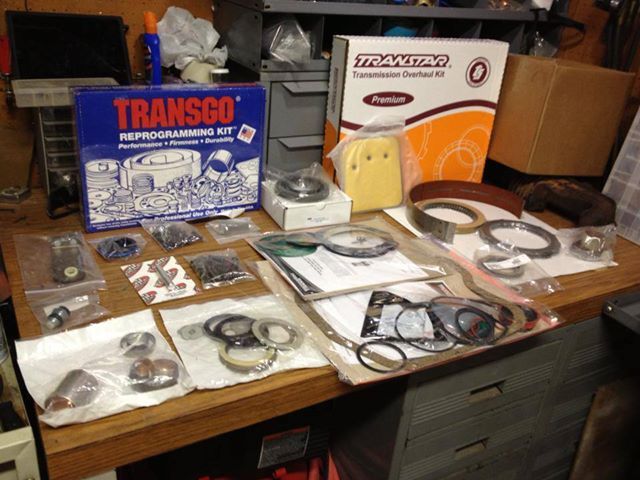
Once I had a handle on the parts, I sourced them from different vendors take a look at post 15 for the parts list:
Northern auto parts (http://www.northernautoparts.com) for the Deluxe rebuild kit by Transtar. When the Kit arrived I noticed the package read for 71 and up. I called the good folks at Northern and they said I was good to go with the 71 and up kit. I expressed my apprehension and they said that they would check on my concern and get back to me. While I was waiting for Northern to call back with an update I pulled up the Transtar website and when through the catalog. While on the website I found the number for their location in Edison NJ which is just 10 minutes from my work. I made a call to the Edison location and spoke with a nice guy there who explained that Transtar does not produce the 62-70 kit any longer and he suggested that I purchase the supplemental Kit containing the 62-up things I'll need. About 10 minutes after I wrapped up with Transtar Northern called back and said the same thing, they explained that is why the site indicate I need to purches the "K22950E-4" sub kit. All was good. So if you buy that kit keep in mind that you'll need to purchase the sub kit to if you are working on a 62-70 transmission.
TSR (https://www.tsr-racing.com) for basically everything else except the shift Kit.
Summit Racing (http://www.summitracing.com/) for the Transgo TF2 Shift Kit
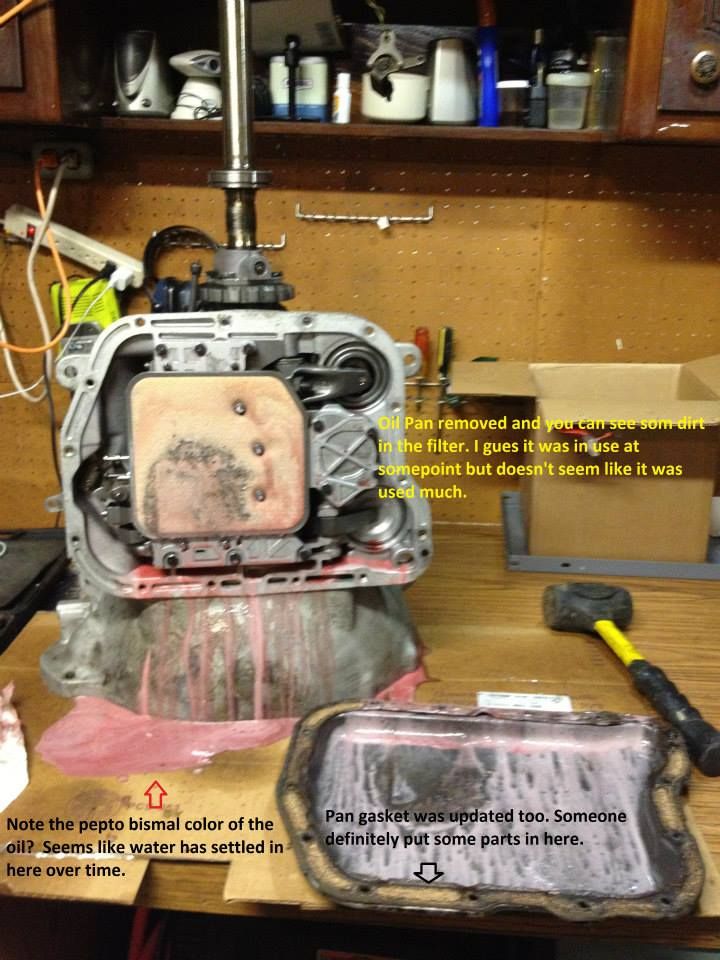
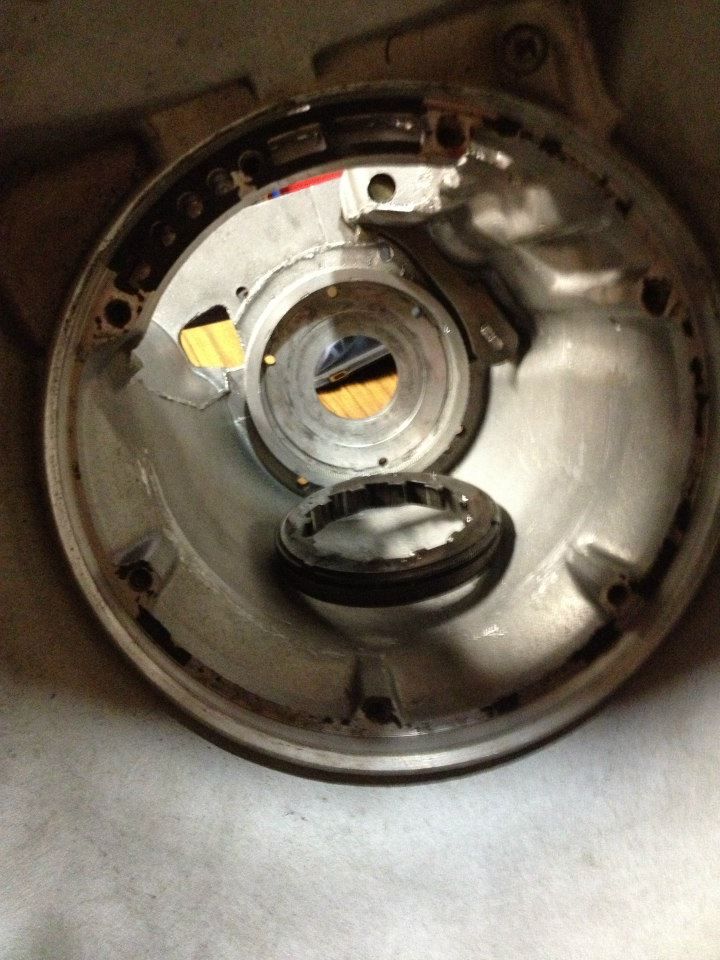
I removed the tail shaft housing and noticed it looked good.

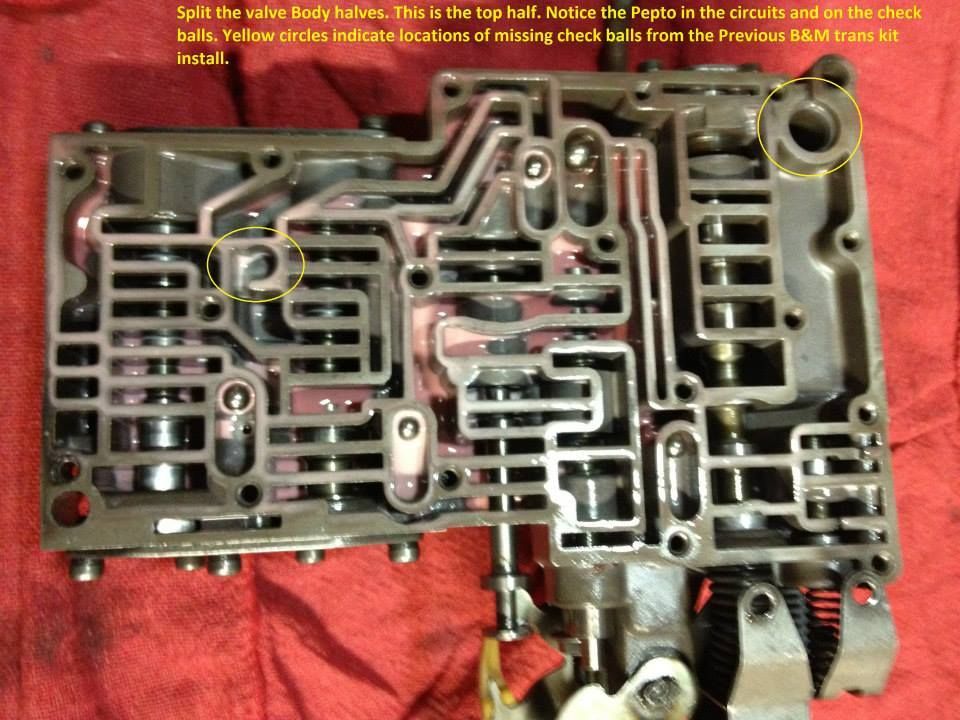
IT wasn't until I pulled the oil pan that I saw the pepto bismal... I don't know how long this trans sat out of the car but it looked like someone did a lot of work then let it sit.
Taking the assemblies out of the case went smooth (slide hammers are key).
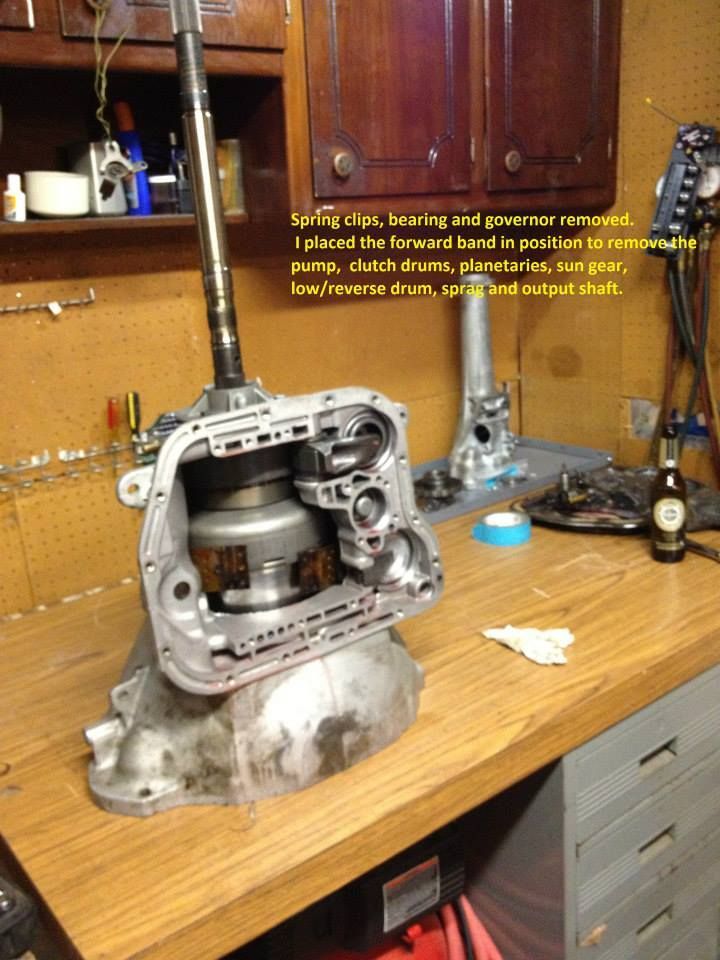
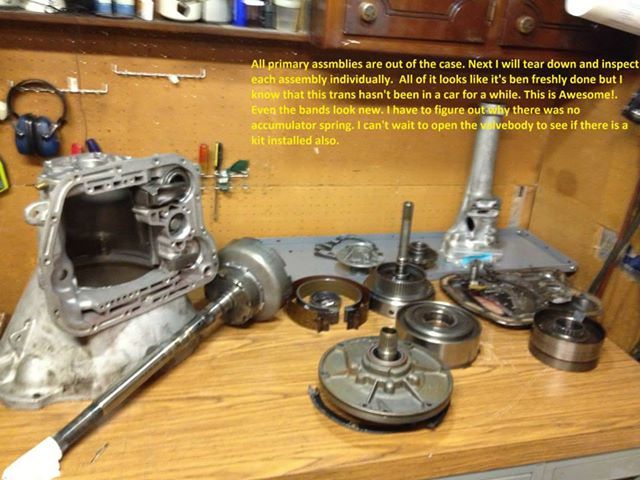
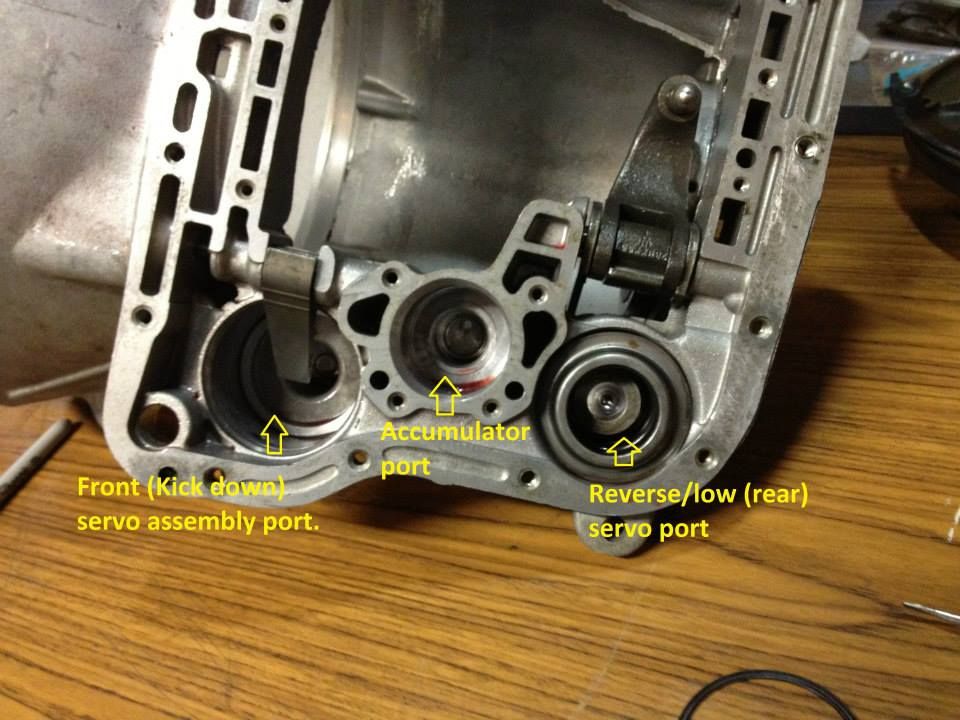
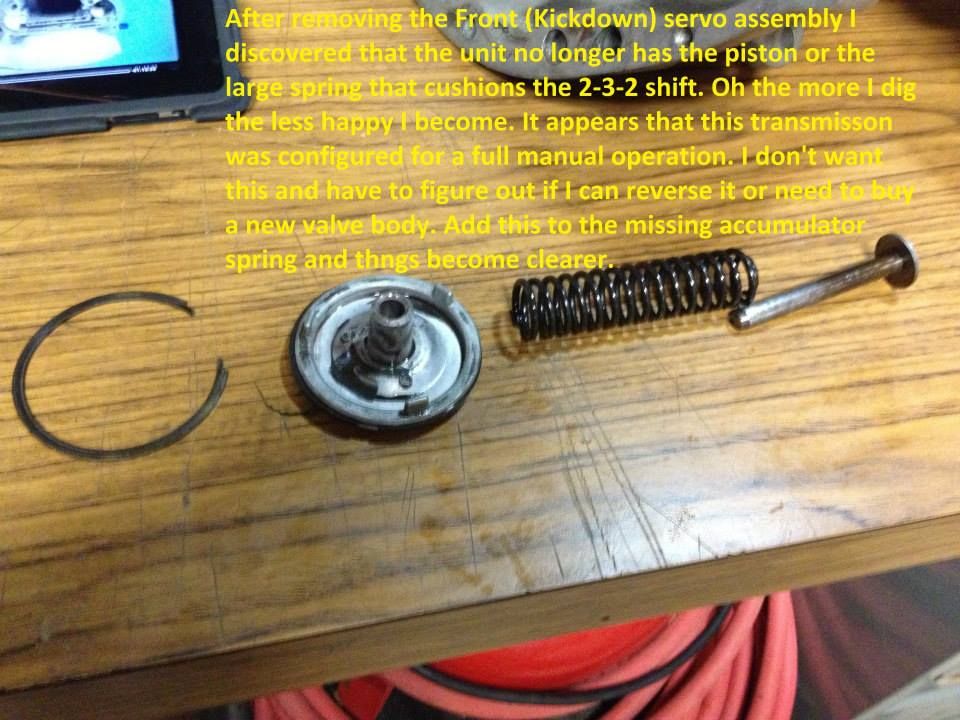
This is when it started to get interesting and more expensive. As I disassembled the trans I noticed that there seemed to be a lot of new parts as if it was overhauled run for a short while then pulled and set aside. As I removed the Valve body the first thing I noticed was that the Accumulator spring was missing and the piston was free to slam up and down in the port. I also noticed that the Apply (Kick down) servo was not complete either. So Now it hits me that this trans was prep'ed for full manual Race application and I need to bring it back to Street Auto. I can't wait to look at the valve body but I think I know what to expect.
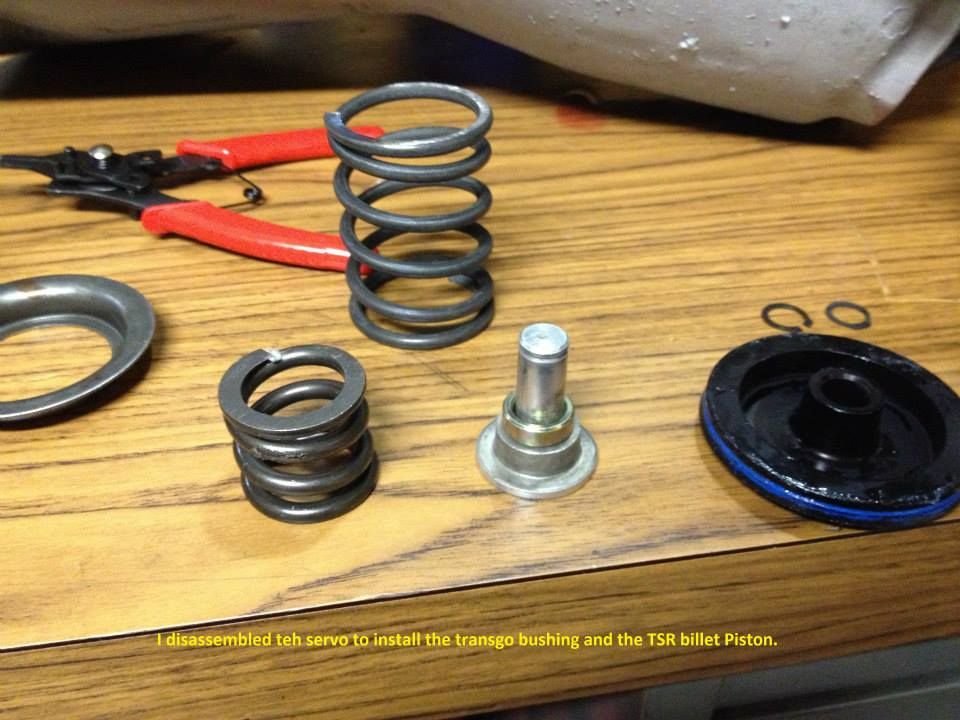
The Apply servo is missing the Piston and the outer spring (I picked up a new setup from (Pat Blais)
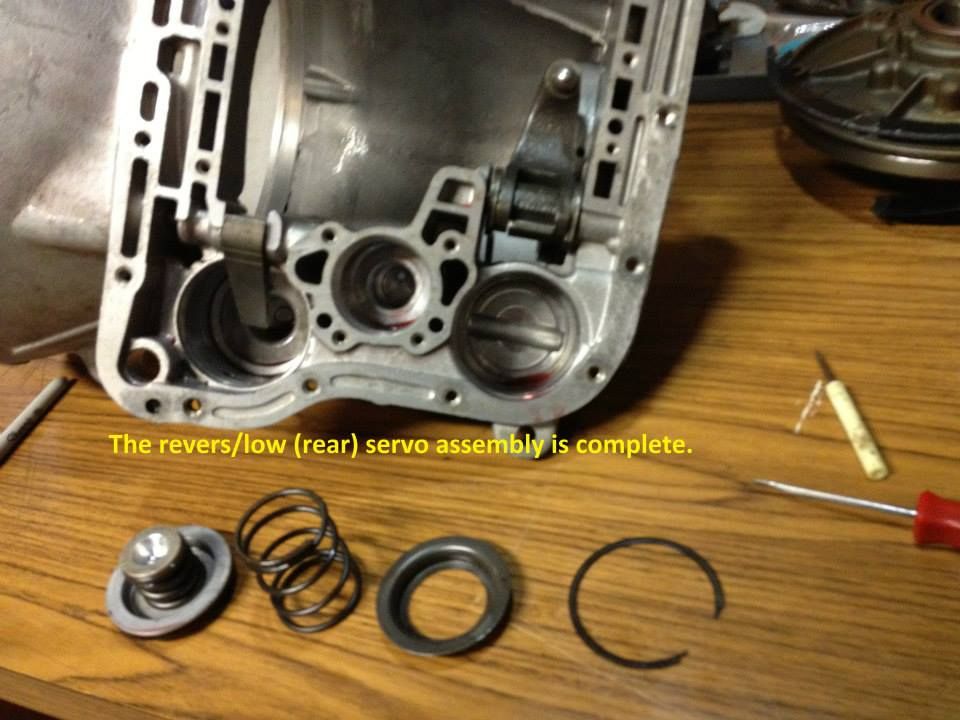
The Low/revers servo was left absolutely stock.
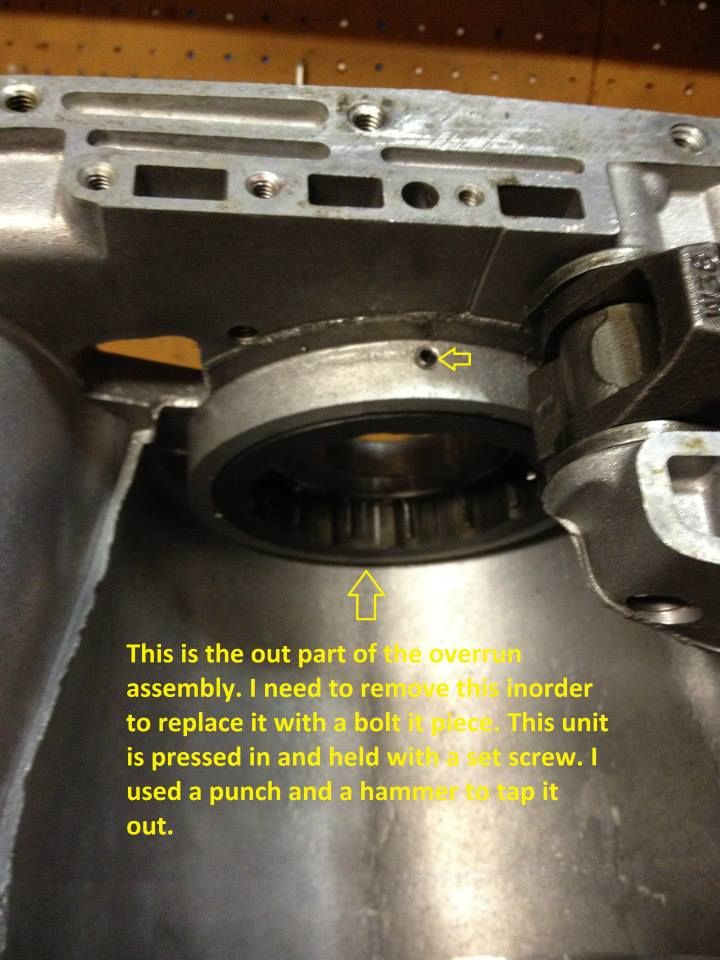
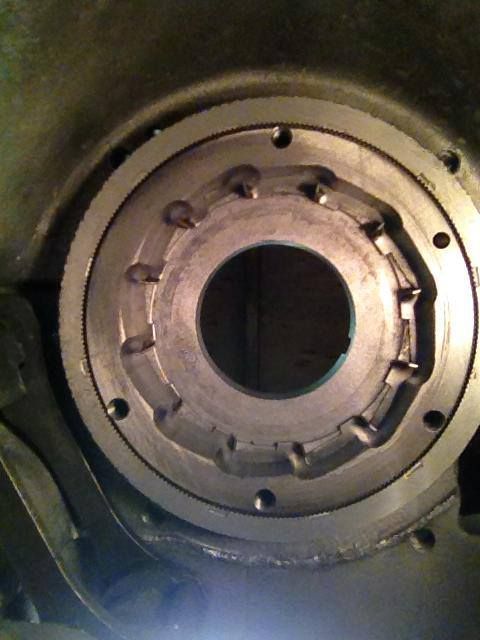
I removed the Overrun Bearing (Sprag) to replace it with a bolt in unit.
Disassembled the front clutch and notice that the frictions and steels looked barley used. Many folks have told me to replace them anyway since they've been sitting in water and well let's face it I didn't tear this down for nothing. This clutch was set up with the 340 spec 6 springs. I'll be upgrading to 12.
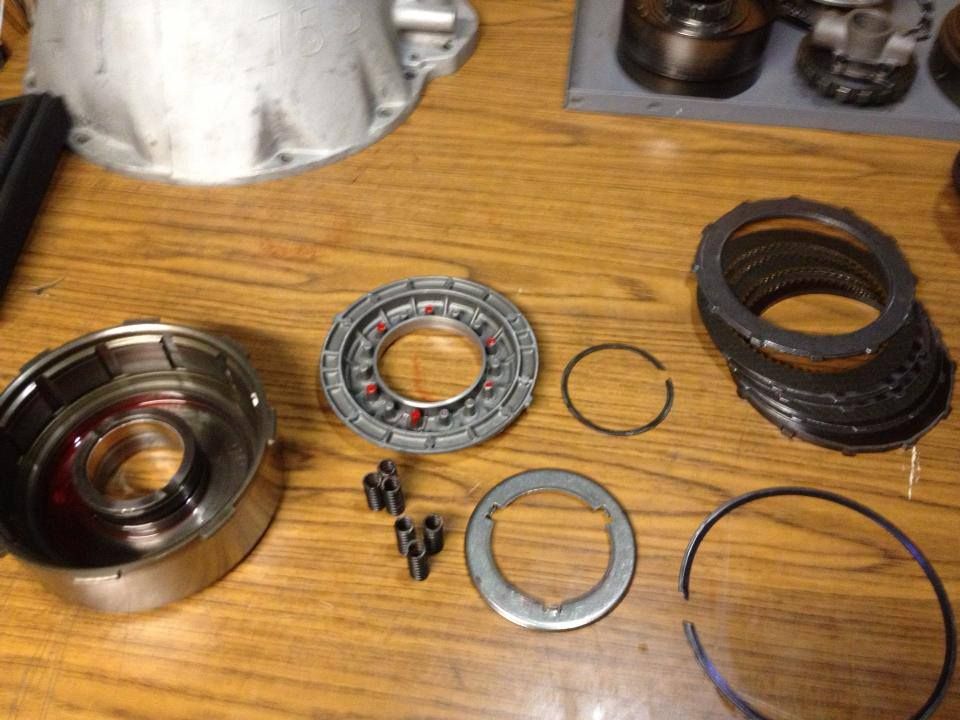
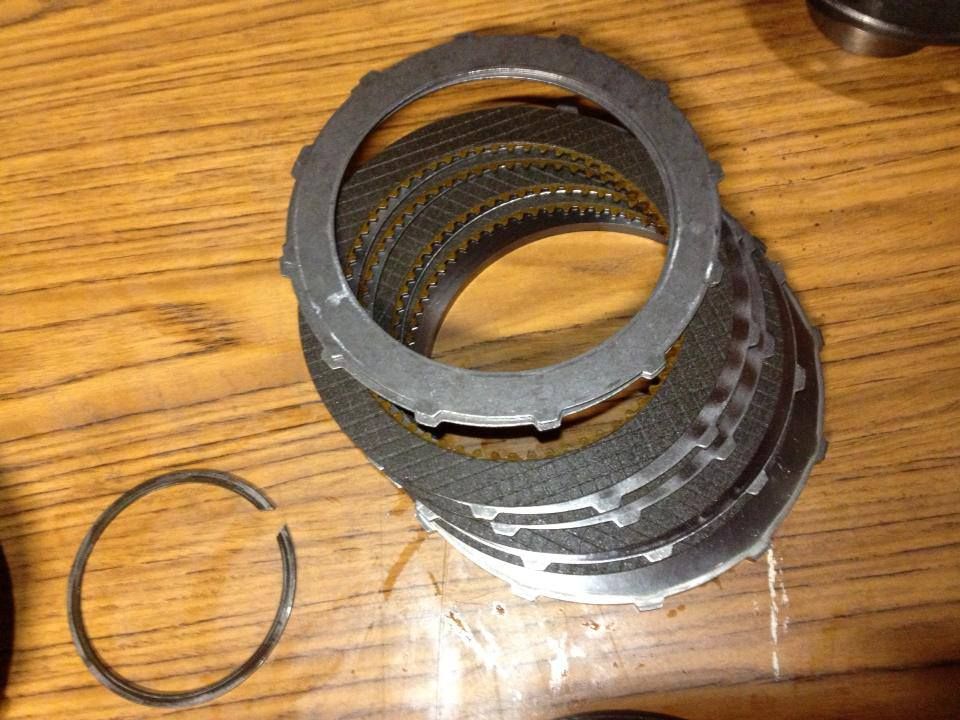
Moved on to the forward clutch and yess the material there looked the same as the front did and the bands for that matter. "shakes head"
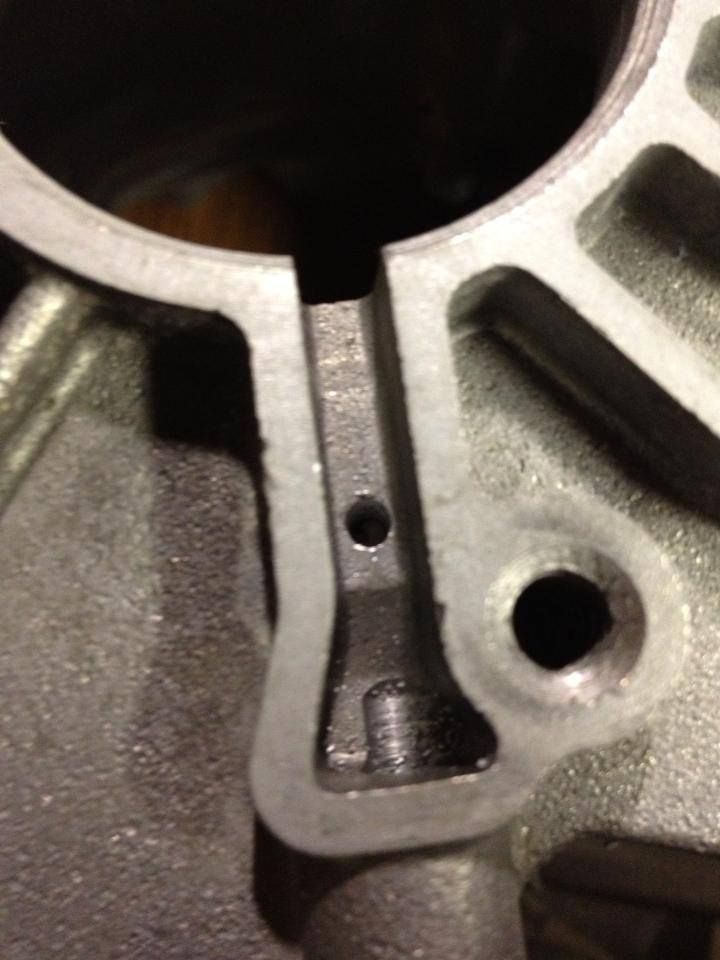
I drilled a 1/8 hole through the case on the oil return port as described in Munroe's handbook to provide additional lubrication to the bolt in overrun sprag.

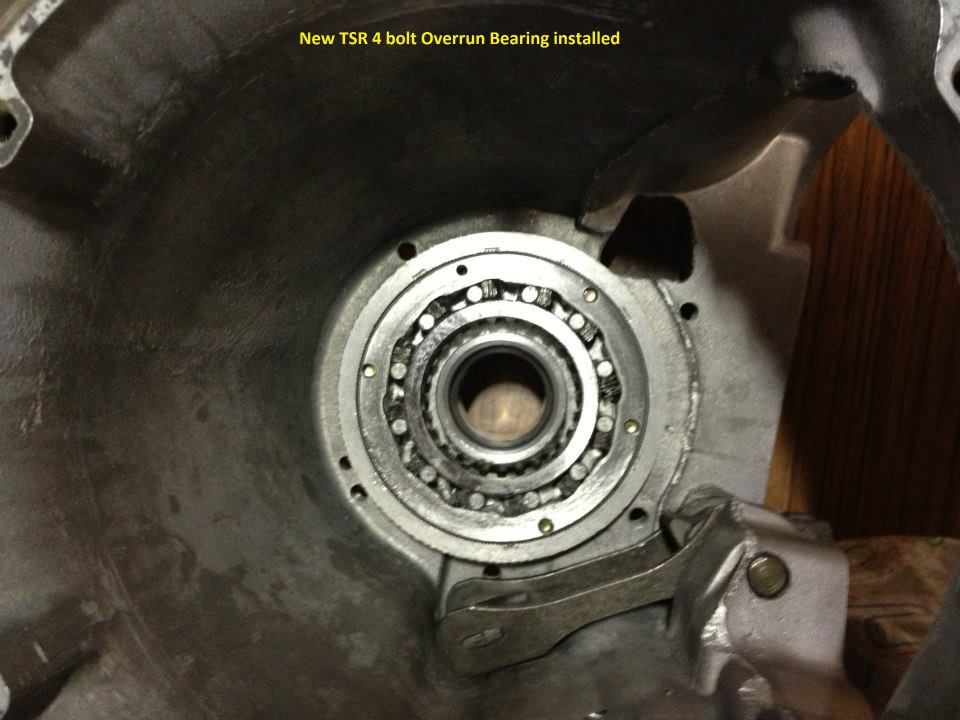
With the lubrication hole drilled and the metal shavings cleaned out I installed the bolt in overrun unit. I used the bolts to line it up and start it into the boss then finishing with a press. (A press isn't required but it sure makes it easier)
With the Overrun installed I reassembled (with all the new stuff) the pump, front clutch, forward clutch then did a Test
[ame]http://vid953.photobucket.com/albums/ae16/alv1970/2013-09-03112844_zps7a9702e8.mp4[/ame]
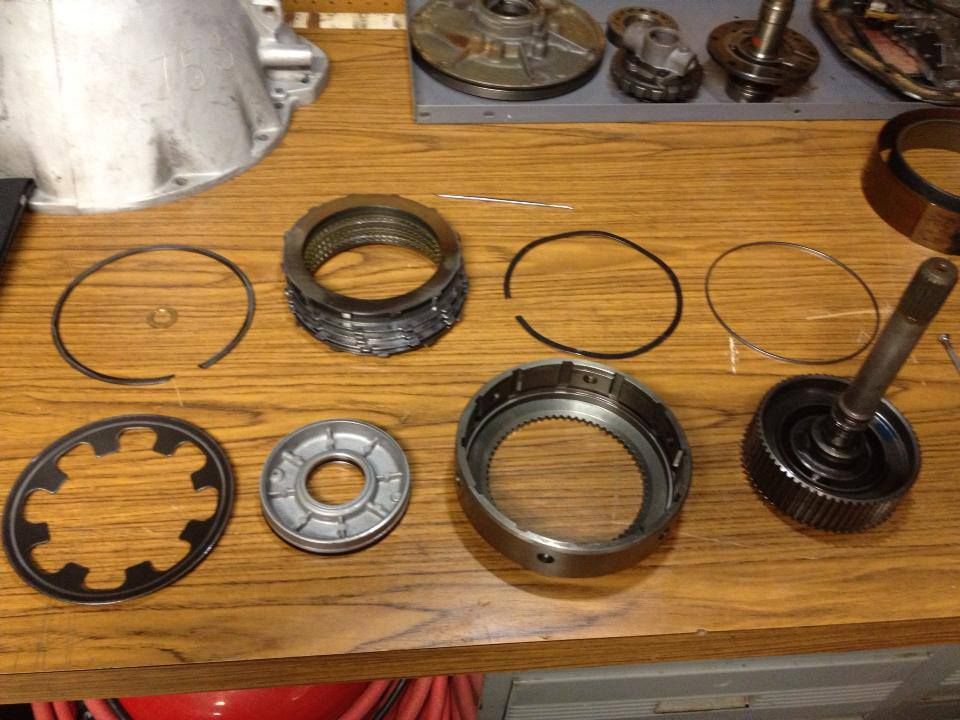
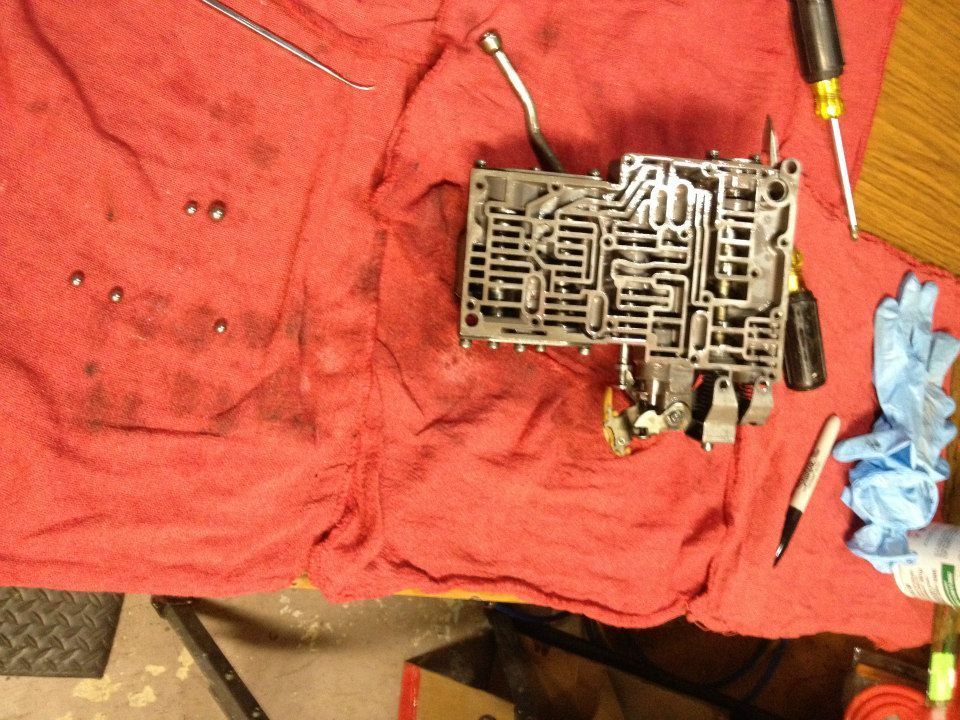
Here I wrap up the planetary, reassemble the drive line in the case along with the servos, then head on to the Valve Body. BTW I picked up an unmolested OEM 69 valve body (also from Pat Blais) which I'll use to install the Transgo kit.
Servos.. this is when I started using parts from the Transgo tf2 kit. The front servo goes in as it came out complete with 2 springs, piston, rod and retainer, except it has been cleaned, inspected and has new rings.
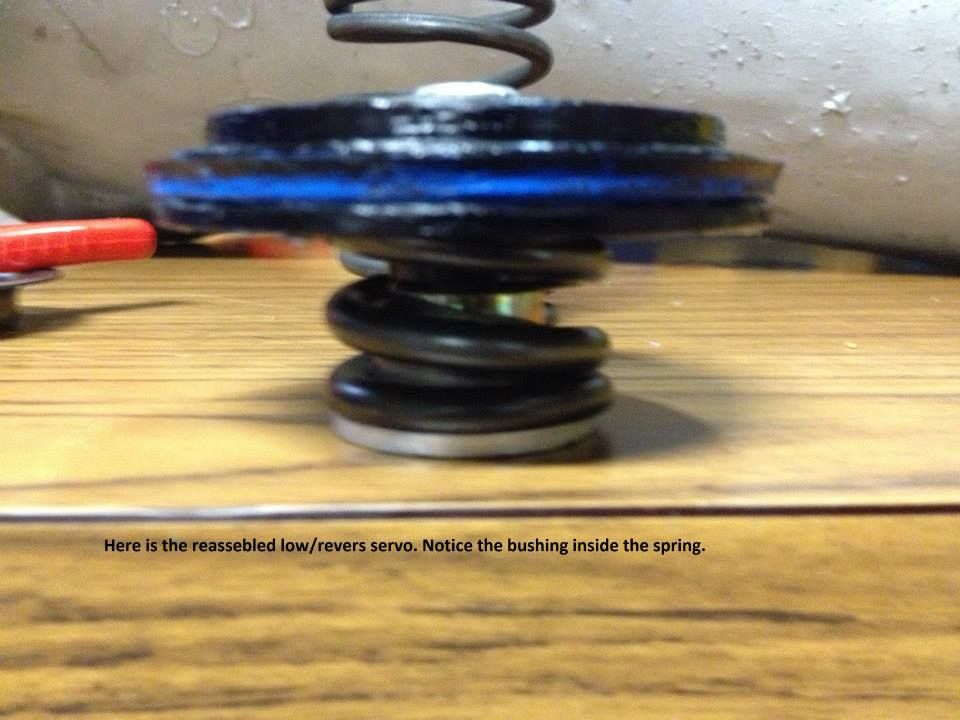
Rear Lo/rev servo is update with transgo pieces.

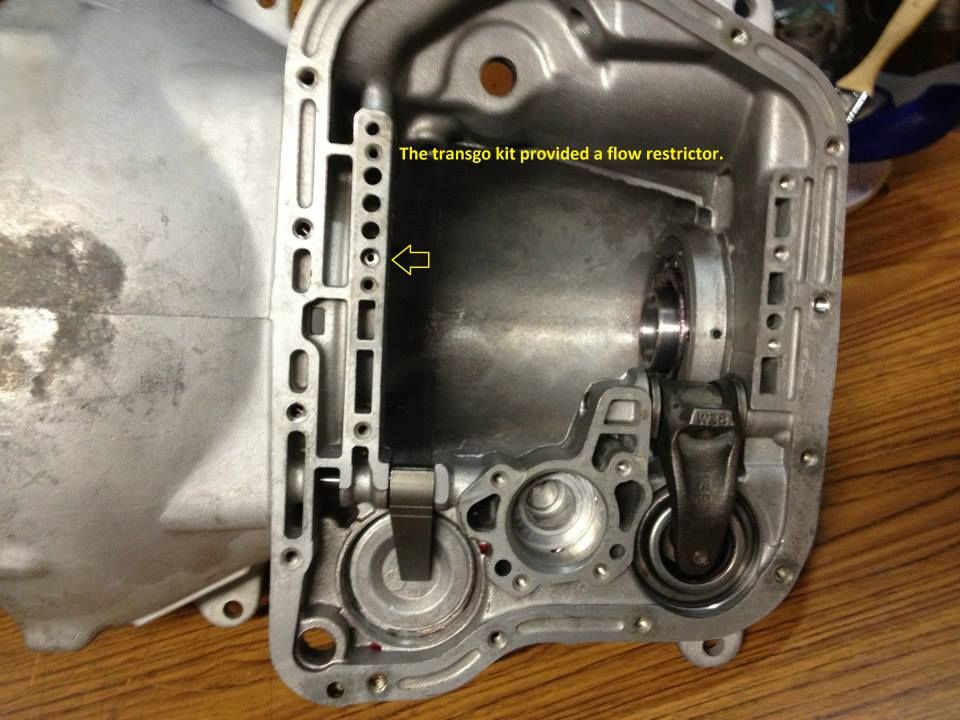
Transgo restriction plug installed
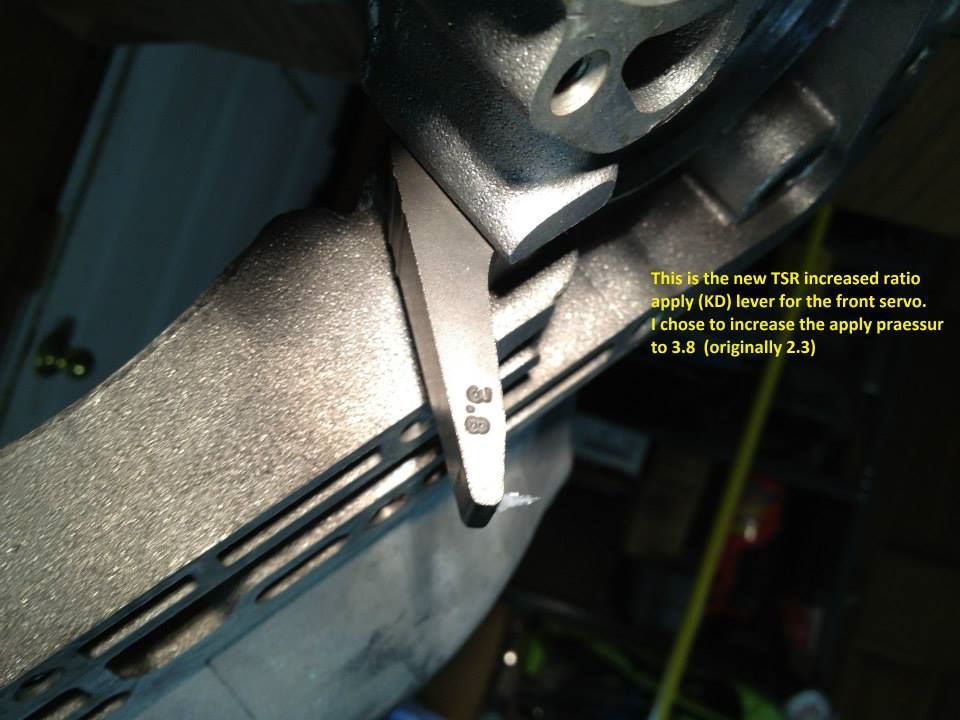
New front band apply lever
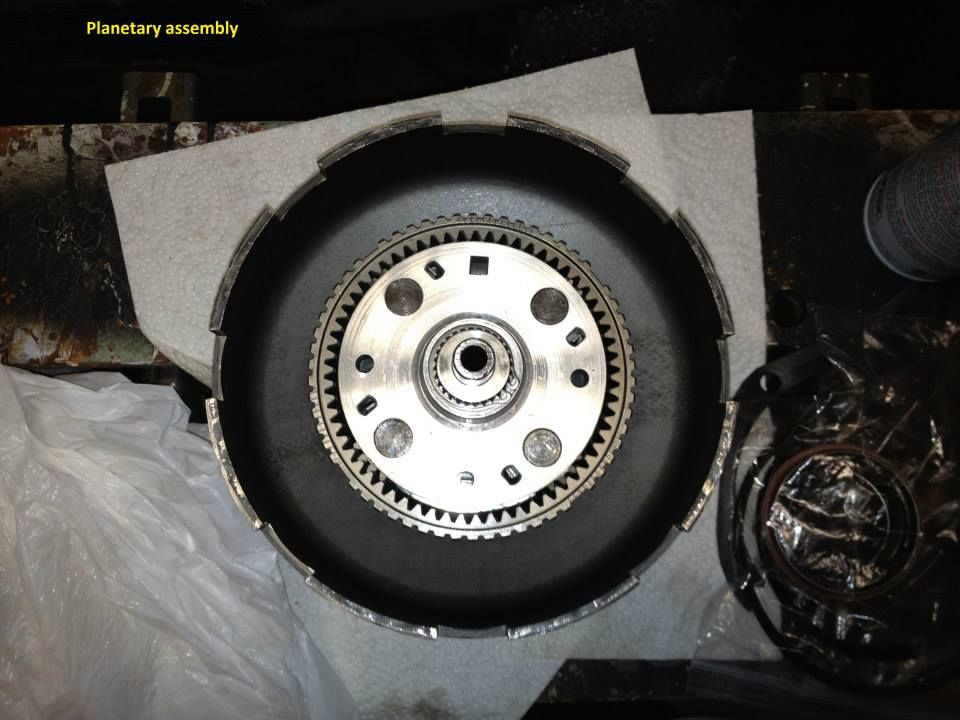
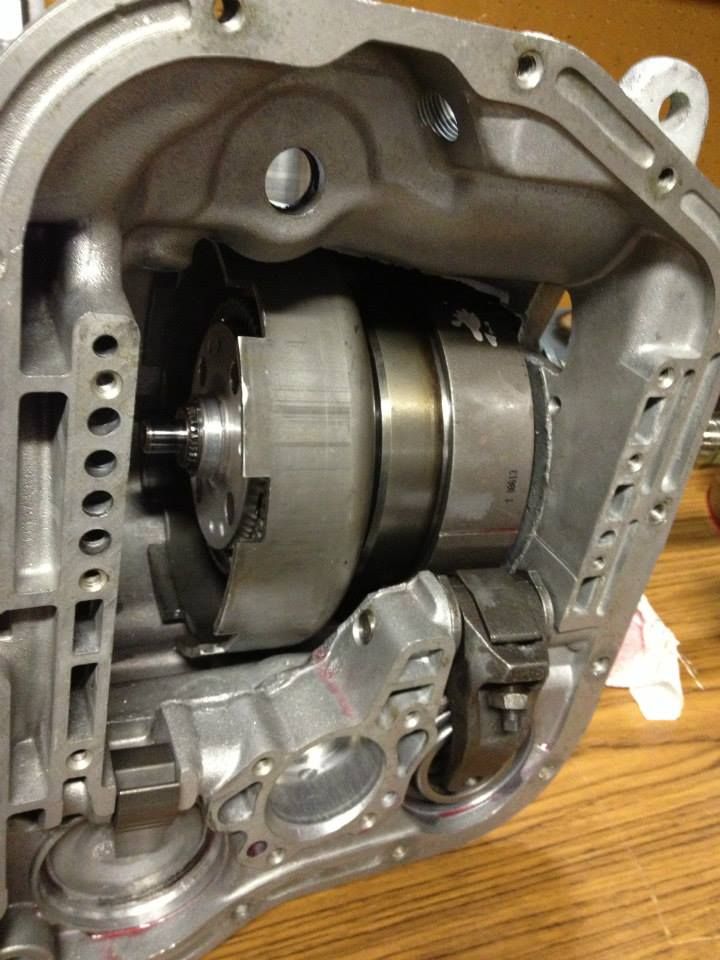
Planet is set up and ready to go in...
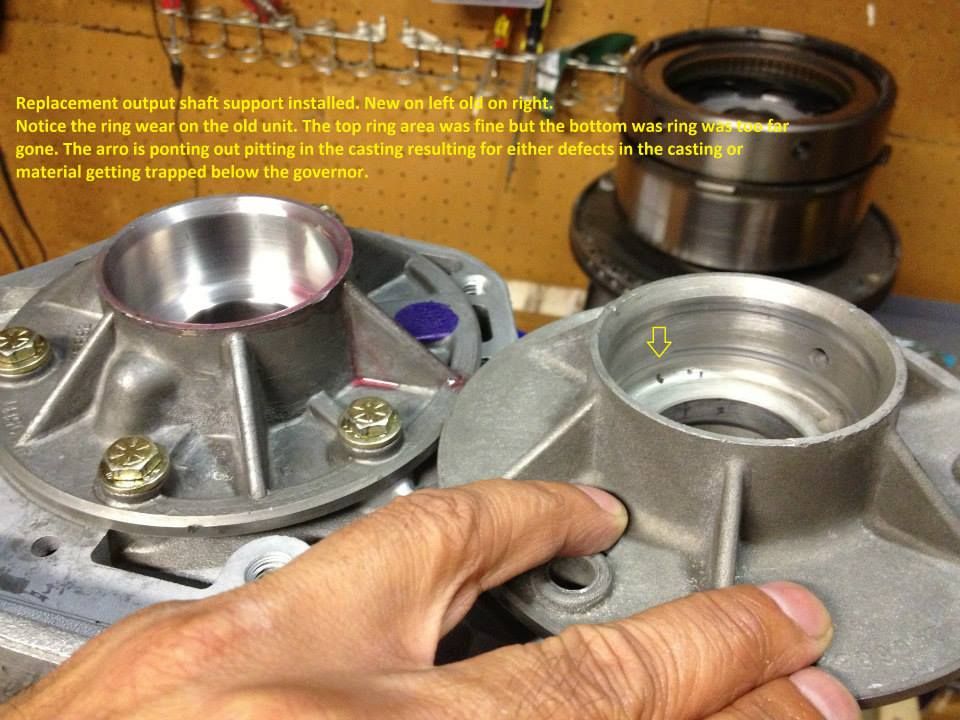
The output shaft support was pretty well worn in by the lower ring seal of the governor so I ordered a new one from Whatever It Takes Transmission [WIT] (https://www.wittrans.com) It's not a big deal if you are setting up for full manual but since I am returning to auto and I have it apart why not replace it.
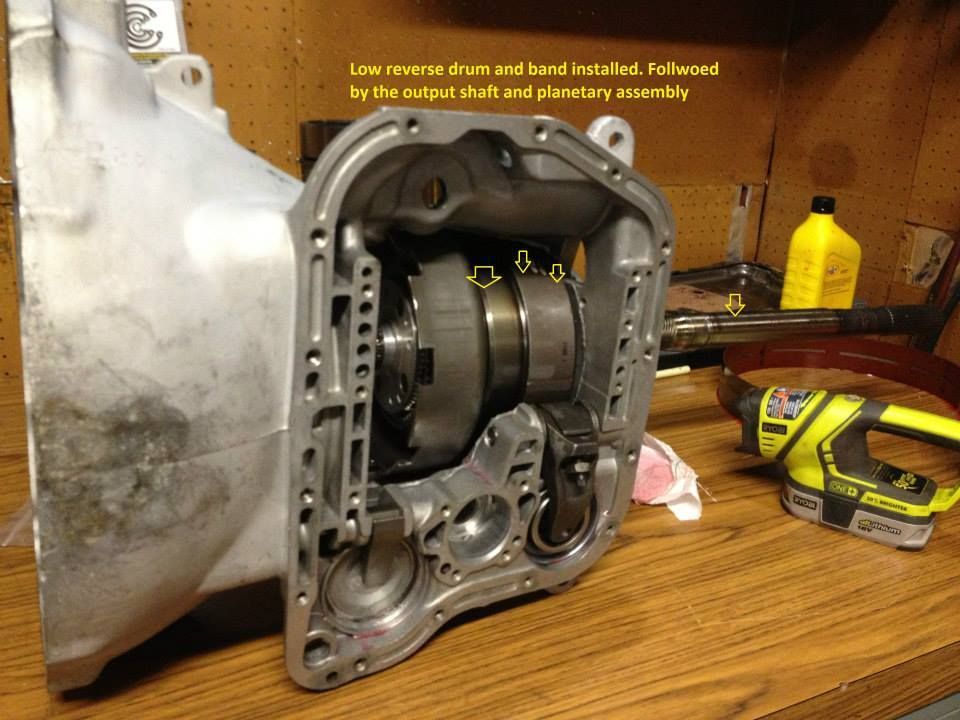
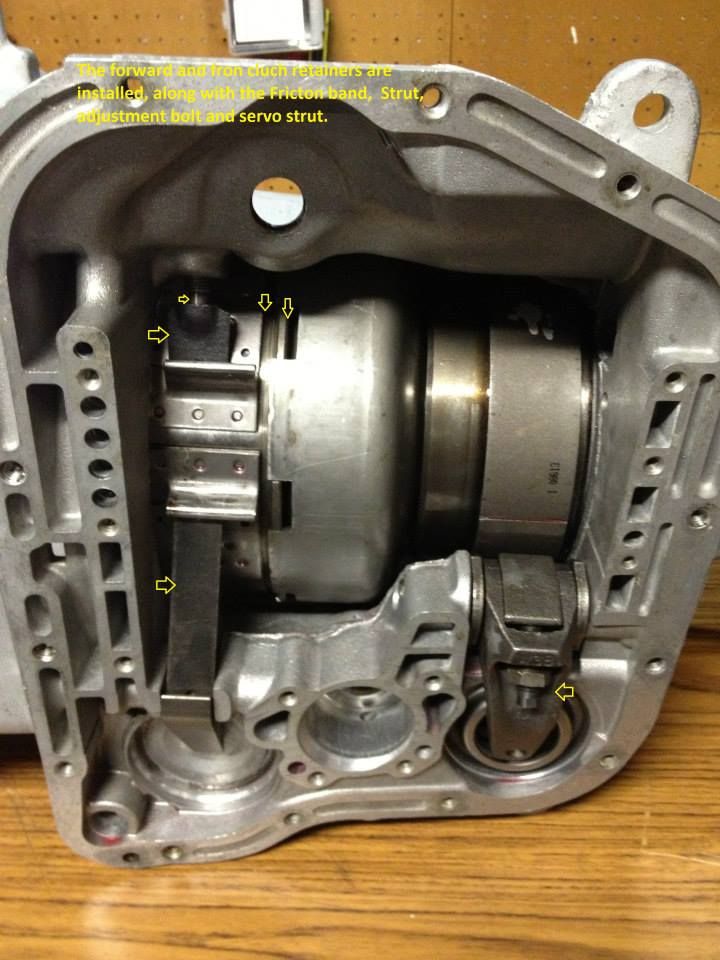
Low/Rev drum, band and planet installed in the case.
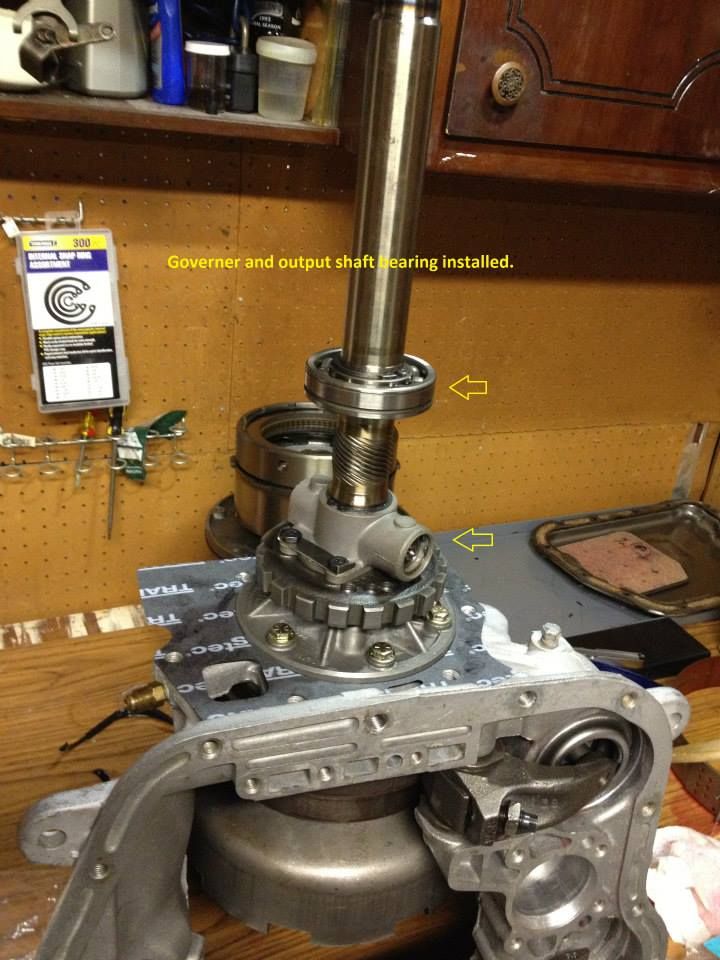
Next the Governor and bearing
Next the input shaft assembly (front and rear clutch packs)
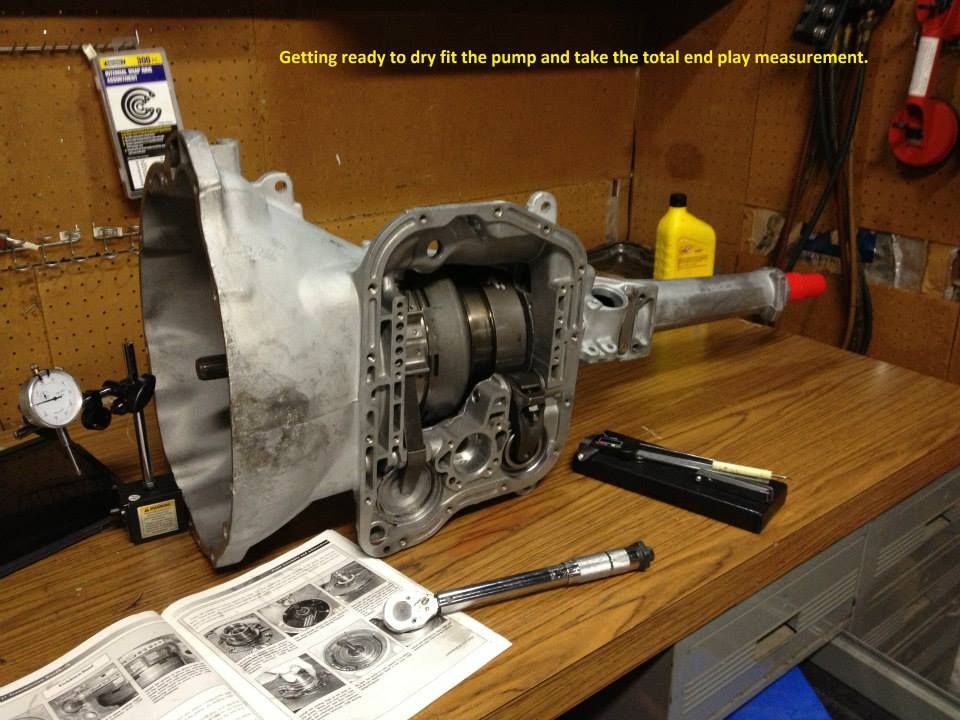
Time to dry fit the pump and take total end play measurements
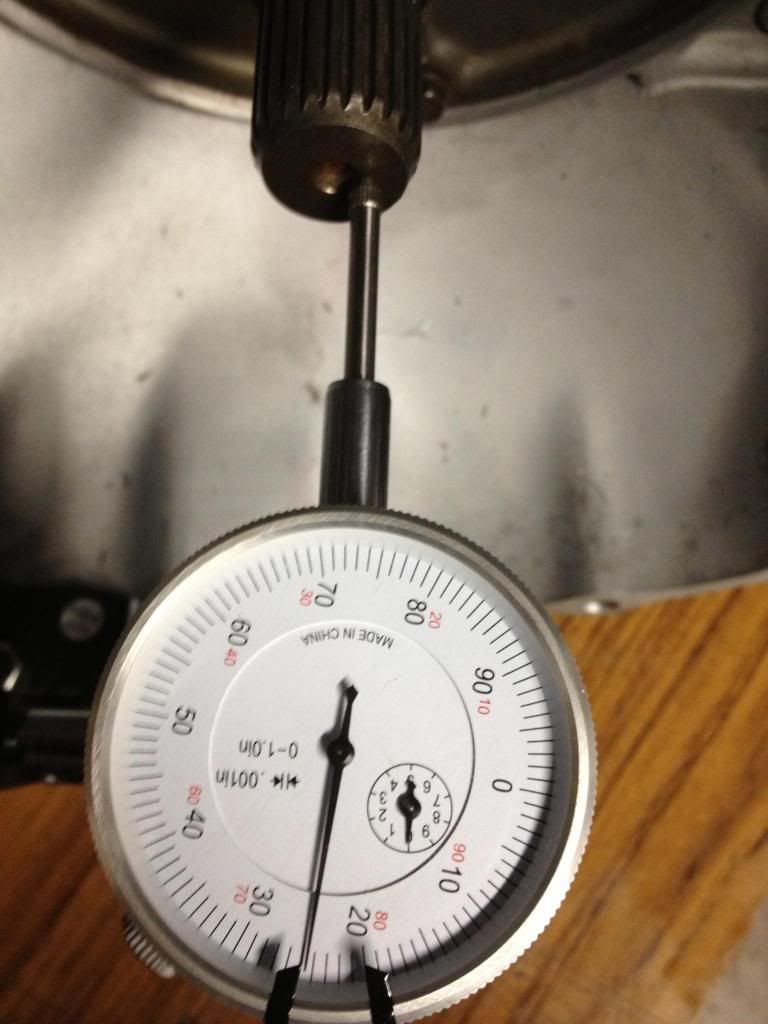
I'm stoked with this measurement
with a good read on the dial I put pump in with the new seals along with the tail housing then made the adjustments to both bands.
Next stop... valve body.
I hope to have a nice street setup when I'm done and I'm praying it all works and I didn't do something stupid! LOL
Here's a recap of the details of my final build:
My trans is set to the following spec:
1. Rear clutch pack clearance is .040
2. Front clutch clearance is .045
3. Planetary play is .025
4. Total end play clearance is .024
5. Front clutch pack increased from the 6 springs to 12
6. Front (KD) servo using both spring 45# inner/45#outer ( I have a 20# inner in inventory that can be switched in later)
7. L/R servo has the Transgo Spring and bush
8. Transgo restriction cup installed
9. Rear band adjusted to 3/8" of travel
10. Front band adjusted with small wrench to Snug then backed out 2.5 turns
Transgo TF2 setup.
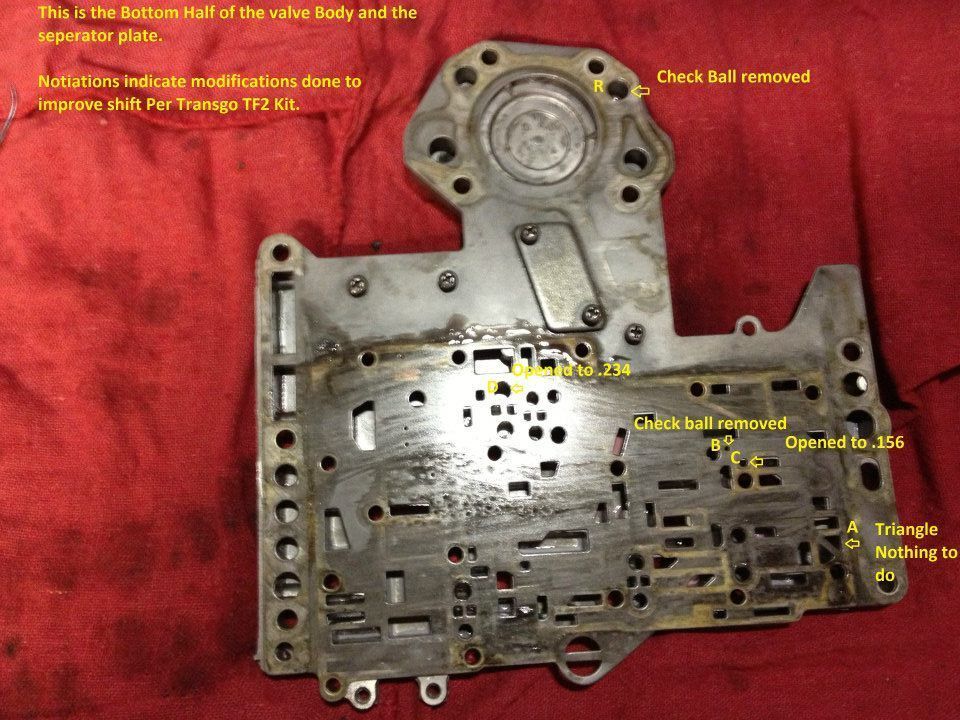
Part 1:
A. Triangle did not drill
B. 1-2 shift did not drill (ball left out)
C. 2-3 shift drilled to .156 or 5/32
D. drilled to .234 0r 15/64
Part 2:
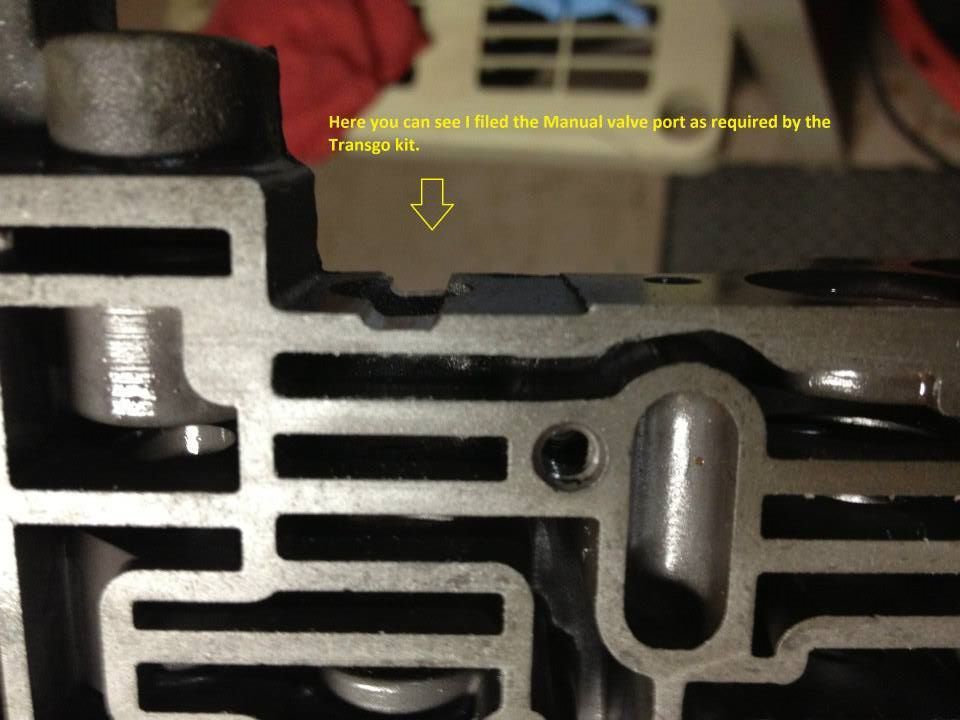
1. Re designed Manual Valve installed
2. Filed Notch halfway through manual bore
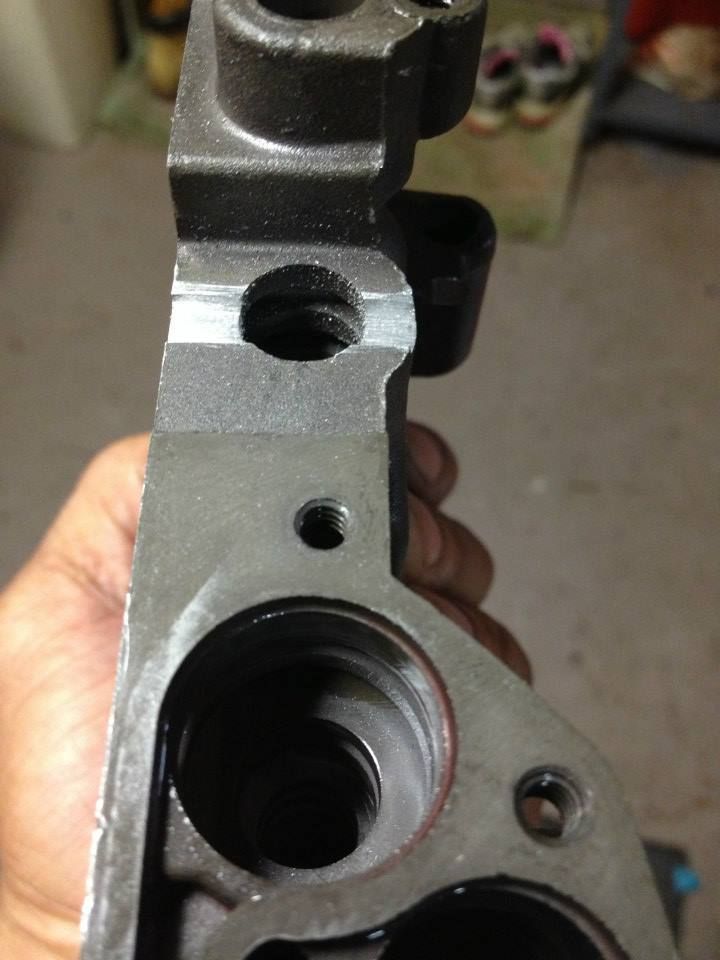
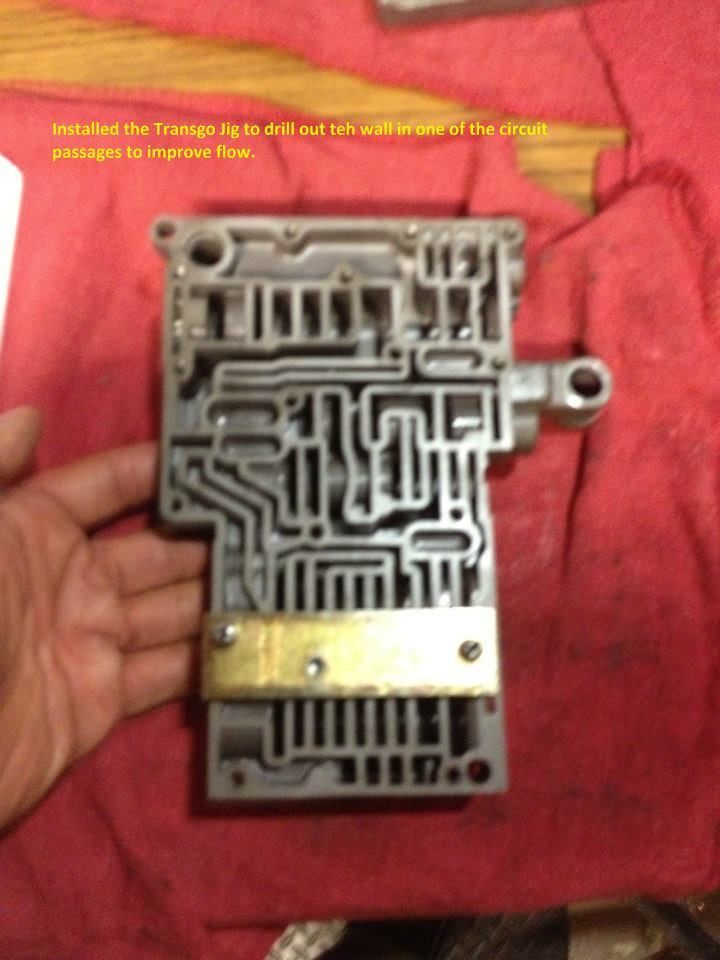
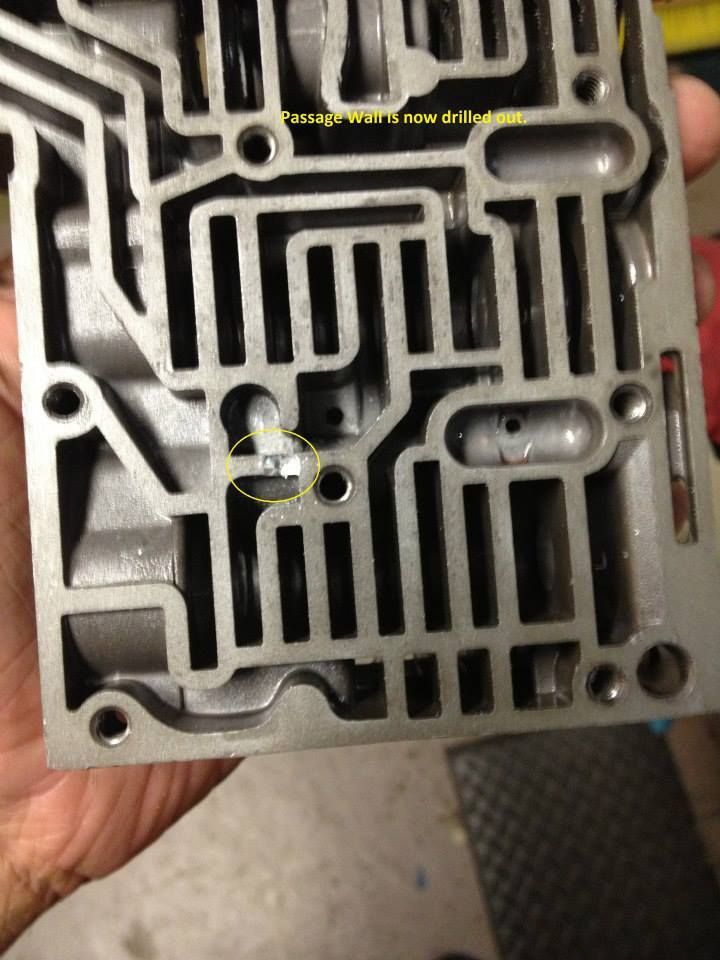
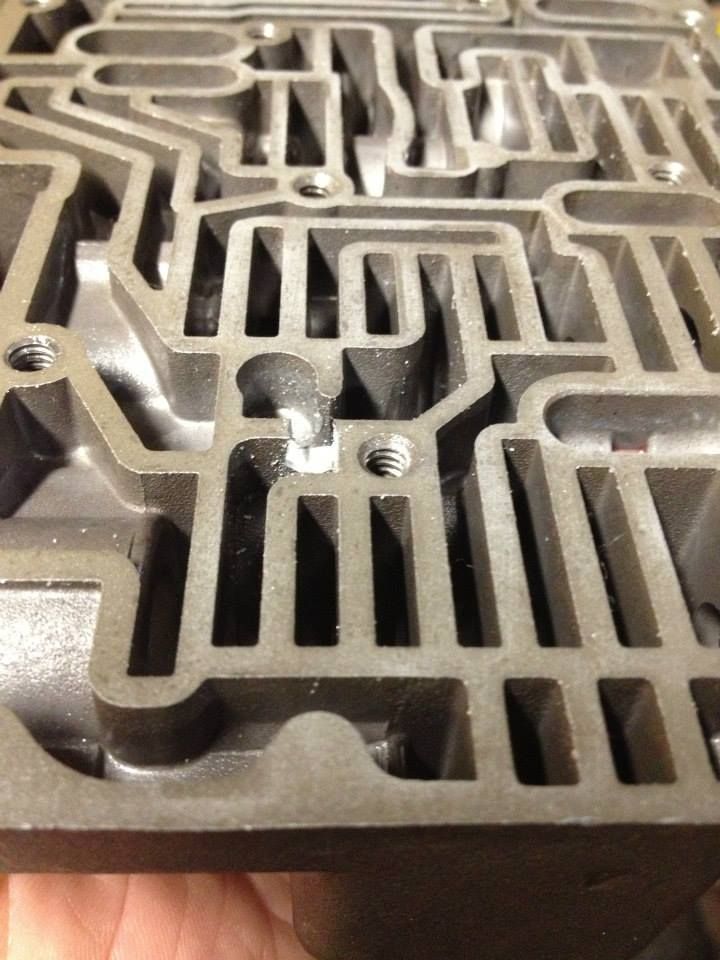
3. Drilled passage wall to increase fluid flow
4. Grind TV stem to .281 or 9/32 added yellow spring
5. Installed new shim and spring seat on PR valve, also added the new inner and outer Orange spring.
6. set PR adjustment flush against the inside edge of the spring retainer.
7. Installed new L/R Spring
8. Installed 2-3 restrictor cup
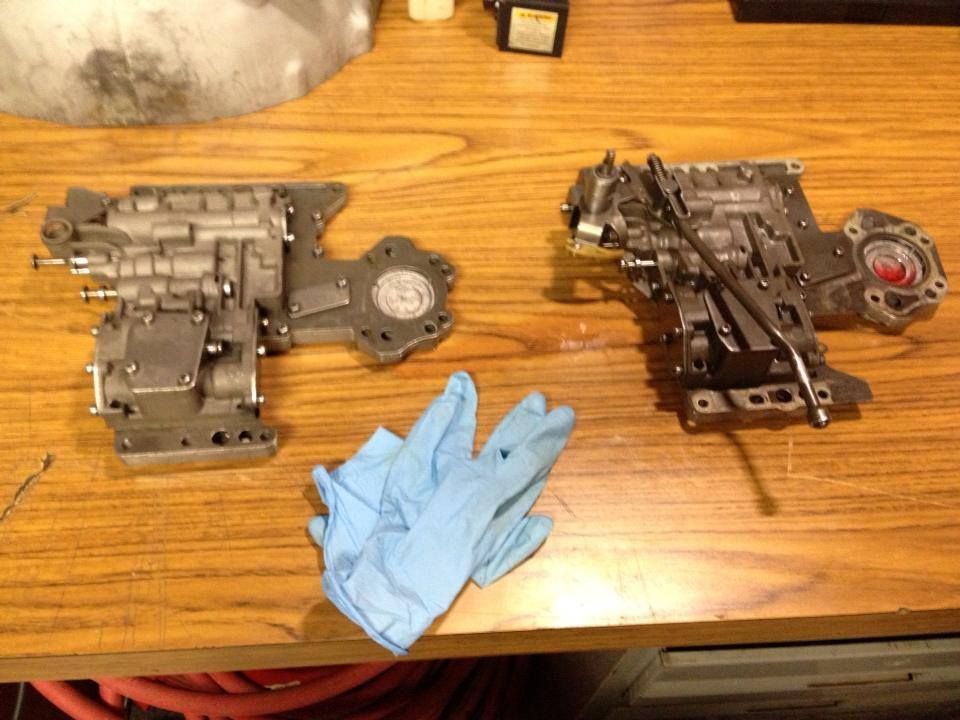
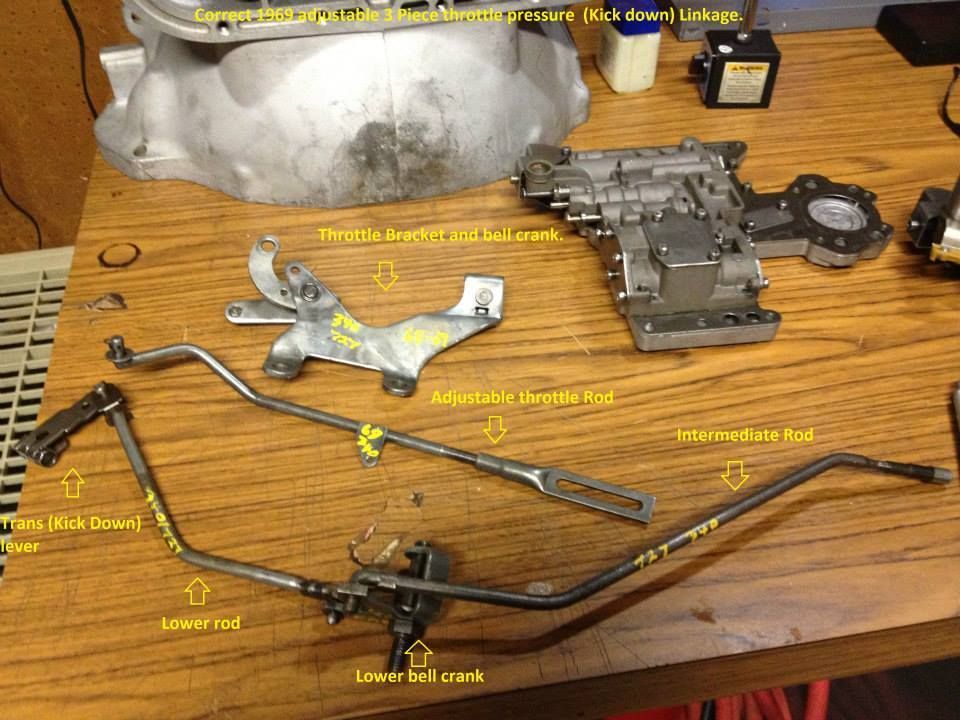
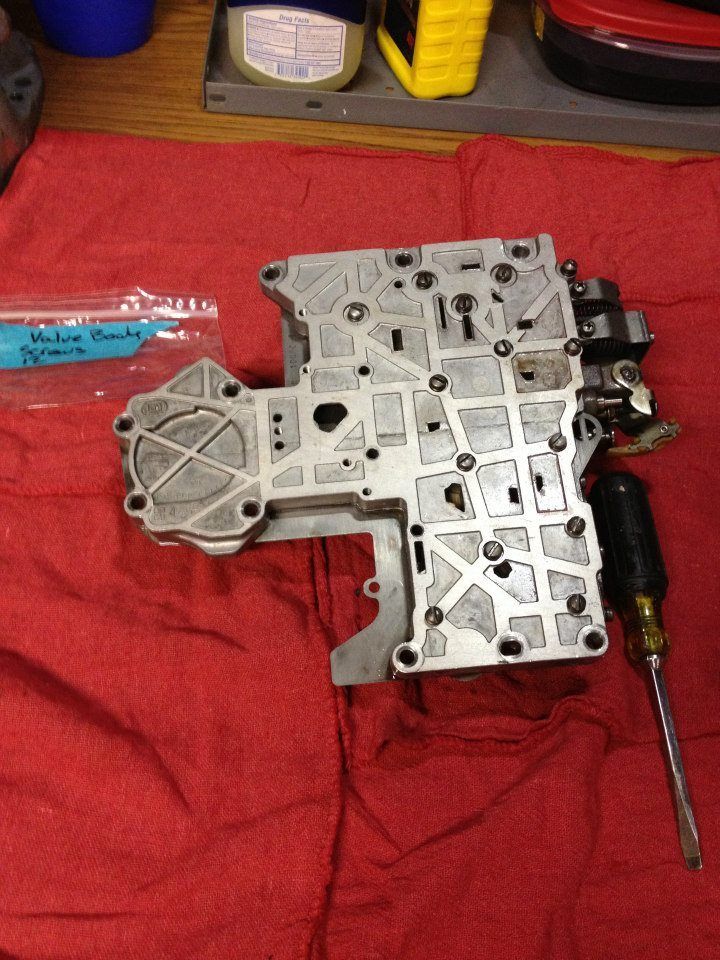
I picked up a spare Stock 69 Valve Body cleaned and ready to restore back to OEM spec.
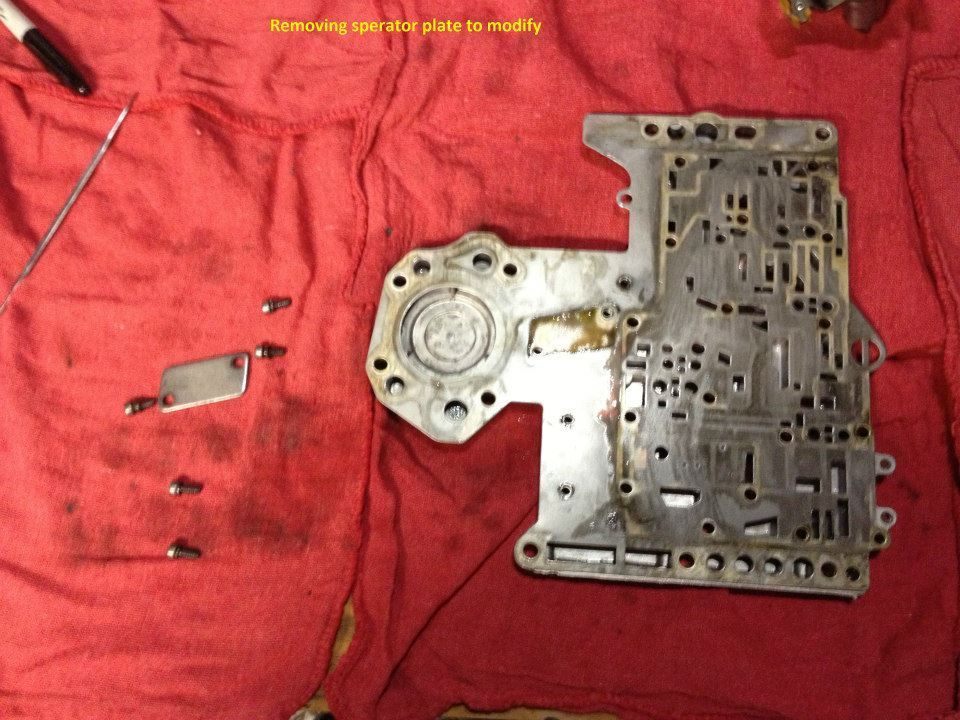
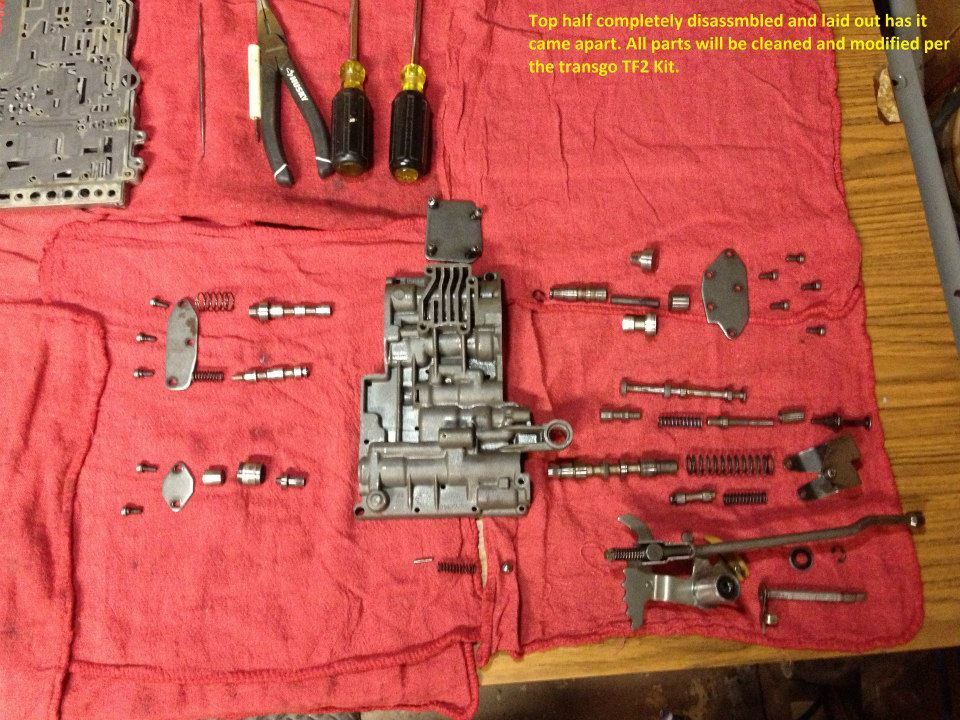
Split the Valve Body
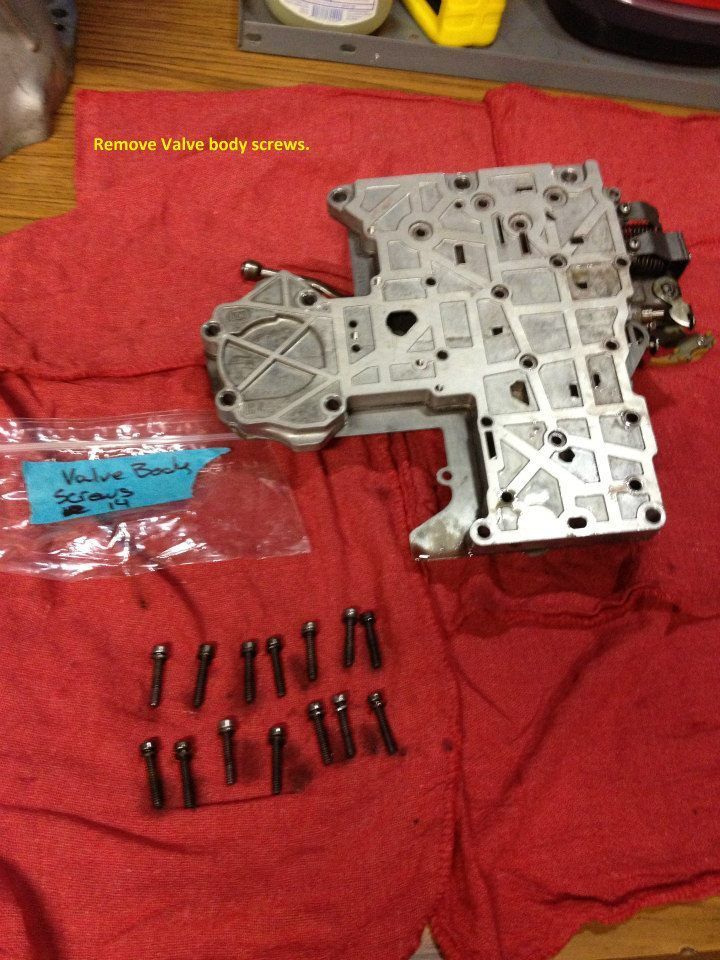
Remove separator plate and Drill.
The valve body sandwich
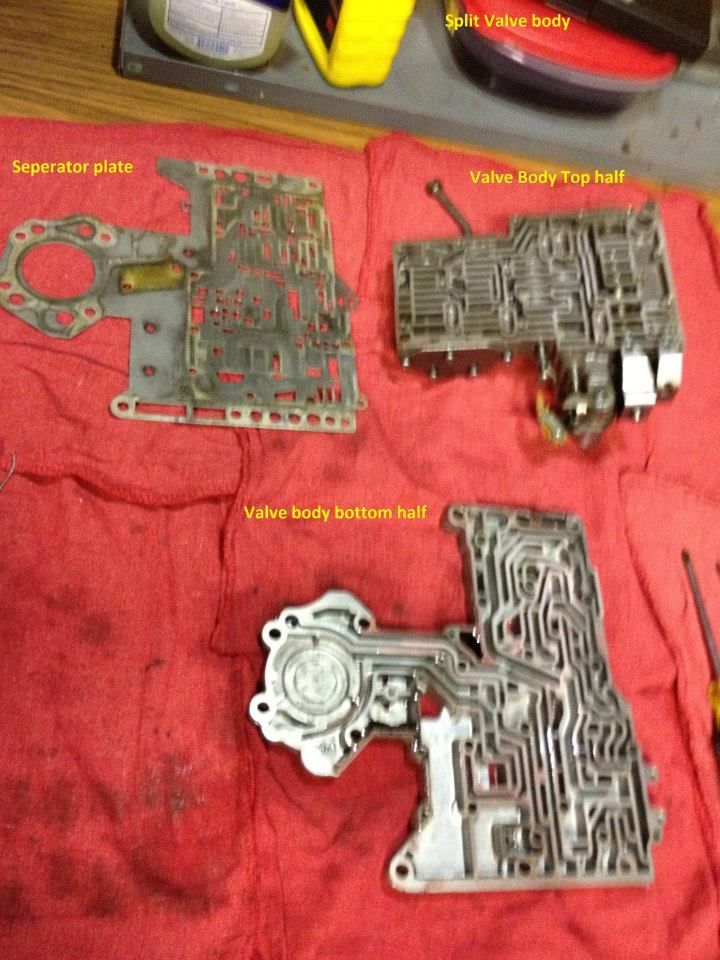
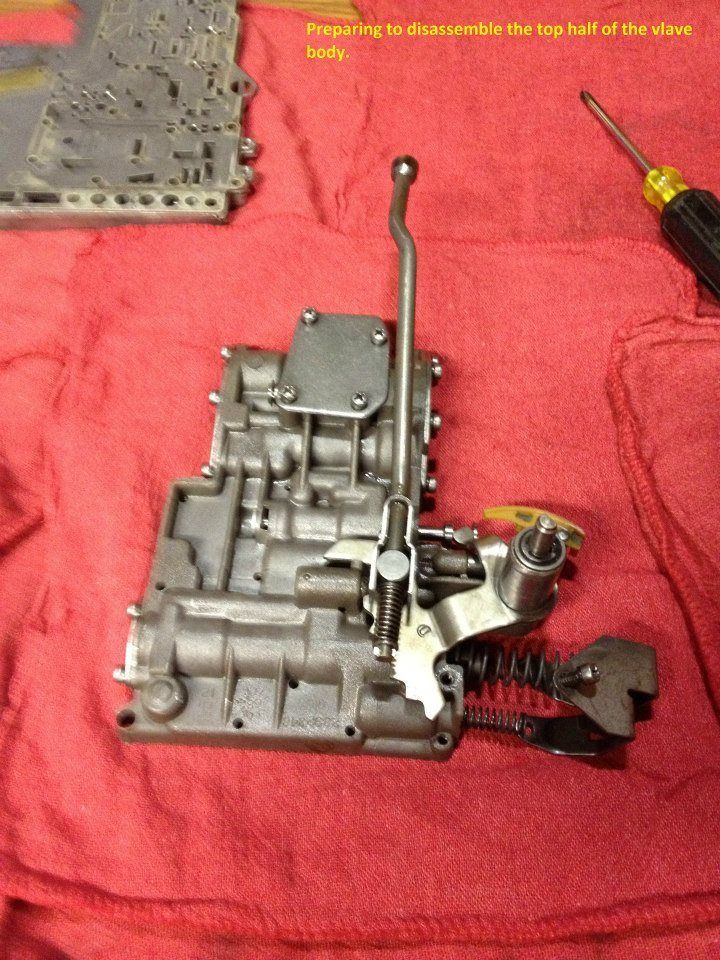
Working on the Top half
Before Transgo Mods
After Transgo Mods
Updated Manual valve, springs and TV grind.
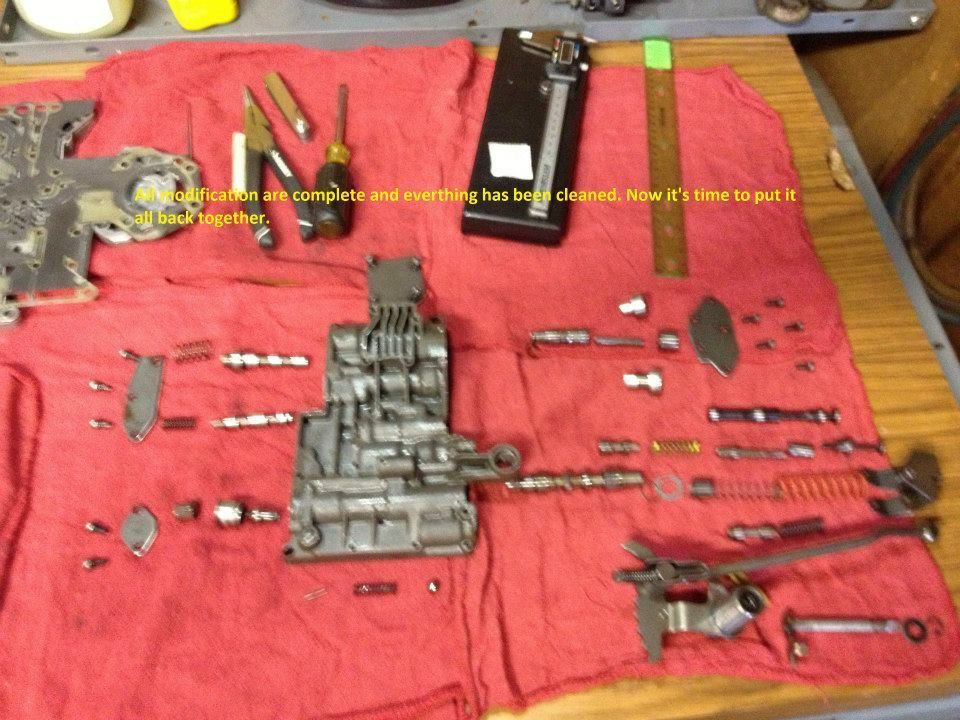
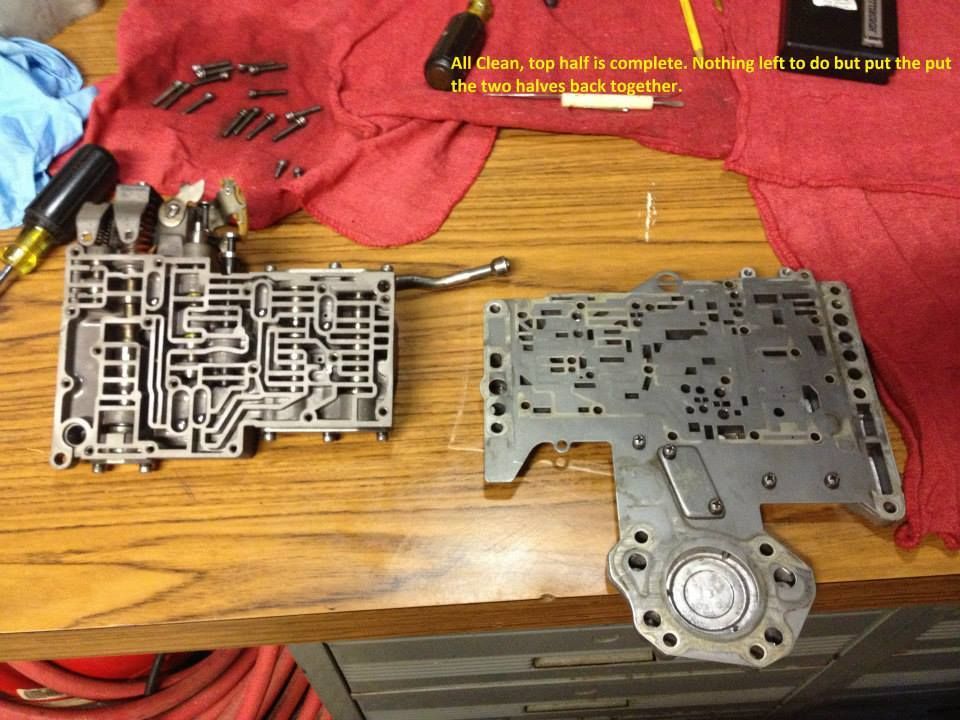
Now I’m ready to button it up after that last hit with the Parts cleaner and compressed air.
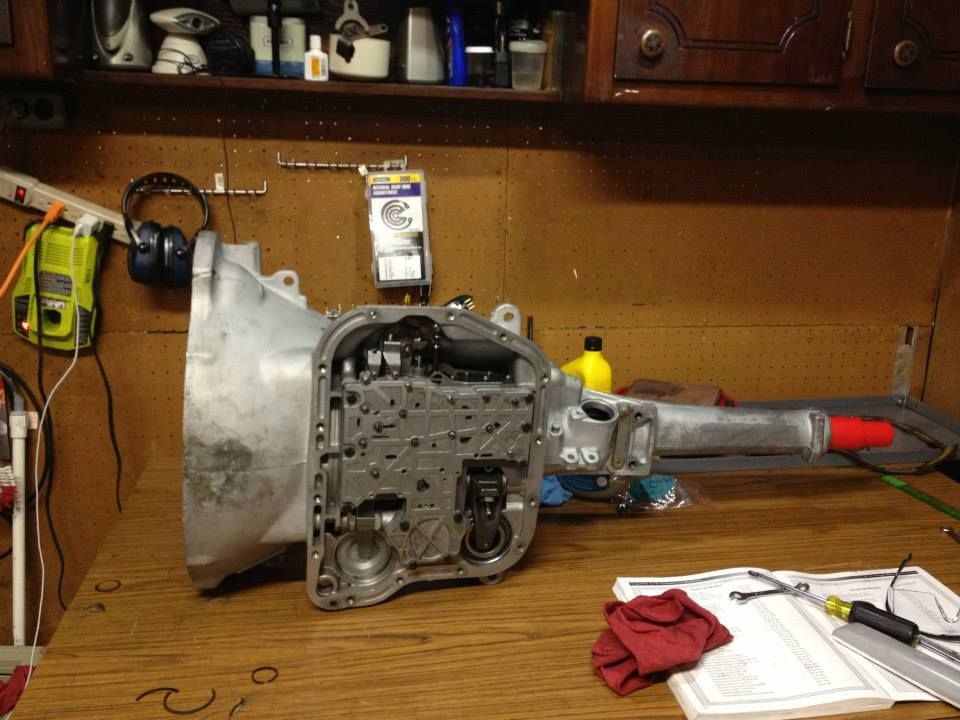
All done and tucked away
All buttoned up and ready to go on the shelf. Problem is I'm all out of space in my little one car garage. lol
First A727 rebuild is in the books!
Whew! this is addictive for sure. :D
It's time to make some room in the garage to pull the engine out.
This was about the time I needed to shift gears a little bit and decided to take a stab at rebuilding the original A727. With the help of the awesome folks here on FABO I did Just that. Here is the link to the thread I started in the transmission and drive train tech section.
A727 Rebuild kits redux - Rebuild kits everywhere (62-70 vs 71+)
http://www.forabodiesonly.com/mopar/showthread.php?t=245164
I've decided to pull the rebuild portion into this thread... starting now... lol
Some points before I begin.
* The Video and handbook are valuable resources (a must have for any beginner).
* FABO members are very knowledgeable and have provided very solid advice
Once I had a handle on the parts, I sourced them from different vendors take a look at post 15 for the parts list:
Northern auto parts (http://www.northernautoparts.com) for the Deluxe rebuild kit by Transtar. When the Kit arrived I noticed the package read for 71 and up. I called the good folks at Northern and they said I was good to go with the 71 and up kit. I expressed my apprehension and they said that they would check on my concern and get back to me. While I was waiting for Northern to call back with an update I pulled up the Transtar website and when through the catalog. While on the website I found the number for their location in Edison NJ which is just 10 minutes from my work. I made a call to the Edison location and spoke with a nice guy there who explained that Transtar does not produce the 62-70 kit any longer and he suggested that I purchase the supplemental Kit containing the 62-up things I'll need. About 10 minutes after I wrapped up with Transtar Northern called back and said the same thing, they explained that is why the site indicate I need to purches the "K22950E-4" sub kit. All was good. So if you buy that kit keep in mind that you'll need to purchase the sub kit to if you are working on a 62-70 transmission.
TSR (https://www.tsr-racing.com) for basically everything else except the shift Kit.
Summit Racing (http://www.summitracing.com/) for the Transgo TF2 Shift Kit
I removed the tail shaft housing and noticed it looked good.
IT wasn't until I pulled the oil pan that I saw the pepto bismal... I don't know how long this trans sat out of the car but it looked like someone did a lot of work then let it sit.
Taking the assemblies out of the case went smooth (slide hammers are key).
This is when it started to get interesting and more expensive. As I disassembled the trans I noticed that there seemed to be a lot of new parts as if it was overhauled run for a short while then pulled and set aside. As I removed the Valve body the first thing I noticed was that the Accumulator spring was missing and the piston was free to slam up and down in the port. I also noticed that the Apply (Kick down) servo was not complete either. So Now it hits me that this trans was prep'ed for full manual Race application and I need to bring it back to Street Auto. I can't wait to look at the valve body but I think I know what to expect.
The Apply servo is missing the Piston and the outer spring (I picked up a new setup from (Pat Blais)
The Low/revers servo was left absolutely stock.
I removed the Overrun Bearing (Sprag) to replace it with a bolt in unit.
Disassembled the front clutch and notice that the frictions and steels looked barley used. Many folks have told me to replace them anyway since they've been sitting in water and well let's face it I didn't tear this down for nothing. This clutch was set up with the 340 spec 6 springs. I'll be upgrading to 12.
Moved on to the forward clutch and yess the material there looked the same as the front did and the bands for that matter. "shakes head"
I drilled a 1/8 hole through the case on the oil return port as described in Munroe's handbook to provide additional lubrication to the bolt in overrun sprag.
With the lubrication hole drilled and the metal shavings cleaned out I installed the bolt in overrun unit. I used the bolts to line it up and start it into the boss then finishing with a press. (A press isn't required but it sure makes it easier)
With the Overrun installed I reassembled (with all the new stuff) the pump, front clutch, forward clutch then did a Test
[ame]http://vid953.photobucket.com/albums/ae16/alv1970/2013-09-03112844_zps7a9702e8.mp4[/ame]
Here I wrap up the planetary, reassemble the drive line in the case along with the servos, then head on to the Valve Body. BTW I picked up an unmolested OEM 69 valve body (also from Pat Blais) which I'll use to install the Transgo kit.
Servos.. this is when I started using parts from the Transgo tf2 kit. The front servo goes in as it came out complete with 2 springs, piston, rod and retainer, except it has been cleaned, inspected and has new rings.
Rear Lo/rev servo is update with transgo pieces.
Transgo restriction plug installed
New front band apply lever
Planet is set up and ready to go in...
The output shaft support was pretty well worn in by the lower ring seal of the governor so I ordered a new one from Whatever It Takes Transmission [WIT] (https://www.wittrans.com) It's not a big deal if you are setting up for full manual but since I am returning to auto and I have it apart why not replace it.
Low/Rev drum, band and planet installed in the case.
Next the Governor and bearing
Next the input shaft assembly (front and rear clutch packs)
Time to dry fit the pump and take total end play measurements
I'm stoked with this measurement
with a good read on the dial I put pump in with the new seals along with the tail housing then made the adjustments to both bands.
Next stop... valve body.
I hope to have a nice street setup when I'm done and I'm praying it all works and I didn't do something stupid! LOL
Here's a recap of the details of my final build:
My trans is set to the following spec:
1. Rear clutch pack clearance is .040
2. Front clutch clearance is .045
3. Planetary play is .025
4. Total end play clearance is .024
5. Front clutch pack increased from the 6 springs to 12
6. Front (KD) servo using both spring 45# inner/45#outer ( I have a 20# inner in inventory that can be switched in later)
7. L/R servo has the Transgo Spring and bush
8. Transgo restriction cup installed
9. Rear band adjusted to 3/8" of travel
10. Front band adjusted with small wrench to Snug then backed out 2.5 turns
Transgo TF2 setup.
Part 1:
A. Triangle did not drill
B. 1-2 shift did not drill (ball left out)
C. 2-3 shift drilled to .156 or 5/32
D. drilled to .234 0r 15/64
Part 2:
1. Re designed Manual Valve installed
2. Filed Notch halfway through manual bore
3. Drilled passage wall to increase fluid flow
4. Grind TV stem to .281 or 9/32 added yellow spring
5. Installed new shim and spring seat on PR valve, also added the new inner and outer Orange spring.
6. set PR adjustment flush against the inside edge of the spring retainer.
7. Installed new L/R Spring
8. Installed 2-3 restrictor cup
I picked up a spare Stock 69 Valve Body cleaned and ready to restore back to OEM spec.
Split the Valve Body
Remove separator plate and Drill.
The valve body sandwich
Working on the Top half
Before Transgo Mods
After Transgo Mods
Updated Manual valve, springs and TV grind.
Now I’m ready to button it up after that last hit with the Parts cleaner and compressed air.
All done and tucked away
All buttoned up and ready to go on the shelf. Problem is I'm all out of space in my little one car garage. lol
First A727 rebuild is in the books!
Whew! this is addictive for sure. :D
It's time to make some room in the garage to pull the engine out.