The Great Pumpkin - '71 Duster
So the interior in the Duster is pretty much done. I really can't think of anything else there is to do. Carpet is all in and trimmed, both front seats are installed, steering components, dash, lights, gauges, glove box, dome lens etc. all done. Check!
I also accomplished a big step in repairing my heater delete fresh air vent. I removed the heater box a while back to save weight and de-clutter the car. When you do that, you're either going to need to put it back in or find some way to cover up the vent hole under the cowl. Right-side heater delete fresh air vents are basically impossible to find but I actually have two of 'em. One of them however, is different than the version most would recognize from an early-A/Hemi Dart application.
In any event, both vents had broken parts, the 'real deal' being the worse of the two. The original hinge was rusted and broke off at the ends, taking part of the vent door lip with it. The other vent is cable operated like a B-body but was missing the bracket for the cable.
The one I ended up using I actually got from Australia (thanks Gary/Aussieplymouths!) and fits an early '70's Valiant/Pacer/Ute. It is in fact their driver side vent since their steering wheel is on the 'wrong' side. It mounts the same though and the sheet metal opening on the underside of the cowl is also the same. It's ABS-type plastic as opposed to the fiberglass compound material of the early-A style. It's cable operated, is a one-piece body and is lighter. I thought about making a bracket for the cable to use it like that but I would have had to figure out where to put the cable. I abandoned that in favor of making a new door.
I had some 22 gauge sheet metal laying in my scrap pile. I had no plan to make a door for it initially but I figured I'd just see what I could come up with. I traced the original door I had and cut out the rough shape. I used a hammer and dolly to form the metal. I started working on it and a few hours later I had a door. I even replicated the little lip of the original to seal it against the lip of the vent box. Came out OK.
The hinges on these things are what always seem to cause problems - they rust/seize and eventually break. The hinge is basically just a rivet put through two protruding pieces of sheet metal and joined together. Not the strongest design but probably the cheapest.
So seeing as the hinges were shot and/or broken off, I had to figure out how to make this thing work like an actual door. I spent some time at the hardware store trying to figure out which hinge would work best. I ended up with a 'semi-overlay' type. The hinge kinda sticks out and does not interfere with the door when opening. This involved the least amount of alteration to the vent box as well, only had to make two additional small holes to mount the hinge. It's a little too big for my tatse and looks kind of out of place but it works. Plus, it's much sturdier than the original pivot hinge.
While looking at the hinges, I found a tension spring closure latch that looked like it would work to keep the door shut. It's basically like a mailbox latch. Works great - you can flip it open with your finger but it holds tight when closed.
Also dealt with the some details of the trunk area. I had a really nice trunk board left over from another project that I used. I had to modify it a little due to the location of the battery in the trunk and the wiring that goes through the floor. I cut out a corner of it so it wasn't interfering with the wiring. I was also lucky to find a hold down stud/cup/wing nut assembly on Ebay for cheap to complete the job.
I had ordered a trunk mat from a supplier a few weeks back but it wasn't what I was expecting. The material and pattern were completely different than what I took out of the car. I had unknowingly chosen an alternative to the OE rubber/gray plaid and it did not look right. Legendary sells rolls of original material that you cut to size. I may go with that so I don't have too mess with customizing a repro one to fit around my battery box.
Here's some pics finally after a long while without.
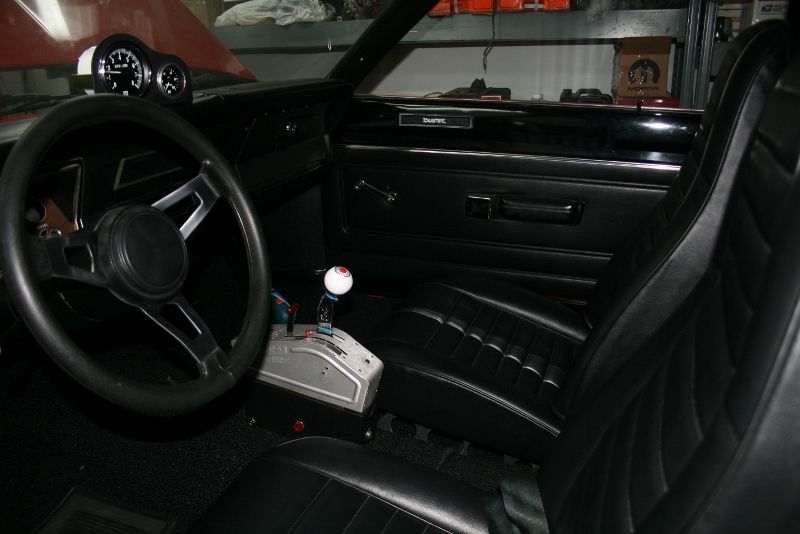
Here's the interior with both seats in.
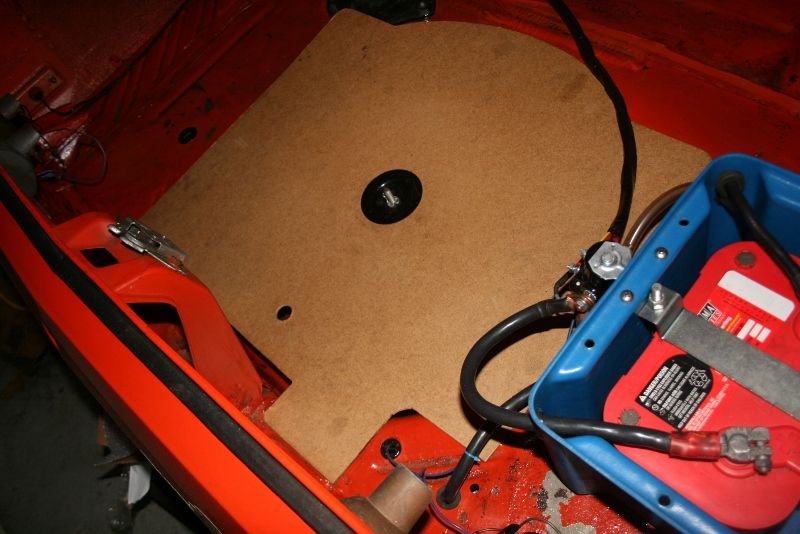
Here's the trunk with board. Note cutout in the lower right corner for the cut-off switch wiring. Trunk board hold down stud/cup/wing nut keeps it in place.
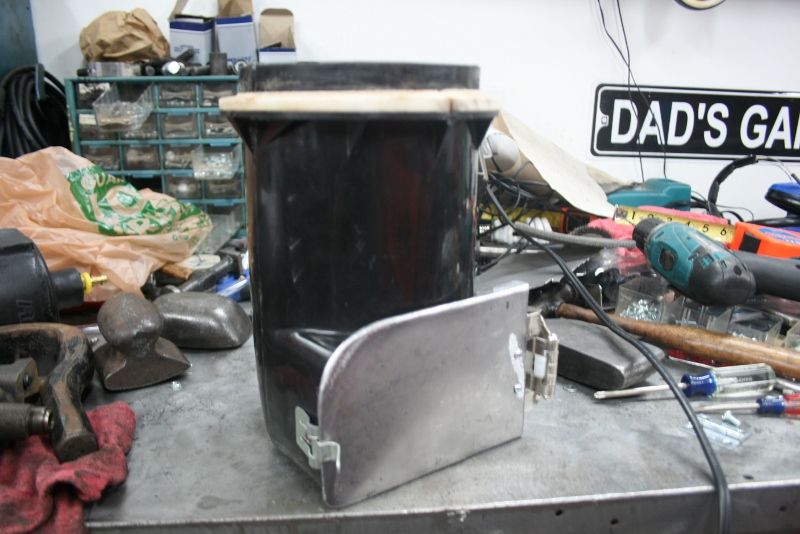
So here's the modified, right side vent box.
A shot of the original early-A style door for comparison. Note broken hinges top and bottom.
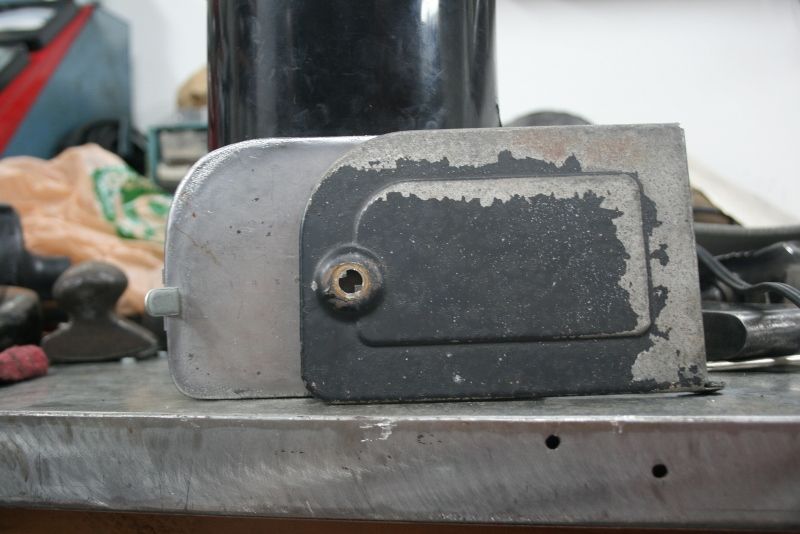
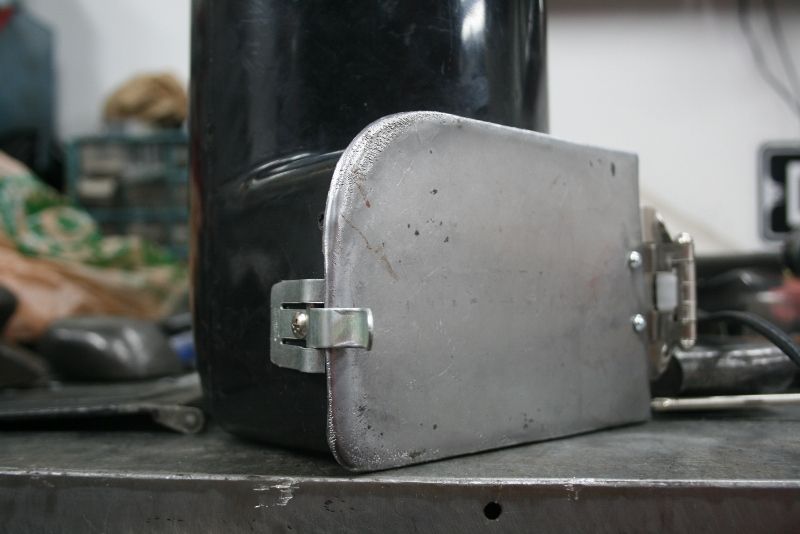
Two more shots of the door, hinge and latch. Its gonna get painted and have some better hardware but this is what's going in the car. I may try to work on the other box at some point down the road but in the interest of moving forward, this will do for now.

Hope to have some time over the next few days to fire the car up. Got my oil pump priming tool and new plugs all set to go.
More to come!
So the interior in the Duster is pretty much done. I really can't think of anything else there is to do. Carpet is all in and trimmed, both front seats are installed, steering components, dash, lights, gauges, glove box, dome lens etc. all done. Check!
I also accomplished a big step in repairing my heater delete fresh air vent. I removed the heater box a while back to save weight and de-clutter the car. When you do that, you're either going to need to put it back in or find some way to cover up the vent hole under the cowl. Right-side heater delete fresh air vents are basically impossible to find but I actually have two of 'em. One of them however, is different than the version most would recognize from an early-A/Hemi Dart application.
In any event, both vents had broken parts, the 'real deal' being the worse of the two. The original hinge was rusted and broke off at the ends, taking part of the vent door lip with it. The other vent is cable operated like a B-body but was missing the bracket for the cable.
The one I ended up using I actually got from Australia (thanks Gary/Aussieplymouths!) and fits an early '70's Valiant/Pacer/Ute. It is in fact their driver side vent since their steering wheel is on the 'wrong' side. It mounts the same though and the sheet metal opening on the underside of the cowl is also the same. It's ABS-type plastic as opposed to the fiberglass compound material of the early-A style. It's cable operated, is a one-piece body and is lighter. I thought about making a bracket for the cable to use it like that but I would have had to figure out where to put the cable. I abandoned that in favor of making a new door.
I had some 22 gauge sheet metal laying in my scrap pile. I had no plan to make a door for it initially but I figured I'd just see what I could come up with. I traced the original door I had and cut out the rough shape. I used a hammer and dolly to form the metal. I started working on it and a few hours later I had a door. I even replicated the little lip of the original to seal it against the lip of the vent box. Came out OK.
The hinges on these things are what always seem to cause problems - they rust/seize and eventually break. The hinge is basically just a rivet put through two protruding pieces of sheet metal and joined together. Not the strongest design but probably the cheapest.
So seeing as the hinges were shot and/or broken off, I had to figure out how to make this thing work like an actual door. I spent some time at the hardware store trying to figure out which hinge would work best. I ended up with a 'semi-overlay' type. The hinge kinda sticks out and does not interfere with the door when opening. This involved the least amount of alteration to the vent box as well, only had to make two additional small holes to mount the hinge. It's a little too big for my tatse and looks kind of out of place but it works. Plus, it's much sturdier than the original pivot hinge.
While looking at the hinges, I found a tension spring closure latch that looked like it would work to keep the door shut. It's basically like a mailbox latch. Works great - you can flip it open with your finger but it holds tight when closed.
Also dealt with the some details of the trunk area. I had a really nice trunk board left over from another project that I used. I had to modify it a little due to the location of the battery in the trunk and the wiring that goes through the floor. I cut out a corner of it so it wasn't interfering with the wiring. I was also lucky to find a hold down stud/cup/wing nut assembly on Ebay for cheap to complete the job.
I had ordered a trunk mat from a supplier a few weeks back but it wasn't what I was expecting. The material and pattern were completely different than what I took out of the car. I had unknowingly chosen an alternative to the OE rubber/gray plaid and it did not look right. Legendary sells rolls of original material that you cut to size. I may go with that so I don't have too mess with customizing a repro one to fit around my battery box.
Here's some pics finally after a long while without.
Here's the interior with both seats in.
Here's the trunk with board. Note cutout in the lower right corner for the cut-off switch wiring. Trunk board hold down stud/cup/wing nut keeps it in place.
So here's the modified, right side vent box.
A shot of the original early-A style door for comparison. Note broken hinges top and bottom.
Two more shots of the door, hinge and latch. Its gonna get painted and have some better hardware but this is what's going in the car. I may try to work on the other box at some point down the road but in the interest of moving forward, this will do for now.
Hope to have some time over the next few days to fire the car up. Got my oil pump priming tool and new plugs all set to go.
More to come!