Painting Without Removing Engine
That's an interesting approach. I like it.
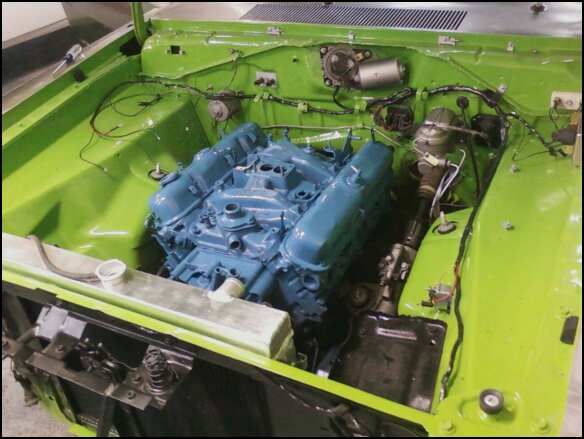
I did this engine compartment at the same time that I did the under side of the hood, after the front end was repaired, adjusted and seam sealed properly;

I like the oven cleaner idea. I pressure washed this one, used commet and a red scuff pad. Go slow when you sand, so you don't slice your hands. There are a lot off places to cut and snag the scotch brite.
I did hit the aprons and flatter areas with some 400 grit paper and used an acid etch primer where I was down to bare metal. It was originally F8 green, went to FJ6, so I used a light gray sealer to get even color coverage.
It was shot right there, in the driveway. I came back over the radiator support center with some flat black single stage rustoleum, thinned 50% with basecoat reducer. I've discovered that laquer thinner does work, but it takes way too long to cure and it mottles in the gun, when you try to clean it. It's better to use acetone or paint thinner, with rustoleum enamels. Nothing has topped using basecoat reducer with it and some japan dry, though, for the black.
Things I pulled out:
-Bulkhead connectors, including the main firewall one (pushed through, masked)
-Radiator
-Intake manifold
-Valve covers
-Distributor
-Ballast, Voltage Regulator, Ignition Module
-Wiper motor
-All 4 wiring harnesses, battery, cables, starter relay
-Battery, tray, brackets and horns
-Washer bottle, hoses, clips
-Master cylinder (brake lines pulled away from firewall and masked, along with clips that unscrewed)
-Throttle cable, masked the e brake line, pulled away as far as I could.
-Power steering gearbox and pump (this really helps get everything nice)
-Exhaust manifolds (this is also a key part to remove)
-Charcoal canister and line
-Galvanized headlamp buckets, headlamp bezels, grille, bumper filler and front bumper...
-Hood latch and support bracket (painted off the car)
-Hood bumpers, Adjuster stops, weatherstrip sections and of course, insulation and clips from the hood
I also masked the shocks (if I had to do it again, I'd just take them out) and masked the heater core tubes at the firewall and any insulation showing, as well as the steering column and mount plate hole at the firewall, inside, unbolted the plate and slipped paper in there. I also masked the K member at the joining areas. I wasn't concerned too much about it, though, I didn't want lots of overspray on it or the strut rods, so they got taped, too. That pic is showing the car partially unmasked. The fenders were masked, to keep junk from flying into the paint, car was bagged and the K member was masked, though. That's why they're not snot green as well.
This also gave me a good opportunity to restore one of the component sets at a time, before putting it all back in. Gave me a good opportunity to check wiring on a multimeter and fix everything nice, get rid of bad connectors, replace bad wires, etc, while re-wrapping them.
Harnesses are easy to clean up. If you hang them from a wire and tie off branch areas with a single piece of tape, it gives you the structure and allows you to still remove or add new wiring, before wrapping it again.
A good thing to do is to take a bright LED light with you to check color coverage in odd areas. It's easy to miss something with shadows cast all over the place. It also helps a ton to check clear/ gloss even coverage everywhere. I had a light with me, while I was painting, to grab and check everything, before moving to the next area and next stage.
I ended up redoing the engine (flattened cam, bad oil) anyway, but it's still plenty nice for a driver and is usually one of the cleaner cars at local cruises.
If I was going to make the car extremely show quality, the K member and everything else would come out and I'd clean the entire under side of the car up and redo the undercoat. I may end up doing the front end again and I have a spare K and components for that swap. I think I'll do that when I swap the stick in, but for now, I like the results. ~

That's an interesting approach. I like it.
I did this engine compartment at the same time that I did the under side of the hood, after the front end was repaired, adjusted and seam sealed properly;
I like the oven cleaner idea. I pressure washed this one, used commet and a red scuff pad. Go slow when you sand, so you don't slice your hands. There are a lot off places to cut and snag the scotch brite.
I did hit the aprons and flatter areas with some 400 grit paper and used an acid etch primer where I was down to bare metal. It was originally F8 green, went to FJ6, so I used a light gray sealer to get even color coverage.
It was shot right there, in the driveway. I came back over the radiator support center with some flat black single stage rustoleum, thinned 50% with basecoat reducer. I've discovered that laquer thinner does work, but it takes way too long to cure and it mottles in the gun, when you try to clean it. It's better to use acetone or paint thinner, with rustoleum enamels. Nothing has topped using basecoat reducer with it and some japan dry, though, for the black.
Things I pulled out:
-Bulkhead connectors, including the main firewall one (pushed through, masked)
-Radiator
-Intake manifold
-Valve covers
-Distributor
-Ballast, Voltage Regulator, Ignition Module
-Wiper motor
-All 4 wiring harnesses, battery, cables, starter relay
-Battery, tray, brackets and horns
-Washer bottle, hoses, clips
-Master cylinder (brake lines pulled away from firewall and masked, along with clips that unscrewed)
-Throttle cable, masked the e brake line, pulled away as far as I could.
-Power steering gearbox and pump (this really helps get everything nice)
-Exhaust manifolds (this is also a key part to remove)
-Charcoal canister and line
-Galvanized headlamp buckets, headlamp bezels, grille, bumper filler and front bumper...
-Hood latch and support bracket (painted off the car)
-Hood bumpers, Adjuster stops, weatherstrip sections and of course, insulation and clips from the hood
I also masked the shocks (if I had to do it again, I'd just take them out) and masked the heater core tubes at the firewall and any insulation showing, as well as the steering column and mount plate hole at the firewall, inside, unbolted the plate and slipped paper in there. I also masked the K member at the joining areas. I wasn't concerned too much about it, though, I didn't want lots of overspray on it or the strut rods, so they got taped, too. That pic is showing the car partially unmasked. The fenders were masked, to keep junk from flying into the paint, car was bagged and the K member was masked, though. That's why they're not snot green as well.
This also gave me a good opportunity to restore one of the component sets at a time, before putting it all back in. Gave me a good opportunity to check wiring on a multimeter and fix everything nice, get rid of bad connectors, replace bad wires, etc, while re-wrapping them.
Harnesses are easy to clean up. If you hang them from a wire and tie off branch areas with a single piece of tape, it gives you the structure and allows you to still remove or add new wiring, before wrapping it again.
A good thing to do is to take a bright LED light with you to check color coverage in odd areas. It's easy to miss something with shadows cast all over the place. It also helps a ton to check clear/ gloss even coverage everywhere. I had a light with me, while I was painting, to grab and check everything, before moving to the next area and next stage.
I ended up redoing the engine (flattened cam, bad oil) anyway, but it's still plenty nice for a driver and is usually one of the cleaner cars at local cruises.
If I was going to make the car extremely show quality, the K member and everything else would come out and I'd clean the entire under side of the car up and redo the undercoat. I may end up doing the front end again and I have a spare K and components for that swap. I think I'll do that when I swap the stick in, but for now, I like the results. ~