You are using an out of date browser. It may not display this or other websites correctly.
You should upgrade or use an alternative browser.
You should upgrade or use an alternative browser.
Follow my 1967 Dodge Dart Restoration
- Thread starter mopar_muscle
- Start date
-
67 prostreet gt
Well-Known Member
mopar_muscle
Well-Known Member
Sledger46, thank you very much for your interest in my project and your advice. I love to get input from others.
I also thought of getting a viper bell housing at first, but after reading a bit more about it i learned that there are a number of reasons why it can not be used for my application:
- The bell housing bolt pattern on the v10 viper engine is very different from the LA v8 engine that i am using.
- The viper t56 pilot shaft length differs from the camaro t56 pilot shaft length (which is what i have). So even if i could bolt the the viper bell housing to my engine, the bell housing depth will not allow the pilot shaft to correctly fit the pilot bearing in the crank shaft.
- The starter bolt pattern and position on the viper bell housing will not line up with the old mopar starter.
I chose to use the camaro pressure plate and clutch plate for a couple of reasons:
Keep in mind that i got the camaro clutch system included with the transmission and that it is still in a very good condition.
-The distance between the engine and transmission is much smaller than with the original 4 speed transmission, i need to use a clutch system that is narrow enough to fit in between the engine and t56, and the original dodge 4 speed pressure plate is much wider (or longer) than the camaro pressure plate and simply does not fit in between the engine and t56.
-Since i already have the camaro clutch system, i would prefer not spending the extra money on buying a dodge viper clutch system, which will probably also need modifications to work for my application.
-Also, by using the camaro clutch system, i can use the clutch fork that came with the t56 and will not need to modify the clutch fork at all.
Lastly, i am an engineering student and i am currently taking a machining class and have to do a final project to pass the class. Since we are learning about casting aluminum i decided to cast and machine a bell housing for my final project.
Thank you,
Louwtjie
mopar_muscle
Well-Known Member
Darter6, what a coincidence that we were interested in the same car!
I am definitely going to be at MATS! Ive never been to it, so it should be a fun weekend!
Ill be going down to Vegas with a friend and he will probably bring his 69 Dart or 70 Roadrunner.
If you are there we should meet up at the show.
Louwtjie
I am definitely going to be at MATS! Ive never been to it, so it should be a fun weekend!
Ill be going down to Vegas with a friend and he will probably bring his 69 Dart or 70 Roadrunner.
If you are there we should meet up at the show.
Louwtjie
I've been a volunteer for the last 12 years at MATS. You can find me in the Slant Six pits. I should have my 64 dart ready by then.
You have a very cool at school project going on there.. "To be young again" working on cars day and night on the weekends,and everynight during the week...... (sigh) I need a nap.........
You have a very cool at school project going on there.. "To be young again" working on cars day and night on the weekends,and everynight during the week...... (sigh) I need a nap.........
67 prostreet gt
Well-Known Member
I've been a volunteer for the last 12 years at MATS. You can find me in the Slant Six pits. I should have my 64 dart ready by then.
You have a very cool at school project going on there.. "To be young again" working on cars day and night on the weekends,and everynight during the week...... (sigh) I need a nap.........
Haha is young guys sometimes need naps 2
Posted via Topify using iPhone/iPad
mopar_muscle
Well-Known Member
I've been a volunteer for the last 12 years at MATS. You can find me in the Slant Six pits. I should have my 64 dart ready by then.
You have a very cool at school project going on there.. "To be young again" working on cars day and night on the weekends,and everynight during the week...... (sigh) I need a nap.........
Okay that sounds good. As the date comes closer ill send you a PM.
mopar_muscle
Well-Known Member
Bell housing CAD drawing.
I have finally started working on the CAD drawing for the bell housing. I finished the transmission side flange and will be working on the engine side flange and the actual bell over the rest of the weekend. Hopefully ill get it done by Sunday.
Here is a pic of how far I got today:
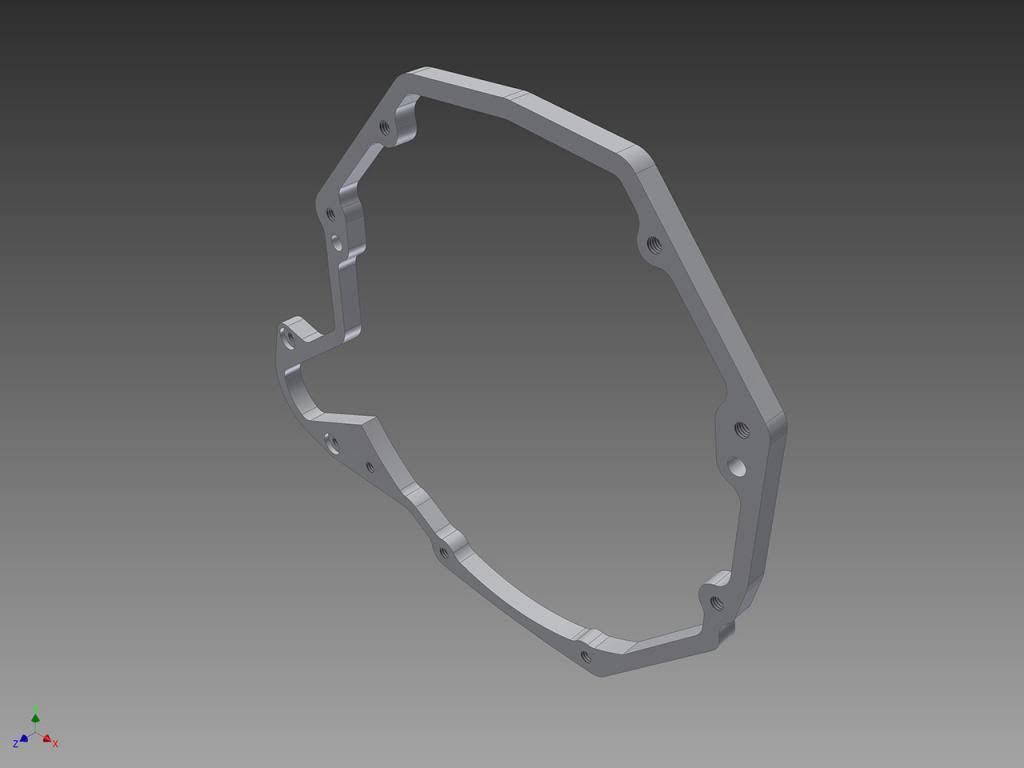
I have finally started working on the CAD drawing for the bell housing. I finished the transmission side flange and will be working on the engine side flange and the actual bell over the rest of the weekend. Hopefully ill get it done by Sunday.
Here is a pic of how far I got today:

mopar_muscle
Well-Known Member
Hi all.
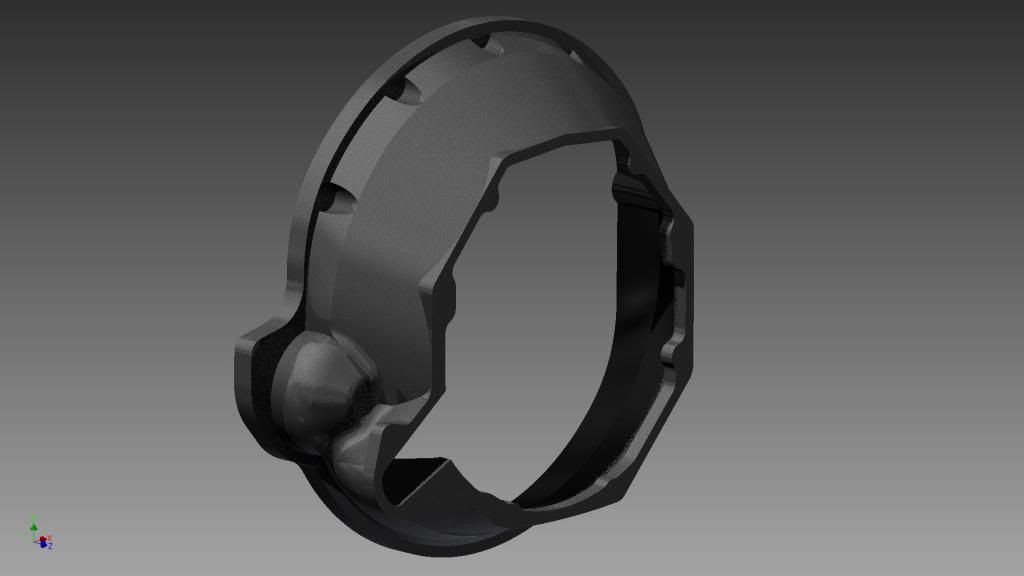
Over the weekend i worked a lot on the bell housing design. The design is not complete yet, but getting there.
I still need to work on the starter and clutch fork locations. I am going to make it enclosed so that it will be protected and unexposed.
This process feels like its taking forever, but i am very excited for the end result and can not wait to cast and machine this, and then finally bolt the engine and transmission to it.
Here is a pic of the bell housing design so far:

txstang84
Well-Known Member
:happy1:
adiffrentcity
Bent Rodder
:happy1:
mopar_muscle
Well-Known Member
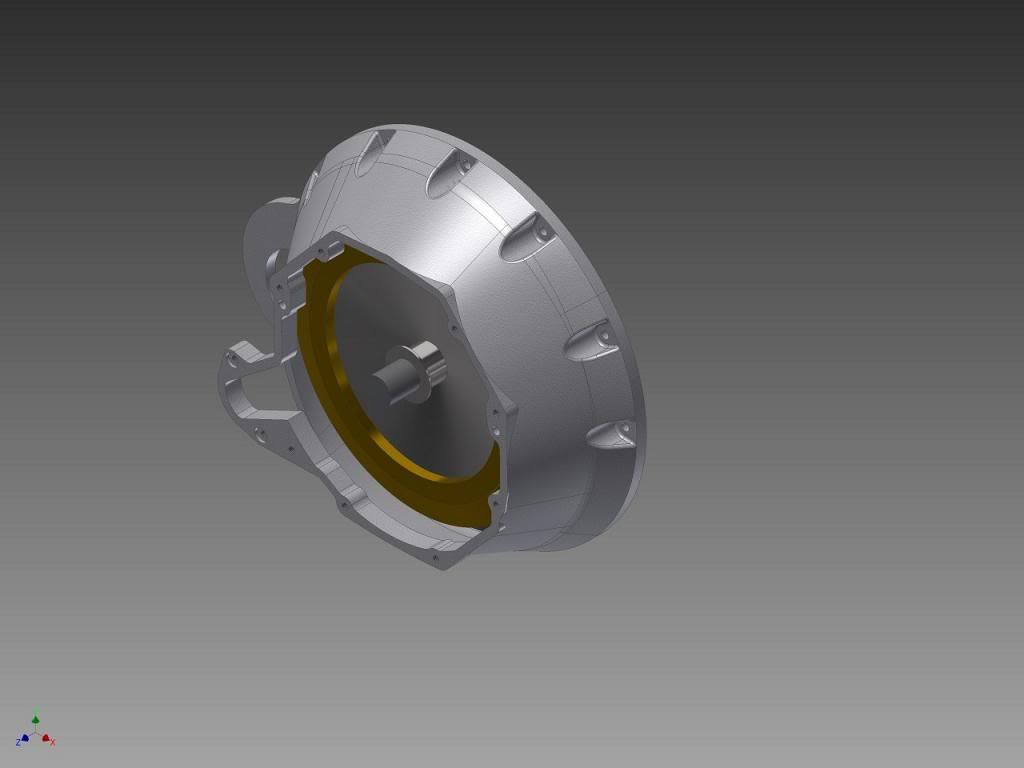
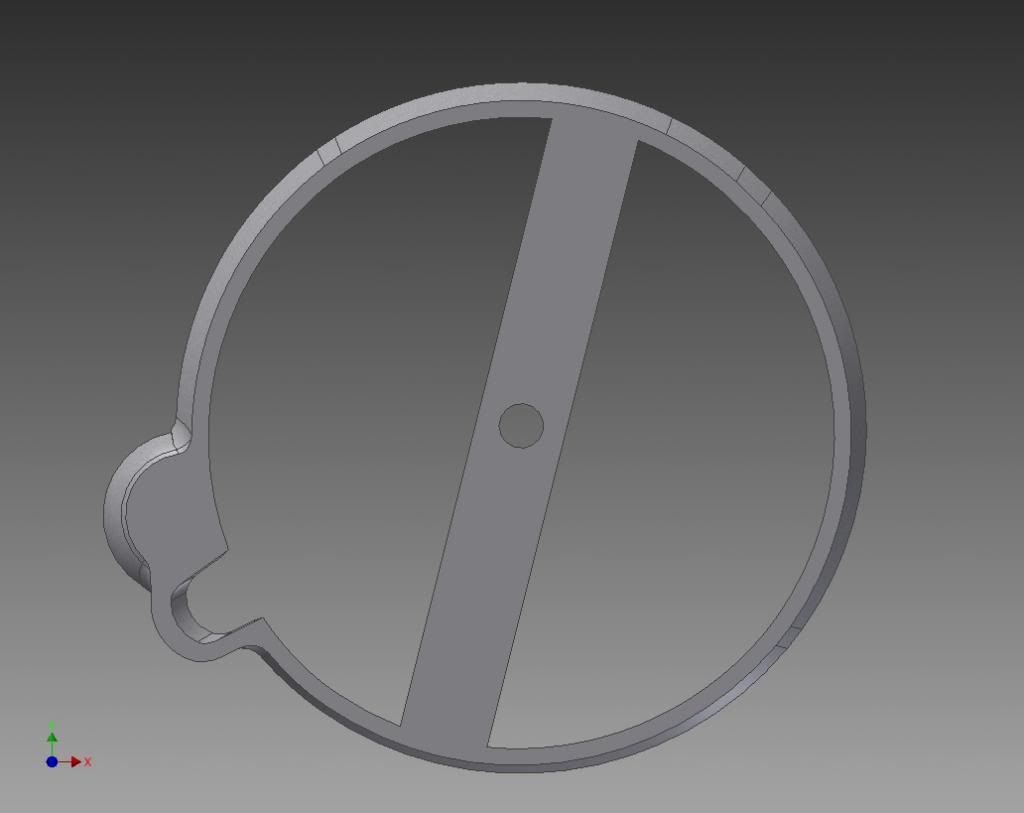
The bell housing's design is finally done and now the casting and machining process can be started.
Note there are no bolt holes on the CAD model. They will be CNC machined in after its been casted.
Here are some screen shots of the final CAD model:
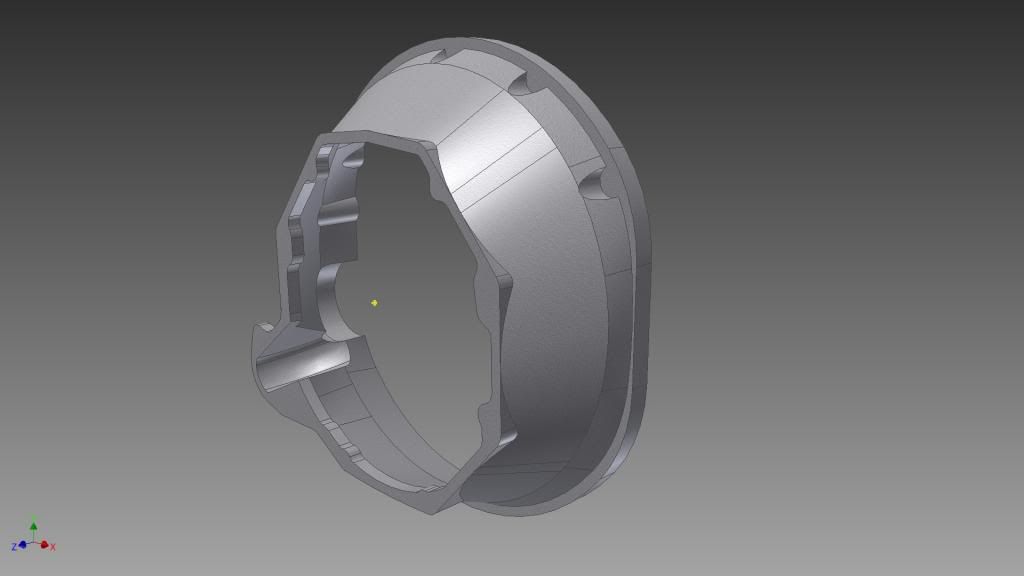
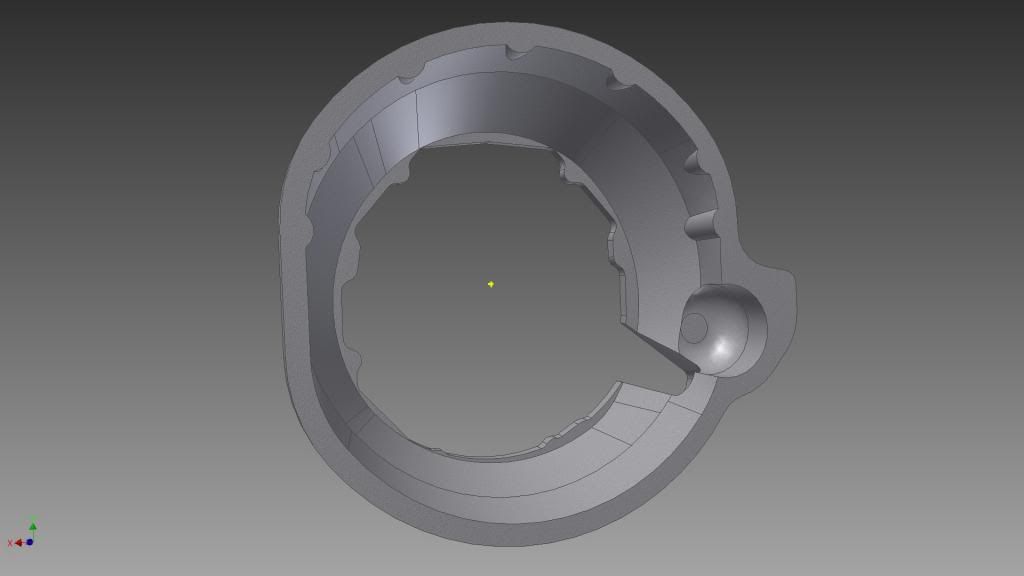
Note there are no bolt holes on the CAD model. They will be CNC machined in after its been casted.
Here are some screen shots of the final CAD model:


4mulaSvaliant
Well-Known Member
Subscribed! Love the attention to detail!
Keith Mopar
Mopar Nut
Great work, I love your build. It's cool you can do build that bell housing, good work.
mopar_muscle
Well-Known Member
I am pretty excited about the past weeks happenings. Here is an update:
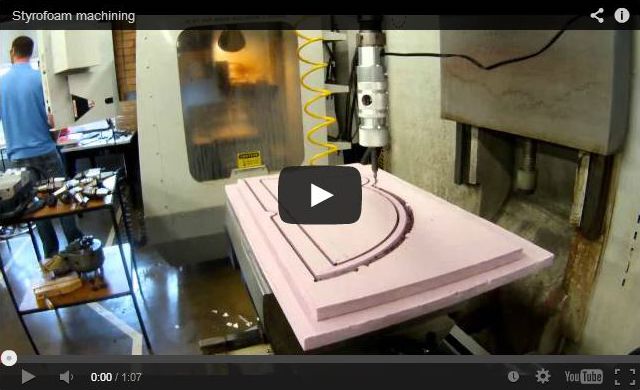
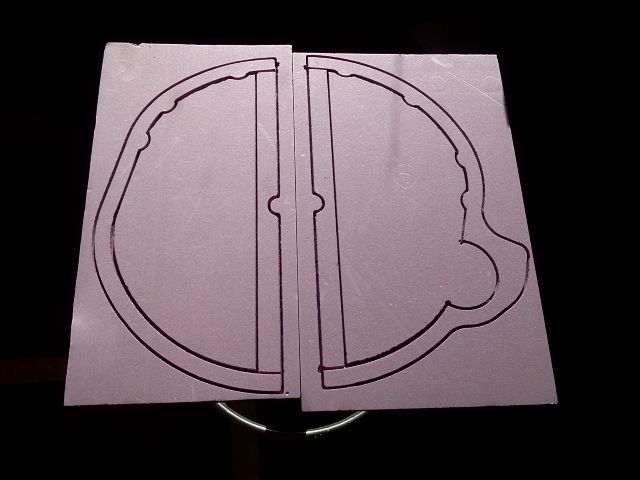
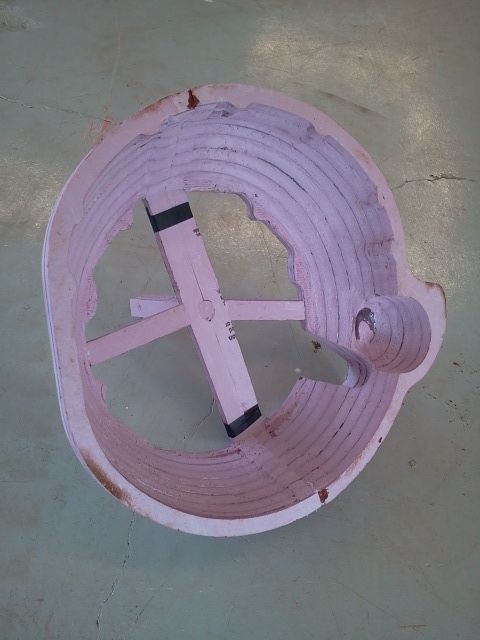
After completing the bell housings design with CAD, I "cut" the design into sections so that it could be made out of layers of styrofoam. This picture shows one of the sections.
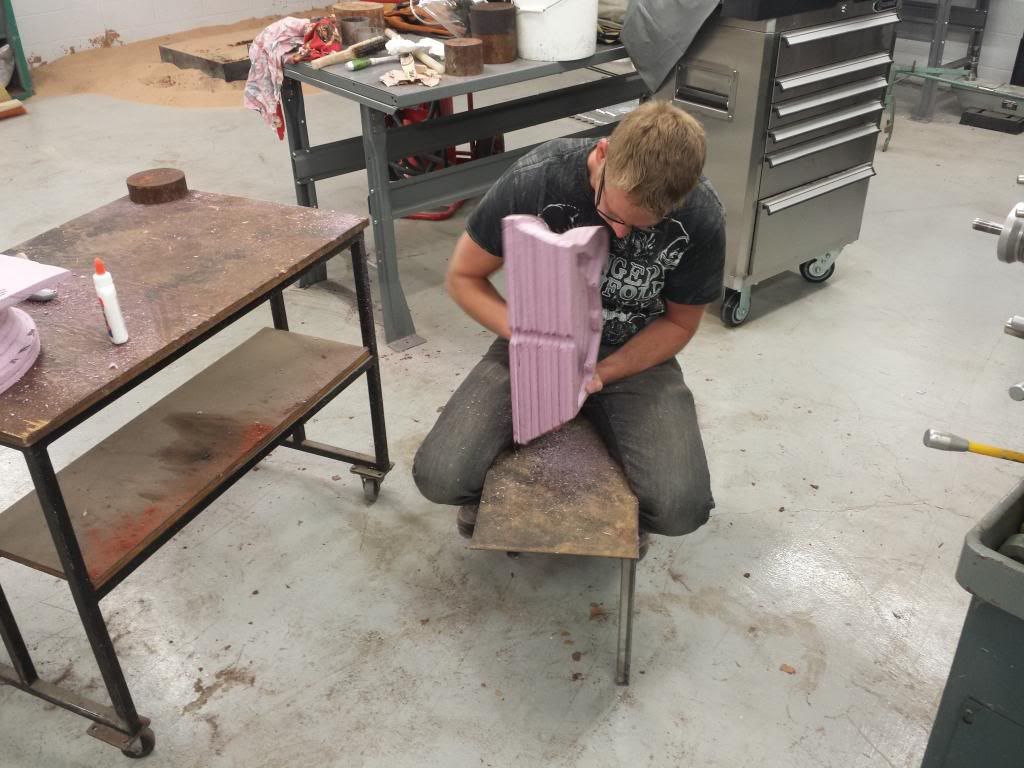
The bell housing will be made out of 9 layers of styrofoam, which will each be cut in half to fit on the CNC milling machine. There for I had to cut 18 pieces of styrofoam. All the pieces will be glued together to form the bell housing.

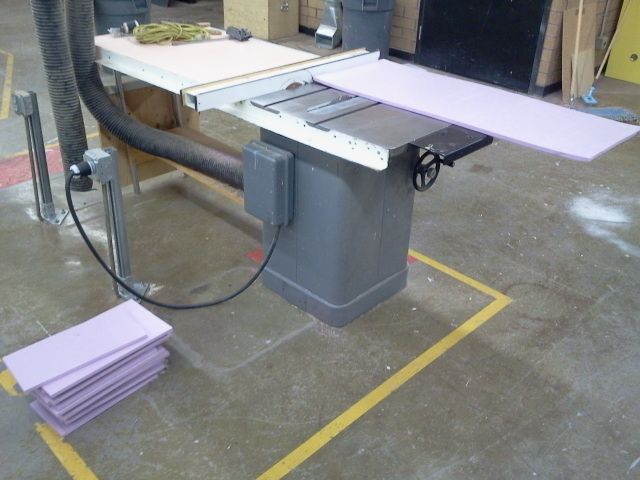
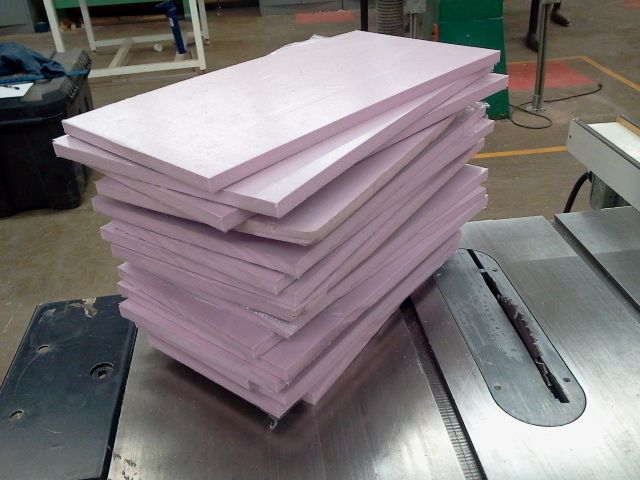
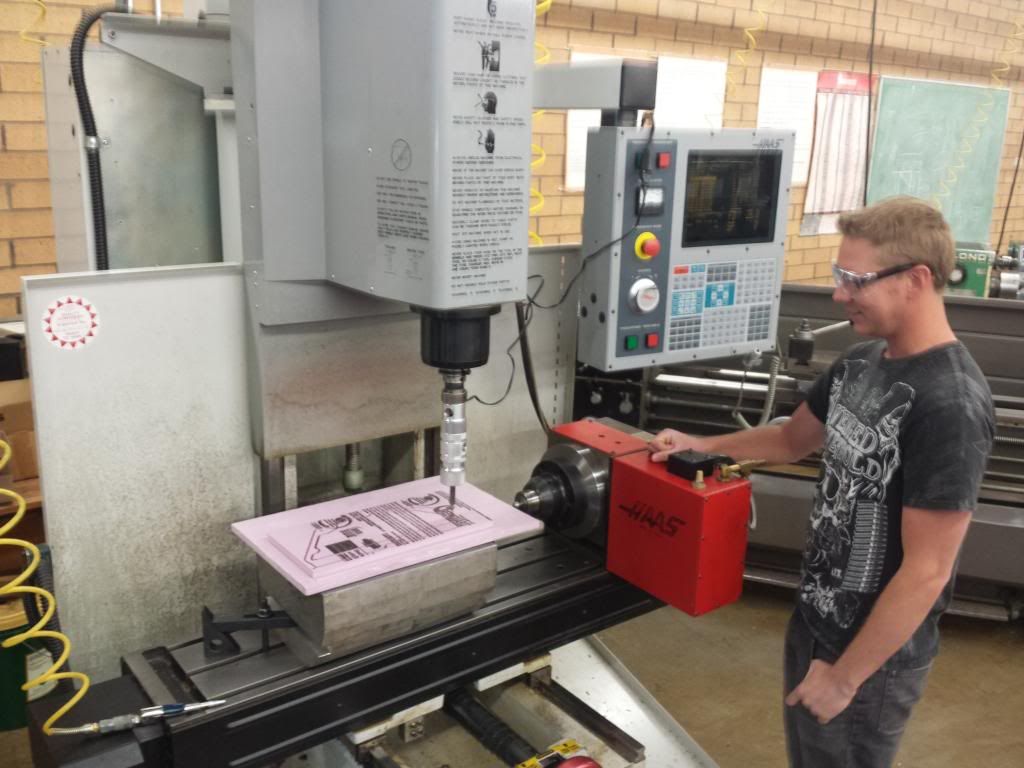
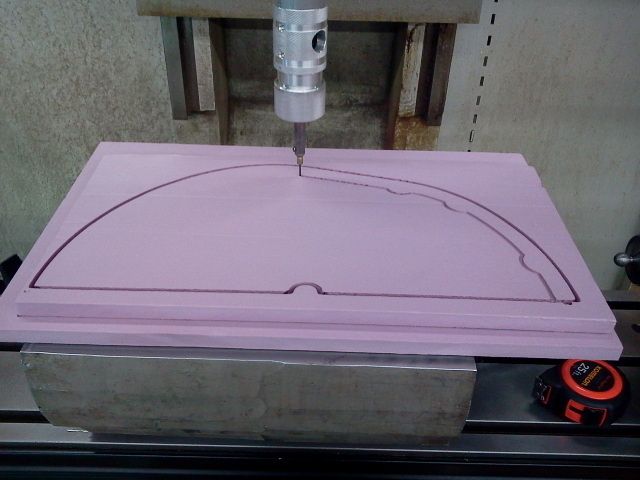
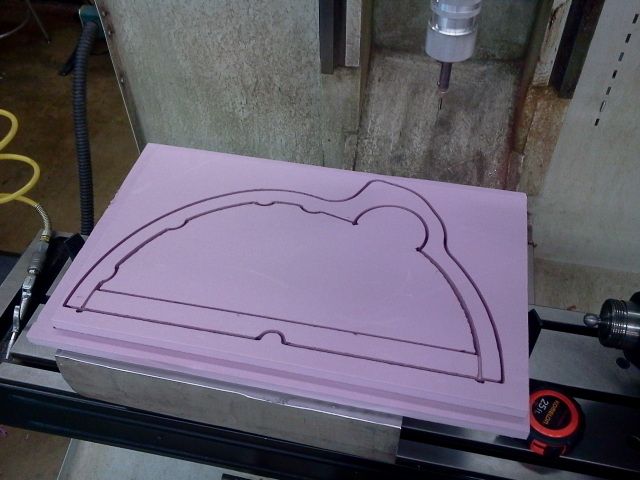
I then machined every styrofoam piece on the CNC milling machine.
PLEASE take a look at the video clip i attached.
VIDEO
[ame=https://www.youtube.com/watch?v=3XxnnA6BU5o&feature=em-upload_owner]
 [/ame]
Here are some pics:
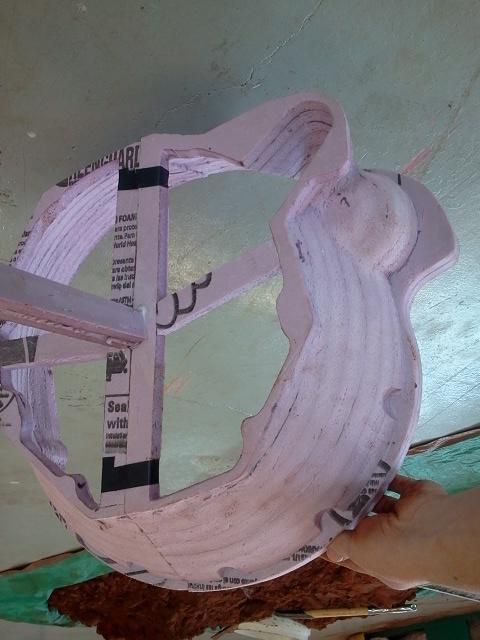
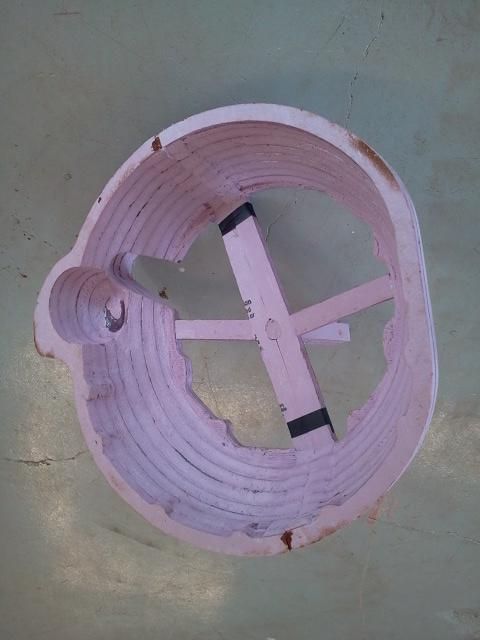
After all 18 pieces of styrofoam were machined, I glued them together 9 layers high. After the glue dried many hours of sanding got the result i wanted. A perfect styrofoam mold for casting:
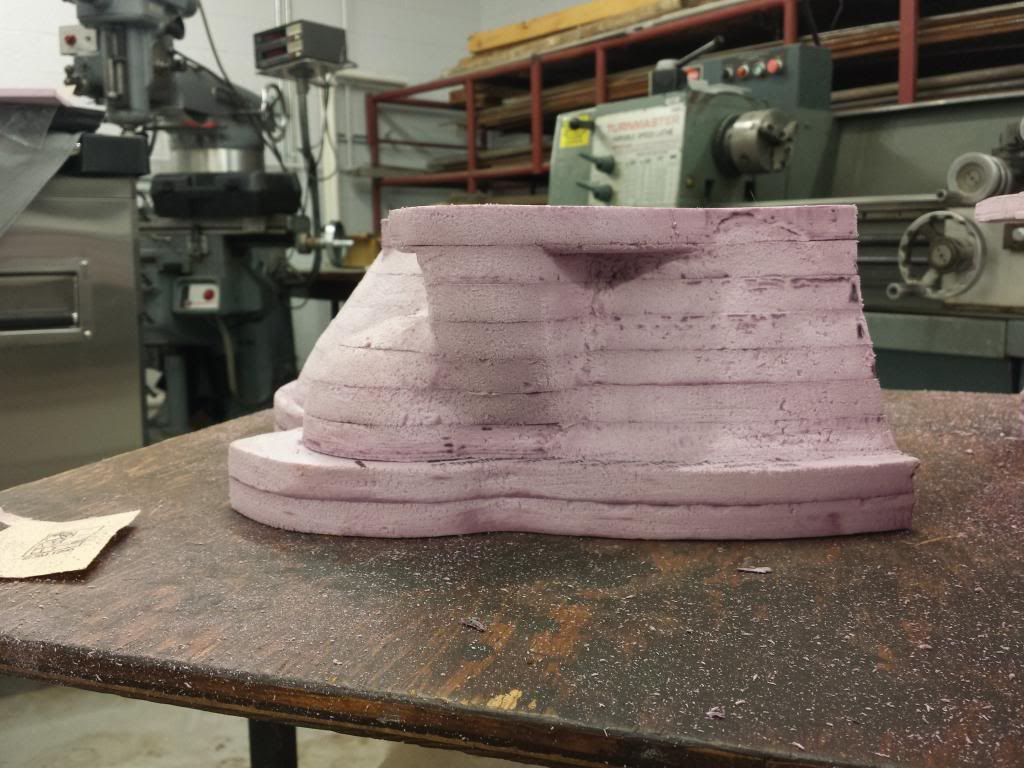
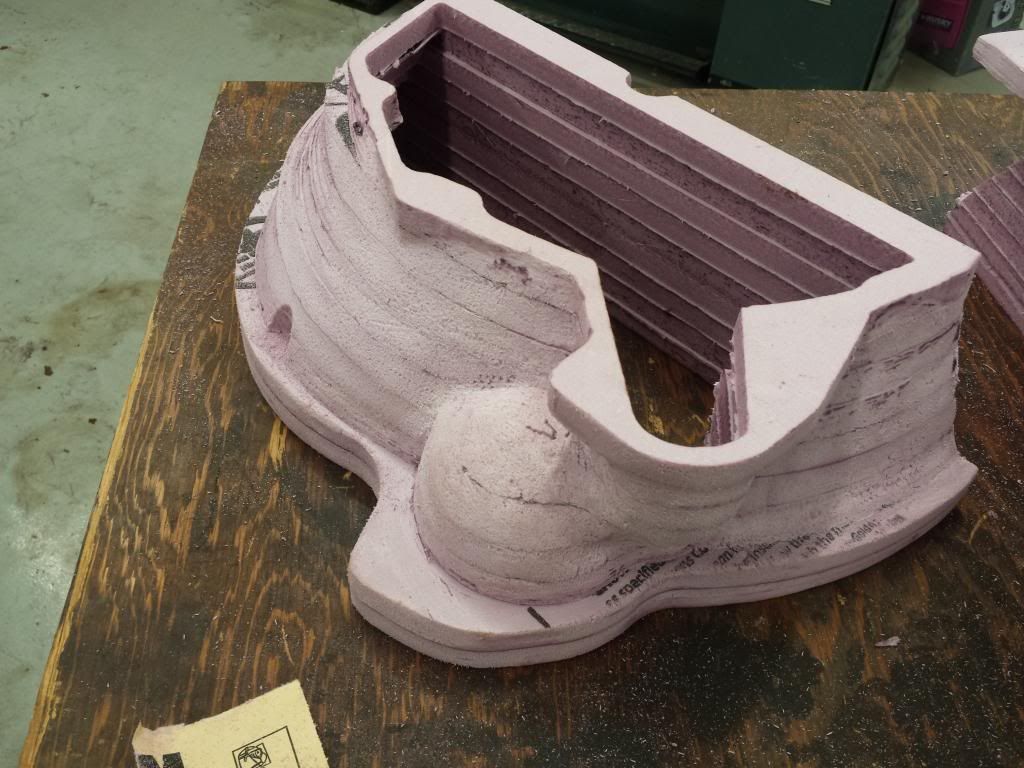
The styrofoam standing out in the center of the bell housing's mold is were the molted aluminum will be poured into and distribute to all corners of the bell housing.
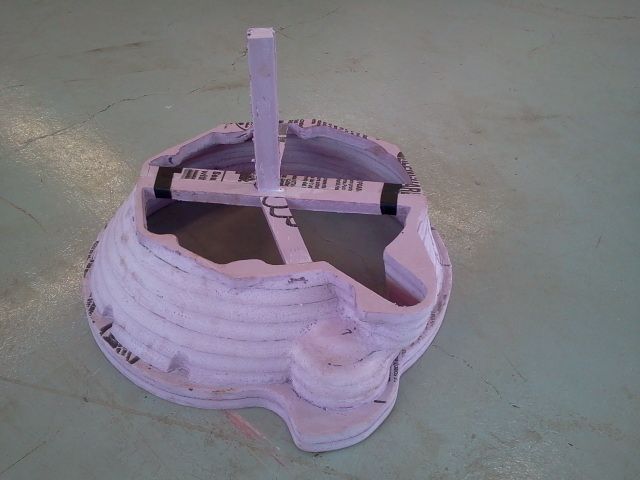
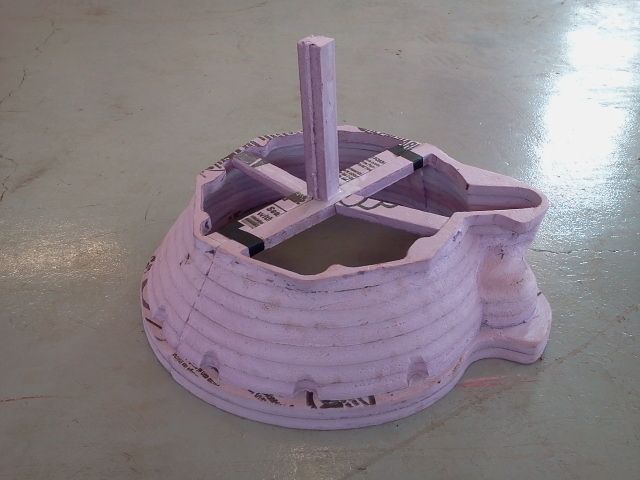
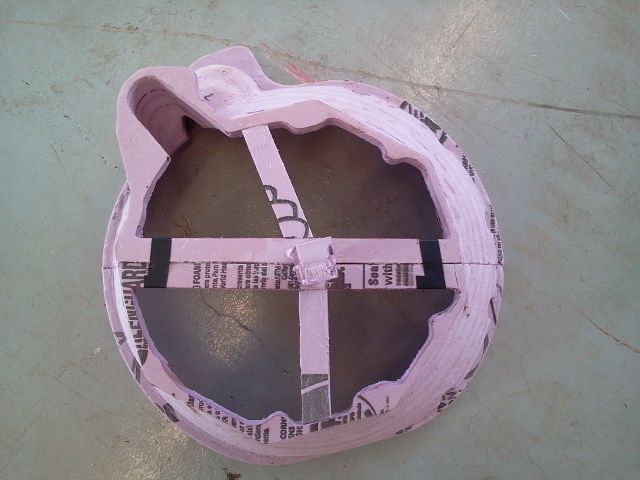
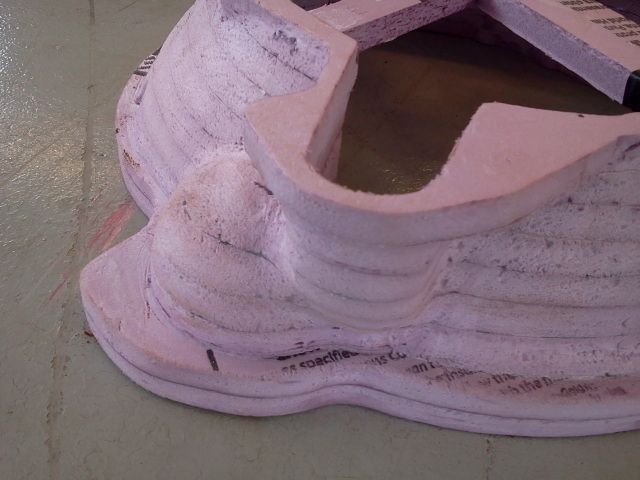
Note the areas where the starter and clutch fork is located has enclosed bulges to protect these items against outside elements, maximizing its life span. This was one of the more difficult, but one of the more important part of the design to me.
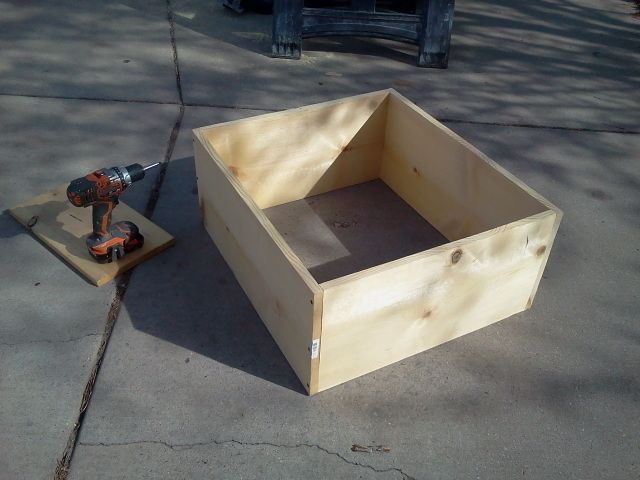
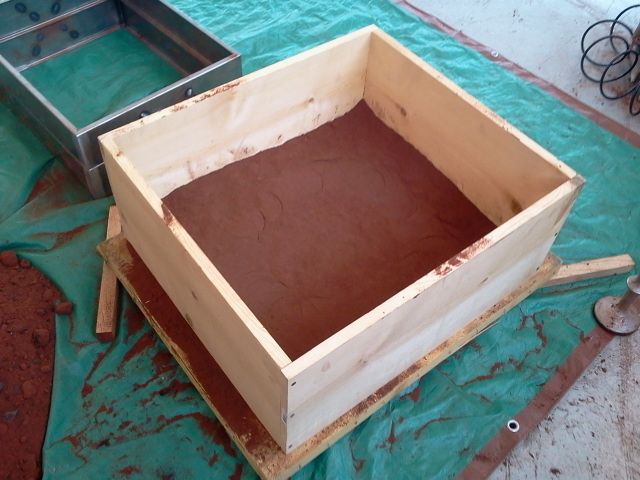
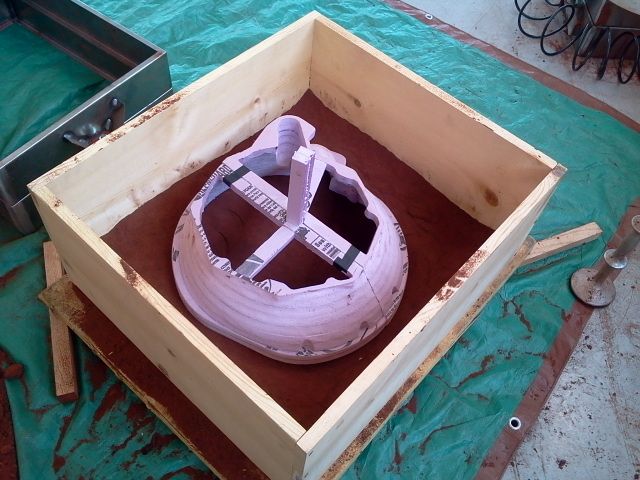
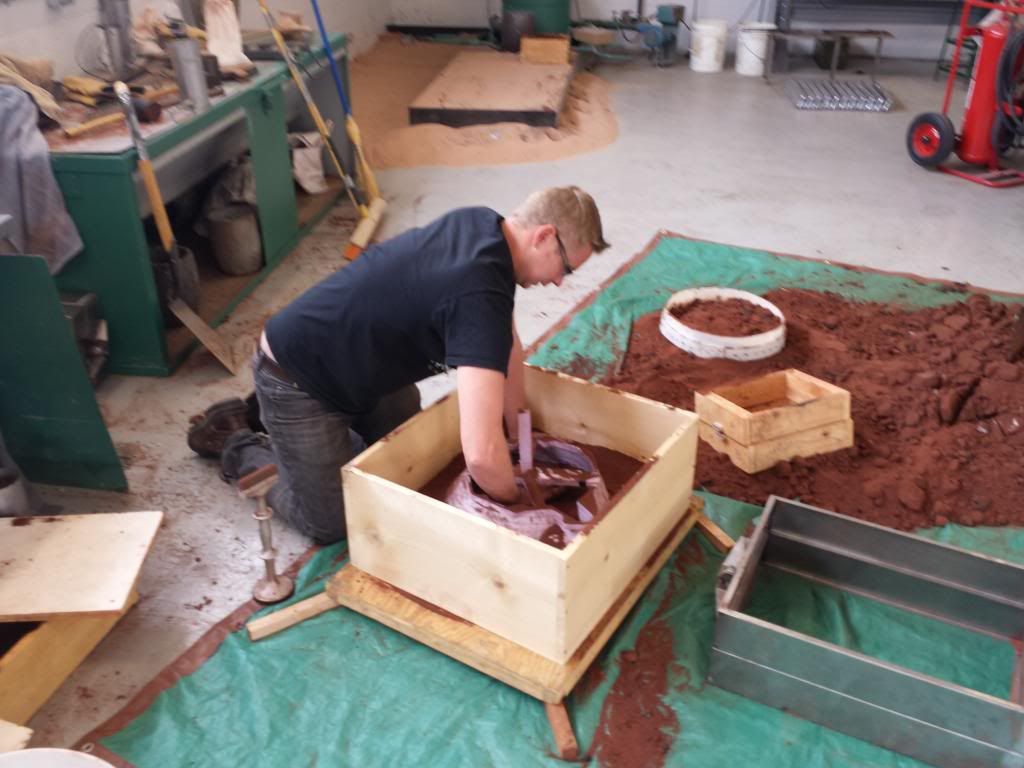
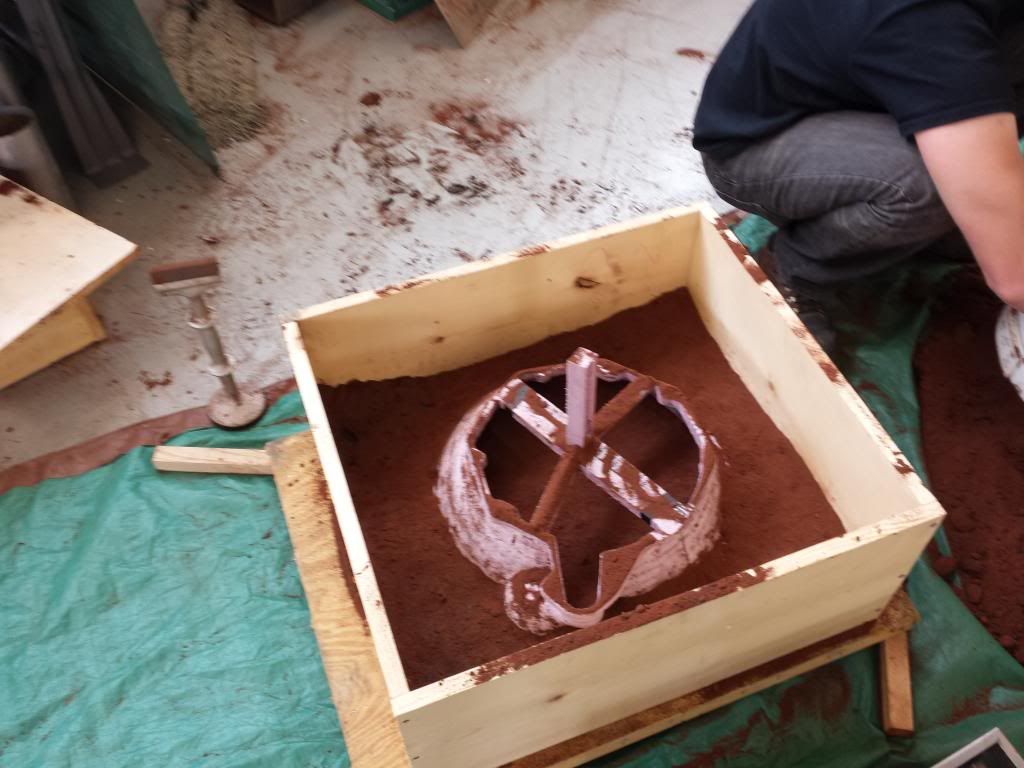
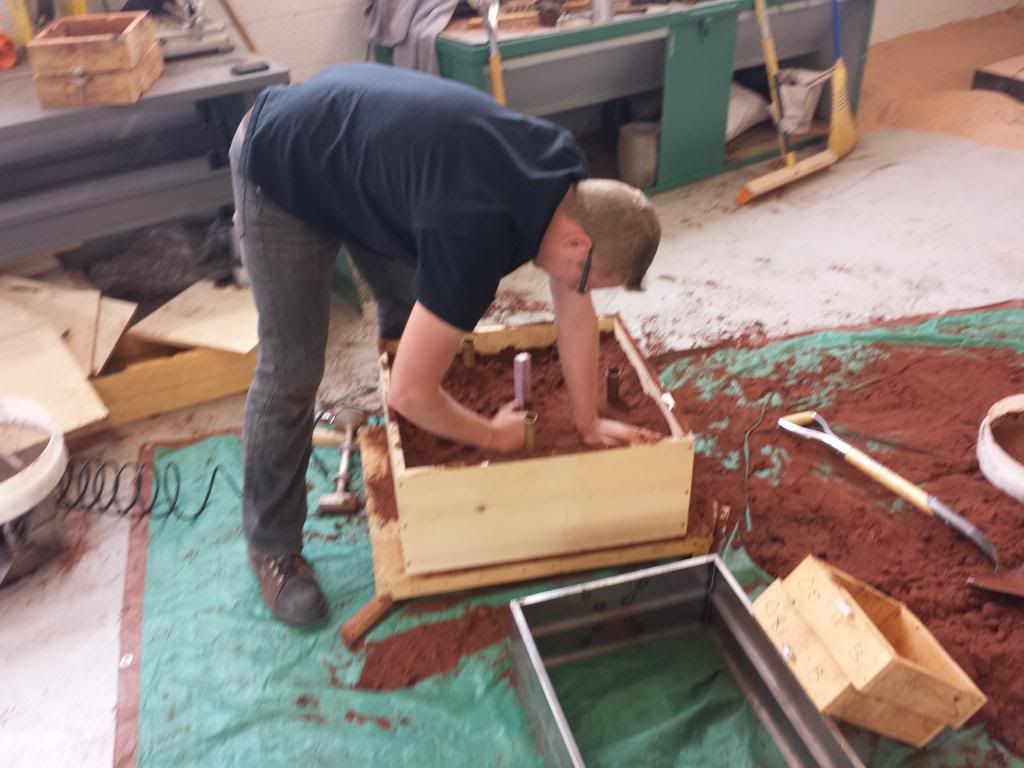
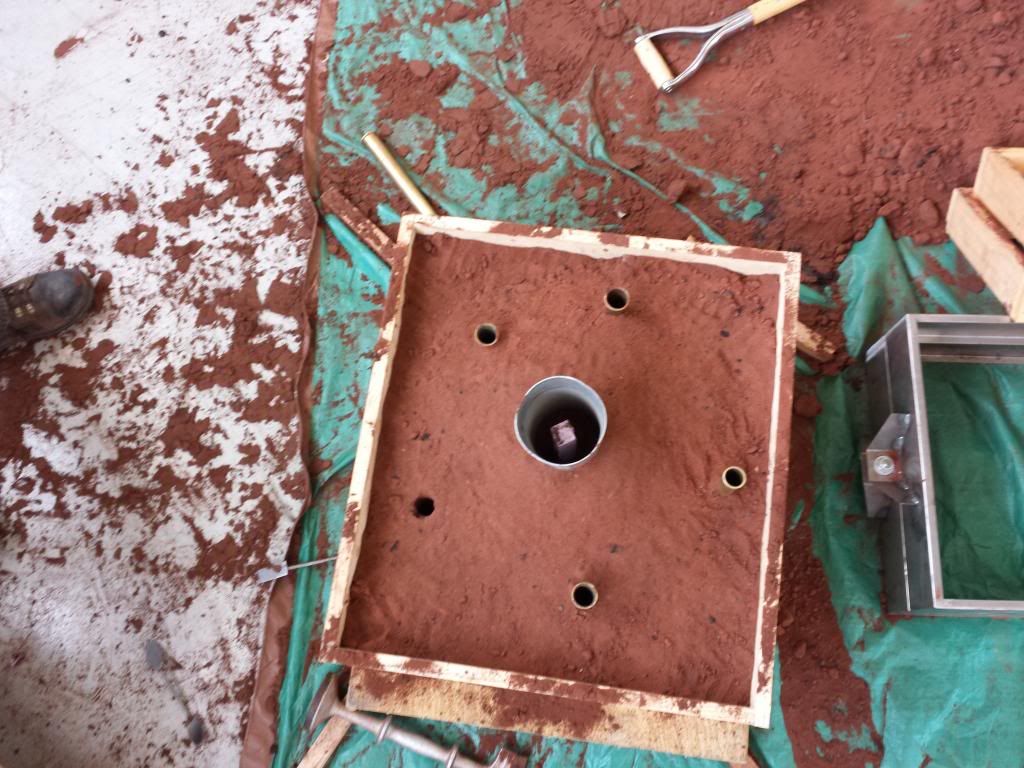
At this point the styrofoam mold was complete and ready for casting. How ever, I still needed a flask to place the mold into to cast. So i ran to Home Depot and got some wood. I constructed i simple box:
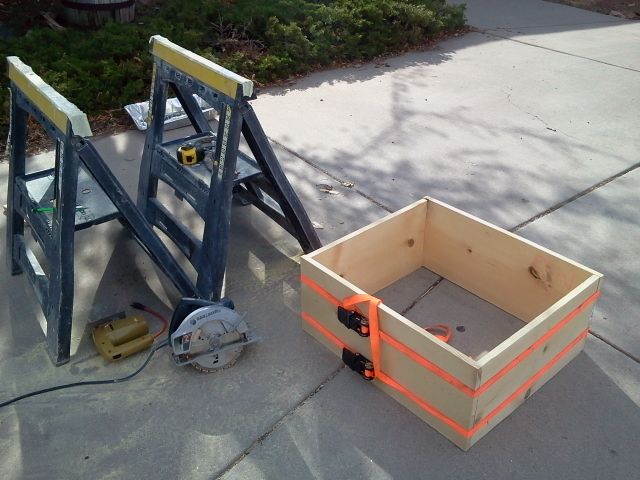
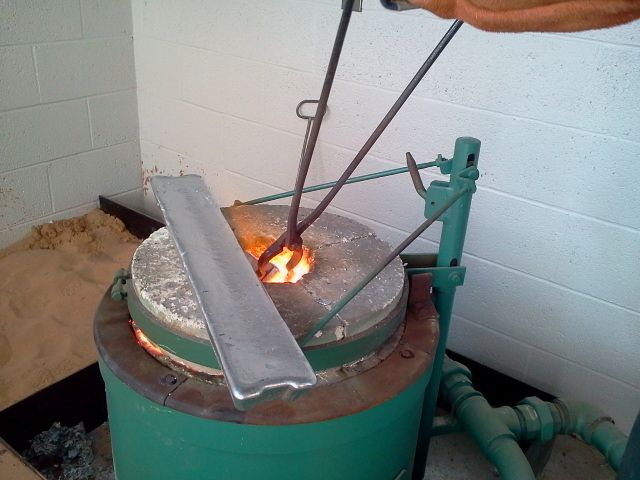
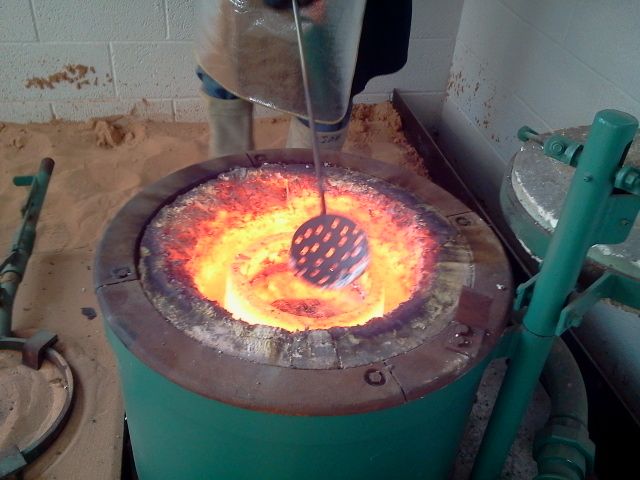
Today i placed the styrofoam mold into the wooden flask and packed it with sand. The sand was packed very carefully to ensure a good cast. I made 5 risers around the outer edge of the mold and made a volcano shaped hole in the middle where the molten aluminum will be poured into. The risers act as vents and reservoirs during the casting process.
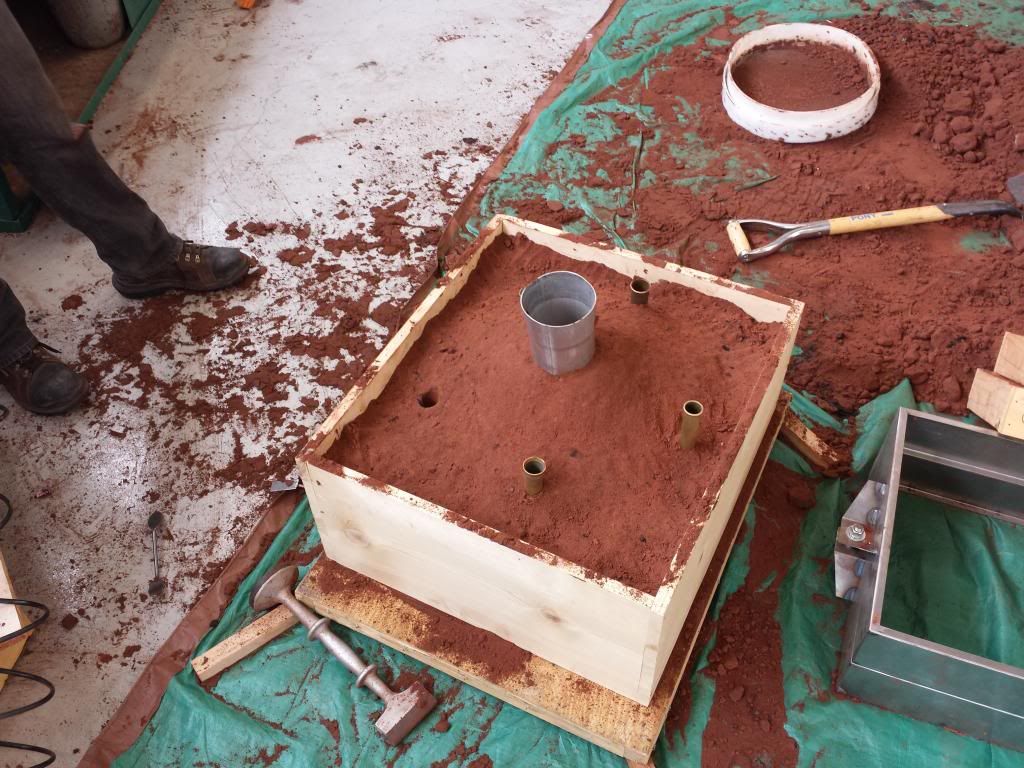
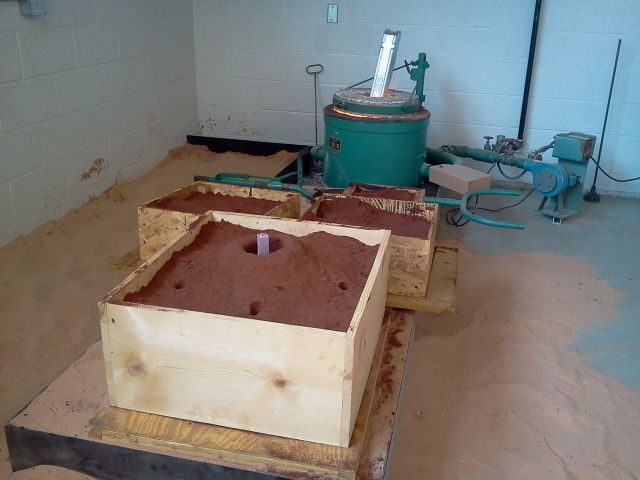
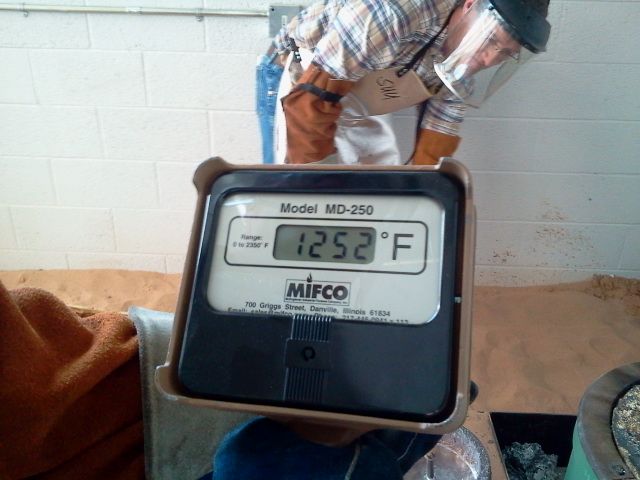
The furnace was started and a few staffs of aluminum was melted. Aluminum melt at around 1200 Fahrenheit. The aluminum's temperature was measured at 1252 Fahrenheit just before casting it.
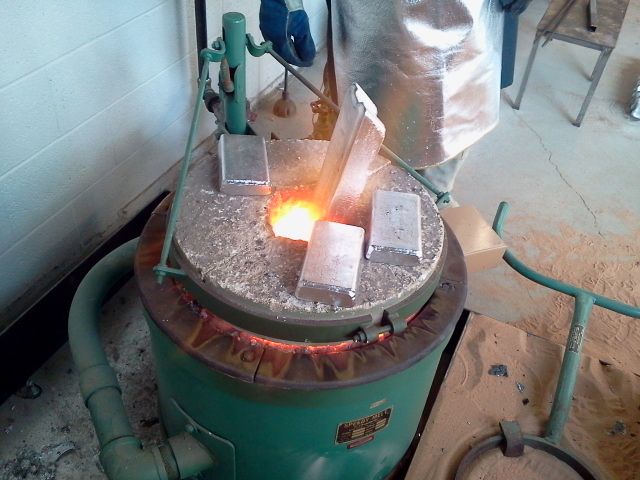
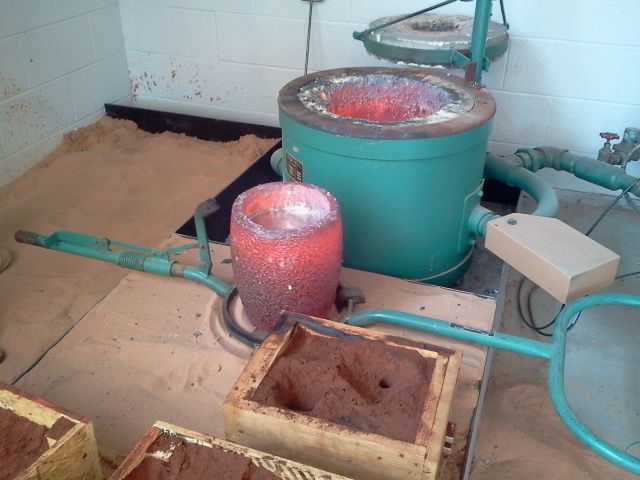

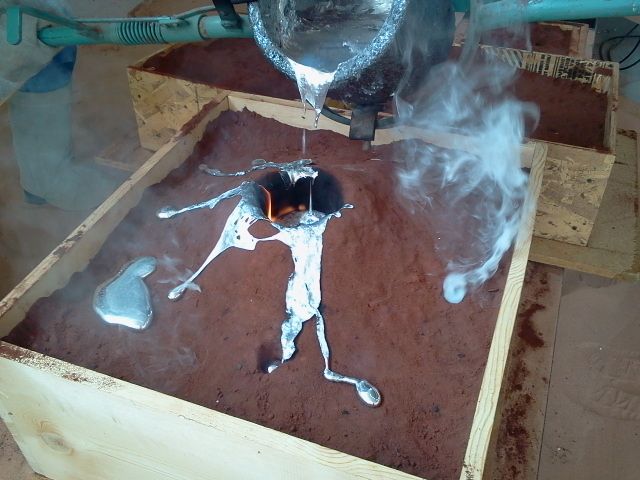
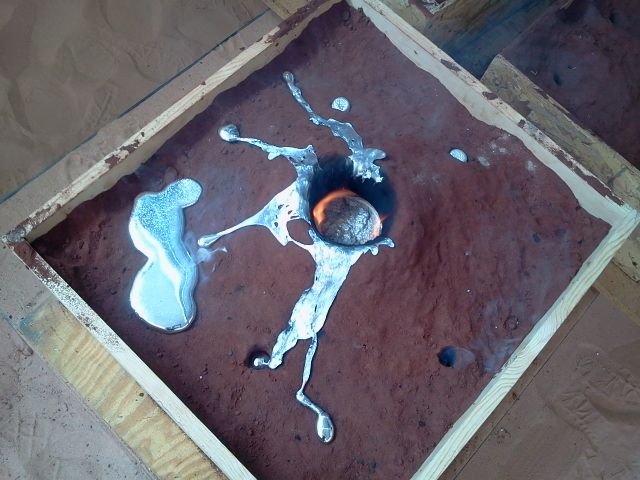
I cant wait for tomorrow morning so I can go dig the cast aluminum bell housing out of the sand!!
It will then required some more machining for all the bolt holes and good mating surface areas.
I hope it turns out a success.
Louwtjie
After completing the bell housings design with CAD, I "cut" the design into sections so that it could be made out of layers of styrofoam. This picture shows one of the sections.

The bell housing will be made out of 9 layers of styrofoam, which will each be cut in half to fit on the CNC milling machine. There for I had to cut 18 pieces of styrofoam. All the pieces will be glued together to form the bell housing.


I then machined every styrofoam piece on the CNC milling machine.
PLEASE take a look at the video clip i attached.
VIDEO
[ame=https://www.youtube.com/watch?v=3XxnnA6BU5o&feature=em-upload_owner]
Here are some pics:


After all 18 pieces of styrofoam were machined, I glued them together 9 layers high. After the glue dried many hours of sanding got the result i wanted. A perfect styrofoam mold for casting:


The styrofoam standing out in the center of the bell housing's mold is were the molted aluminum will be poured into and distribute to all corners of the bell housing.


Note the areas where the starter and clutch fork is located has enclosed bulges to protect these items against outside elements, maximizing its life span. This was one of the more difficult, but one of the more important part of the design to me.


At this point the styrofoam mold was complete and ready for casting. How ever, I still needed a flask to place the mold into to cast. So i ran to Home Depot and got some wood. I constructed i simple box:


Today i placed the styrofoam mold into the wooden flask and packed it with sand. The sand was packed very carefully to ensure a good cast. I made 5 risers around the outer edge of the mold and made a volcano shaped hole in the middle where the molten aluminum will be poured into. The risers act as vents and reservoirs during the casting process.


The furnace was started and a few staffs of aluminum was melted. Aluminum melt at around 1200 Fahrenheit. The aluminum's temperature was measured at 1252 Fahrenheit just before casting it.


I cant wait for tomorrow morning so I can go dig the cast aluminum bell housing out of the sand!!
It will then required some more machining for all the bolt holes and good mating surface areas.
I hope it turns out a success.
Louwtjie
varlo
Joe- Long Island, Oakdale
pics pics pics!!!!!!!
Martythetrimmer
Well-Known Member
great thread...I don't think I've ever looked forward to an update as much as your next one!...like what you are doing and what a great shop to build in, you should see how little space I'm working in!
reading earlier about your K frame, thought about spool mounting the engine...half way between stock and an engine plate style!
here's mine for a 62...to suit non Mopar engine but it's an idea!
subscribed, Marty
View attachment 2.jpg
View attachment 3.jpg
reading earlier about your K frame, thought about spool mounting the engine...half way between stock and an engine plate style!
here's mine for a 62...to suit non Mopar engine but it's an idea!
subscribed, Marty
View attachment 2.jpg
View attachment 3.jpg
sparksfly121
67 Dart GT Conv
H20loo
Well-Known Member
Thank you for walking us through the casting process- that was interesting.
I hope it turned out the way you expected. This will be a great series of photos for your portfolio or resume.
I hope it turned out the way you expected. This will be a great series of photos for your portfolio or resume.
mopar_muscle
Well-Known Member
Marty, those spool mounts you made are really awesome! I love the fabrication work. That is definitely a suggestion ill keep in mind. Thank you very much.
H20loo, I love posting pictures of the things i do step by step. I have family and friends far a way in my home country, and this way i can show them what im keeping myself busy with here in a foreign country, United States.
Thank you everybody for subscribing. It is much appreciated!
Louwtjie
H20loo, I love posting pictures of the things i do step by step. I have family and friends far a way in my home country, and this way i can show them what im keeping myself busy with here in a foreign country, United States.
Thank you everybody for subscribing. It is much appreciated!
Louwtjie
txstang84
Well-Known Member
Lost foam casting-brilliant! Awesome work bro-keep it up
mopar_muscle
Well-Known Member
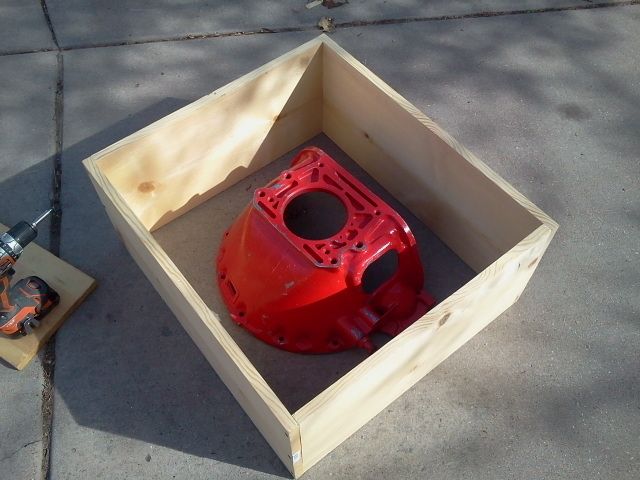
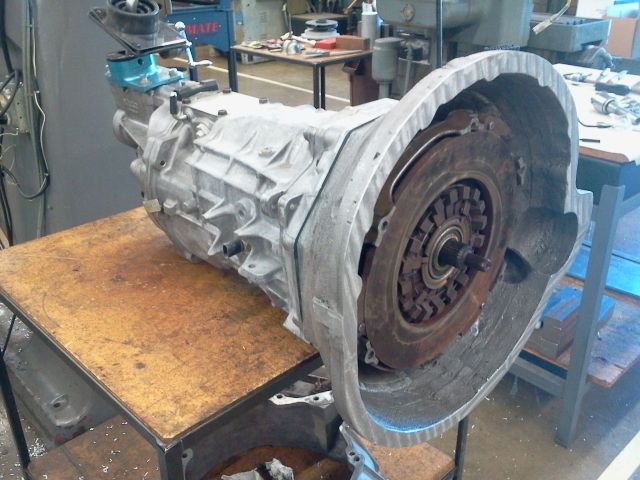
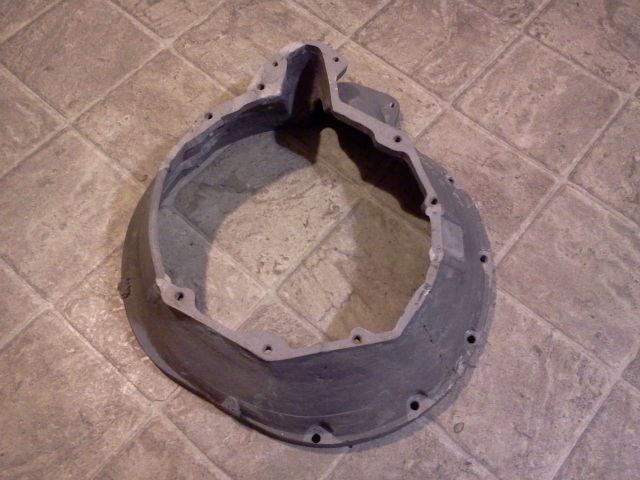
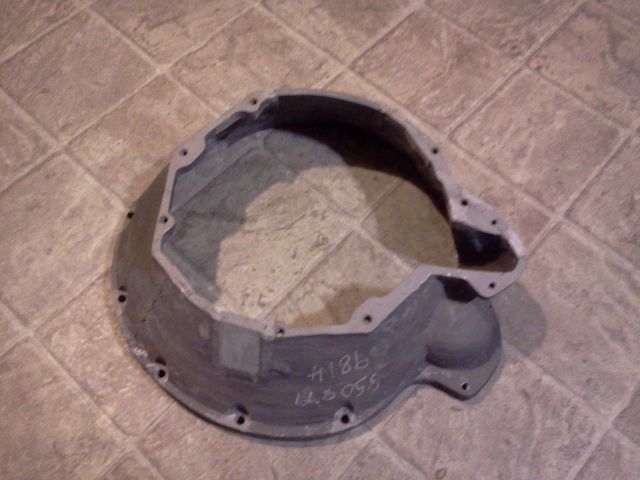
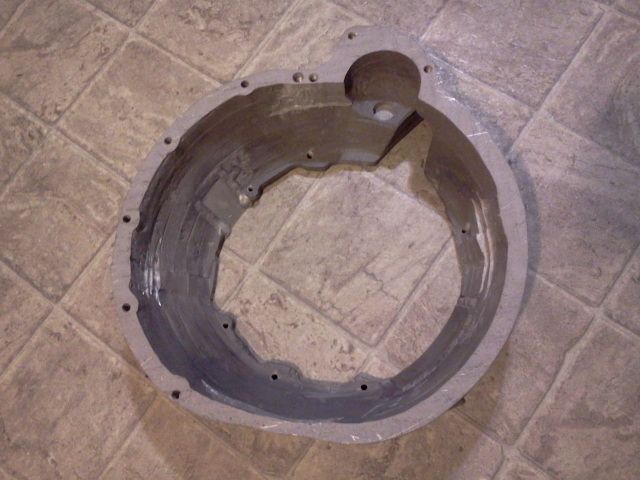
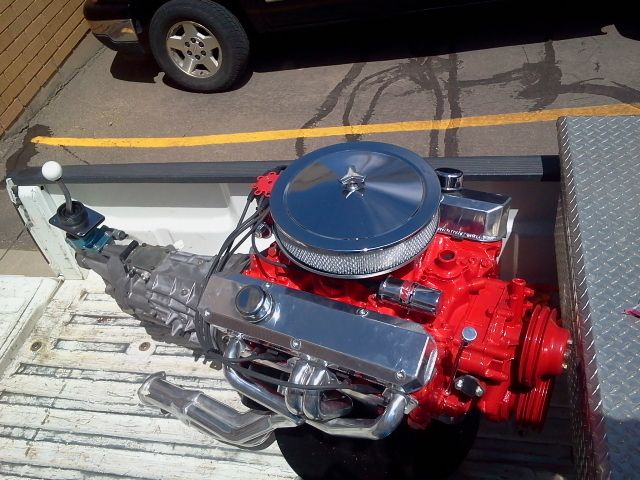
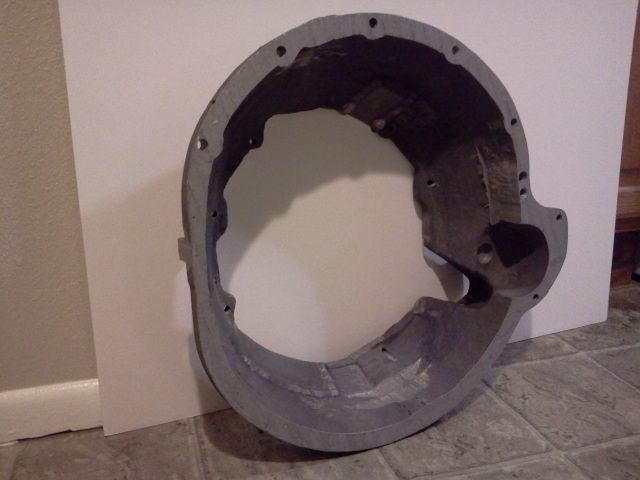
This is so far my favorite and most exciting update: Revealing what came out of the sand box!
Here it is after the final maching attached to both the engine and transmission:
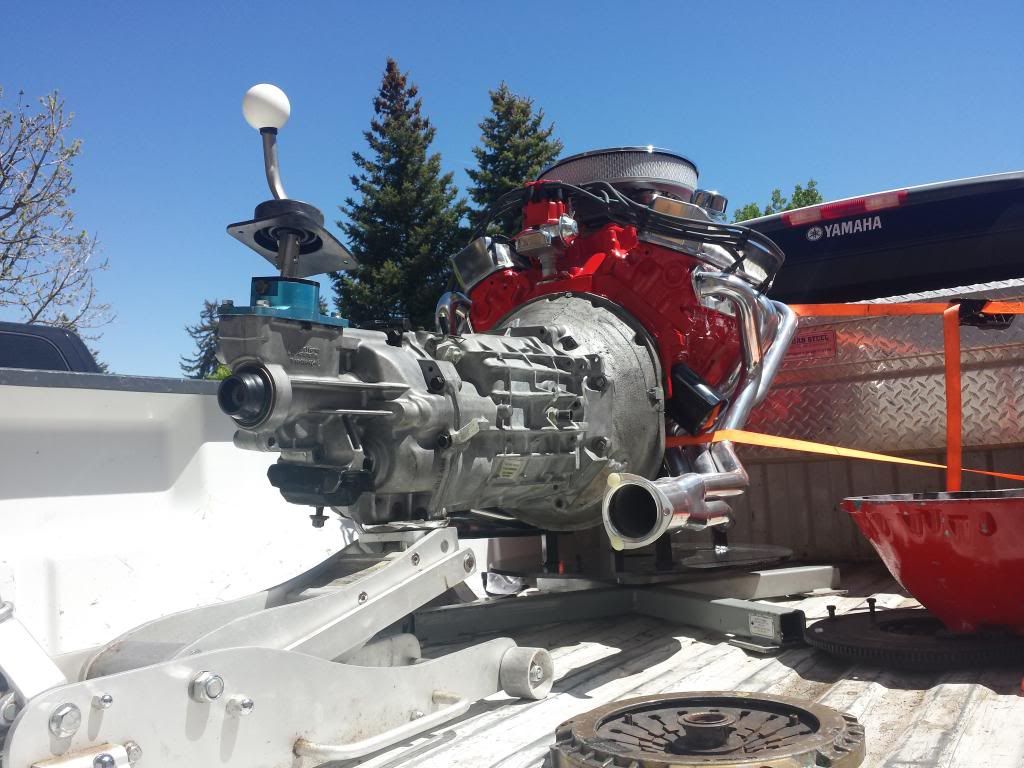
Here's the story and machining prosess:
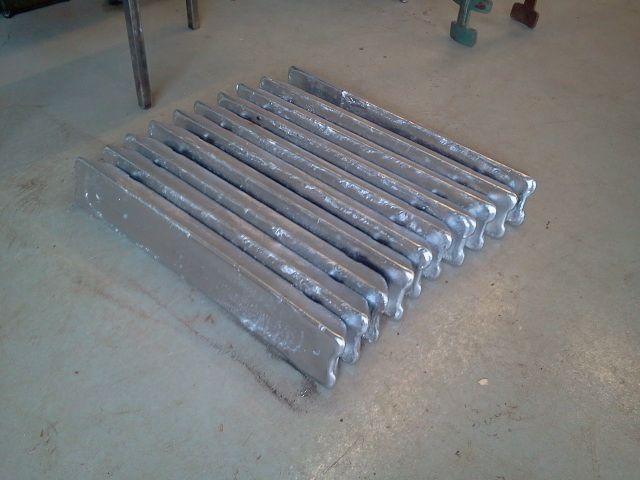
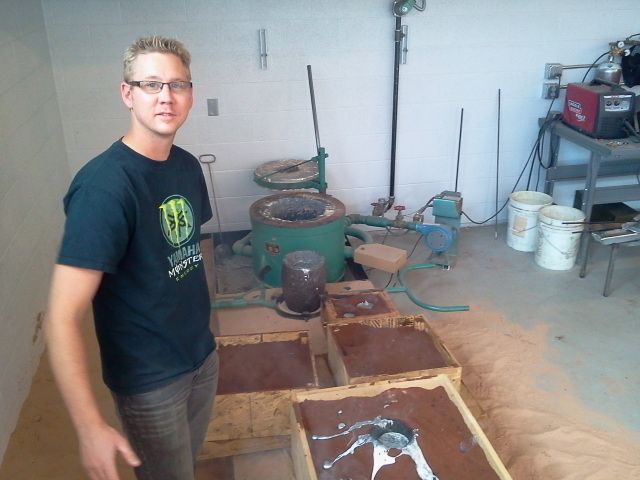
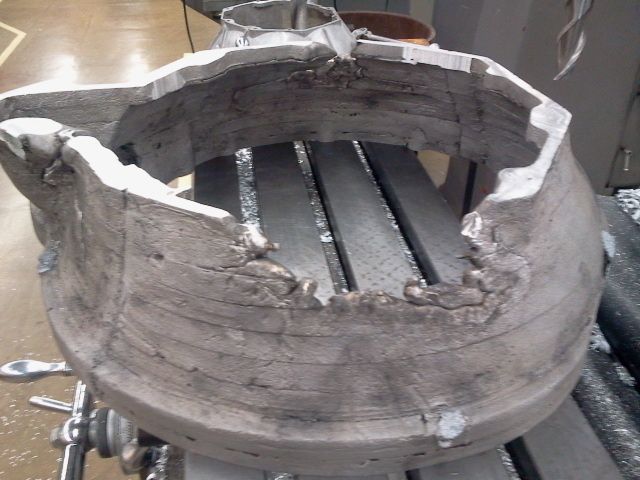
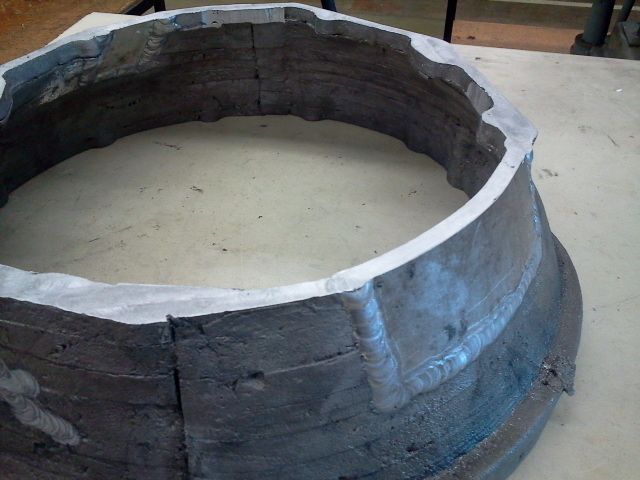
The morning after we casted the aluminum, i dug the sand out of the flask, excited like a kid on Christmas. Buried in the sand was the bell housing i worked so long and hard for!
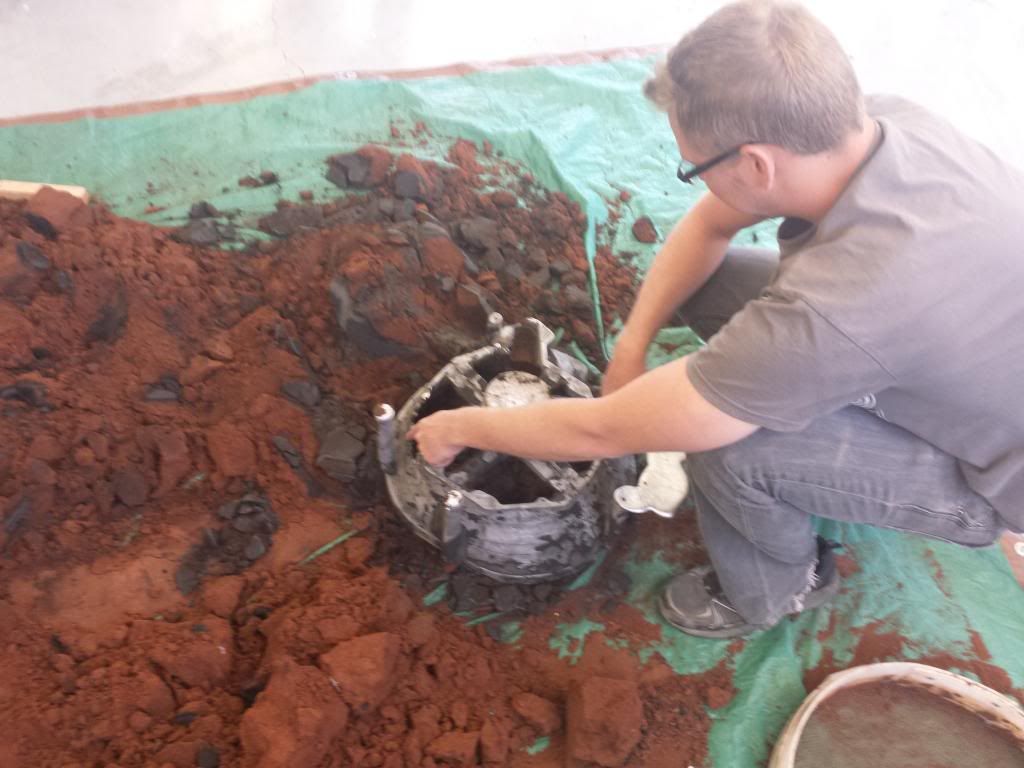
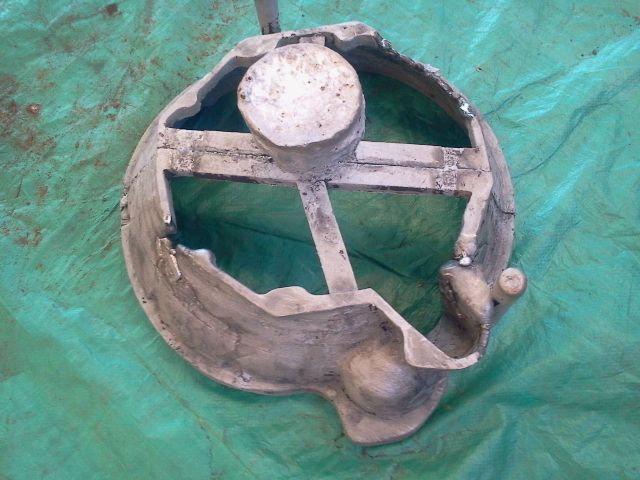
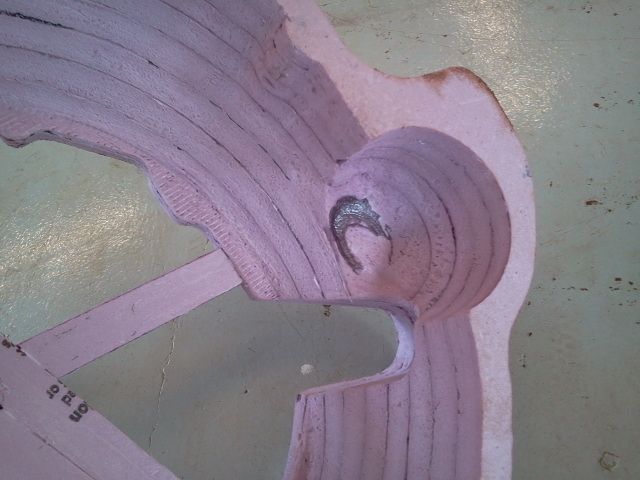
After I took it out and cleaned the sand of it, I noticed that there were a few flaws in the casting. Two areas where the aluminum froze and left an bad area. This was nothing too bad and could easily be corrected.
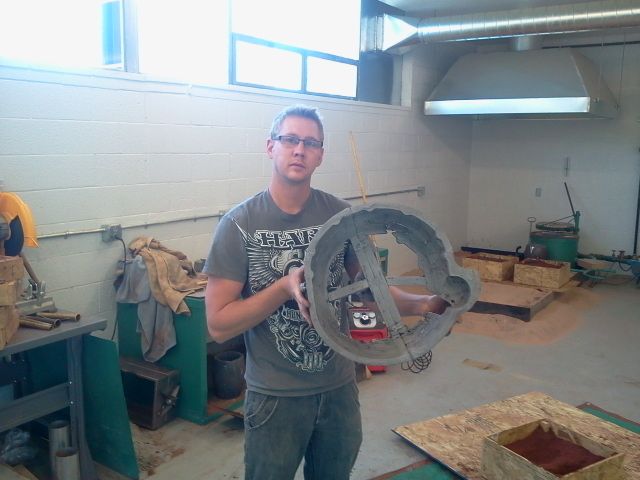
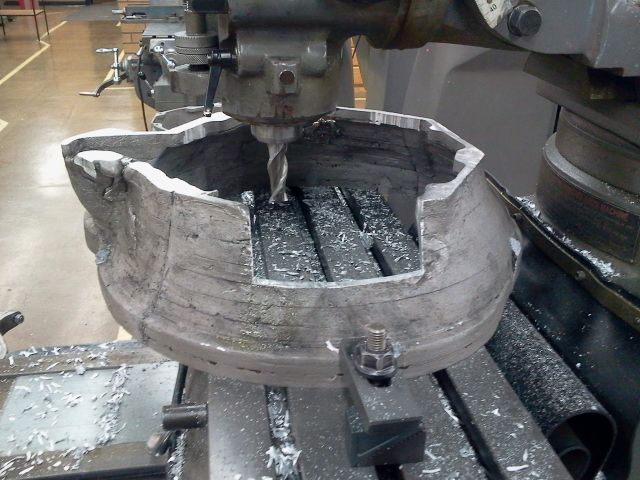
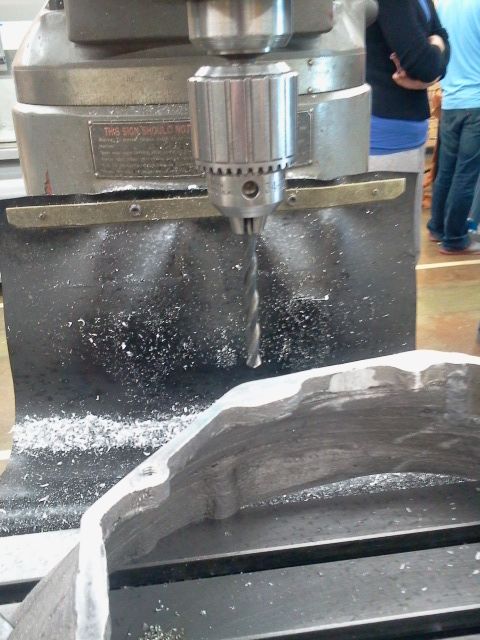
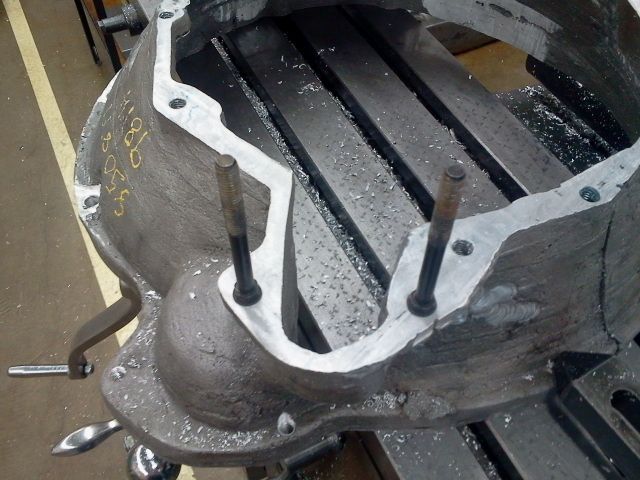
I milled the bad areas out and left an square hole:
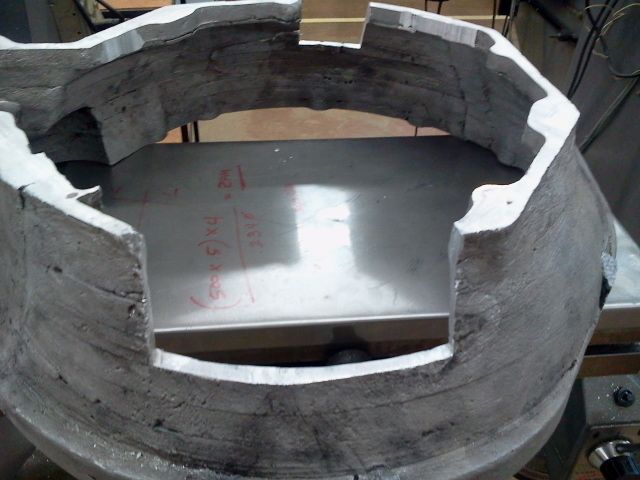
I then cut and bent a aluminum plate to fit the hole perfectly:

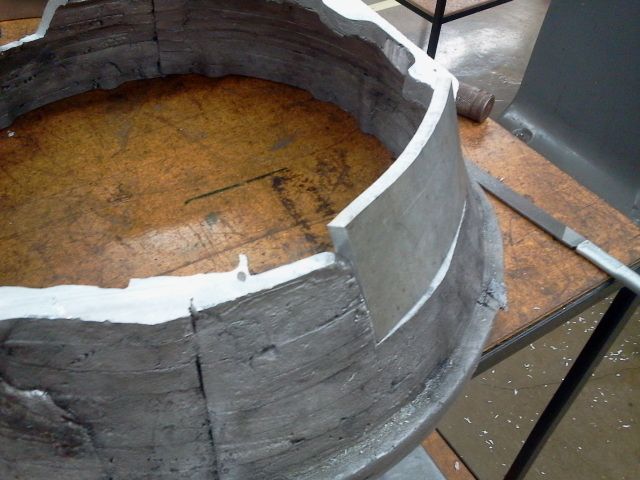
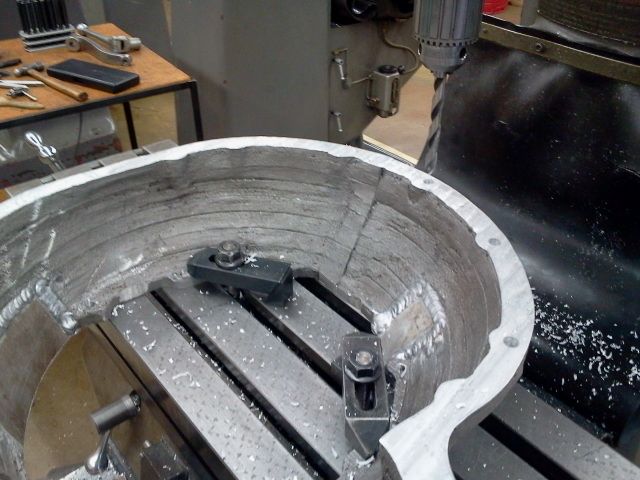
After it was tig welded into place, I surface milled the bell housing on both sides to ensure the correct bell depth:
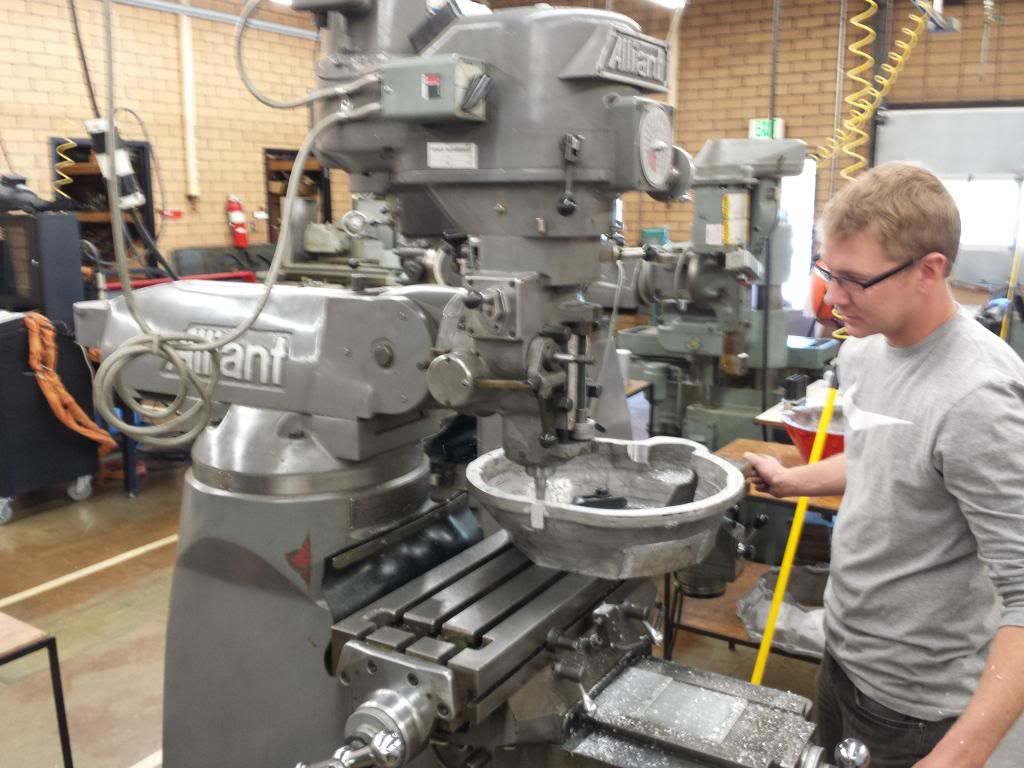
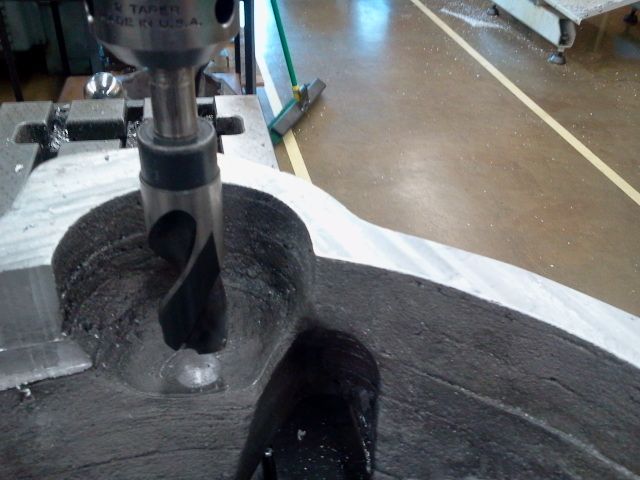
I then drilled and tapped the holes on the transmission side:
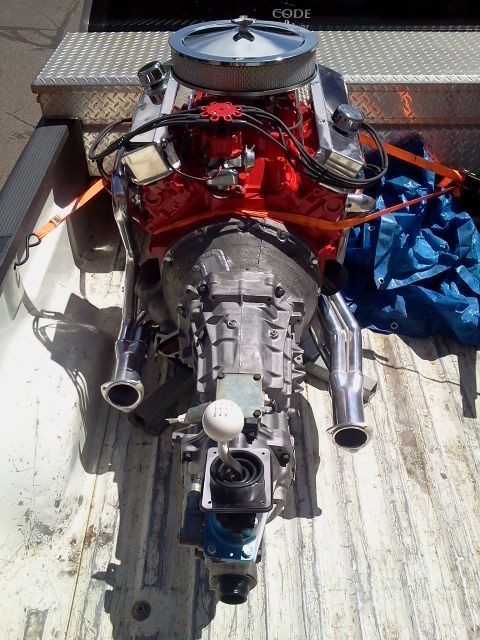
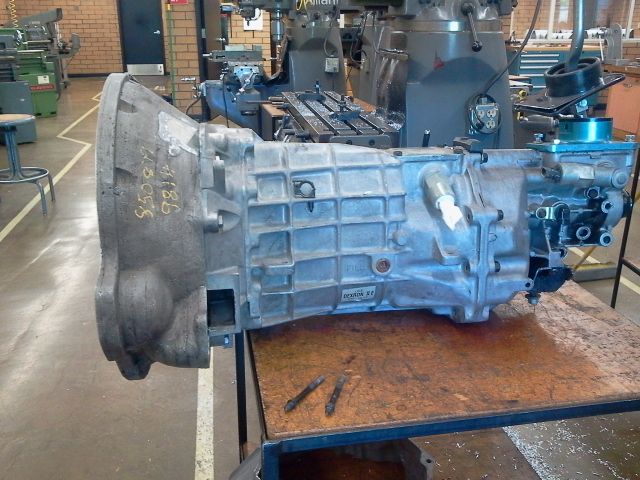
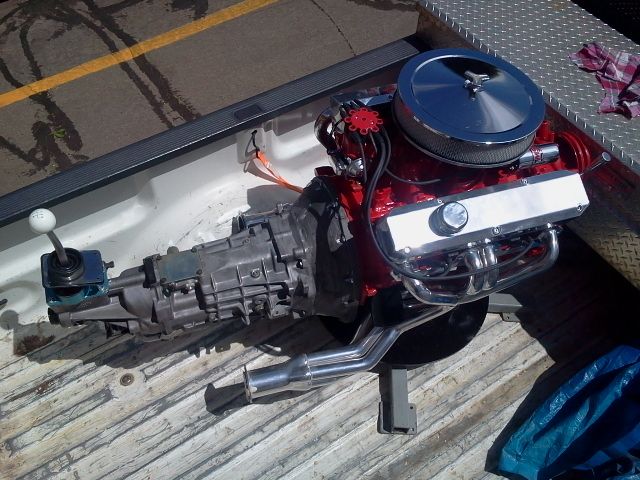
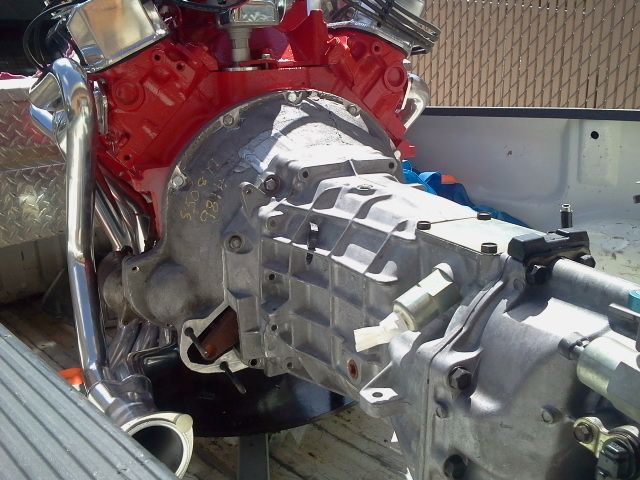
It bolted perfectly to the T56 transmission:
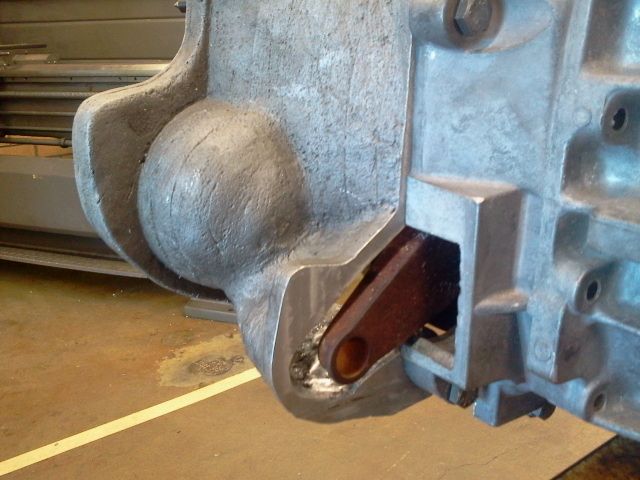
The clutch fork's hole also aligns perfectly with it:
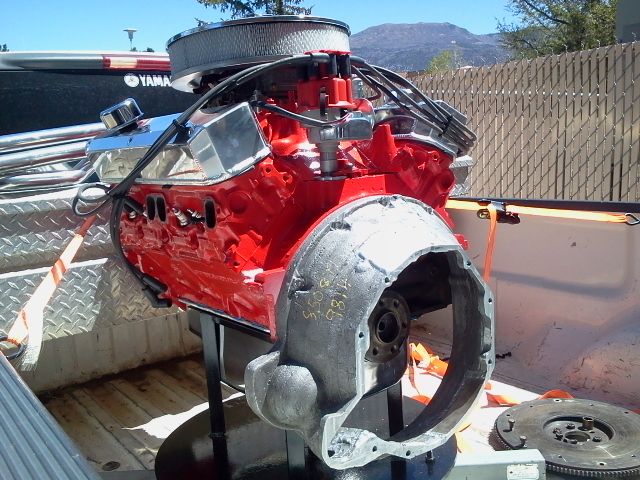
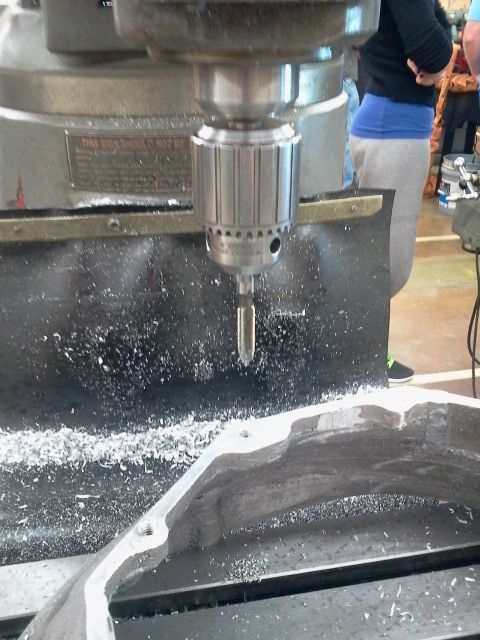
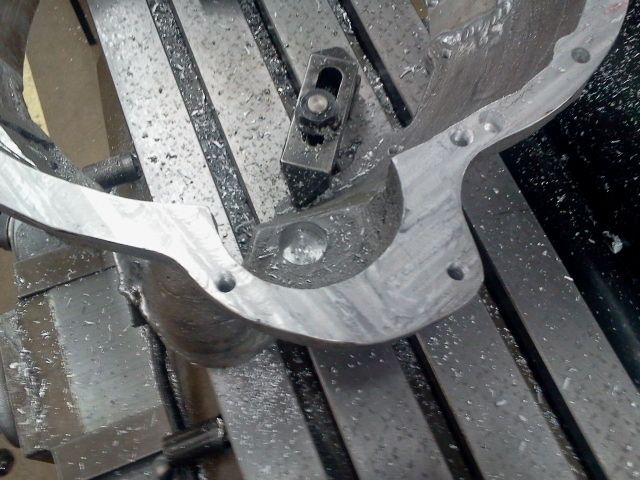
I then drilled all the holes for the engine side of the bell housing, as well as the holes to mount the starter and clutch slave cylinder:
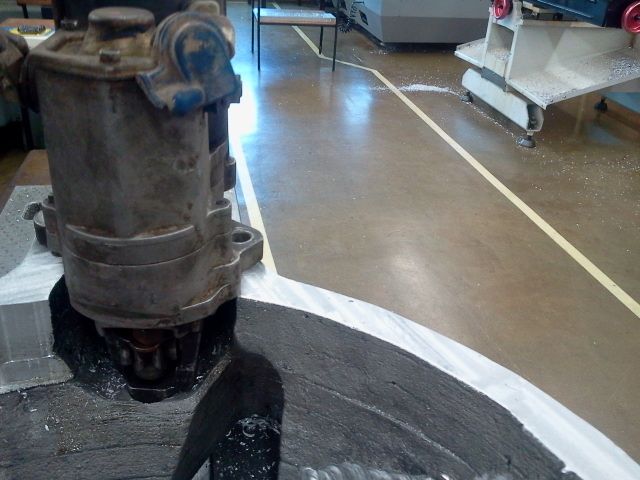
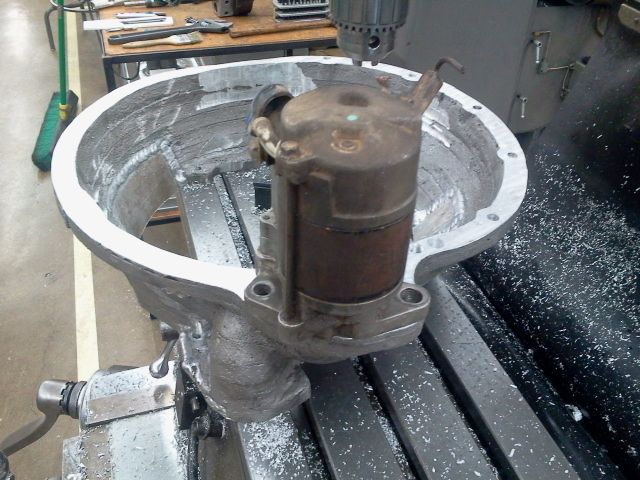
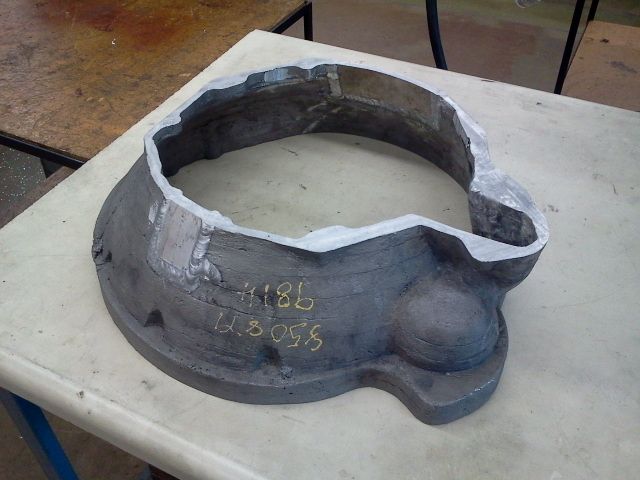
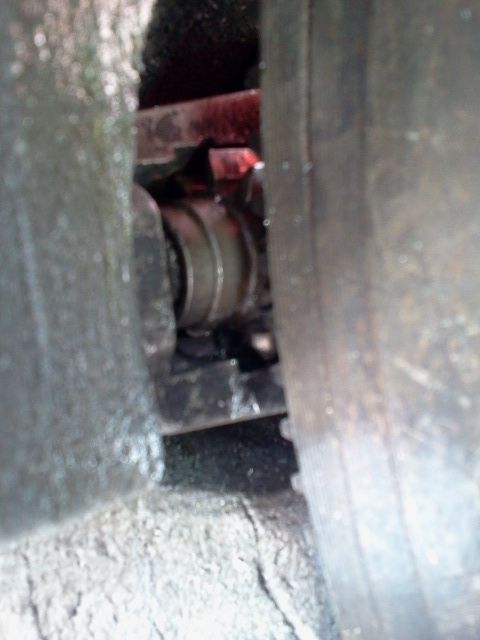
This pictures show how perfect the starter engages into the flywheel when it is all bolted to the engine:
The bell housing is finally machined!
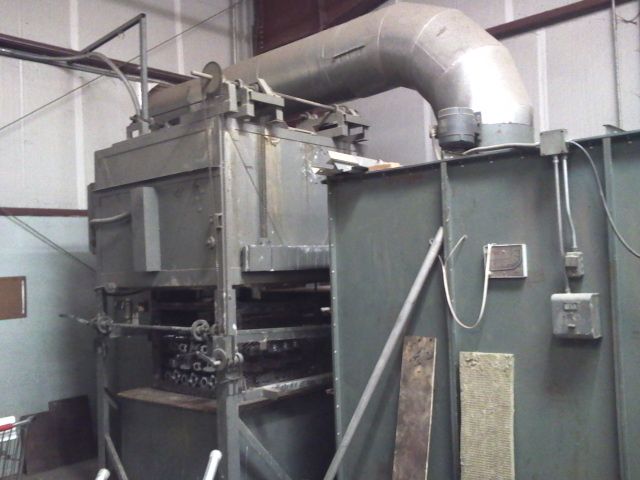
How ever, before i can bolt it together and throw it in the car, the cast aluminum needs to be heat treated to make the alloy harder and stronger.
The heat treating process was just as interesting as the casting process.
Explained:
Aluminum melts at 1200 degrees Fahrenheit, so during the heat treating process the bell housing was put into an big oven and brought up to an temperature of 1000 degrees Fahrenheit and kept at that temperature for 12 hours. The reason for this is to bring the cast aluminum to an almost melting state. This allows all the alloy molecules to travel through the aluminum matrix and rearrange them selves to a more natural and even distribution through out the bell housing. After the 12 hours is over, the bell housing was immediately dropped into cold water. This freezes all the molecules at that perfect state, ensuring a much stronger and harder aluminum alloy. Also, after aluminum is casted, it ages and gets stronger little by little for about a month. To speed this process up, the bell housing was put back into the oven and brought up to 340 degrees Fahrenheit and kept at that temperature for 4 hours. The bell housing is now as strong as any aluminum bell housing from a car manufacturing company.
Here it is placed in the oven and then brought up to 1000 degrees Fahrenheit to temper the metal:
After heat treating the bell housing it had a great noticeable difference not only in its hardnes, but also in color and the way it sounds when being tapped with something.

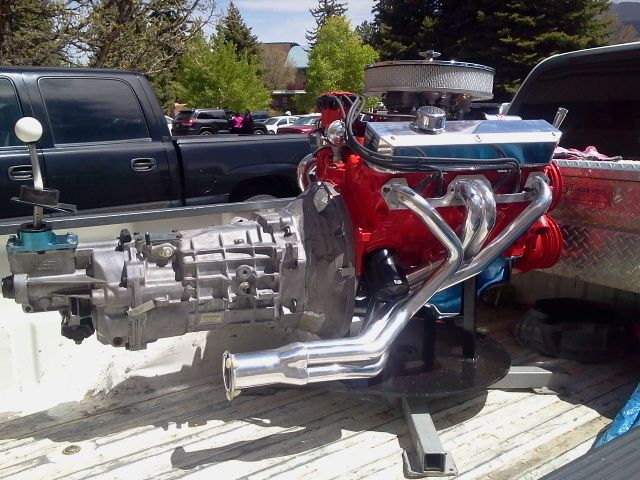
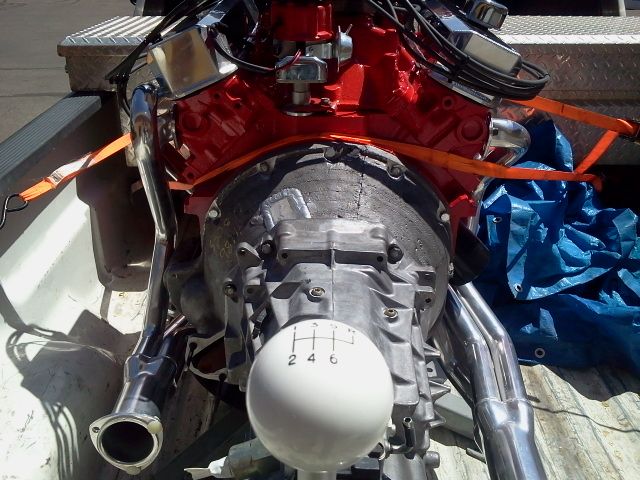
Here are some more pictures of it all bolted together, including starter:
Thank you for following
Louwtjie
Here it is after the final maching attached to both the engine and transmission:


Here's the story and machining prosess:
The morning after we casted the aluminum, i dug the sand out of the flask, excited like a kid on Christmas. Buried in the sand was the bell housing i worked so long and hard for!


After I took it out and cleaned the sand of it, I noticed that there were a few flaws in the casting. Two areas where the aluminum froze and left an bad area. This was nothing too bad and could easily be corrected.

I milled the bad areas out and left an square hole:


I then cut and bent a aluminum plate to fit the hole perfectly:


After it was tig welded into place, I surface milled the bell housing on both sides to ensure the correct bell depth:


I then drilled and tapped the holes on the transmission side:


It bolted perfectly to the T56 transmission:

The clutch fork's hole also aligns perfectly with it:

I then drilled all the holes for the engine side of the bell housing, as well as the holes to mount the starter and clutch slave cylinder:


This pictures show how perfect the starter engages into the flywheel when it is all bolted to the engine:

The bell housing is finally machined!
How ever, before i can bolt it together and throw it in the car, the cast aluminum needs to be heat treated to make the alloy harder and stronger.
The heat treating process was just as interesting as the casting process.
Explained:
Aluminum melts at 1200 degrees Fahrenheit, so during the heat treating process the bell housing was put into an big oven and brought up to an temperature of 1000 degrees Fahrenheit and kept at that temperature for 12 hours. The reason for this is to bring the cast aluminum to an almost melting state. This allows all the alloy molecules to travel through the aluminum matrix and rearrange them selves to a more natural and even distribution through out the bell housing. After the 12 hours is over, the bell housing was immediately dropped into cold water. This freezes all the molecules at that perfect state, ensuring a much stronger and harder aluminum alloy. Also, after aluminum is casted, it ages and gets stronger little by little for about a month. To speed this process up, the bell housing was put back into the oven and brought up to 340 degrees Fahrenheit and kept at that temperature for 4 hours. The bell housing is now as strong as any aluminum bell housing from a car manufacturing company.
Here it is placed in the oven and then brought up to 1000 degrees Fahrenheit to temper the metal:


After heat treating the bell housing it had a great noticeable difference not only in its hardnes, but also in color and the way it sounds when being tapped with something.


Here are some more pictures of it all bolted together, including starter:


Thank you for following
Louwtjie
mopar_muscle
Well-Known Member
From the dream to reality:
I'm very thankful for having the opportunity to create something like this, and appreciate all the help i got along the way.
Louwtjie


I'm very thankful for having the opportunity to create something like this, and appreciate all the help i got along the way.
Louwtjie
-


