The Great Pumpkin - '71 Duster
So I thought I had the crank all buttoned up but no dice. I went to check end play and it was .002". Not good!
I tried to re-seat the crank by smacking it back and forth with a dead blow hammer but it wouldn't budge. So, the caps came off and out came the crank.
I went around with this a few times, mostly because I didn't really know exactly what I was doing. I have learned that crank end play is similar to backlash on a diff. where you just want enough movement for a margin of safety. You can actually feel the crank move a little with the caps on. Factory spec for this is somewhere between .002"-.007". With a hi-po engine it's better to be on the looser side. Some say to start at .006" and up to .010" is acceptable.
So not knowing what I was doing was more related to how it feels. When I first checked it, it wouldn't move at all but I didn't realize it wasn't moving because of insufficient clearance. I was prying on the crank throw with a big screwdriver trying to get it move but it was getting hung up on something. Leaning in the screwdriver also gives false readings because it really only takes a little nudge to get the dial indicator to move.
After a few tries, I took the #3 thrust bearing out. I read in the Big Inch Mopar Small Blocks book that you can rub the #3 bearing thrust surface on some emery paper to get the clearance. So that's what I did. Took a while to get it to where I needed it and the thrust surface seemed like it may have had some definite high spots. After every round of sanding, I checked the width with a caliper to try and gauge how much I was taking off. It's wasn't easy to do it that way. What I failed to do was do both at the same time so as to not have any discrepancy between the top and bottom half. I believe any difference was minimal though.
SO I put the modified bearing and still no change. Out came the crank again, this time to check the caps. It was suggested to me over on Moparts that the caps may have not been cut perfectly square. I didn't think that was likely though - I reasoned that the oil clearances were dead nuts. But the clearances really have nothing to do with how square the cap surfaces are to the block.
So I looked and sure enough, there was a spot on the rear cap where the cutter did not make a perfect cut towards the outside front of the cap which may have been causing it to bind ever so slightly. I hit it with a stone to even it out but really, nothing significant, just a few light passes. I checked the rest for burrs and found one that I also hit with the stone.
So all of it goes back together again but this time must have been the charm. I finally stumbled on the movement I was looking for, just a little back and forth with a slight pry on the crank throw. Not sure why I didn't get it before, maybe the cap really was the culprit. Perhaps it wasn't seating right, I don't really know.
Regardless, my clearance without the caps was now .010". The caps all went back on while checking clearances at every step and it stayed good. After all the caps were installed, I still lost a few thousandths (to be expected) but it was right at .007. Perfect!
So now that the end play is good, on to the next step which is installing the rods and pistons on to the crank. I will need to check the oil clearances on the rods though and I'll probably use Plastigauge for that since A) the pistons are already on the rods and B) even if they were not, I'd still have no way to torque the rod bolts down and check to check with a dial gunge because I don't have a rod vise. (Hope that makes sense to you) Hope this goes a little smoother than the end play. I am feeling a little wary of doing the rods though since I will be using a rod bolt stretch gauge for the first time.
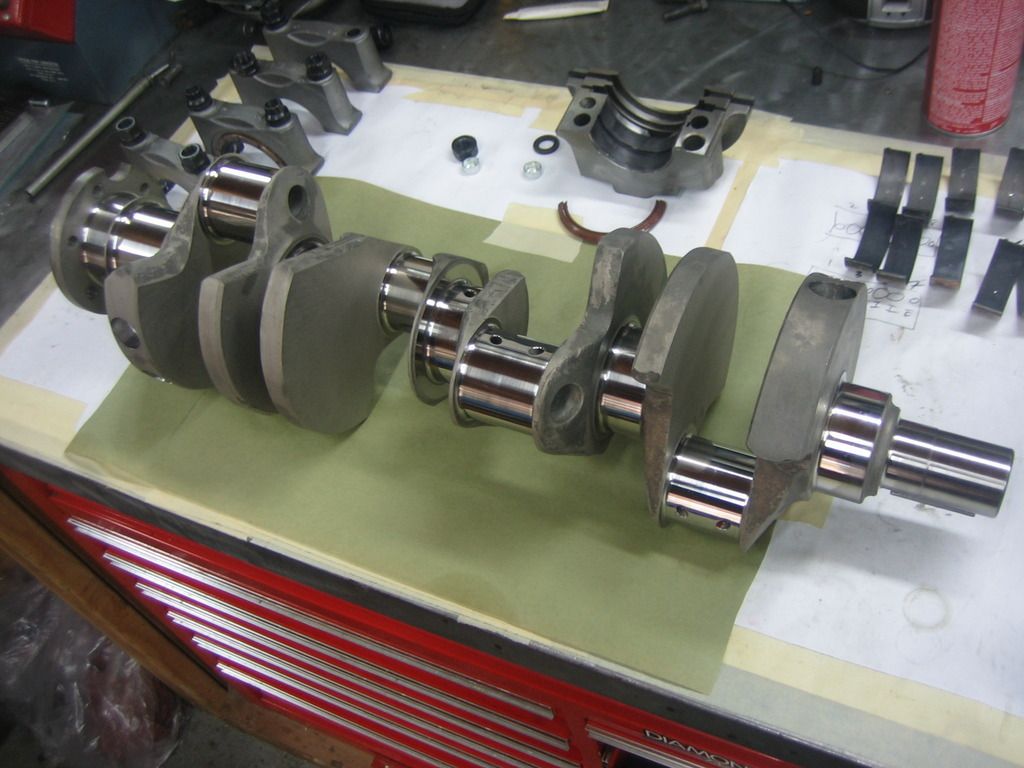
Here's the 4" BPE crank with the caps and bearings ready to go in the block. Note my attempt to be neat and organized
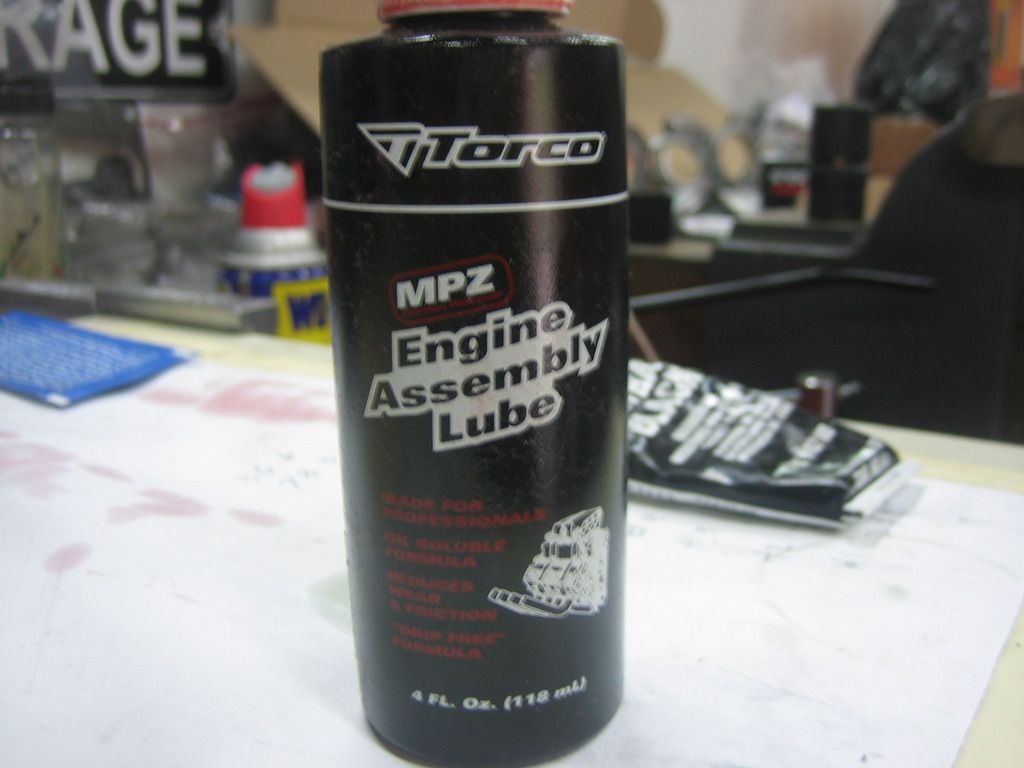
This is the engine assembly lube I used. It's sticky, kinda gets everywhere if you're not careful. I've had to wash it off several times. I changed to the Permatex brand which is basically the same but less expensive and easier to clean.
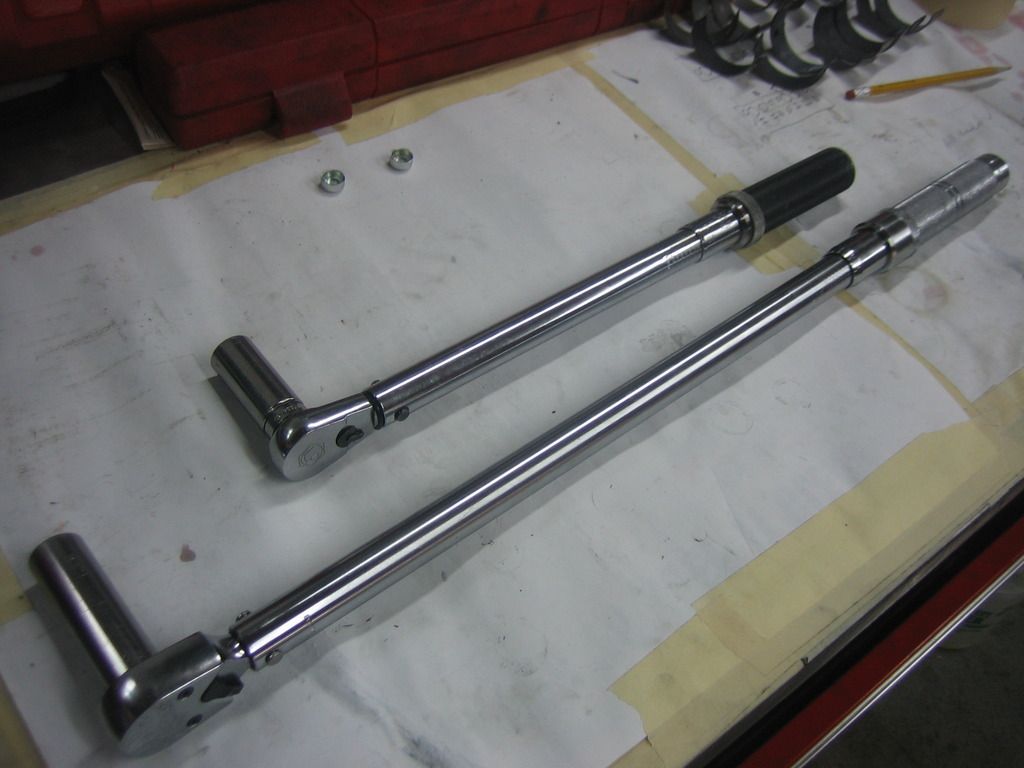
This pic shows the method I used for torquing the main caps down. The ARP instructions say to get to your final torque in three equal steps. If I had one torque wrench, I'd be adjusting it 3 times for every stud. With the two, I only have to adjust one wrench one time. Lot easier! Incidentally, the stud kit I got from Hughes has one regular bolt in it which clears the oil pump. The bolt gets torqued to 85 ft lbs, unlike the studs which get 110 ft lbs. The #3 studs also have 12 pt nuts as opposed to hex so I had to switch out the socket when doing that cap.
Checking end play. When I took this pic, I realized the little tip on the dial indicator plunger was missing. Doh! Found another one and stuck it on. The other dial indicator I have was taken apart, all the screws were off the back cover. I didn't remember doing that. I think I may have dropped it and was checking it out but stopped and got another one. Strange.

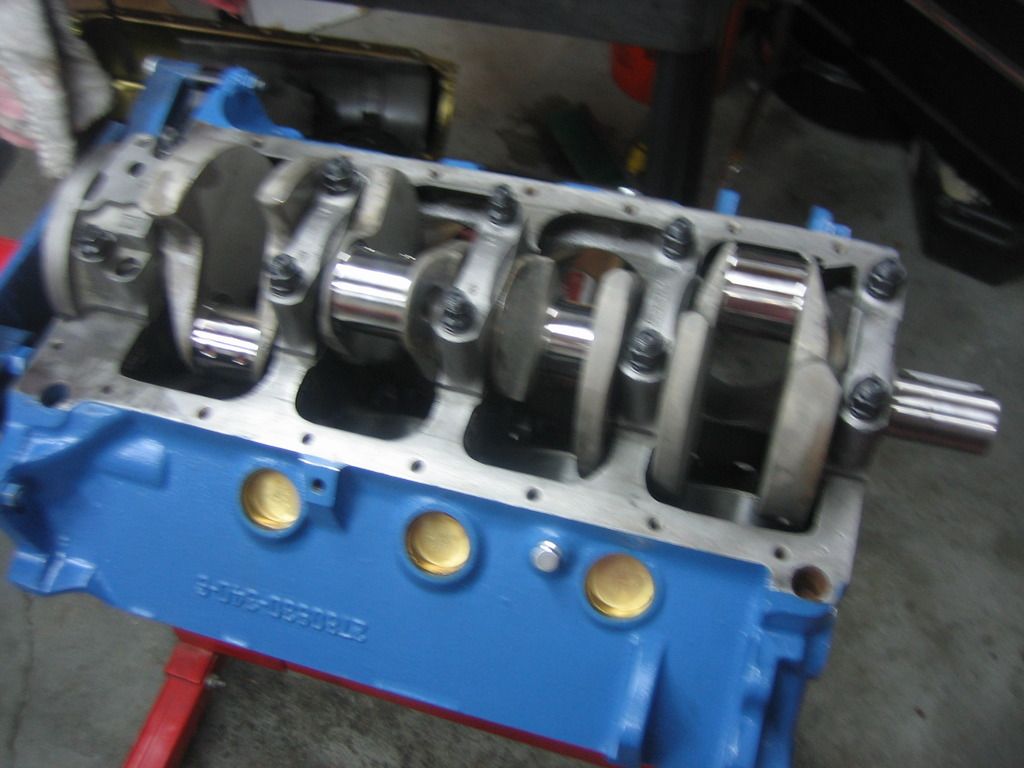
Here's the crank in for good with the end play right.
Sorry for the blurry pics. More to come.
So I thought I had the crank all buttoned up but no dice. I went to check end play and it was .002". Not good!
I tried to re-seat the crank by smacking it back and forth with a dead blow hammer but it wouldn't budge. So, the caps came off and out came the crank.
I went around with this a few times, mostly because I didn't really know exactly what I was doing. I have learned that crank end play is similar to backlash on a diff. where you just want enough movement for a margin of safety. You can actually feel the crank move a little with the caps on. Factory spec for this is somewhere between .002"-.007". With a hi-po engine it's better to be on the looser side. Some say to start at .006" and up to .010" is acceptable.
So not knowing what I was doing was more related to how it feels. When I first checked it, it wouldn't move at all but I didn't realize it wasn't moving because of insufficient clearance. I was prying on the crank throw with a big screwdriver trying to get it move but it was getting hung up on something. Leaning in the screwdriver also gives false readings because it really only takes a little nudge to get the dial indicator to move.
After a few tries, I took the #3 thrust bearing out. I read in the Big Inch Mopar Small Blocks book that you can rub the #3 bearing thrust surface on some emery paper to get the clearance. So that's what I did. Took a while to get it to where I needed it and the thrust surface seemed like it may have had some definite high spots. After every round of sanding, I checked the width with a caliper to try and gauge how much I was taking off. It's wasn't easy to do it that way. What I failed to do was do both at the same time so as to not have any discrepancy between the top and bottom half. I believe any difference was minimal though.
SO I put the modified bearing and still no change. Out came the crank again, this time to check the caps. It was suggested to me over on Moparts that the caps may have not been cut perfectly square. I didn't think that was likely though - I reasoned that the oil clearances were dead nuts. But the clearances really have nothing to do with how square the cap surfaces are to the block.
So I looked and sure enough, there was a spot on the rear cap where the cutter did not make a perfect cut towards the outside front of the cap which may have been causing it to bind ever so slightly. I hit it with a stone to even it out but really, nothing significant, just a few light passes. I checked the rest for burrs and found one that I also hit with the stone.
So all of it goes back together again but this time must have been the charm. I finally stumbled on the movement I was looking for, just a little back and forth with a slight pry on the crank throw. Not sure why I didn't get it before, maybe the cap really was the culprit. Perhaps it wasn't seating right, I don't really know.
Regardless, my clearance without the caps was now .010". The caps all went back on while checking clearances at every step and it stayed good. After all the caps were installed, I still lost a few thousandths (to be expected) but it was right at .007. Perfect!
So now that the end play is good, on to the next step which is installing the rods and pistons on to the crank. I will need to check the oil clearances on the rods though and I'll probably use Plastigauge for that since A) the pistons are already on the rods and B) even if they were not, I'd still have no way to torque the rod bolts down and check to check with a dial gunge because I don't have a rod vise. (Hope that makes sense to you) Hope this goes a little smoother than the end play. I am feeling a little wary of doing the rods though since I will be using a rod bolt stretch gauge for the first time.
Here's the 4" BPE crank with the caps and bearings ready to go in the block. Note my attempt to be neat and organized
This is the engine assembly lube I used. It's sticky, kinda gets everywhere if you're not careful. I've had to wash it off several times. I changed to the Permatex brand which is basically the same but less expensive and easier to clean.
This pic shows the method I used for torquing the main caps down. The ARP instructions say to get to your final torque in three equal steps. If I had one torque wrench, I'd be adjusting it 3 times for every stud. With the two, I only have to adjust one wrench one time. Lot easier! Incidentally, the stud kit I got from Hughes has one regular bolt in it which clears the oil pump. The bolt gets torqued to 85 ft lbs, unlike the studs which get 110 ft lbs. The #3 studs also have 12 pt nuts as opposed to hex so I had to switch out the socket when doing that cap.
Checking end play. When I took this pic, I realized the little tip on the dial indicator plunger was missing. Doh! Found another one and stuck it on. The other dial indicator I have was taken apart, all the screws were off the back cover. I didn't remember doing that. I think I may have dropped it and was checking it out but stopped and got another one. Strange.
Here's the crank in for good with the end play right.
Sorry for the blurry pics. More to come.