70 duster: updating, and a no-dough pro-touring makeover
Last budget: 10290.34ish
Money spent and made:
Sold the 340 leaves -100
Sold the big block torsion bars -200
pst 1.08 tbars 230
Qa1 adjustable strut rods: 180
Spax adjustable shocks: 239
2 inch blocks: 20
Speedway leaf spring sliders: 69
4x4x6x1/4 leaf spring slider steel 18
Techflex f6 loom 50
Plugs/wires/cap/rotor 25
Spartan2 wideband and controller 100
Sweet mfg u joint 53
New total: 10,974.34 ish
Long time, no updates. But I have an EXCUSE this time!!!
But it a pretty lame excuse, so I wont use it.
I also don't have a bunch of pictures, because I honestly didn't take them. I got engrossed in building the harness, and just kept going. I find wiring to be very therapeutic and zen-like.
So, first up is the suspension tweaks. I honestly always felt the car was under-sprung and over-damped with the kyb’s, 340 leaves, big block torsion bars, etc. My steering coupler also needed rebuilt again, and my adjustable strut rods were seized sold and had to be cut out to remove. So yeah, pretty rough. I sold what I could, scrapped the rest. The t-bars went to California, the 340 leaves went to Roy in exchange for his worn out stockers, and the strut rods are in the scrap metal bin. The kybs are in cold storage helping to hold the floor down. Anybody want fairly fresh KYB shocks?
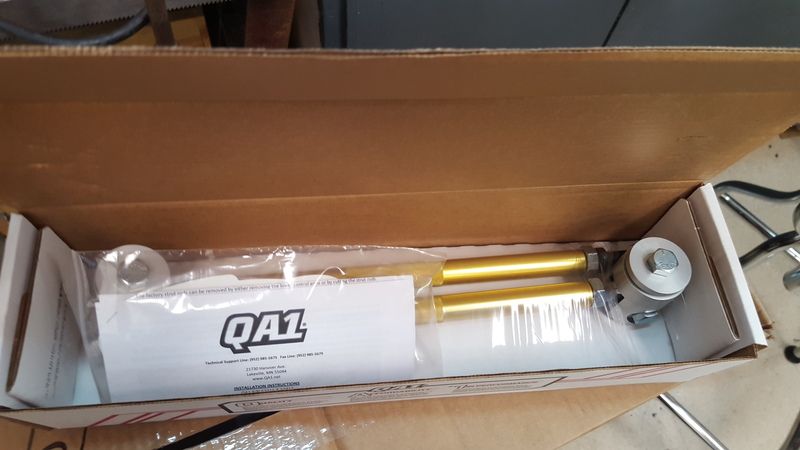
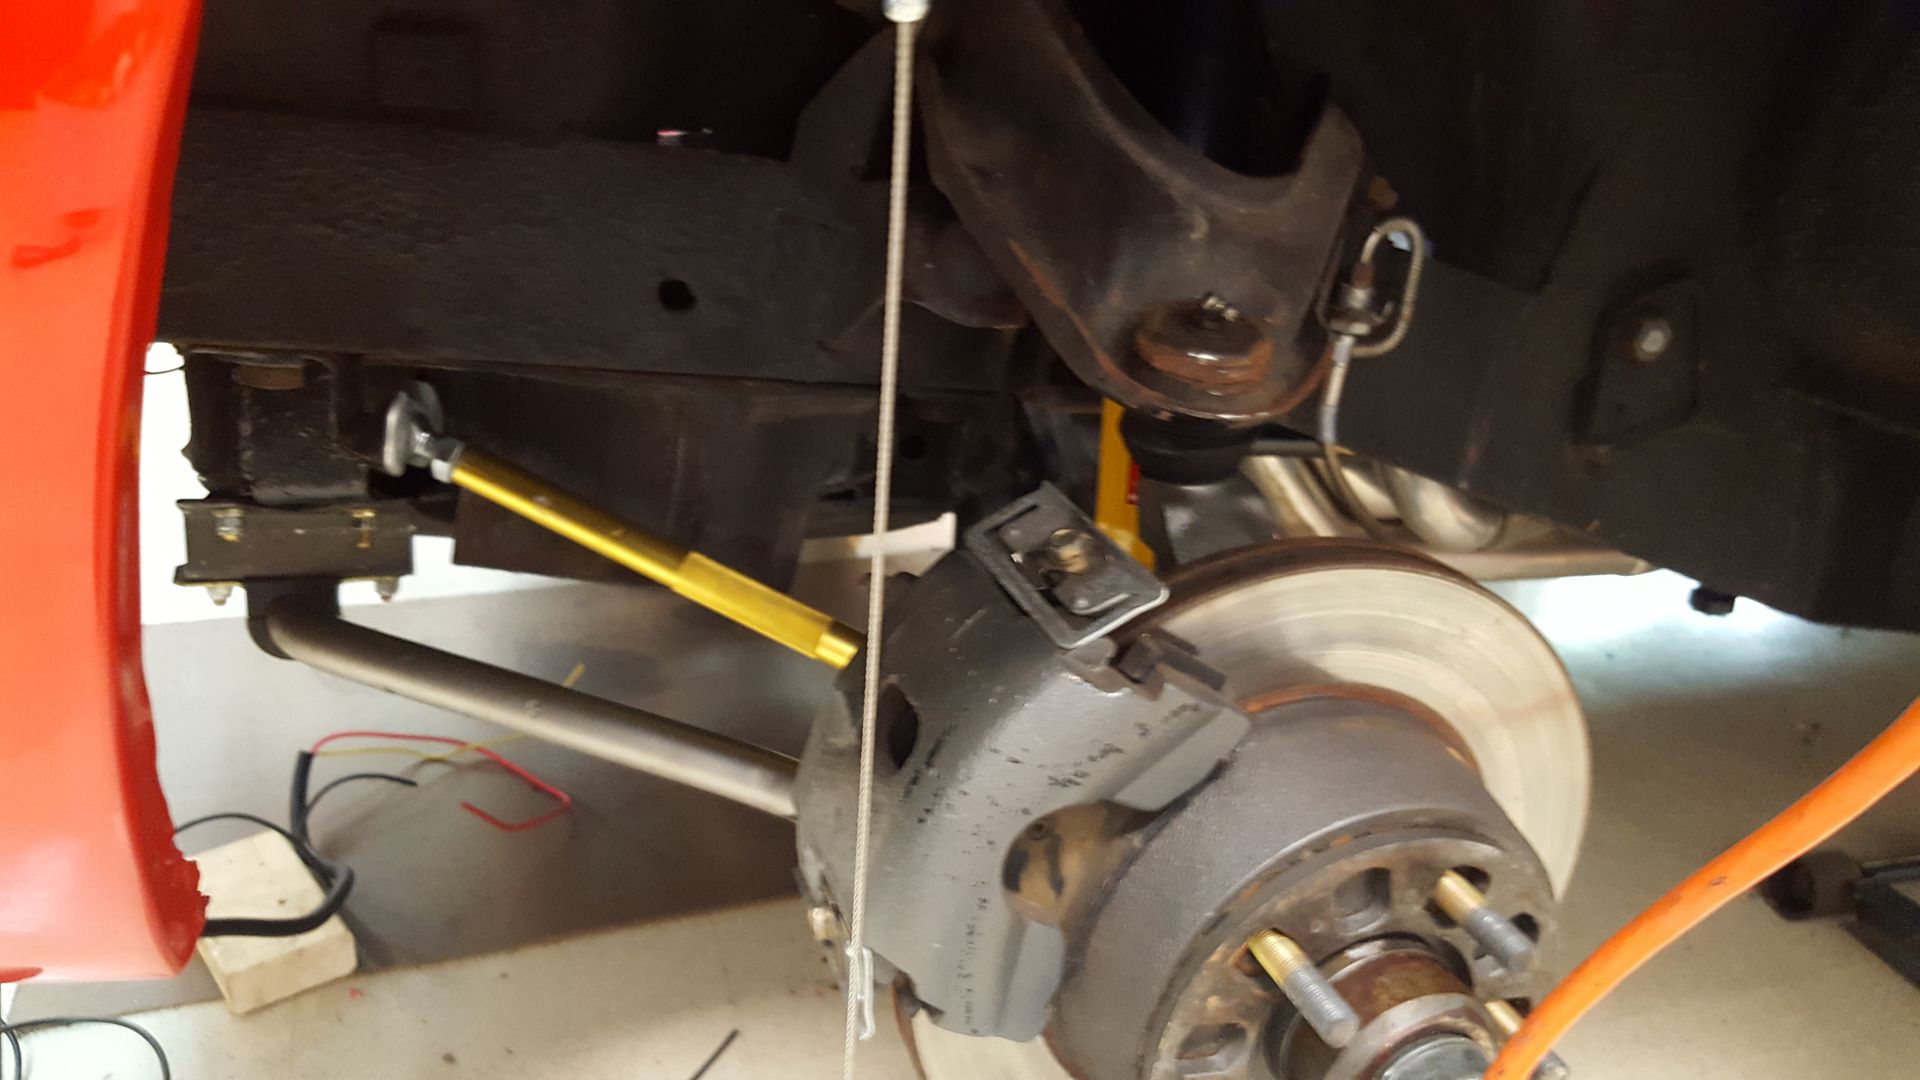
So up front, I replaced the chopped up strut rods with qa1 adjustable because they were inexpensive, looked to be well engineered, and readily repairable should the worst happen. Coated them up with never-seize because the ends are steel and the tube is aluminum, and I know there is some issues with that when you add water. I also went with PST torsion bars, and spax adjustable shocks.
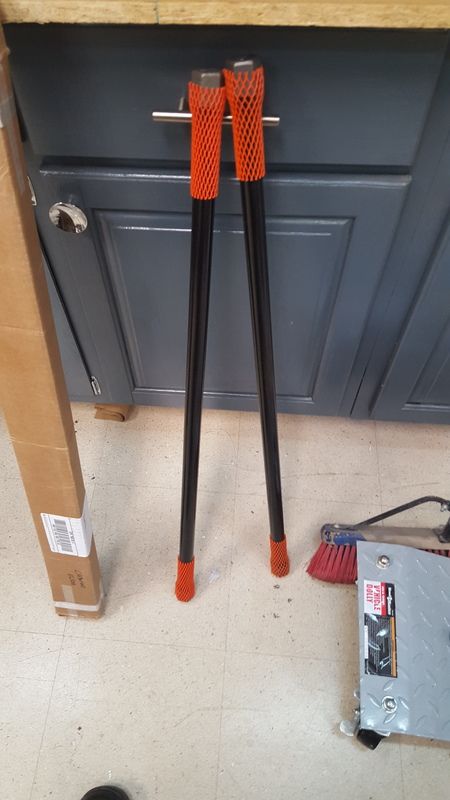
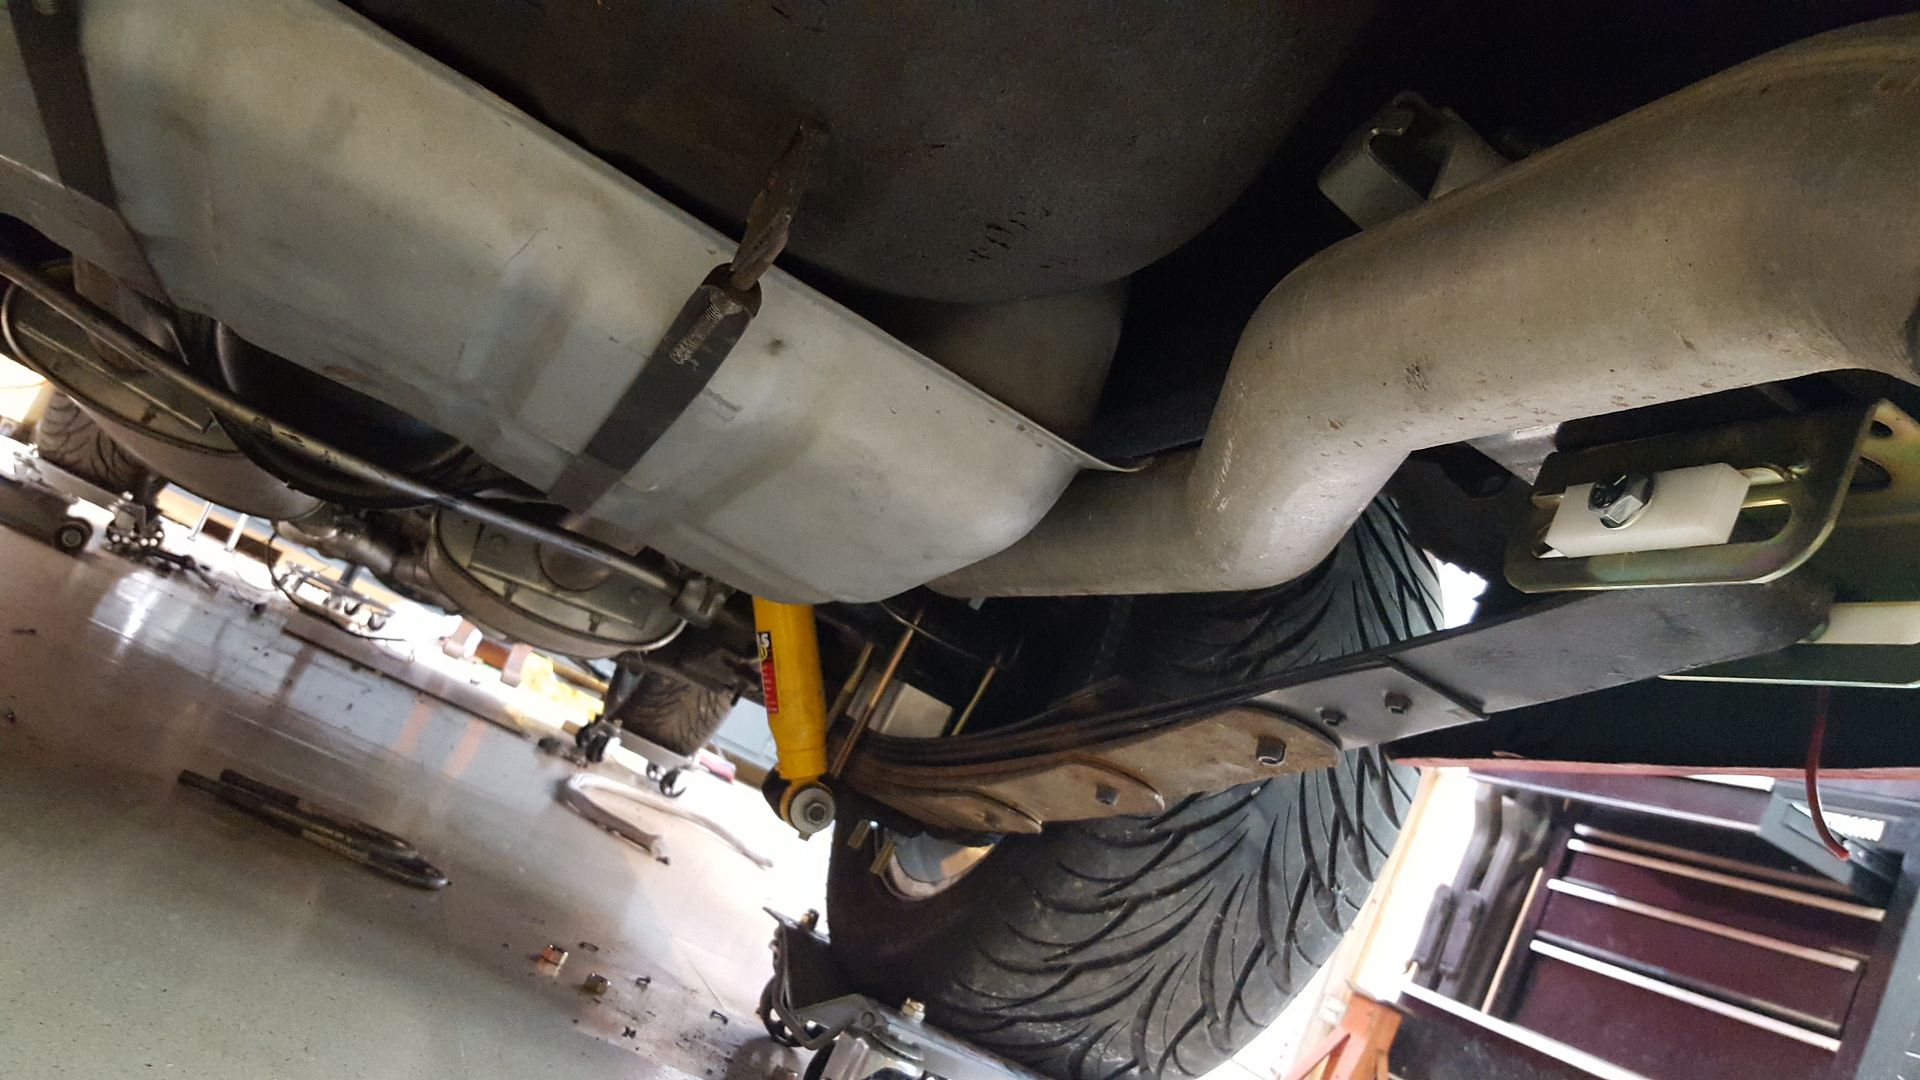
In the rear, I wanted to try something completely lunatic fringe. Taking a page from the circle track/road race guys, I'm experimenting. I wanted to try my hand a a custom built leaf pack, as well as try out sliders. So I did.
I built, using Roy's worn out cuda springs and a set of junkyard durango springs, a 7 leaf pack with a spring on top of the main leaf to act as a traction/brake hop bar. They're right at 200 lb/in at the moment, so they may be too stuff. But with as simple as building the pack is, its easy to experiment with different leaves and lengths. The leaf pack I built wound up raising the car about 3 inches over where I had it on flipped hangars and 10 year old 340 leaves. I wanted about 1/2-1 inch higher, so we got too much. Grabbed a set of 2 inch lowering blocks at the parts store, and away I went!!
The sliders aren't finished yet, as I'm still arguing with the voices in my head about how to build the mounts. But I think I have a plan now. Maybe.
Here's the mock up.

Ok, next up I guess is going to be the very verbose, very dry, completely un-entertaining and baffling wall of text about wiring. Feel free to skip to the end, as there will be very few pictures worth looking at until then.
After building the main power distribution system in the last post consisting of ground wires, distribution panels, alternator wires, etc, we now have to put it to use. This is done with plenty of little wires of various colors going to various things. And so....
On most harnesses I have built for the old cars, I have come to the conclusion (right or wrong) that I don't want all the current going through the ignition switch. Mostly because they aren't rated for what the updates are pulling now (there's really no empirical data on amp ratings that I have found, but charging systems of the day were 75 at the HIGH end. Smallest alternator I have installed lately is 105 amp. So yeah, don't want that being sent through a Chinese copy of a 40 year old design...) so I relay the whole system. I use a panel that I found on eBay from Britain of all places, and only sent a 3 amp load through the switch itself. Use the switch to fire 4 relays accessory1 &2 (30a ea) starter (30a) and ignition (30a). I like doing it this way. I use Chrysler relays from wrecked 90s era FWD mopars, as they are robust, cheap, and over engineered. I use the Bosch 5 pin relay wiring diagram found almost anywhere. As my daughter would say, “easy peasey lemon squeezy!”. I also tend, on my own stuff, to use EZ wiring 21 circuit harness kits. They suck horribly. Poorly laid out, indecipherable writing without glasses, and slightly undersized in some circuits. Also, no ground wires, anywhere. At all. And if you're counting on the contents of the box to have all the terminals you'll need, you're wrong. American autowire is a much better product in every conceivable way, except price. I use these as the cheapest source of bulk colored wire and a fuse panel I can find. Immediately upon removing the harness from the box, I cut every zip tie and unloom it from the way the manufacturer laid it out. Out of 10 times I have installed one of these, only once was it anywhere close to how I wanted it laid out in the car. Its just easier to get the hassle of rerouting it all out of the way at the beginning.
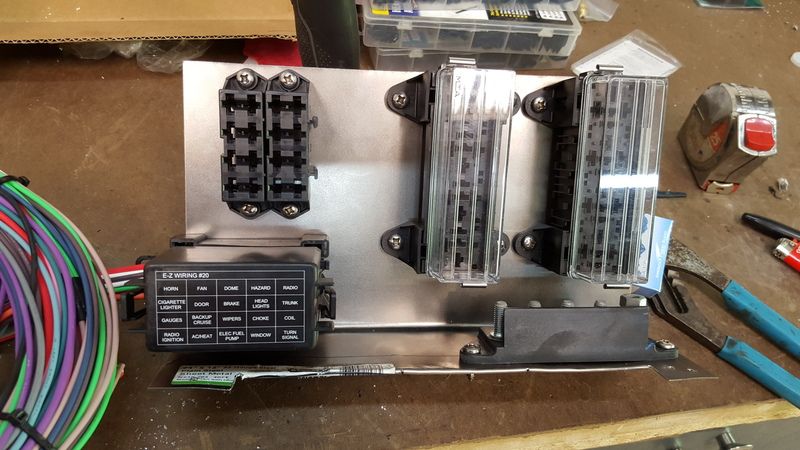
So, in this car, I needed effectively two separate wiring harnesses. The main chassis harness, which powers everything but the EFI, and the EFI. I designed it in such as way that there are only 3 wires that cross between the two: batter feed to both sets of relays, one wire from the ignition relay to the megasquirt relays, and a ground screw for the relays. Everything else is separate. Relays also act as a filter for electrical noise, so using them is very beneficial. I also needed separate fuses for the injectors, megasquirt, fuel pump, and wideband. This whole fuse block is powered from the main relay, which is powered from the ignition relay.
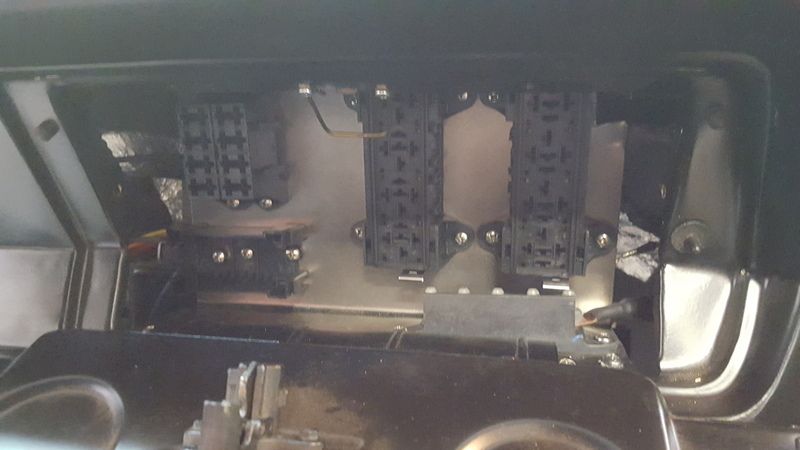
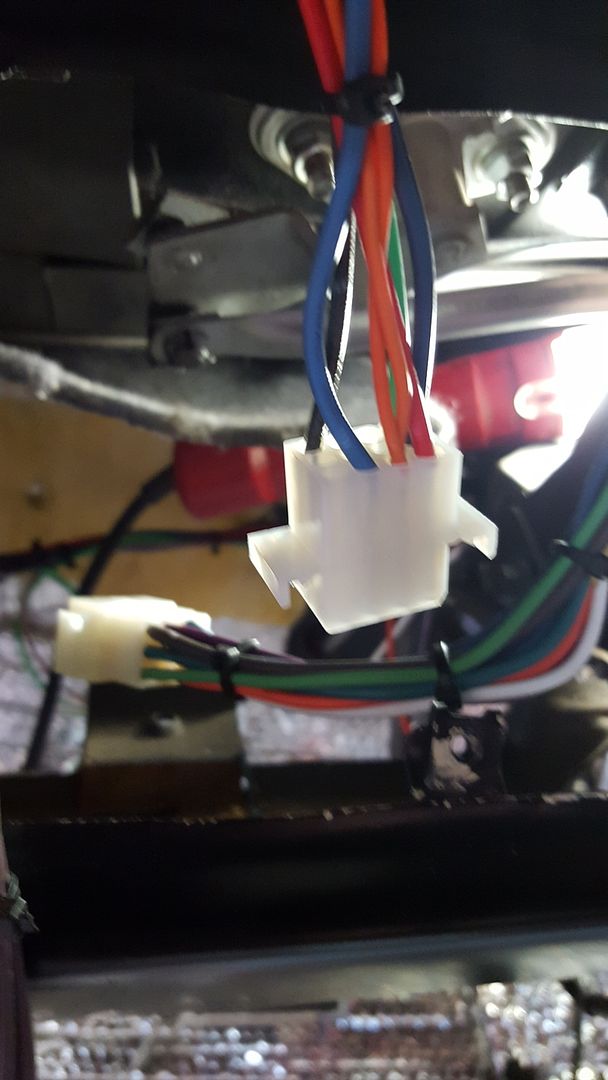
Anyway, here's a picture of the panel I made for the glove compartment to hold all this crap.

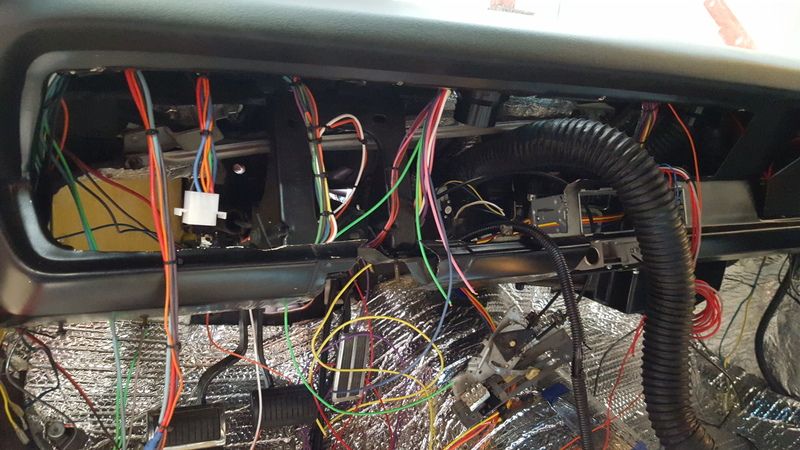
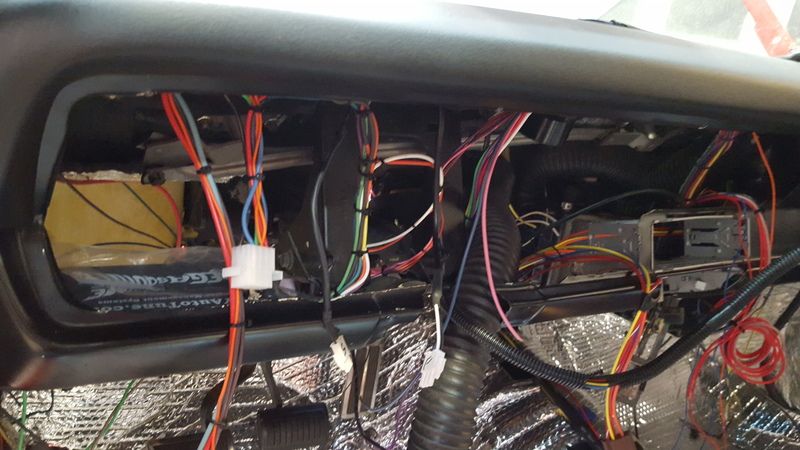
Now comes the part that either makes or breaks the whole job. Routing the harness. It needs to be accessible, but tidy and hidden in plain sight. Its one of those jobs that when done well is not noticed, even though everyone can see it. Its very daunting. My method goes through a TON of zip ties. I tend to string one circuit at a time. Typically I start with the ignition switch and relay power. Now, I've done enough harnesses that I have a general idea of how big the bundles will be, and how they will need to be routed. I also, before starting to string wires, locate ALL electrical components where they will live permanently. Then, its just a matter of playing connect the dots. I also make certain to leave enough slack in my wiring drops to be able to easily service things later. It sucks digging around under a dash for the gauge cluster connectors because you didn't leave enough slack to fit your hand between the instrument panel and dash frame.
Which brings me to my next topic: harness connectors. In most cases, there is no good reason to permanently wire a component. Most things WILL fail on a long enough time line, and having to cut them out of the harness just to re-splice things is tedious and unnecessary. I tend to use a variety of connectors. My preferred are GM wetherpack, and radio shack 12 pin computer power terminals. They are readily available almost anywhere, easy to assemble and disassemble, and carry up to 15 amps reliably (you can do 30 amp loads, but the terminals are harder to find, and I prefer a Packard style for higher amp loads.)
Anyway, here's some random pictures I took.
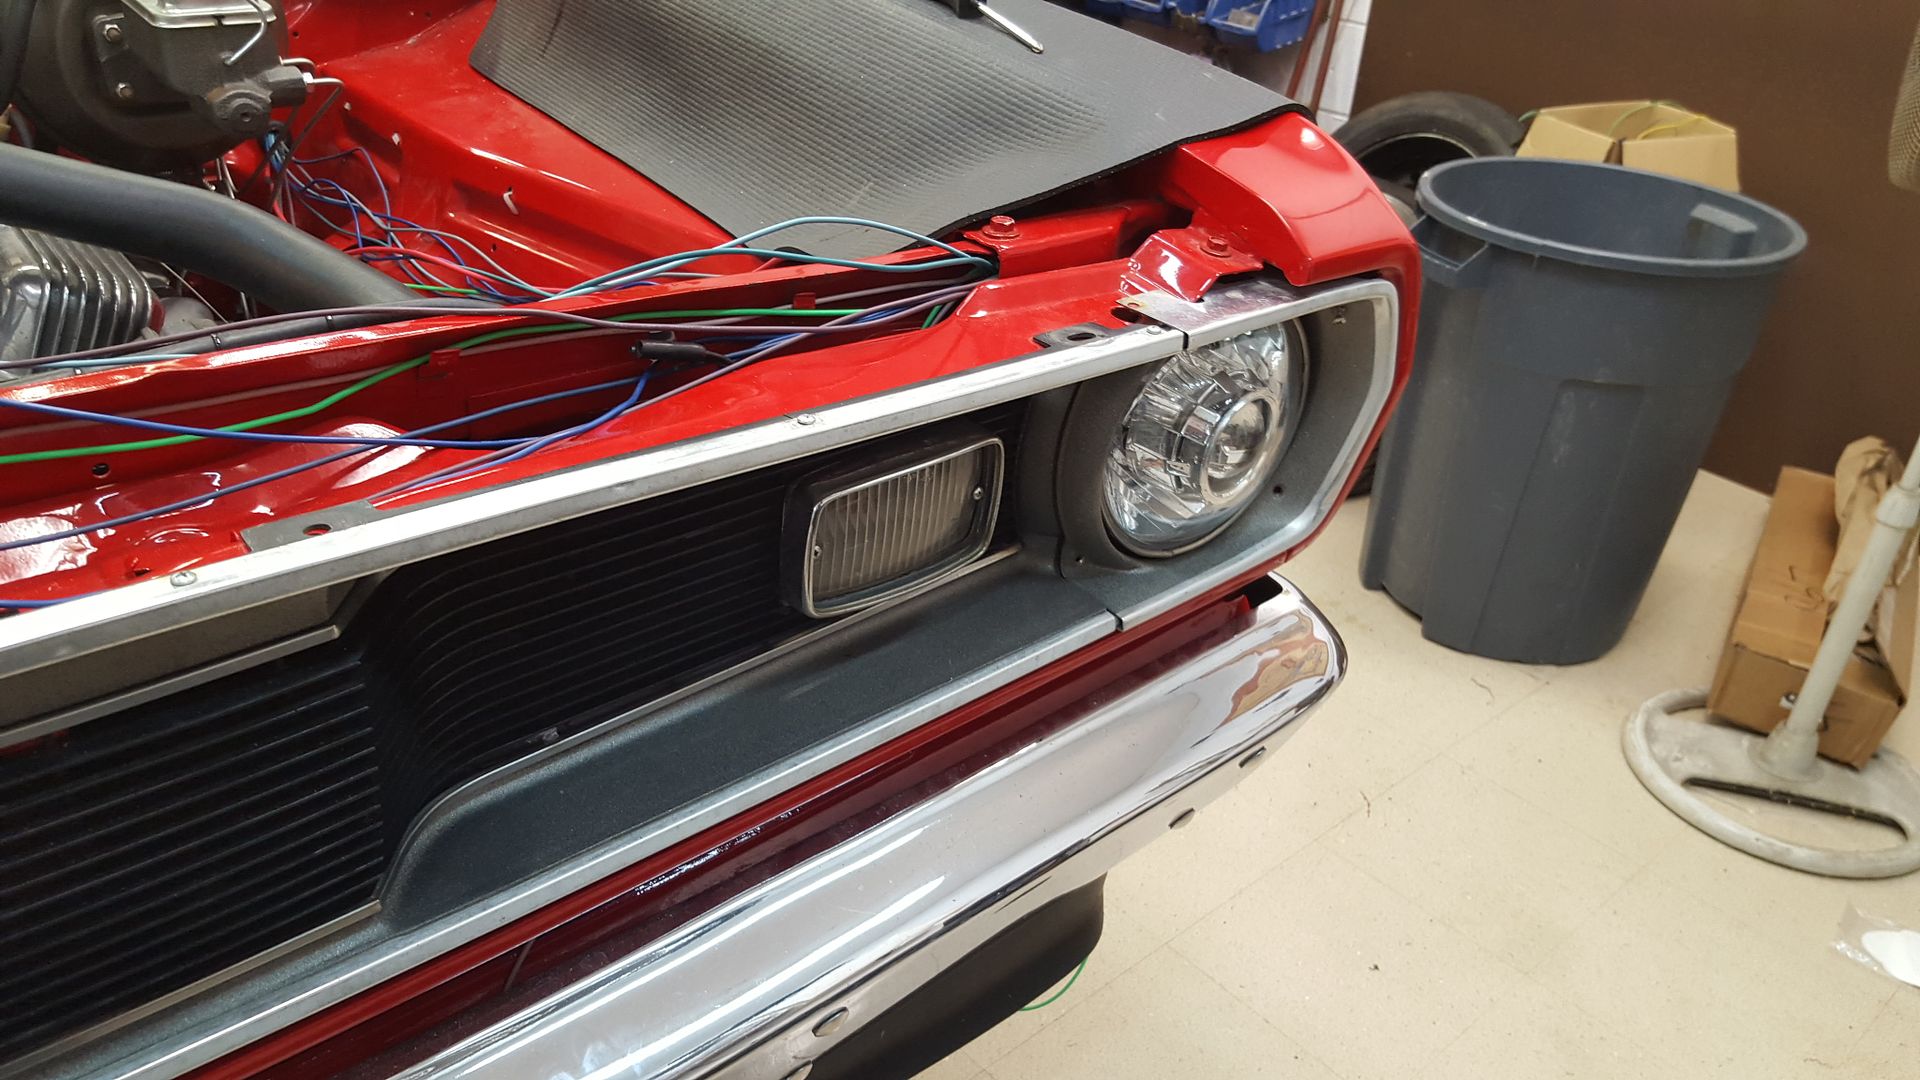
On this car, I decided to install a rostra cruise control unit. But I didn't want anyone to know it. So I mounted it under the dash, feeding the cable out through the firewall with the wiring harness. Tucked up real nice, with nice cable routing. I also deleted all the extra wires that made it universal, just to clean things up. A lot of folks don't do that, and I understand why, but I'm not one of those folks.

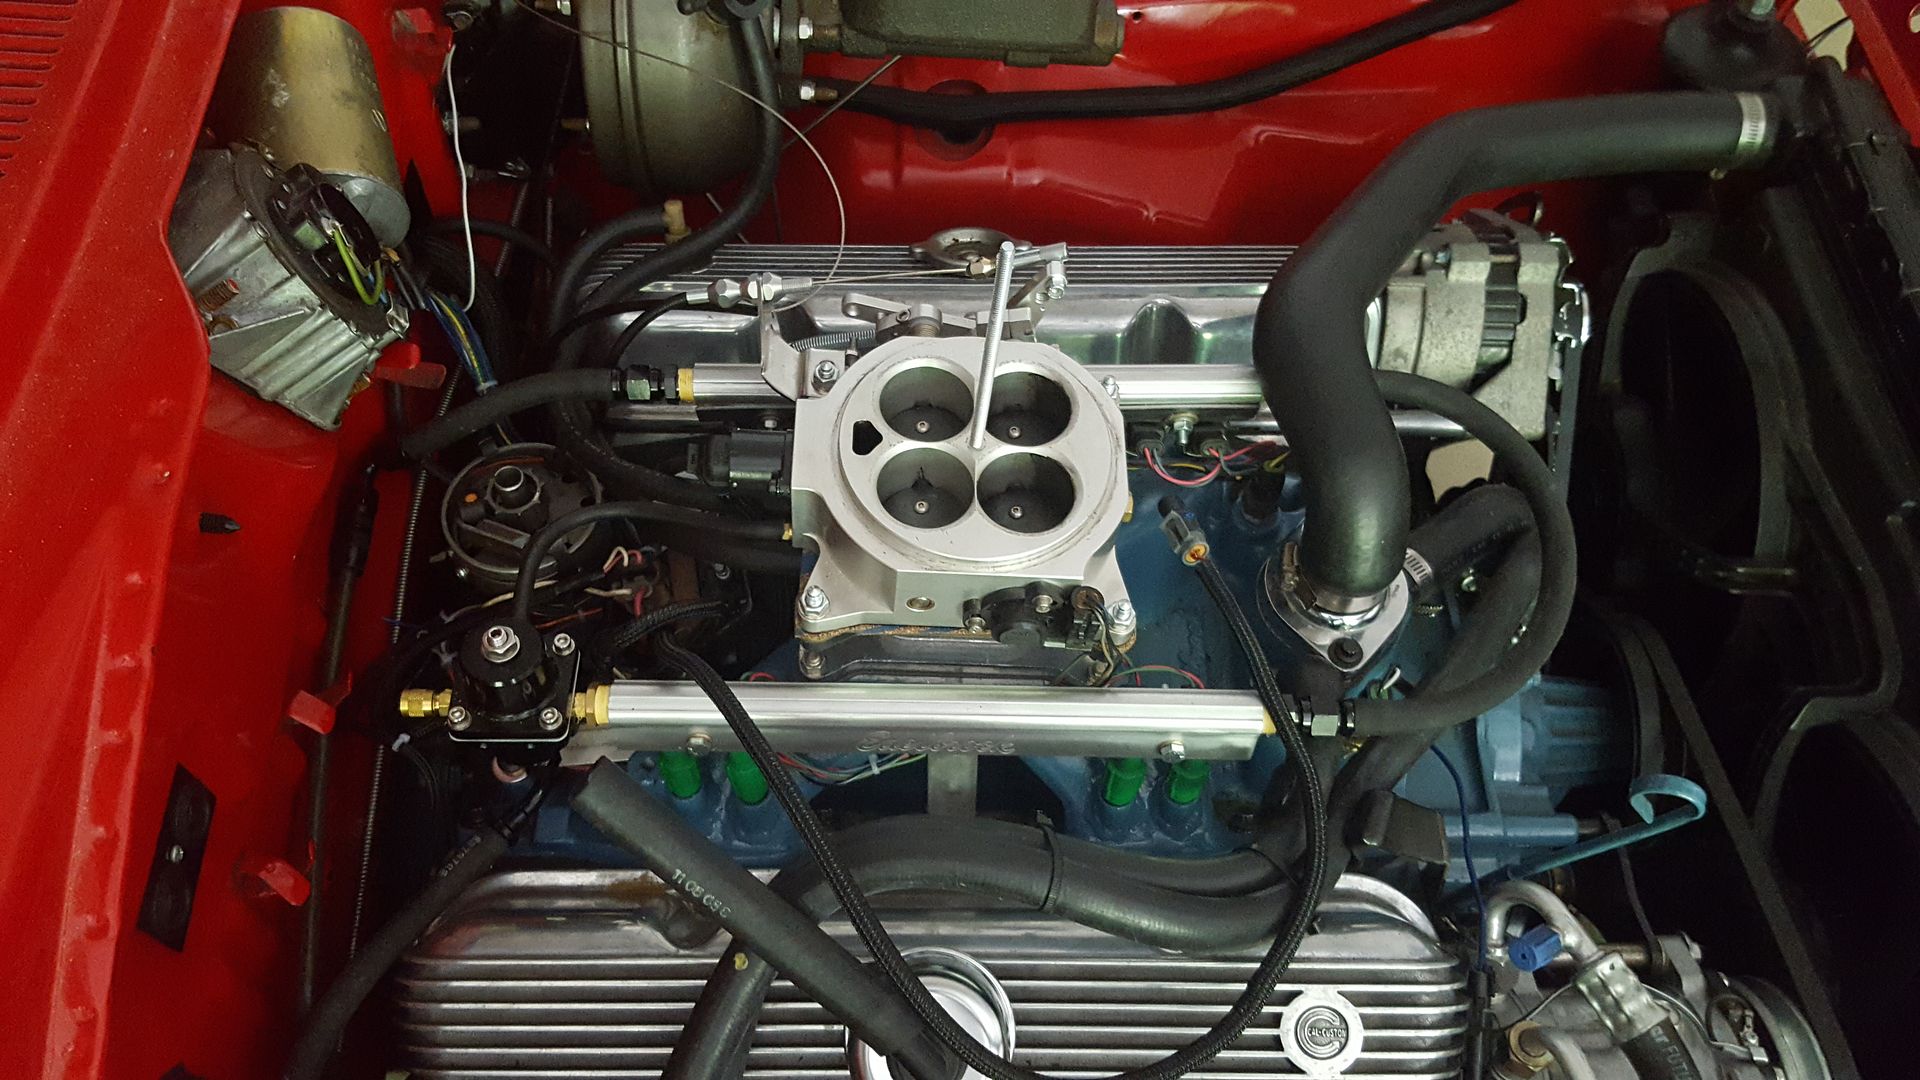
Engine bays are where I take special pride. A well done harness isn't quite what the import kids used to call a wire tuck, but it kind of is. Its all hidden in plain sight. The type of wiring loom must coincide with the build style, the wires must be accessible but hidden, and they must be protected from damage. Factory usually wasn't the cleanest looking, but if you follow their suggestions, they'll get you pretty close. They did it for maximum ease of service and assembly. But also least succeptiable to damage.
On this car, I've had three different harness coverings on three different harnesses, factory was covered with convoluted tubing in high school. The last Restoration, it got wrapped with summit extreme tape, a non adhesive glossy black silicone tape. This time, I wanted something similar to the painless powerbraid. Techflex f6pro is on amazon for cheap, and I like it. Wrap the ends with the summit tape, and hide it in plain sight. See what I'm talking about? The entire engine bay is wired except plug wires in this picture. Play find the harness...

I also am a huge fan of light upgrades. I have a very hard time seeing at night, and old cars typically lack in the light department compared to new stuff anyway. So I build a set of bi-xenon projector retrofit headlights out of a jeep JK set of factory housings, and mirimoto 6.0 projectors. Unfortunately they looked like alien boobs, so I scrapped them and am throwing the projectors into the daily. Ill find a set of cibie e-codes and some good bulbs for this one.

On the topic of light upgrades, I do enjoy good interior lighting as well. Lately, I have been using these .96 cent 1x2 flat LED self adhesive panels for interior lights. They work well, though they don't always have consistent light color. This shipment was bluish. But, they are nearly invisible when placed properly. In this car, I've got two for trunk lights, and 4 for foot well lights in the interior. Speaking of interior, I finally adapted the neon hand brake lever, and dyed the console black. Only been meaning to do that for a couple of years. Additionally, I added a USB charge port to the console up near the cup holders. I still have to figure out how to hook up the parking brake handle to the rear drums, but, one step at a time.

Last budget: 10290.34ish
Money spent and made:
Sold the 340 leaves -100
Sold the big block torsion bars -200
pst 1.08 tbars 230
Qa1 adjustable strut rods: 180
Spax adjustable shocks: 239
2 inch blocks: 20
Speedway leaf spring sliders: 69
4x4x6x1/4 leaf spring slider steel 18
Techflex f6 loom 50
Plugs/wires/cap/rotor 25
Spartan2 wideband and controller 100
Sweet mfg u joint 53
New total: 10,974.34 ish
Long time, no updates. But I have an EXCUSE this time!!!
But it a pretty lame excuse, so I wont use it.
I also don't have a bunch of pictures, because I honestly didn't take them. I got engrossed in building the harness, and just kept going. I find wiring to be very therapeutic and zen-like.
So, first up is the suspension tweaks. I honestly always felt the car was under-sprung and over-damped with the kyb’s, 340 leaves, big block torsion bars, etc. My steering coupler also needed rebuilt again, and my adjustable strut rods were seized sold and had to be cut out to remove. So yeah, pretty rough. I sold what I could, scrapped the rest. The t-bars went to California, the 340 leaves went to Roy in exchange for his worn out stockers, and the strut rods are in the scrap metal bin. The kybs are in cold storage helping to hold the floor down. Anybody want fairly fresh KYB shocks?
So up front, I replaced the chopped up strut rods with qa1 adjustable because they were inexpensive, looked to be well engineered, and readily repairable should the worst happen. Coated them up with never-seize because the ends are steel and the tube is aluminum, and I know there is some issues with that when you add water. I also went with PST torsion bars, and spax adjustable shocks.


In the rear, I wanted to try something completely lunatic fringe. Taking a page from the circle track/road race guys, I'm experimenting. I wanted to try my hand a a custom built leaf pack, as well as try out sliders. So I did.
I built, using Roy's worn out cuda springs and a set of junkyard durango springs, a 7 leaf pack with a spring on top of the main leaf to act as a traction/brake hop bar. They're right at 200 lb/in at the moment, so they may be too stuff. But with as simple as building the pack is, its easy to experiment with different leaves and lengths. The leaf pack I built wound up raising the car about 3 inches over where I had it on flipped hangars and 10 year old 340 leaves. I wanted about 1/2-1 inch higher, so we got too much. Grabbed a set of 2 inch lowering blocks at the parts store, and away I went!!

The sliders aren't finished yet, as I'm still arguing with the voices in my head about how to build the mounts. But I think I have a plan now. Maybe.
Here's the mock up.

Ok, next up I guess is going to be the very verbose, very dry, completely un-entertaining and baffling wall of text about wiring. Feel free to skip to the end, as there will be very few pictures worth looking at until then.
After building the main power distribution system in the last post consisting of ground wires, distribution panels, alternator wires, etc, we now have to put it to use. This is done with plenty of little wires of various colors going to various things. And so....
On most harnesses I have built for the old cars, I have come to the conclusion (right or wrong) that I don't want all the current going through the ignition switch. Mostly because they aren't rated for what the updates are pulling now (there's really no empirical data on amp ratings that I have found, but charging systems of the day were 75 at the HIGH end. Smallest alternator I have installed lately is 105 amp. So yeah, don't want that being sent through a Chinese copy of a 40 year old design...) so I relay the whole system. I use a panel that I found on eBay from Britain of all places, and only sent a 3 amp load through the switch itself. Use the switch to fire 4 relays accessory1 &2 (30a ea) starter (30a) and ignition (30a). I like doing it this way. I use Chrysler relays from wrecked 90s era FWD mopars, as they are robust, cheap, and over engineered. I use the Bosch 5 pin relay wiring diagram found almost anywhere. As my daughter would say, “easy peasey lemon squeezy!”. I also tend, on my own stuff, to use EZ wiring 21 circuit harness kits. They suck horribly. Poorly laid out, indecipherable writing without glasses, and slightly undersized in some circuits. Also, no ground wires, anywhere. At all. And if you're counting on the contents of the box to have all the terminals you'll need, you're wrong. American autowire is a much better product in every conceivable way, except price. I use these as the cheapest source of bulk colored wire and a fuse panel I can find. Immediately upon removing the harness from the box, I cut every zip tie and unloom it from the way the manufacturer laid it out. Out of 10 times I have installed one of these, only once was it anywhere close to how I wanted it laid out in the car. Its just easier to get the hassle of rerouting it all out of the way at the beginning.
So, in this car, I needed effectively two separate wiring harnesses. The main chassis harness, which powers everything but the EFI, and the EFI. I designed it in such as way that there are only 3 wires that cross between the two: batter feed to both sets of relays, one wire from the ignition relay to the megasquirt relays, and a ground screw for the relays. Everything else is separate. Relays also act as a filter for electrical noise, so using them is very beneficial. I also needed separate fuses for the injectors, megasquirt, fuel pump, and wideband. This whole fuse block is powered from the main relay, which is powered from the ignition relay.
Anyway, here's a picture of the panel I made for the glove compartment to hold all this crap.


Now comes the part that either makes or breaks the whole job. Routing the harness. It needs to be accessible, but tidy and hidden in plain sight. Its one of those jobs that when done well is not noticed, even though everyone can see it. Its very daunting. My method goes through a TON of zip ties. I tend to string one circuit at a time. Typically I start with the ignition switch and relay power. Now, I've done enough harnesses that I have a general idea of how big the bundles will be, and how they will need to be routed. I also, before starting to string wires, locate ALL electrical components where they will live permanently. Then, its just a matter of playing connect the dots. I also make certain to leave enough slack in my wiring drops to be able to easily service things later. It sucks digging around under a dash for the gauge cluster connectors because you didn't leave enough slack to fit your hand between the instrument panel and dash frame.
Which brings me to my next topic: harness connectors. In most cases, there is no good reason to permanently wire a component. Most things WILL fail on a long enough time line, and having to cut them out of the harness just to re-splice things is tedious and unnecessary. I tend to use a variety of connectors. My preferred are GM wetherpack, and radio shack 12 pin computer power terminals. They are readily available almost anywhere, easy to assemble and disassemble, and carry up to 15 amps reliably (you can do 30 amp loads, but the terminals are harder to find, and I prefer a Packard style for higher amp loads.)
Anyway, here's some random pictures I took.


On this car, I decided to install a rostra cruise control unit. But I didn't want anyone to know it. So I mounted it under the dash, feeding the cable out through the firewall with the wiring harness. Tucked up real nice, with nice cable routing. I also deleted all the extra wires that made it universal, just to clean things up. A lot of folks don't do that, and I understand why, but I'm not one of those folks.

Engine bays are where I take special pride. A well done harness isn't quite what the import kids used to call a wire tuck, but it kind of is. Its all hidden in plain sight. The type of wiring loom must coincide with the build style, the wires must be accessible but hidden, and they must be protected from damage. Factory usually wasn't the cleanest looking, but if you follow their suggestions, they'll get you pretty close. They did it for maximum ease of service and assembly. But also least succeptiable to damage.
On this car, I've had three different harness coverings on three different harnesses, factory was covered with convoluted tubing in high school. The last Restoration, it got wrapped with summit extreme tape, a non adhesive glossy black silicone tape. This time, I wanted something similar to the painless powerbraid. Techflex f6pro is on amazon for cheap, and I like it. Wrap the ends with the summit tape, and hide it in plain sight. See what I'm talking about? The entire engine bay is wired except plug wires in this picture. Play find the harness...


I also am a huge fan of light upgrades. I have a very hard time seeing at night, and old cars typically lack in the light department compared to new stuff anyway. So I build a set of bi-xenon projector retrofit headlights out of a jeep JK set of factory housings, and mirimoto 6.0 projectors. Unfortunately they looked like alien boobs, so I scrapped them and am throwing the projectors into the daily. Ill find a set of cibie e-codes and some good bulbs for this one.


On the topic of light upgrades, I do enjoy good interior lighting as well. Lately, I have been using these .96 cent 1x2 flat LED self adhesive panels for interior lights. They work well, though they don't always have consistent light color. This shipment was bluish. But, they are nearly invisible when placed properly. In this car, I've got two for trunk lights, and 4 for foot well lights in the interior. Speaking of interior, I finally adapted the neon hand brake lever, and dyed the console black. Only been meaning to do that for a couple of years. Additionally, I added a USB charge port to the console up near the cup holders. I still have to figure out how to hook up the parking brake handle to the rear drums, but, one step at a time.
