Electrical is gone

-

72DartSwingerV8

Well-Known Member
Joined
Jan 10, 2010
Messages
227
Reaction score
2
Location
San Diego
Car is a 1972 Dodge Dart Swinger 318 AC and Heater. The engine runs no problems but I have no power to any interior lights, turn signals get no power to even flash once, brake lights don't work, hazards don't work, heater fan doesn't work, no gauge lights, nothin. The bulkhead connectors have been checked and cleaned, all fuses are good, and grill lights turn on as running lights. I'm thinking that its a fusible link somewhere but I checked the ones close to the firewall and they are all good. Where are all of the locations of the fusible links and other possible fuses and does anyone have any other ideas for this problem?

Thanks
Jake
 
You need a wiring diagram. You can find many by searching FABO. Besides just looking at a fuse, it is invaluable to measure the voltage at both sides of the fuse (rel. to a good ground), using a multimeter or even a test light. My father had us suffer for years without AC in FL because the blower's fuse looked good, when it was actually melted at the very end.

In my 65 Dart, the interior lights come off the Instrument Feed line and the blower off the Accessory Feed line. There are individual fuses to each device. Both lines come from terminals on the ignition switch, so that could be the common culprit. However, the switch may not be getting +12 V at its "Batt" terminal. That should be the same as the black wire at your ammeter. Not sure why your running lights work. It looks like the headlight switch has 2 sources: "B1" and "B2". Both come from ammeter blk, one direct and the other via a fuse shared with the stop lights. However, I don't know which one controls which output (many) on the headlight switch. Best guess is that your ignition switch is getting power (since you have running lights) and is thus faulty. A multi-meter would dispel guesses. I got several free from Harbor Freight.
 
You can download useable wiring diagrams here:

http://www.mymopar.com/index.php?pid=31

these two:

http://www.mymopar.com/downloads/1972/72ValiantA.JPG

http://www.mymopar.com/downloads/1972/72ValiantB.JPG


and here at FABO, this thread, you can download an entire '72 service manual:

http://www.forabodiesonly.com/mopar/showthread.php?t=132309&highlight=manual,+download

the link:

http://www.abodyjoe.com/pictures/Misc. car info/1972 Plymouth Chassis Serv Man.pdf

Do ANY accessories work? Have you checked, is the fuse box getting power?

The fuse box is actually supplied from THREE sources

1 The hot buss, hot all the time feeds some of the fuses such as interior lights and brake lights

2 the accessories buss is fed by the ignition switch and powers things that are switched off with the key, like the radio, wipers, heater

3 the third is tricky. the headlight switch, which is several switches in one box, gets headlight circuit power directly off a splice in the harness after the ammeter. There's a circuit breaker on the light switch, ONLY for the head light circuit

The light switch ALSO gets power from the tail light fuse, and that part of the switch then controls the dash lights, so dash light power LEAVES the headlight switch, THEN goes to the instrument panel fuse. So that THIRD source is a little tricky

You need to take a test lamp and see if the fuses are getting power.
 
Fuses are all getting power except for the one that says INS. I have been looking at wiring diagrams in the back of the Chiltons but I will look into the other ones. NONE of the accessories work except the radio but its an aftermarket add on so I think it's directly to the battery. I've been checking tons of connections with a test light but not with a voltmeter yet. I was mainly looking for a complete power drop off for all these accessories to stop working.
 
Im kinda in the same boat with a 73 duster, no dash lights work at all and no power going to the multi pin connector on the back of the cluster, headlights and taillights and running lights work, no turn signals either.:banghead:
 
Fuses are all getting power except for the one that says INS. I have been looking at wiring diagrams in the back of the Chiltons but I will look into the other ones. NONE of the accessories work except the radio but its an aftermarket add on so I think it's directly to the battery. I've been checking tons of connections with a test light but not with a voltmeter yet. I was mainly looking for a complete power drop off for all these accessories to stop working.

The only time the ins fuse gets power is when the headlight switch has the park or headlights ON. It's the "one odd thing."

There are TWO feeds to the fuse box, you need to check both sides of the fuse clips

Some of the box is fed "hot" such as tail light, courtesy lights, etc, and part of it is fed from the IGN switch.

I'd be thinkin' that either the IGN switch has gone bad, or it's connector has deteriorated, or it's something right at the fuse box.
 
I checked both sides of the fuse box clips and they check out fine. I'm in the middle of replacing the ignition switch but i can't get the steering wheel lock plate out of the way in order to remove the old ignition switch. It looks like it was pressed on there and I tried using a puller to no avail. Any suggestions on that?
 
You need to troubleshoot this before you tear into the lock, and be sure what you have

You say you "checked both sides of the fuse clips" Well, what was the result?

You don't need to tear into the wheel until you check the IGN switch. You can acess the connector by removing the small trim panel under the column.

Ignition switches don't fail all that often. It's more likely the connector at the bottom of the switch pigtail is burnt, or a problem right in the fusebox. I believe the wire connector for the accessory feed going to the fusebox accessory buss is RIVETED which means that if the plastic box has deteriorated, and or the buss/ rivet has corroded, that could be the cause.

I would suggest you pull the battery ground for safety, and unbolt the fuse box so you can get it out/ down where you can see the reverse side.

Also, VERY common for fuse clips to become so rusted they don't make contact, as well as common for fuses to fail when old even though visually they look OK.
 
I chekced the fuse box as you suggested and found that the fuse was getting power but not the clips that hold the fuses due to corrosion. After cleaning them all up I now have a dome light as well as an intermittent turn signal flash, solid brake lights, and reverse lights. I still have no gauge lights at all and I turned the dimmer but thats not it. I also am trying to find the flasher unit for the turn signals. I have the emergency flasher working which has 2 pink wires going to it and also a flasher that has a yellow and a grey going to it. The strange thing is that when the blinker is going (very slowly) the flasher with the yellow and grey isnt the one flashing. Is there another flasher that I'm missing. I here the clicking sound somewhere in the dash but can't locate it. If I could get the signals and gauge lights to work then I would be set.
 
For the instrument lights, I'd go right to the headlight switch, pull it out where you can get to it.

There are three, actually 4 circuits in the switch

The HEADLIGHT switch section if fed 'unfused' as I mentioned earlier

The TAIL and PARK circuits are fed from the tail fuse, and this part of the power feed also provides power for the dash lights switch and dimmer, which then feeds off OUT of the switch to the instrument panel fuse

So in order for the dash lights to work, BOTH the tail light circuit has to be working, and the instrument circuit has to have continuity and have a good instrument fuse..

Some other things to suspect are the instrument cluster wire connector(s) which get corroded, the connector pins break loose from the board, and the copper board and lamp sockets get corroded.

This corrosion in the fuse panel is typical.
 
What wires to I test for in the light switch? The headlights were on and the only wires getting power were the pink and black w/ tracer. Basically, how do I test to see if the light switch is working properly? Also, is there a flasher mounted to the back of the gauge panel on a 72 Dart?

EDIT: Scratch that. I can get a new light switch for $15 so I'll go ahead and do that tomorrow. Even if it's not the current problem, the corrosion on the current one will cause problems later on.
 
I had the same problem with corroded fuse clips from water dripping on fuse block. I replaced the block with inexpensive aftermarket unit using ATC/ATO fuses, and mounted on the old block. By preserving existing location, all that had to be done was re-terminate each conductor using shrink tube, and install to new block in same configuration.

That corrosion is still causing voltage drop, and heat buildup at the fuse block tempting the fire gods to pay a visit…

100_0646.jpg

100_0647.jpg
 
Alright, replaced the headlight switch and nothing has changed. My current problems:

No gauge lights
No turn signals

Flashers, ignition switch, and headlight switch have been replaced. Fuse box has been cleaned and has continuity. The ammeter gauge has continuity on both sides as well. Any other suggestions?
 
Nothing except dig into the wiring diagrams we posted and start checking.

On signals, start with brake lights, do you have them? If so, it means the power from the brake light switch is going THROUGH the turn sig. switch OK, and both signal bulbs are OK

If the above is true, find the flasher, and make sure it has power. If so, try another flasher or just jumper around it, which obviously will give you a "steady" light when you move the lever

Gauge lights: Turn them on, turn the dimmer all the way to the left (bright) and then go to the fuse block and see if you have power on both sides of the instrument light fuse.

If so, move up to the instrument cluster and check there.
 
alot of times, the dash lights just burn out. and since they're somewhat difficult to access without dropping the column, people would often just accept that the ol' dart didn't have dash lights and it would get driven that way for a while. so while you've got it apart you could try changing a few and see what happens. sometimes the board's just dirty. as for the turn signals, maybe the turn signal cam? something not making contact? i've seen some broken ones on the manual signals that would work when in just the right position.
 
I had my '65 cluster out, when easy to access the lamps. I put in LED bulbs since they should last almost forever and less heat to discolor the plastic. I cleaned all the board connections. I also bypassed the 5 V reg in the fuel gage and installed the $22 electronic regulator (e-bay). I also had all the plastic pieces re-chromed.
 
ALright so after the headlight switch nothing changed until I drove the car for a bit. The turn signals and some gauge lights are working now. Problem is, my ammeter is pinned at the +40 until something makes it go back down to zero. After it drops down its pretty stable but sometimes during idle it can get erratic. I'm sure this is a ground problem that has a loose connection somewhere but I can't seem to find the loose connection. Next thing is that my temp gauge was working on and off until I replaced the sending unit, now it doesn't work at all. I hate driving cars without a temp gauge so I need to fix this before any more test runs. The plan of attack is to replace all the bulbs in the gauge panel and clean up any dirt or corrosion that could be there. What else could be causing the problem with the temp gauge problem though?

Thanks for the help so far guys, don't know what I'd do without it.
Jake
 
This sounds to me like multiple problems.

I assume by now you have downloaded one of the free shop manuals and wiring diagrams??

I would approach this in two steps:

1. Go through the car wiring FIRST and look for obvious and KNOWN problem areas.

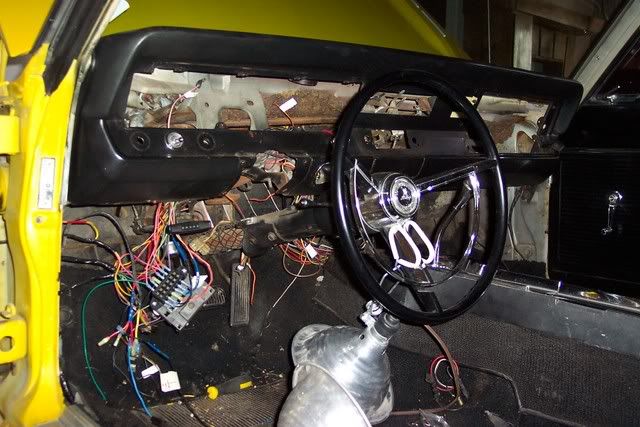
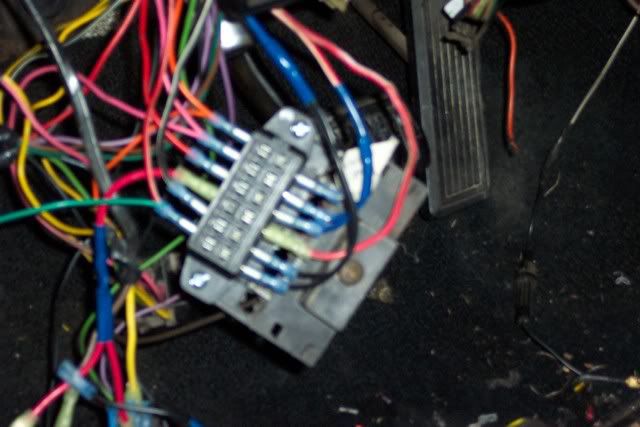
That is.......pull apart and inspect the bulkhead connector. If you are not planning on re--wiring the whole car at this time, fix it by replacing individual connectors, cleaning ones that can be save, and on the big high--current conductors, you might consider biting the bullet, and running wire for the ammeter circuit straight through

Go through the lighting from stem to stern. Clean the sockets, inspect the lamp contacts, clean them, and dope them liberally with dielectric grease, available at any electric supply outfit, or Lowes or Home Depot

Find and clean body grounds. Open the left kick panel and inspect and clean the connector for the tail lamp harness. If nothing else, pull it apart, inspect, and plug/ unplug the connector several times to "scrub" the terminals clean

Pull the trim below the column and pull apart and scrub the signal switch and the ignition switch connectors. You can check voltage through the switch by probing the one side of the connector when it's together. Check the battery buss going in (key off) against the accessory line and ignition line (key on) to check for drop through the switch and connector.

You need a multimeter and test lamp. Multimeters nowadays are not very expensive.

For a quick check on your charging problem, do the following things:

FIRST and foremost, remove the regulator, clean and wire brush the mount bolts, and use star washers to remount the regulator.

THEN TEST IT!!

There are two important circuits you need to test, the GROUND, and the HOT side of the harness

To test the HOT side, you will be testing for VOLTAGE DROP in the path from the

battery--fuse link--bulkhead connector--ammeter circuit--ignition switch connector--through the switch--back OUT the switch connector--back OUT the bulkhead (on the dark blue ignition supply buss)--to the regulator

To check this, turn the key to RUN, engine not running. Put one probe of your meter on the battery POS post, the other on the "key side" of the ballast resistor. A second place to check is the blue wire on the field of the alternator (There are two, blue, and green) You are looking for VOLTAGE DROP, so you are wanting to see a LOW reading, the lower the better.

IF the reading is much over .2V (two TENTHS of a volt) be concerned. If it approaches or is OVER 1/2 volt, get busy. Look for the voltage drop, in the path above. Your number one suspect is the bulkhead connector, second is the ignition switch or it's connector

NOW check the ground. Start the car, get the engine up to RPM to simulate "low to medium cruise"

Stick one probe on the battery NEG post, and stab the other probe on the regulator case. Be sure to "stab" through any paint, chrome, rust.

Here, once more, you are looking for a low reading. Over .2V is too much, and if over that, indicates a poor ground.

One good way to improve the battery--to block--to body ground is to buy a 1 ft starter cable (ring to ring) bolt it to the unused end of the driver side REAR head, and bolt the other end to the master cylinder stud. Clean and brush this clean, and use star washers

The second problem is a ground to the regulator. IF the body is rusty or the bolt holes stripped, you'll have to deal with that.
 
Or you could just replace the dimmer switch. If it is bad non of your heads lights or dash lights will work.
 
-
Back
Top