Couple progress pics.

-

cudaspaz

Well-Known Member
Joined
Feb 9, 2005
Messages
13,377
Reaction score
245
Location
In a tree near you.
Here's a couple pics of the fuel system.

Hope to have the brakes done, gauge cluster, and paint the motor this weekend.

fuelsystem1.jpg

fuelsystem2.jpg

Lone regulator.
regulator.jpg

motor-1.jpg

mymotor1.jpg

cuda2.jpg

cuda-1.jpg


Got the wiring kit ready to install as well and I'm finally getting back to this car after a few years of saving my hard earned pennies.

It's really hard to save for a project like this with five active teenage daughters, but were truckin now thanks to some good cross- motivation from Mullinax and kind words from all you FABO members, and priceless help from my golden Mopar friend, Nick.
 
nhra book say regulater must be at least 6" from firewall

That's okay because she is a street machine, not a drag car.

Got too much money into her to be breaking stuff at the drag strip, BUT, if I change my mind it's and easy fix ya.

Thanks for the kind words.
 
Sweet looking ride Cudaspaz! Every time i see this car it looks better. Just a little more work and you will be on your way to enjoyment. I can only hope that one day i can get my projects finished.
 
Sweet looking ride Cudaspaz! Every time i see this car it looks better. Just a little more work and you will be on your way to enjoyment. I can only hope that one day i can get my projects finished.

Thanks, I can't wait to turn the key!!

I can't help to wonder if they ever get finished.
 
I modified my gauge cluster holes and stuffed some aftermarket gauges in there.
I put a 140 mph speedo in the original speedo hole which required some filing and care, and I installed an aftermarket quad gauge in the factory trio gauge hole which required less filing.
I may leave the center performance idicator there.

I did not want to restore the cluster with the chrome, and the black, so I went spycho with some flat black for a simple look and I touched up the letters and trim with a silver sharpie and it goes real nice with the scheme of the car.
I also installed a new plastic dash cap from year-one. cost $105 with shipping.

I will post some pics of it tomorrow night.
 
Here here.......... Pics............

We have a nice 67 and looking for ideas........Still love those stripes....amazing how they blended so well with the old body..........

I can't wait to see it all trimmed and dressed........Gonna be a real beauty.

:toothy10::toothy10::toothy10::toothy10:
 
yes, very nice job on the whole car. looks sharp.
 
Okay, just got back in, had to take my honey on a date tonight.

Here's what we did today.................

gloveboxdoor.jpg

clusterrear2.jpg

comintogether.jpg

Heater box rebuilt.
heaterbox.jpg

box.jpg

paint.jpg

rearpanel.jpg

fusepanel3.jpg

dashpanel.jpg

insert.jpg

underdash.jpg

dashpanel2.jpg


Did not get a chance to paint the motor because the fab work took much longer on the dash than I thought....enjoy.

I know, I know, way too much orange on the dash, should have paibnted the glove box door black to match the lines of the dash, I know, I see it LOL!

Still gonna put a switch panel where the radio would live, and a push button ignition switch with a hidden turn key ignition.(nick's brain working on ideas).

Still lot's to do.
 
i gotta say the glove box with the fuses is real creative. i think i'll be doing that now since i didn't like the factory glove box liner.
 
Love the car, paint scheme looks great (and Im not usually a fan of solid bright colours but this just looks right)! If you catch this post I have 2 questions if you please.... what size sportsmans are you running on the rear?....with the hinged fibreglass hood did you have to de-tension the factory hood springs in order to avoid putting too much stress on the fibreglass hood when closed? Im keen to go to some "draggier" tyres on the rear and supplement my stock hood with a super stock piece ...
 
Love the car, paint scheme looks great (and Im not usually a fan of solid bright colours but this just looks right)! If you catch this post I have 2 questions if you please.... what size sportsmans are you running on the rear?....with the hinged fibreglass hood did you have to de-tension the factory hood springs in order to avoid putting too much stress on the fibreglass hood when closed? Im keen to go to some "draggier" tyres on the rear and supplement my stock hood with a super stock piece ...

The sportsmans are 29" tall.
I still have the factory hood springs on there, and the hood is holding up fine.

A little bearing grease on the spring contacts helps alot, but once i cut a hole in the hood for the air intake it will probably weaken things up alot so I may just put a prop rod or hydraulic shocks there instead.

The only down side to removing the springs is the brackets rattle like mad with the springs removed.
 
Man I love that car. If I ever get down that way I would love to see it in person. Very nice work

Mike
 
How does the dash cap work? Does it just cover up the old dash pad, or replace it completely?
 
John you are the man!

The dash looks great. Has a classic look to it but a mean street also.

The fuse box location is a great idea. No more break your neck fuse changes.

And to see you have a motor means it won't be long! LOL!

Great job!
 
A man after my own heart! I love the way you did your dash! Those gauges look AWESOME in the stock bezel! I also like the body-color dash frame. As for the fuel system plumbing, I have to tighten 2 fittings and wire the pump to a relay and I'm DONE with it. I know what a job it is to route, bend, and plumb all the lines and fittings. Your wiring job looks good too. Is that a Ron Francis kit? I almost came *this close* to buying one myself. I just have to drop off the radiator to be opened up and cleaned out (Damn field mice & they're nuts....) and I can actually START my engine. Looks like you'll be there soon too.

Don't worry about the slow pace. It's unlikely that you'll miss something important. I know I'm not running a race to finish mine. Even if I have to miss Carlisle with it....
 
Thanks guys,
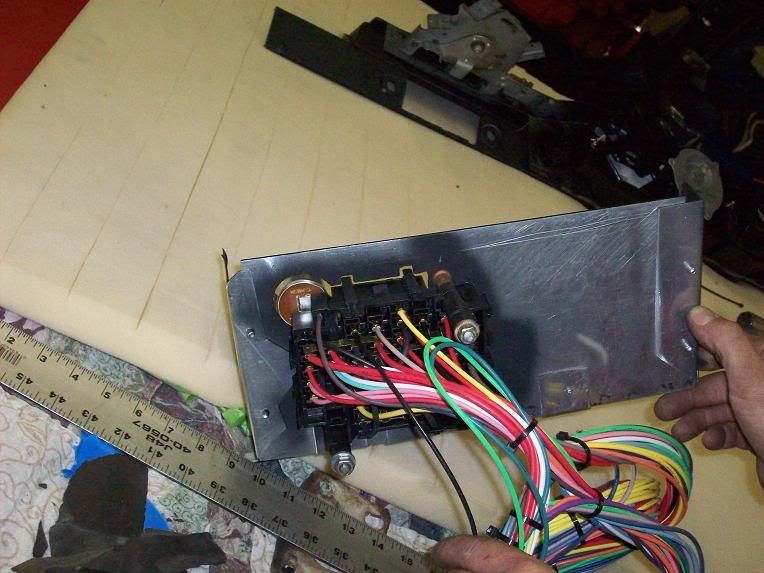
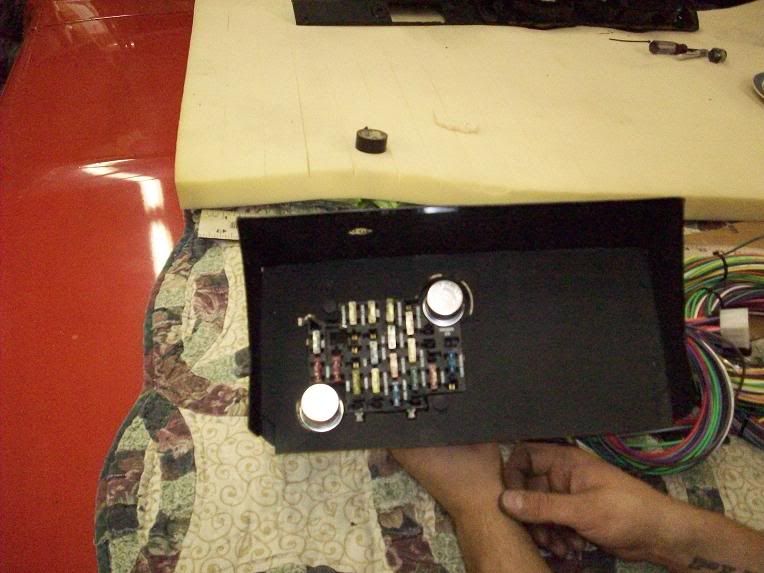
I have to give big cudo's to my buddy Nick for fabbing up the fuse panel as he has as much of an eye for detail as I do and he really enjoys this kind of stuff.

To answer a couple questions, Fastback340, I used the EZ wiring kit which cost substantially less money than the Ron Francis kit, and the wire gauge is pretty stout, the fuses are big, and every wire is labeled with little letters along the entire length of each wire (freaking awesome!).cost: $185 plus shipping for those interested.

The gauges were also available from EZ wiring for a one stop shop and the gauges cost a total of $220.oo for the speedo, quad gauge, quad gauge sending units, and 0-90 ohm fuel level sending unit which my fuel cell already has so I will have an extra back up now.

The quad gauge is about one third the price of the autometer and other brands.
I really wanted the MCX white faced Quad gauge from autometer, but I passed because that unit cost $229.00 alone.

I am happy with the subtle, but functional look of these gauges, but I will probably catch hell from some guys about putting "Dolphin" gauges in a "barracuda"..LOL!
Would have been nice if they named them after a meaner fish, but then I guess the chevy guys would not buy them.

Happy to answer any more questions for those of you that may want to hack your cluster up as it did take some care not to ream out the whole too big so the gauge bracket had a lip to grab onto, and also many other fitment issues with the rear housing (aluminum) had to be modified which took alot longer than I originally hoped for.
Thank goodness for burring bits and shop air.

To answer cuda67bnl's question: yes, it is just a dash cap I got from Year-One which cost $90.oo plus shipping.
To Install: you just scuff up the adges of the dash pad and edges of the dash cap, and wipe with alcohol or Brake-kleen like i used, then squirt the clear silicon stuff around the perimitere edges only, then clamp, tie, weight or do whatever you have to to make sure you have a nice, tight, uniformed fit around the whole perimeter (I used green body painters tape around the whole perimeter)..(work fast as it dries quickly) and it sandwiched evenly around the perimter and looks good as new.

Any residual wipes right off even when dry, but make sure you read the directions because they really stress not to put the sealer anywhere other than the outmost edges as it is a tight fit and you don't want a gooky buffer inside from keeping the edges from mating correctly.
 
I dont see one thing wrong with it. Dolphin suits better than Delco or Philco LOL. Are those instruments well lighted ?
 
-
Back
Top