5.9 FI Magnum swap in 73 swinger

-

streetdak

Well-Known Member
Joined
Feb 14, 2010
Messages
432
Reaction score
20
Location
Cypress, Texas (Houston)
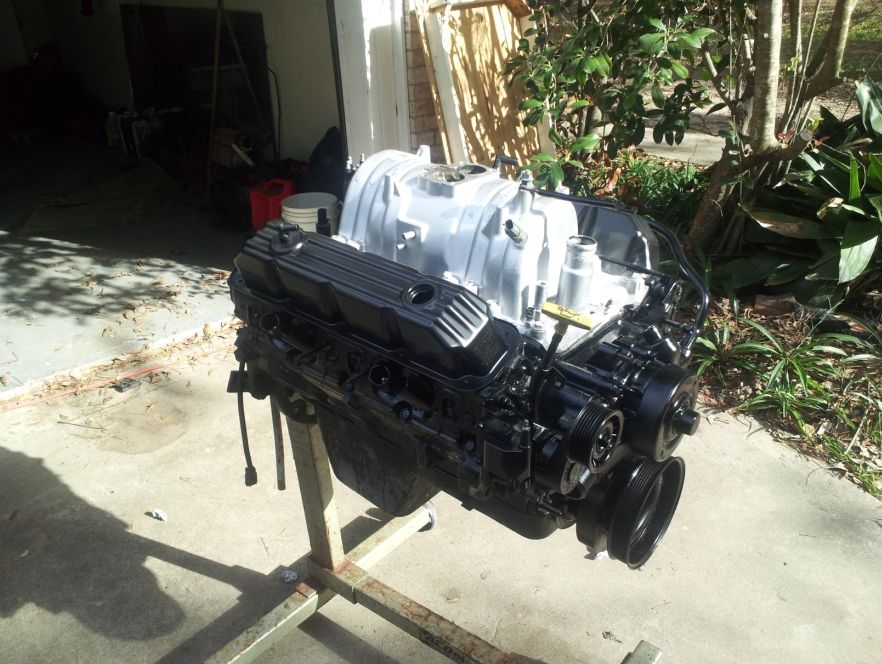
Well thanks to BadAss71 for the awesome inspiration and great thread on his swap (http://www.forabodiesonly.com/mopar/showthread.php?t=188547) I am going to be getting in deep as well on a cost effective magnum 360 fuel injected swap.

My donor vehicle was formerly my mom's 98 5.9 L - Limited Grand Cherokee. I know what some are thinking, that's a rare Jeep/Mopar, why tear it apart?? Well unfortunately my mom has always had a lack of taking care of vehicles, on top of that she is now retired on disability. The Jeep is pretty torn up, interior is stained, cracked and ripped. Exterior was last washed when my brother and I lived at home and could do it for her, and that was 8 years ago. Sunroof leaks bad, evaporator core is bad, and the rear howl's more than a coyote! Needless to say, the jeep is beyond hope of its former glory, wouldn't be worth the money to try to restore this poor thing.

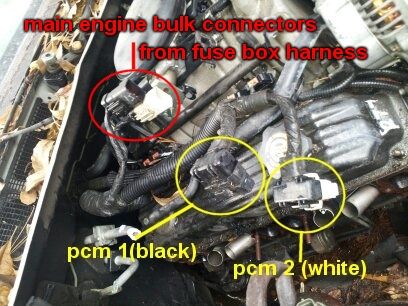
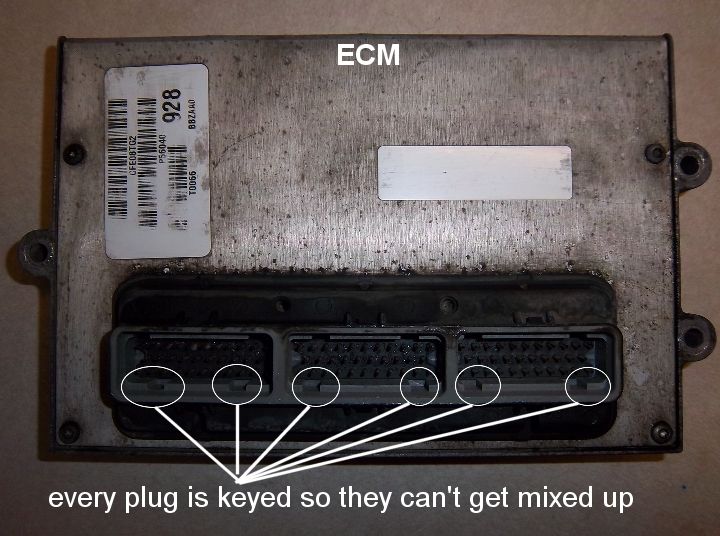
My plan will be a Hybrid of what Badass71 did. I won't be using the 46re from the jeep because it's a 4x4 trans. So I will be using the engine harness from the jeep (modified of course and I will have that mapped out for reference). I will be keeping intact my 73's stock electrical wiring (headlights, tail lights, turn signals and so forth). I will for the time being be using the stock 904 already in the car. I will be trying to successfully wire in the stock jeep cluster as it may fit nicely in the dart's dash due to the shape, and maybe even one more gadget, the overhead computer for fuel mileage/temp and such.

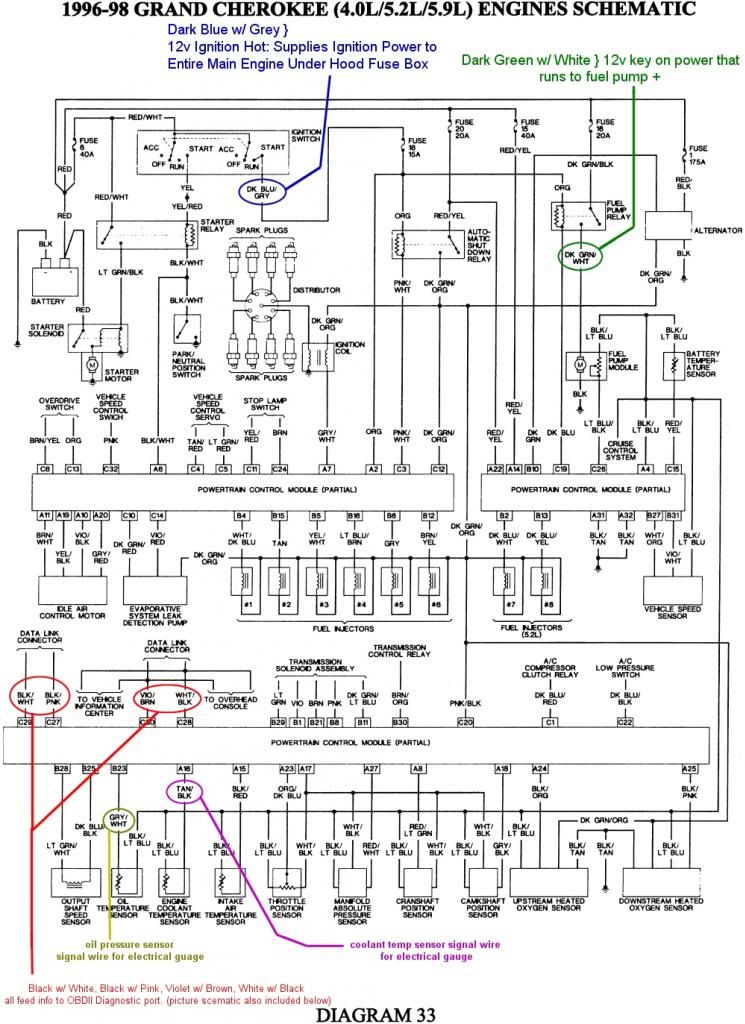
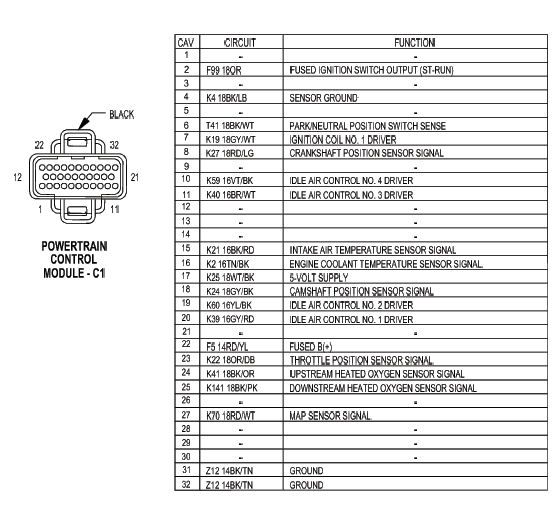
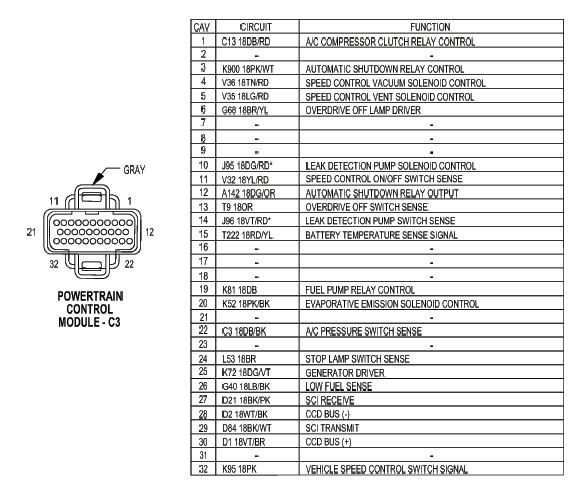
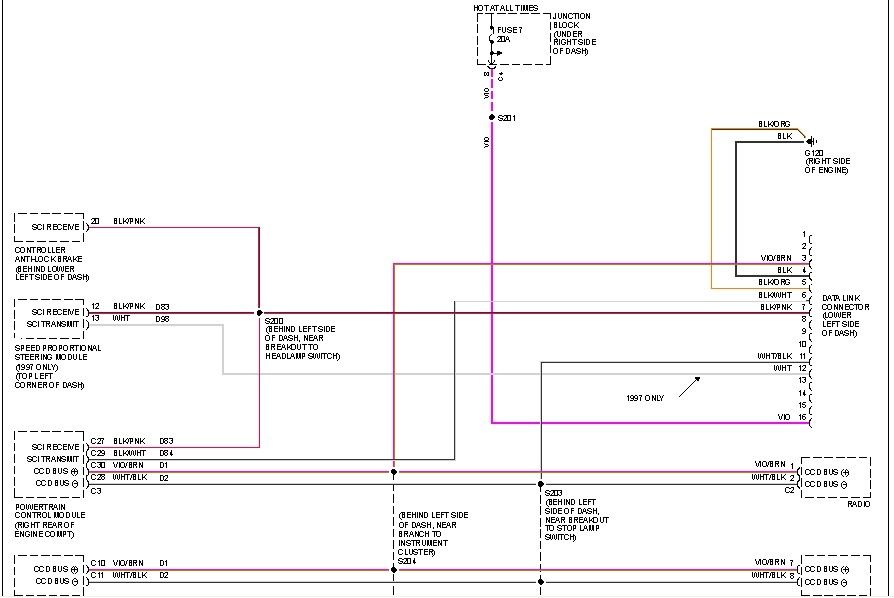
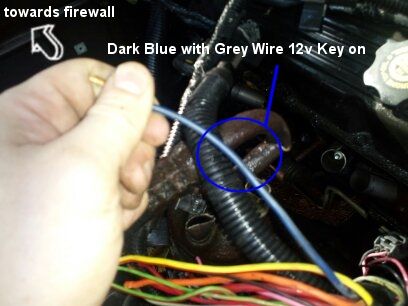
I already have done my research and thanks to autozone.com and a few other sites I have my wiring completely mapped out and we have already fired the motor independent of the jeep by merely connecting 12v power to 1 wire and jumping the starter. When I'm done with the harness from the jeep it will literally only need 2 wires hooked up. 1 Ignition hot, and 1 wire to the fuel pump. I could not believe how simply these things work.

I will be posting the diagrams in the next couple days I have made, and will be taking some pics of the harness while the motor is still in the jeep. Stay tuned, I hope to have this mapped out well for those who need some info on this swap in the future! I'm ready for some dependable, cruise-able fun!
 
ok, here are the first schematics I looked at to gain my plan of attack. Thank god for the wealth of knowledge on the internet because I was able to find all of these in about an hour of searching. Thanks to the main engine fuse and relay box being in the engine compartment, basically simple grounds, constant power and ignition power to one wire will be required to fire up the ecm/fuel pump and ignition relays.

enginescematic.jpg


And here are the pin layouts of the 98 5.9 ECM. If you compare the pin layouts below to the main engine schematic above you will see that the corresponding numbers given will match each other.

Example: A16 on schematic is Tan/Black Coolant Temp Sensor = PCM C1 16
so...
Power Control Module C1 is (A on schematic)
Power Control Module C2 is (B on schematic)
Power Control Module C3 is (C on schematic)

98PCM1.jpg


98PCM2.jpg


98PCM3.jpg
 
Thanks to this little GEM that took me forever to find, I was able to create my own diagram for the OBDII Data Link Connector so I can get engine codes and so forth.

2007-01-23_191631_wire1.jpg


obdIIconnector.jpg


been under the weather today so this is a start. Ill take pics of the engine bay of the wiring here soon.
 
since im using magnum fuel rails, figure ill ask you thats doing the full magnum swap: how are you connecting to the magnum fuel rail? its got some sort of plastic quick connect on it......
 
I'm gonna be paying close attention here. Been thinking about transplanting my 5.9 out of my ram into my duster.
 
since im using magnum fuel rails, figure ill ask you thats doing the full magnum swap: how are you connecting to the magnum fuel rail? its got some sort of plastic quick connect on it......


I am going rob the section of fuel line before the soft line that has the quick disconnects on it. That way I can use the stock soft line up to the fuel rail. There could be a few more options for you, perhaps having some one good with welding pipes weld on an npt male fitting or maybe the companies that make the braided steel hose make a elbow or connector that is made for the quick disconnect.


Update: Ordered A body LA 360 Oil Pan (to be used on all Magnum motors either 5.2 or 5.9), Oil Pickup, Oil Pan Gasket, New Poly Motor Mount Inserts, and header gaskets. I'll Be off for a week from work coming up here soon so I should be able to get a lot done with pics and more info.
 
update on the fuel rail, i just took a peek at the one on the jeep, it is actually 3/8th metal line with the quick disconnect on the end. So since it is not actually soft line I will most likely be using a compression fitting to combine it with the 3/8 fuel line I will run from the tank.
 
This sounds like something I may do in the future. SO jumping on here to follow your issues and how you corrtect them.
 
Ok, so the motor came out yesterday out of the jeep. I took some pics but for some reason my camera on my phone was on the incorrect size setting so some pics are a little small.

The main engine compartment harness runs from the passenger side firewall to a under hood fuse box. That fuse box has some essential and some non essential relays and fuses for the engine so I am going to keep it and utilize it. From the fuse box the wiring harness goes a couple different places. There is a A/C component harness, that goes to drier, ac pressure switches and so forth. Then there is a harness that has 2 bulky connectors that go directly to the main engine harness. There is also one harness that goes to the PCM 3 (grey). Then there is what I call the power harness, it goes to the alternator and main engine grounds and starter. Lastly the longest harness goes from the fuse box to the front of the engine bay that contains horns/headlights/abs/cooing fan and then has communications and others wires that go into the drivers side fire wall, including the dark green with white wire that goes to the fuel pump.

So here is what I did. I all cut the wires going into both sides of the fire wall due to having the schematic. I Isolated the dark blue with grey wire that supplies key on power to the PCM and fuel pump. The dark blue with grey wire was coming from the passenger side firewall into the fuse box itself.

blue-grey.jpg


to test, I re-connected the battery cables after cutting the wires from both sides of the fire wall, connected the dark blue with grey wire to the positive side of the batt. (You could immediately hear the relays click on) CAREFULLY poured a smidge of gas down the throttle body I then jumped the starter wire (light green with black) and the motor fired up!!! (for reference, I also did this same routine before cutting the driver side, the fuel pump kicked on and the motor was running as normal, all injectors firing)

Once confirmation of what was needed for the motor to run, i began removing the harness. You will be able to remove the harness that has the fuse box separately from the main engine harness. Carefully look over your harness coming from the fuse box. There will be a lot to remove that includes all the front lights, horn, abs system, ac system, grounds, cruise control, alternator, starter and 2 important bulk connectors that go to the main engine harness. Once you have everything disconnected and the fuse box unbolted you should be able to remove that whole under hood harness.

pcm1-2a.jpg


After the fuse box harness is removed, and after you disconnect the 02 sensors you will be able to pull the engine out with its own harness still attached. You will however need to disconnect all of the transmission connections and if a its from a 4x4 vehicle I found 2 different plugs on the transfer case itself. Don't forget to disconnect the fuel line, and all throttle/linkage cables.

Just a quick little tip, don't hold back on disconnecting the pcm itself, all three plugs are keyed so you can't get them switched around.

ecmkeyed2.jpg


Next up, trimming the fuse box harness with hopefully better pictures!!
 
How are you going to do the crank position sensor with the 904 trans?
 
How are you going to do the crank position sensor with the 904 trans?

I would say he will notch the bellhousing like others have done


Exactly, a little measuring and grinder action to the 904 bell and the crank sensor will be not a problem. I'll take pics when I do this, I also grabbed the rubber grommet out of the Jeep's 46re bellhousing. I'm stealing the linkage too because It appears it is going to work on the 904.
 
Exactly, a little measuring and grinder action to the 904 bell and the crank sensor will be not a problem. I'll take pics when I do this, I also grabbed the rubber grommet out of the Jeep's 46re bellhousing. I'm stealing the linkage too because It appears it is going to work on the 904.

Wish it was that easy with a 4 speed car. :banghead:
 
Wish it was that easy with a 4 speed car. :banghead:

why wouldnt it be? i had a stick dakota....

aluminum bell, or lakewood? i could see it being EASIER with a lakewood, especially once you tacked a wire retainer to it in the inside. with an aluminum, you could drill and tap a retainer. or drill a small hole through the block, cut the wires, and solder them back together after its fed through. would hate to do it that way, though, as youd have to pull the trans and clutch to chenge the sensor for the crank position.


michael

There are no good options for a flywheel with the notches for the crank sensor. You have to use a 143T flywheel from a Dakota or Ram, which forces you to use a bigger bellhousing and pushed the starter out leaving even less room for exhaust. I've even toyed with sandwiching a Dakota flexplate in between the crank and the flywheel, but it's too tall withought carving something out which probably means the flywheel would interfer with the sensor and make it impossible to run anyways. And the Dakota/Ram bellhousing doesn't accept an A833, if you wanted to stay with one.

Fzmax on here got Modern Driveline to build him a custom flywheel for a Dakota T56 swap because Quicktime doesn't do a 143T bellhousing. I'm pretty sure he got it all to work, but I don't believe it's a cheap option (if they would even make more, that is).

The last option is to take a 143T flywheel and machine it down to fit a 130T ring, but when Fzmax tried that the machine shop told him they couldn't find a good enough flywheel to make it work (don't ask me exactly why, don't remember). I know of one guy that did it, he even said he was going to get more made. That was 2 or more years ago and I still haven't heard from him on a price.

It's been done, but it's work.

Really the best option I can see is to plan to swap an R154 or MA6 into the car and use the Dakota bell and heavy flywheel. You have to cut the snot out of your car (no worse than a T56/TKO swap, but...) which means it isn't as easy as just bolting in EFI.

Or build your own pick-up off the crank pulley. That would solve it.

Specific to my build, I've got the numbers matching shortblock in my '74 Duster 360 4 speed car. It was balance with the flywheel that is in there now, and to swap to a Dakota flywheel would require the motor to come apart, or a different motor to go in. And even if I accept that the motor has to come apart to re-balance it so I can use the big 143T flywheel, I have to then cut the floor to fit a different transmission. Truth is, I really want a 5 speed and have an R154, but I struggle with cutting up a relatively rare car to put it in, and even if I did I don't really want to run a bigger flywheel and have to fight my starter.

One guy relocated the starter pocket on his Dakota/Ram bell so he could run a 130T flywheel on his R154 swap, but then you are back to not having an available flywheel with the notches.

I've spent years fighting this, and all I find are roadblocks. It's not impossible, but it's nothing like the easy with which you can run an auto using the Magnum EFI setup.
 
started painting the motor today, also installed the motor mount inserts from energy suspension, looks like however i may have to use the grinder in the polyurethane cause the new ones are way to wide to fit in the ears on the k frame.

enginepainted.jpg
 
well, just found out due to a different posting, I'm going to have to replace/fix my lower control arms before the motor goes in, so I'm delayed a bit, but it is time for reassembly of the motor after painting! I think she looks sharp!

magpainted.jpg
 
There are no good options for a flywheel with the notches for the crank sensor. You have to use a 143T flywheel from a Dakota or Ram, which forces you to use a bigger bellhousing and pushed the starter out leaving even less room for exhaust. I've even toyed with sandwiching a Dakota flexplate in between the crank and the flywheel, but it's too tall withought carving something out which probably means the flywheel would interfer with the sensor and make it impossible to run anyways. And the Dakota/Ram bellhousing doesn't accept an A833, if you wanted to stay with one.

Fzmax on here got Modern Driveline to build him a custom flywheel for a Dakota T56 swap because Quicktime doesn't do a 143T bellhousing. I'm pretty sure he got it all to work, but I don't believe it's a cheap option (if they would even make more, that is).

The last option is to take a 143T flywheel and machine it down to fit a 130T ring, but when Fzmax tried that the machine shop told him they couldn't find a good enough flywheel to make it work (don't ask me exactly why, don't remember). I know of one guy that did it, he even said he was going to get more made. That was 2 or more years ago and I still haven't heard from him on a price.

It's been done, but it's work.

Really the best option I can see is to plan to swap an R154 or MA6 into the car and use the Dakota bell and heavy flywheel. You have to cut the snot out of your car (no worse than a T56/TKO swap, but...) which means it isn't as easy as just bolting in EFI.

Or build your own pick-up off the crank pulley. That would solve it.

Specific to my build, I've got the numbers matching shortblock in my '74 Duster 360 4 speed car. It was balance with the flywheel that is in there now, and to swap to a Dakota flywheel would require the motor to come apart, or a different motor to go in. And even if I accept that the motor has to come apart to re-balance it so I can use the big 143T flywheel, I have to then cut the floor to fit a different transmission. Truth is, I really want a 5 speed and have an R154, but I struggle with cutting up a relatively rare car to put it in, and even if I did I don't really want to run a bigger flywheel and have to fight my starter.

One guy relocated the starter pocket on his Dakota/Ram bell so he could run a 130T flywheel on his R154 swap, but then you are back to not having an available flywheel with the notches.

I've spent years fighting this, and all I find are roadblocks. It's not impossible, but it's nothing like the easy with which you can run an auto using the Magnum EFI setup.

thats the nature of hotrodding!!!! lol
 
well, just found out due to a different posting, I'm going to have to replace/fix my lower control arms before the motor goes in, so I'm delayed a bit, but it is time for reassembly of the motor after painting! I think she looks sharp!

magpainted.jpg

very sharp
 
-
Back
Top