You are using an out of date browser. It may not display this or other websites correctly.
You should upgrade or use an alternative browser.
You should upgrade or use an alternative browser.
68 GT convertible project
- Thread starter burdar
- Start date
-
Finally an update on the Dart. I've been waiting on the wiper motor. It finally arrived a few weeks ago. I thought the factory yellow/gold zinc would look out of place in the engine compartment so I had it done in black zinc. A black sealer was also used instead of the factory red/orange sealer. I like how it looks.
https://postimg.cc/cr3BJRxD]
 [/url]
Once the motor was in, I worked on the distribution block and front brake lines. The master is an aluminum 15/16" bore unit from Dr Diff. The heater box was next. It went right in without a fight.
https://postimg.cc/njwGXT9W]
 [/url]
https://postimg.cc/LgYBLfz8]
 [/url]
https://postimg.cc/F17xMt2X]
 [/url]
https://postimg.cc/23MxmcDb]
 [/url]
The dash went in last night. It's been 9 years since it was in the car.
https://postimg.cc/sQhgW9nX]
 [/url]
https://postimg.cc/XZhvXDkm]
 [/url]
Next on the list is engine compartment wiring. Then I need to get the glass in the doors. Hopefully I can get the undercoating sprayed in the wheel wells before winter.
https://postimg.cc/cr3BJRxD]
Once the motor was in, I worked on the distribution block and front brake lines. The master is an aluminum 15/16" bore unit from Dr Diff. The heater box was next. It went right in without a fight.
https://postimg.cc/njwGXT9W]
https://postimg.cc/LgYBLfz8]
https://postimg.cc/F17xMt2X]
https://postimg.cc/23MxmcDb]
The dash went in last night. It's been 9 years since it was in the car.
https://postimg.cc/sQhgW9nX]
https://postimg.cc/XZhvXDkm]
Next on the list is engine compartment wiring. Then I need to get the glass in the doors. Hopefully I can get the undercoating sprayed in the wheel wells before winter.
The rear axle, engine and trans are installed.
I assembled the rear axle in the basement last fall since I thought that was the safest place to store it. Not my best idea looking back since I had to get it back OUT of the basement as a complete unit. I enlisted the help of my wife and we loaded it onto a hand truck and slowly...step by step...hauled it upstairs. I pulled it up the stairs while she made sure it didn't fall off the cart. Once it was at the top of the stairs I collapsed on the couch for a half hour before taking it out to the garage. Once it was in, I was able to get some old 15" wheels to fit over the 11.7" Mustang rear brakes. I added 4 flat washers between the wheel and rotor and it just clears. This is just to be able to move the car around in the garage so it's not stuck on jack stands.
https://postimg.cc/qg9zRbdy]
 [/url]
I spent Saturday cleaning up the engine, trans, k-member and suspension. It has been sitting in the garage for years and had accumulated a lot of caked on dust. I had some friends over on Sunday and we got the engine/trans in. Before it could go in the car though, we pulled the trans and replaced the torque converter. A 3500 stall torque converter was a little higher than what I wanted for the street. Then I filled the engine with oil and primed it unit there was oil up at the rockers. Finally, I put the distributor back in and timed it so it should fire right off when the time comes.
https://postimg.cc/2br7Pk0j]
 [/url]
https://postimg.cc/3yMBFCpv]
 [/url]
Before calling it a day, on Sunday, I wanted to check the pinion angle. The pinion looked really high up in the air and I was worried that the perches had been welded in the wrong spot. We jacked up the back of the car while I watched an angle gauge attached to the trans output shaft. Once the gauge read 0, I put the gauge on the pinion yoke. It read 0 as well so that's a pinion angle of 0. It looks like the perches were welded on correctly for an A-body...the flat oval track springs I'm using just threw the angle off a little. I already have some Belltech 2* axle shims and I've read that on a street car you want from -1 to -3* so that should be just right for what I need.
Last night I measured for a driveshaft. I need a shaft 52-1/2" long.(center to center of U-joint) I called up a big driveline shop that I've used in the past. They quoted me $200 plus new solid joints to shorten and balance a driveshaft. That's brand new driveshaft territory! I found a couple shops online that advertise brand new shafts for $270 plus shipping. They wouldn't have a tapered end on the shaft though but I don't know if that's necessary for clearance.
I assembled the rear axle in the basement last fall since I thought that was the safest place to store it. Not my best idea looking back since I had to get it back OUT of the basement as a complete unit. I enlisted the help of my wife and we loaded it onto a hand truck and slowly...step by step...hauled it upstairs. I pulled it up the stairs while she made sure it didn't fall off the cart. Once it was at the top of the stairs I collapsed on the couch for a half hour before taking it out to the garage. Once it was in, I was able to get some old 15" wheels to fit over the 11.7" Mustang rear brakes. I added 4 flat washers between the wheel and rotor and it just clears. This is just to be able to move the car around in the garage so it's not stuck on jack stands.
https://postimg.cc/qg9zRbdy]
I spent Saturday cleaning up the engine, trans, k-member and suspension. It has been sitting in the garage for years and had accumulated a lot of caked on dust. I had some friends over on Sunday and we got the engine/trans in. Before it could go in the car though, we pulled the trans and replaced the torque converter. A 3500 stall torque converter was a little higher than what I wanted for the street. Then I filled the engine with oil and primed it unit there was oil up at the rockers. Finally, I put the distributor back in and timed it so it should fire right off when the time comes.
https://postimg.cc/2br7Pk0j]
https://postimg.cc/3yMBFCpv]
Before calling it a day, on Sunday, I wanted to check the pinion angle. The pinion looked really high up in the air and I was worried that the perches had been welded in the wrong spot. We jacked up the back of the car while I watched an angle gauge attached to the trans output shaft. Once the gauge read 0, I put the gauge on the pinion yoke. It read 0 as well so that's a pinion angle of 0. It looks like the perches were welded on correctly for an A-body...the flat oval track springs I'm using just threw the angle off a little. I already have some Belltech 2* axle shims and I've read that on a street car you want from -1 to -3* so that should be just right for what I need.
Last night I measured for a driveshaft. I need a shaft 52-1/2" long.(center to center of U-joint) I called up a big driveline shop that I've used in the past. They quoted me $200 plus new solid joints to shorten and balance a driveshaft. That's brand new driveshaft territory! I found a couple shops online that advertise brand new shafts for $270 plus shipping. They wouldn't have a tapered end on the shaft though but I don't know if that's necessary for clearance.
The center console and steering column are installed. I first started with the console carpet. I tried gluing it on but didn't have very good luck and ended up peeling it back off. I read on here that some people use Velcro. That worked a lot better. Still, the carpet doesn't look that nice but I'm told that it's just the way it is and that it will look fine once the seats are installed. We will see.
I was worried at first that the console wasn't going to go in with the tach mounted. Every time the console was test fit, the dash wasn't installed. Now that the dash is in, I couldn't just drop it straight down over the shifter any more. In order to get it in I had to remove the ash tray, take the lockout lever off the shifter and have the shifter in a vertical position. Then I had to shove the tach under the dash at an angle and rotate the console over the shifter and into place. It's definitely a tight fit. The steering column went in a little easier. Nothing really complicated about that. The lower bearing upgrade looks like it's going to work nicely and the column basically fell into place.
https://postimg.cc/fJSLYmfm]
 [/url]
https://postimg.cc/DSqwMhDz]
 [/url]
https://postimg.cc/Y4MCcVKz]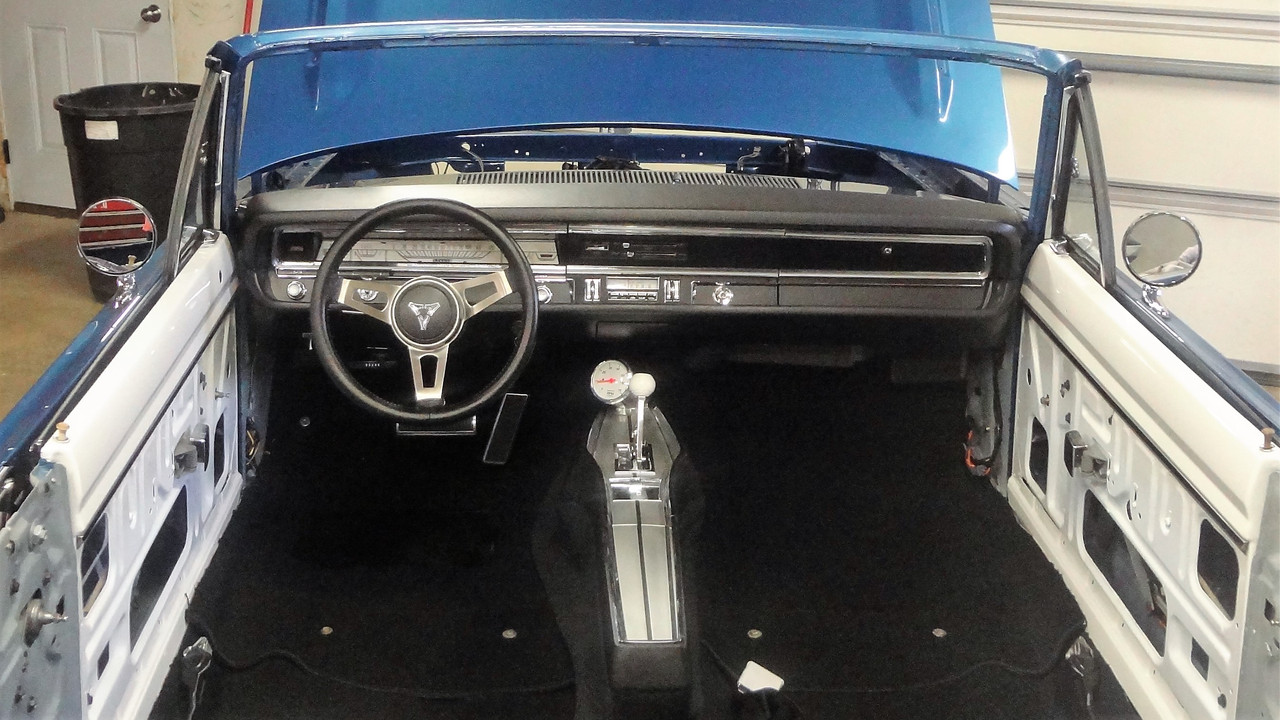 [/url]
Once the console and column were in, I had to hook a battery up just to make sure the lights all worked. There was an issue with the map light and the shift indicator light. After probing some wires with the test light I found the issue. The issue was the same for both lights. The factory wiring has + entering the side(body) of the bulb. The ground wire is the pin on the bottom of the bulb. This works fine for an incandescent bulb but not for an LED. I pulled the wires out of the "T" connector at the map light and revered them. Now the + goes into the bottom pin and the ground is the bulb body. The shift indicator light wasn't as easy of a fix since the bulb socket doesn't have wires that can be easily swapped. I ended up having to cut the two wires going to the bulb and spliced them back together reversed.
https://postimg.cc/9zn04JZc]
 [/url]
I was worried at first that the console wasn't going to go in with the tach mounted. Every time the console was test fit, the dash wasn't installed. Now that the dash is in, I couldn't just drop it straight down over the shifter any more. In order to get it in I had to remove the ash tray, take the lockout lever off the shifter and have the shifter in a vertical position. Then I had to shove the tach under the dash at an angle and rotate the console over the shifter and into place. It's definitely a tight fit. The steering column went in a little easier. Nothing really complicated about that. The lower bearing upgrade looks like it's going to work nicely and the column basically fell into place.
https://postimg.cc/fJSLYmfm]
https://postimg.cc/DSqwMhDz]
https://postimg.cc/Y4MCcVKz]
[/url]Once the console and column were in, I had to hook a battery up just to make sure the lights all worked. There was an issue with the map light and the shift indicator light. After probing some wires with the test light I found the issue. The issue was the same for both lights. The factory wiring has + entering the side(body) of the bulb. The ground wire is the pin on the bottom of the bulb. This works fine for an incandescent bulb but not for an LED. I pulled the wires out of the "T" connector at the map light and revered them. Now the + goes into the bottom pin and the ground is the bulb body. The shift indicator light wasn't as easy of a fix since the bulb socket doesn't have wires that can be easily swapped. I ended up having to cut the two wires going to the bulb and spliced them back together reversed.
https://postimg.cc/9zn04JZc]
I ended up going with a brand new driveshaft from a place I found online. They are out of Wisconsin. I ordered the shaft on a Monday and received it on that Friday. It came painted with a cheap flat black paint which I removed with some paint stripper. Then I polished up the shaft with a polish that leaves a silicone film behind. Hopefully some periodic wipe downs with silicone spray will keep it looking nice. If not I can always paint it but I like the natural look.
https://postimg.cc/dL6TKFP9]
 [/url]
https://postimg.cc/N272FqyB]
 [/url]
https://postimg.cc/kDxbf8Tz]
 [/url]
I'm not sure why I keep having E-brake cable issues but I do. On my Challenger it took a combination of stock, Fine Lines and Inline Tube components to get the E-brake hooked up and working. On the Dart, the front cable is way too long. The adjusting nut is bottomed out before the cable is even close to being tight. I ended up making a spacer that hopefully will work. I'll know for sure once the brakes are blead and the rear calipers are adjusted. I don't want to have to search for another cable if I don't have to.
https://postimg.cc/zV8RMBMB]
 [/url]
https://postimg.cc/dL6TKFP9]
https://postimg.cc/N272FqyB]
https://postimg.cc/kDxbf8Tz]
I'm not sure why I keep having E-brake cable issues but I do. On my Challenger it took a combination of stock, Fine Lines and Inline Tube components to get the E-brake hooked up and working. On the Dart, the front cable is way too long. The adjusting nut is bottomed out before the cable is even close to being tight. I ended up making a spacer that hopefully will work. I'll know for sure once the brakes are blead and the rear calipers are adjusted. I don't want to have to search for another cable if I don't have to.
https://postimg.cc/zV8RMBMB]
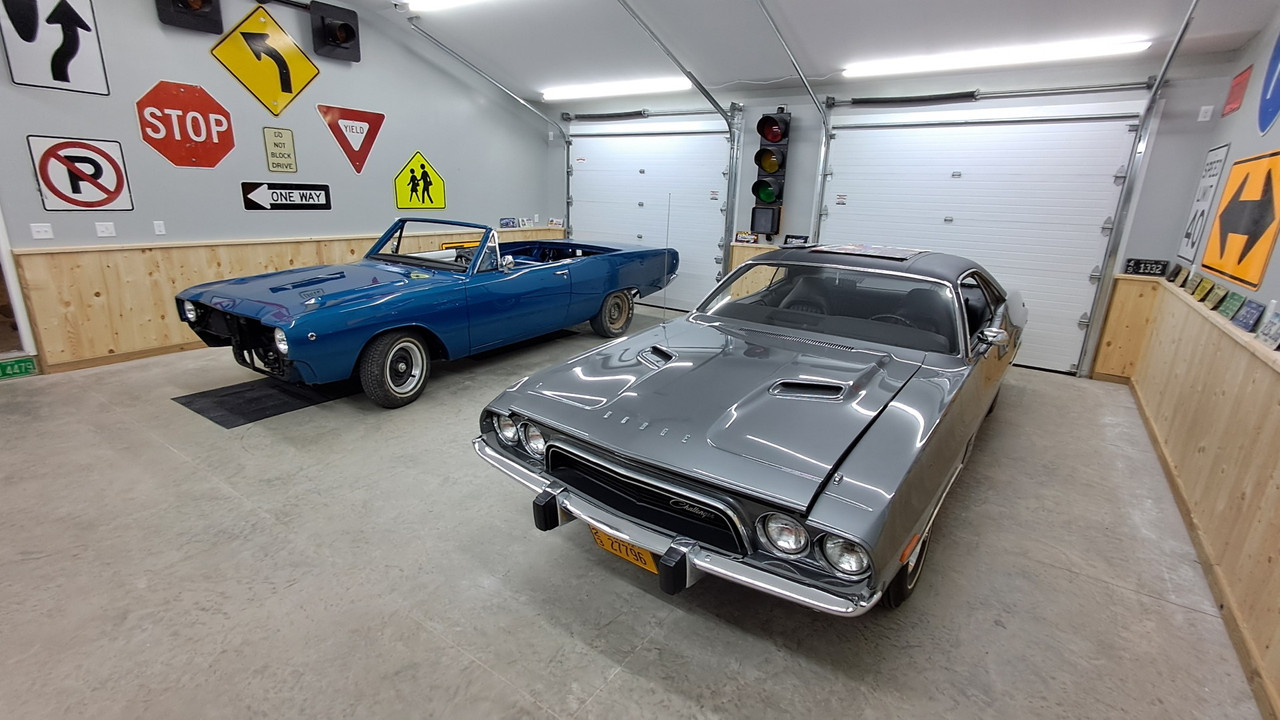
I took a 2 year break from working on the Dart. In those 2 years I built a garage addition onto my existing garage. I work for a lumber yard that builds roof/floor trusses and wall panels. I designed the garage roof so I can install a hoist some day and a coworker designed the wall panels for me. I had the concrete work done and hired a framer to set the walls and trusses. I also hired a crew to shingle the new roof. Once that was done, my dad and I finished the rest of the exterior ourselves.
I had a hard time finding an electrician to wire the new garage. No one would answer their phone or call me back. I ended up having to call one companies emergency number in order to talk to a real person. After I made contact, everything went more smoothly. The electrical rough-in was done in October of 23. Then in November I worked on insulation. Last December I hung the sheetrock. The last piece went up on Dec 31st. By that time it was cold and the plumbing/heating guys wanted a small fortune to install a temp heater so the mud/tape could get done. I decided to just wait until spring.
In May, I hired a guy to mud/tape the garage. Then I sprayed texture and rolled on multiple coats of primer and paint. I wanted to insulate the concrete on the bottom of the walls so I had to install some sort of wainscoting. I was originally going to use that corrugated metal but wasn't completely sold on it. I ended up going with tongue and groove pine and I'm happy with the result. The electricians came back and finished hooking up the new box, outlets and ceiling fan. For lighting I ordered (10) 8' LED shop lights from a company in Wisconsin. They are a lot brighter than I was expecting. I only ended up using (8) of them. A month ago I had the heating/plumbing guys route a new gas line from my basement into the new garage. Then dad and a friend gave me a hand installing the heater and running the exhaust. Now I have a nice safe space to store and work on the cars.
Last edited:
The front hood trim is installed and fit pretty nicely. The attachment nuts end up being really close to the inner hood lip and I couldn't get a standard 1/4" socket on them to tighten them up. I had to take a cheap off brand socket and grind it to make the outside wall thickness thinner so it would slip onto the nuts.
Installing the hood louvers required a little extra work since I wasn't able to test fit them before paint. All the holes in the hood needed to be filed to remove paint buildup and a couple holes needed to be filed oblong so the louver pins would line up.
 [/url]
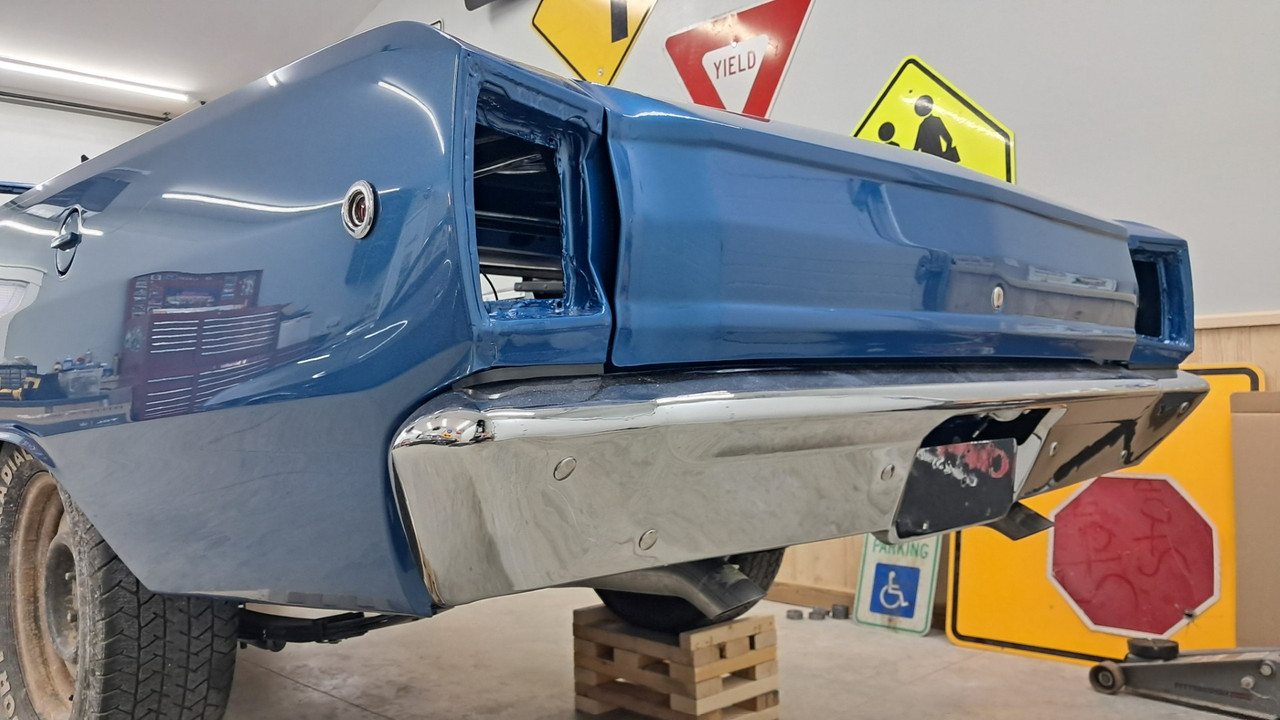
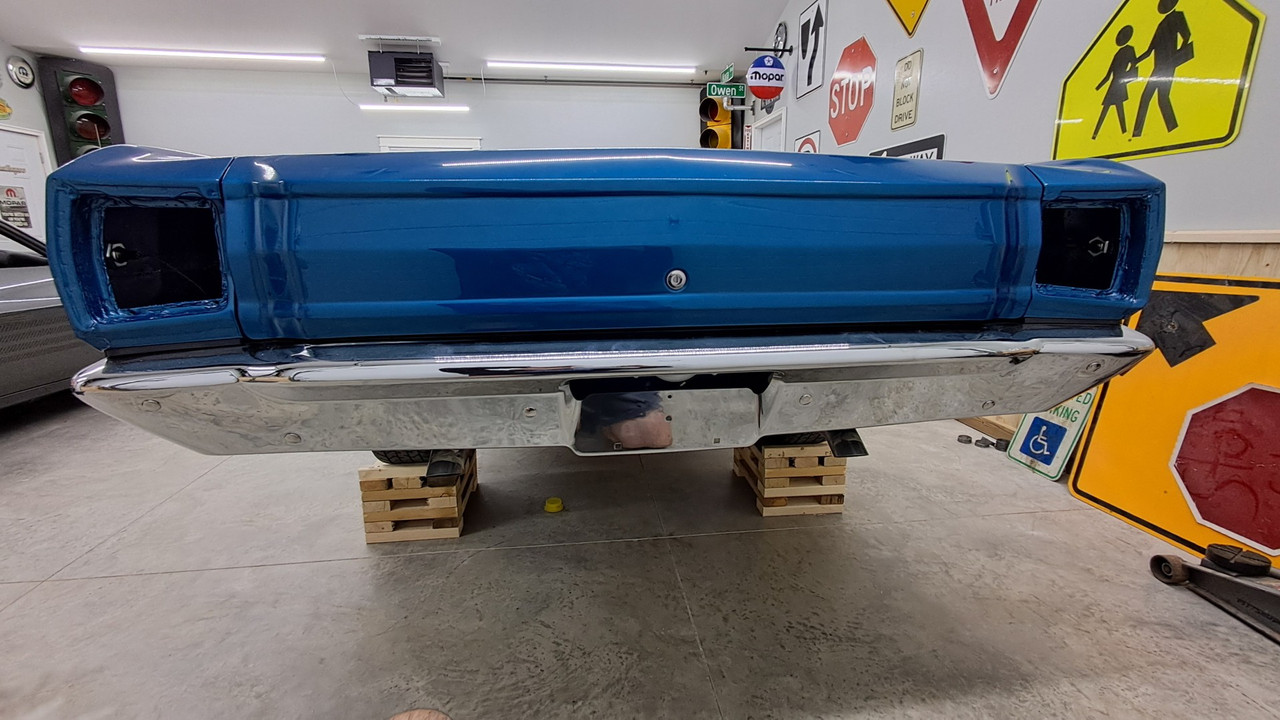
I installed the rear side markers, trunk lock and the trunk weather strip. The stainless trim that goes around the interior opening was a tedious job since all 10 pieces need to fit together just right. I was pretty nervous about pushing those trim clips over the newly painted surface. I tried to do it as gently as I could.
 [/url]
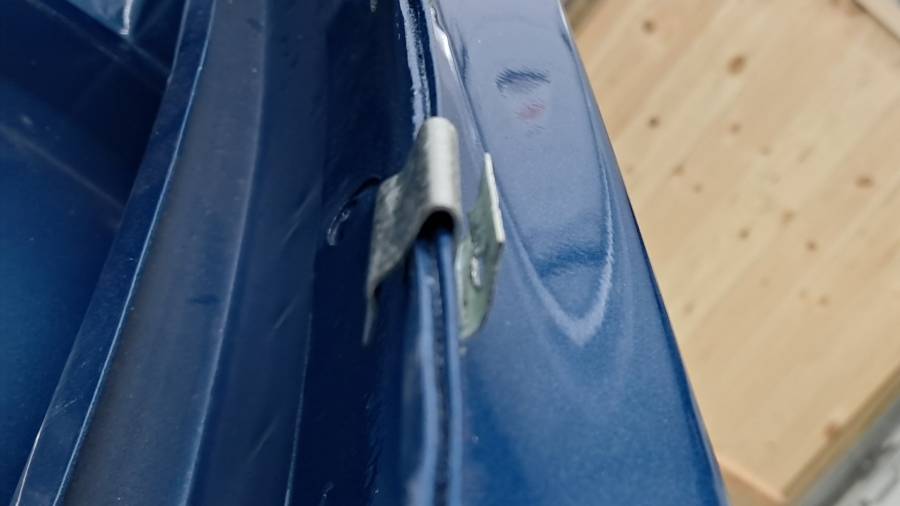
Some of the clips fit nicely but others did not. There were about 4 clips per side that didn't want to push down all the way. The metal on those areas was two layers thick. Not only did the clips not push down all the way but the extra thickness caused the bottom of the clip to stick out away from the body. You can see in the picture that the bottom of the clip is sticking out about 1/4". I'm positive that if I left it this way, the convertible top would have rubbed on that sharp clip edge.
 [/url]
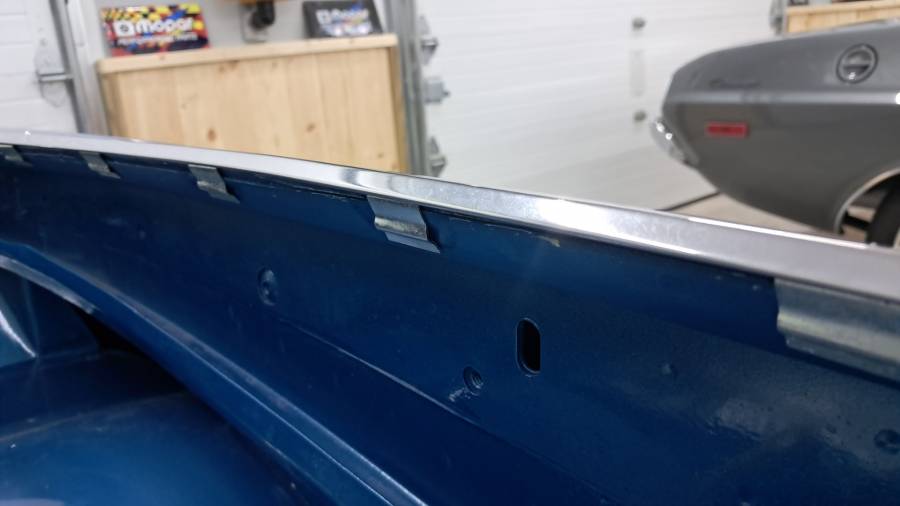
I ended up grinding the inner lip thinner underneath each clip. With that inner edge ground down a little, the clips pushed on and weren't all spread open. You can see how they fit tight to the inner body structure now.
 [/url]
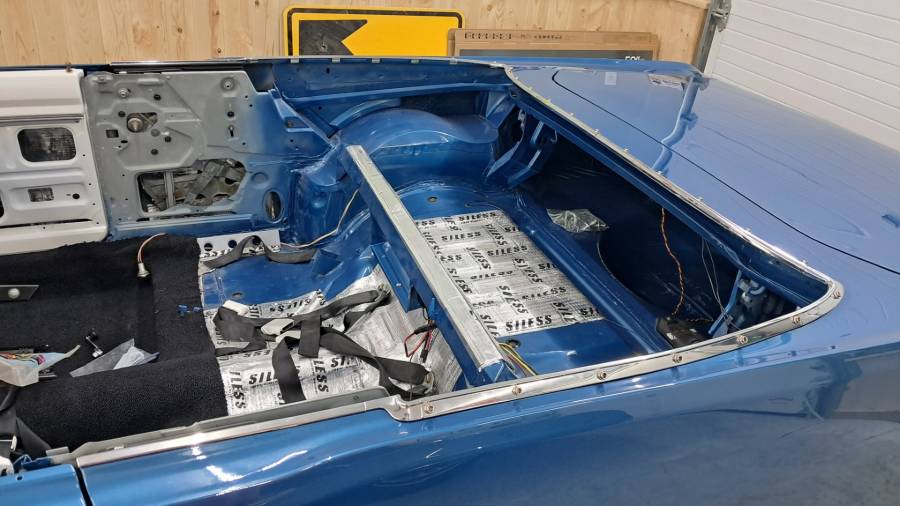
With the clips in place I installed all 10 pieces of trim around that back opening. Then I turned my attention to the door window fuzzies. I watched a Youtube video of someone installing this trim with the glass already installed so I knew it was possible but it just kept fighting me. There wasn't enough room to work and I didn't want to risk breaking the side glass. I ended up removing the three regulator bolts so I could lower the glass all the way down to the bottom of the door. That gave me enough room to work. After those inner and outer pieces were on, I installed the stainless trim on the top of the door.
 [/url]
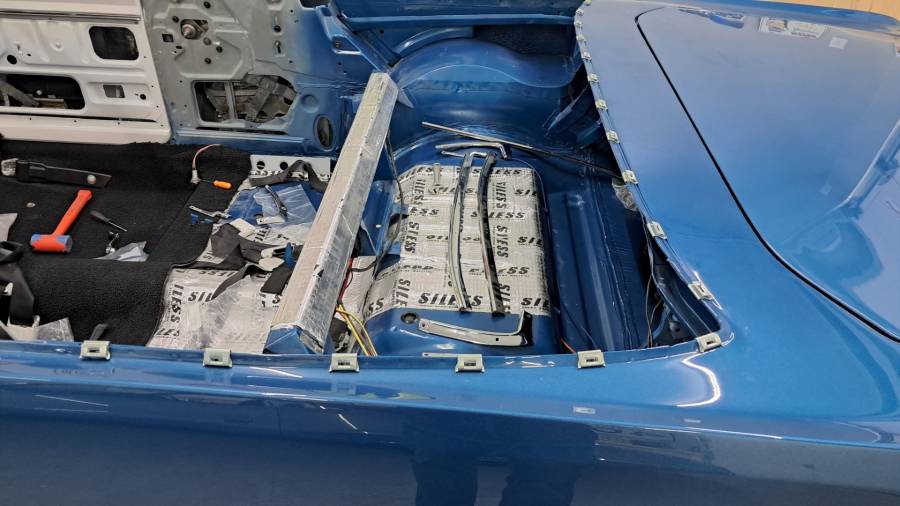
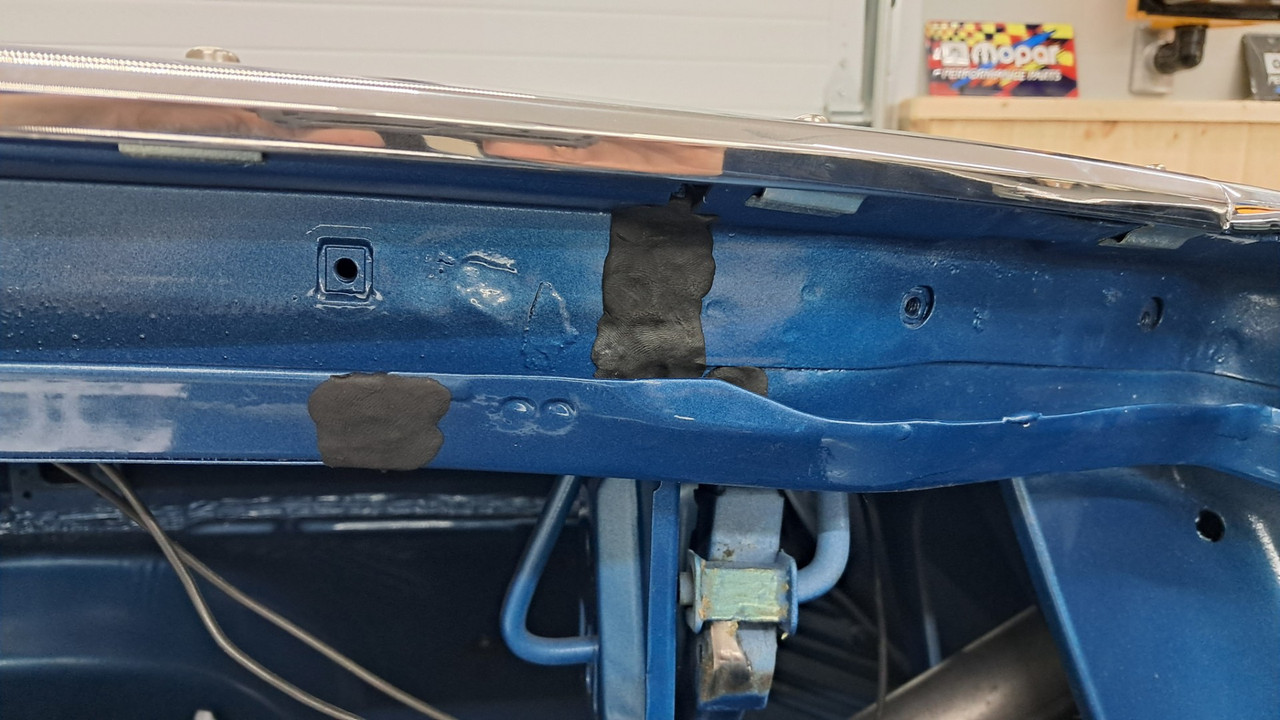
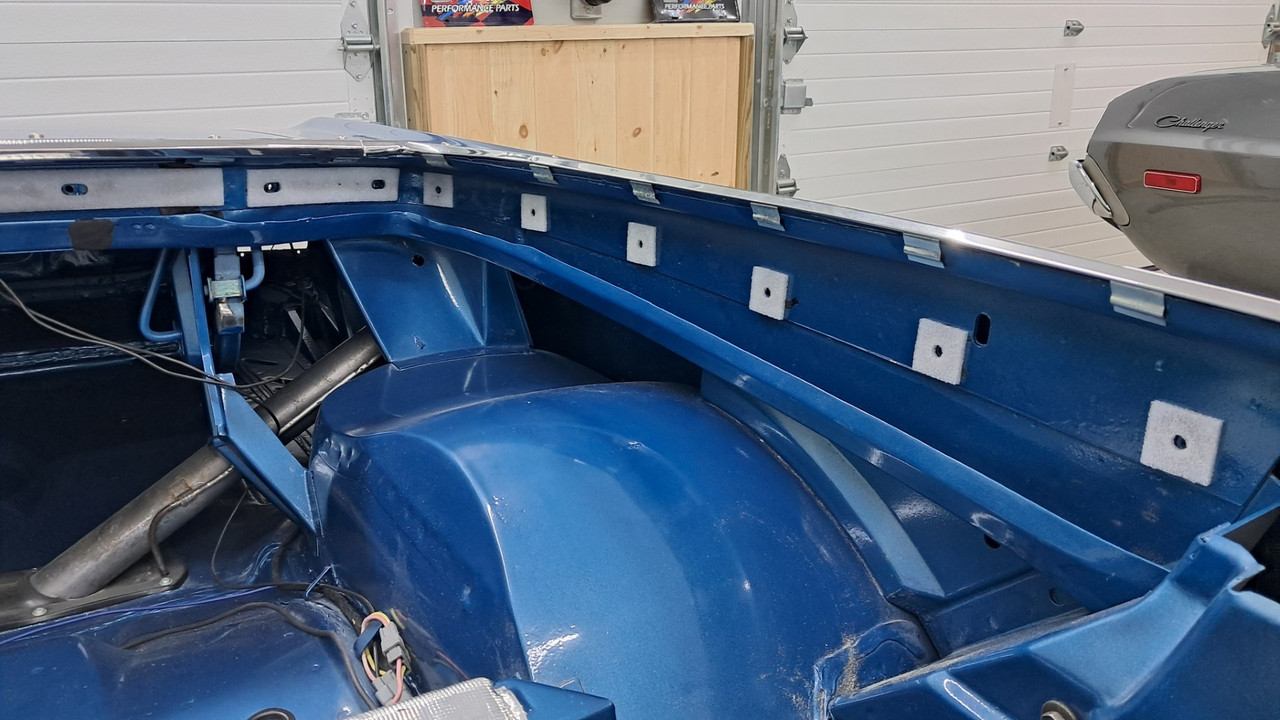
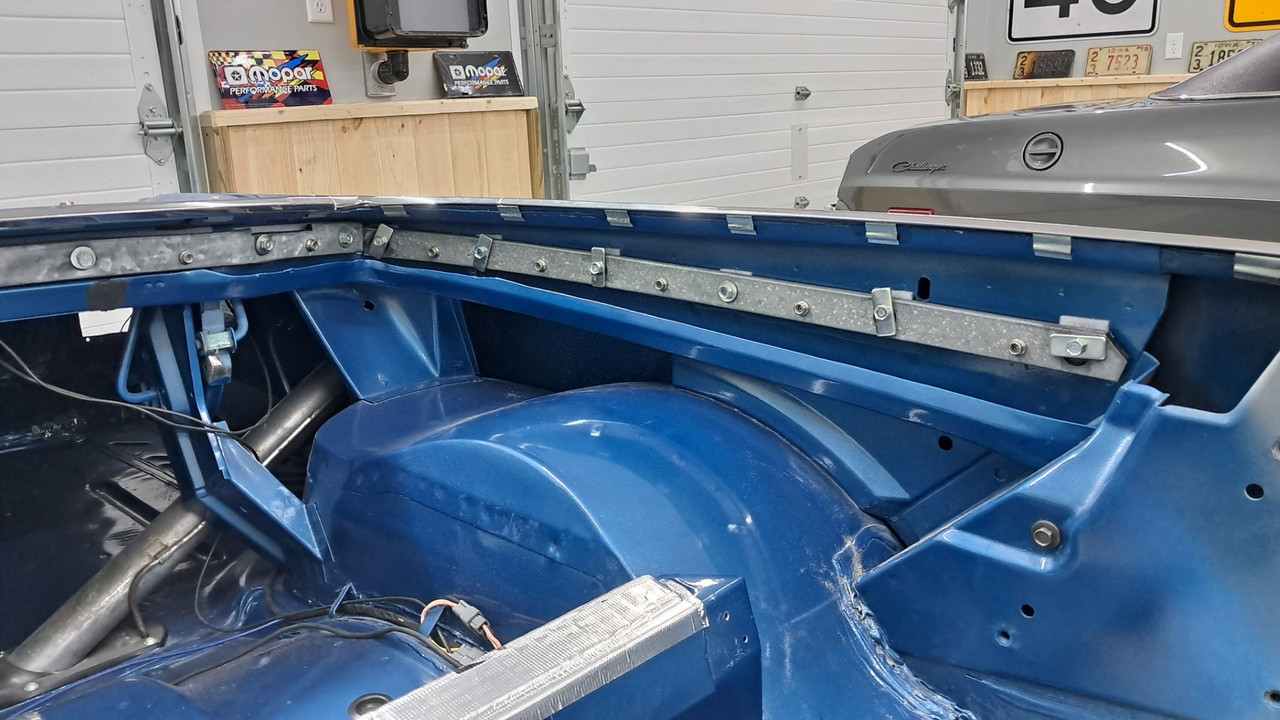
I installed the foam gaskets around the convertible top and temporarily installed the tack strips to get them out of my way. The factory put some butyl over a couple seams in the rain gutter. I assume to insure no water would leak from the gutter into the interior/trunk. They put three layers of sealant over a couple of them. Butyl then some sort of tape on top and finally the foam seals. When I put the foam seals on, I didn't put any adhesive on the outer edges so they can be pulled back to install the tape if that's something I need to do. Any idea what kind of tape to use?
 [/url]
 [/url]
 [/url]
 [/url]
 [/url]
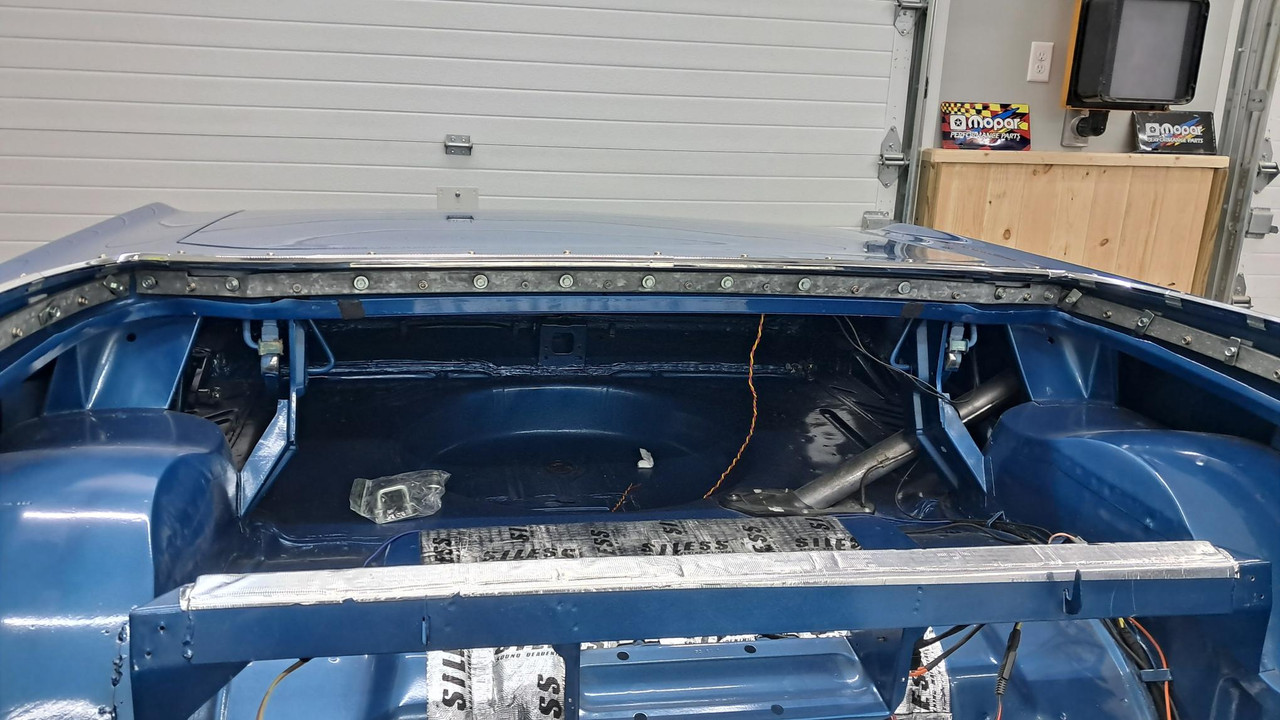
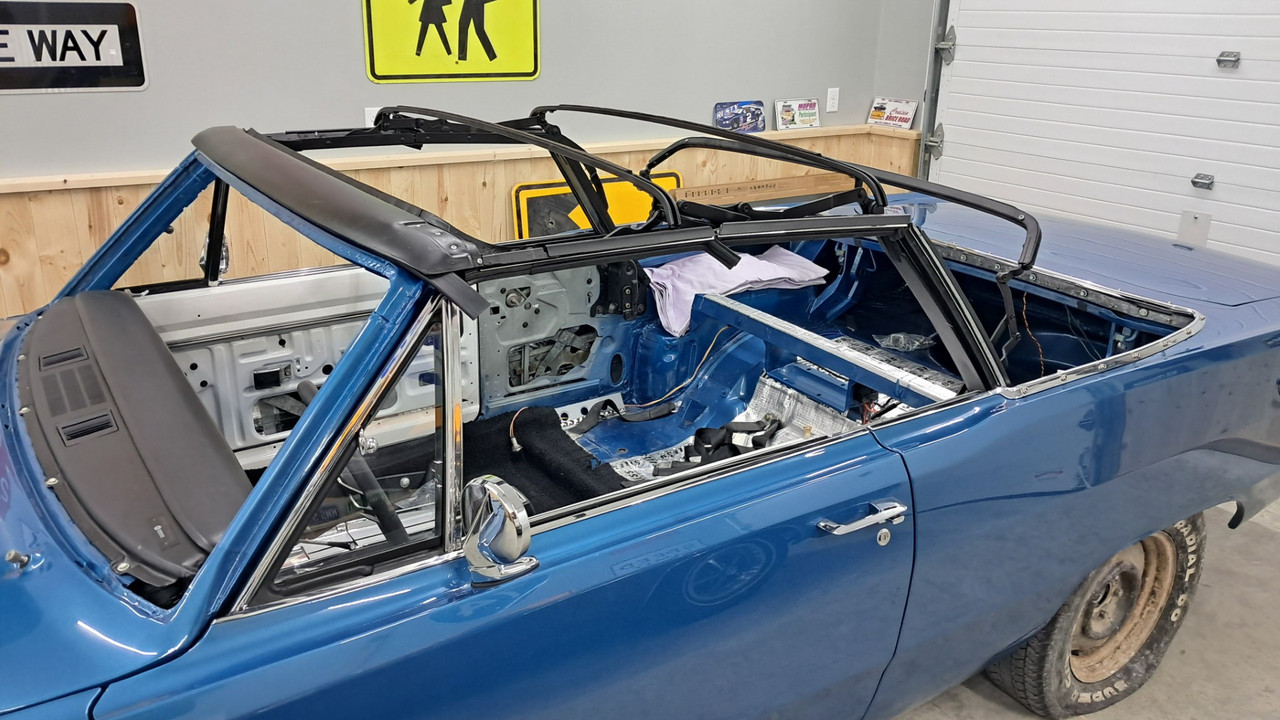
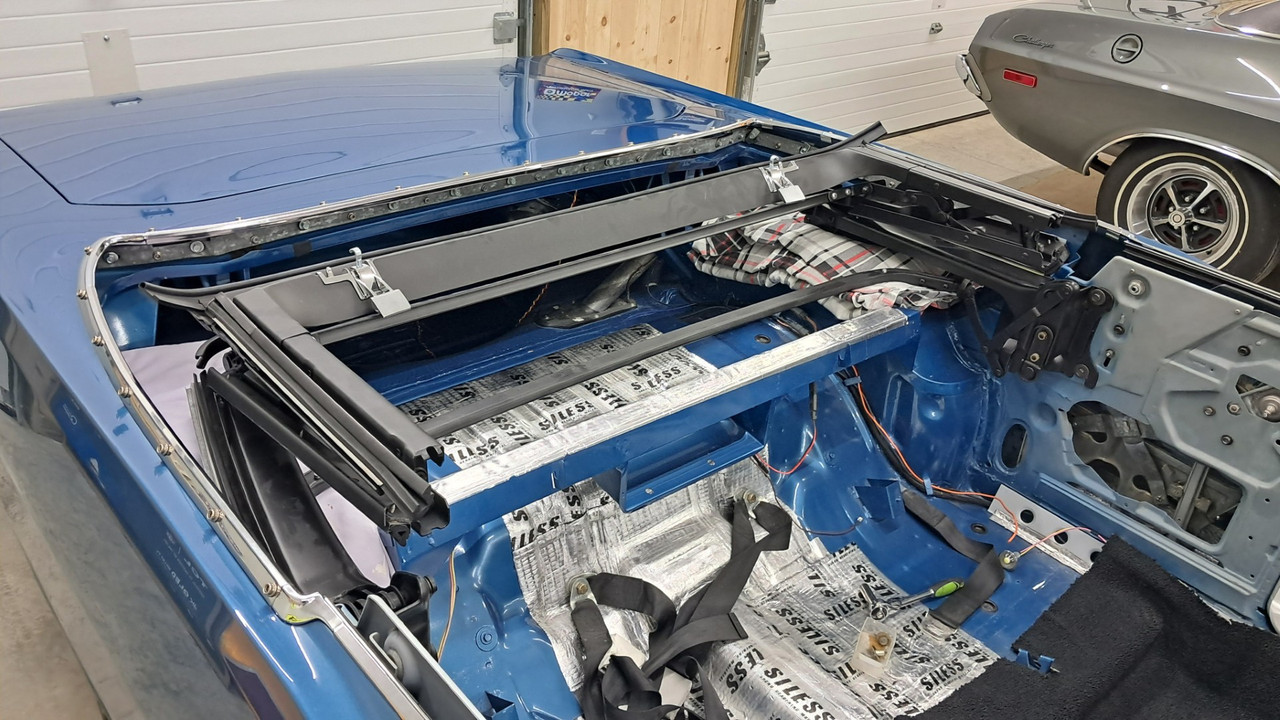
Then I got the convertible top frame out of the basement and on the car. I'll let a professional handle the adjustments when the top gets installed.
 [/url]
 [/url]
Installing the hood louvers required a little extra work since I wasn't able to test fit them before paint. All the holes in the hood needed to be filed to remove paint buildup and a couple holes needed to be filed oblong so the louver pins would line up.
[/url]I installed the rear side markers, trunk lock and the trunk weather strip. The stainless trim that goes around the interior opening was a tedious job since all 10 pieces need to fit together just right. I was pretty nervous about pushing those trim clips over the newly painted surface. I tried to do it as gently as I could.
[/url]Some of the clips fit nicely but others did not. There were about 4 clips per side that didn't want to push down all the way. The metal on those areas was two layers thick. Not only did the clips not push down all the way but the extra thickness caused the bottom of the clip to stick out away from the body. You can see in the picture that the bottom of the clip is sticking out about 1/4". I'm positive that if I left it this way, the convertible top would have rubbed on that sharp clip edge.
[/url]I ended up grinding the inner lip thinner underneath each clip. With that inner edge ground down a little, the clips pushed on and weren't all spread open. You can see how they fit tight to the inner body structure now.
[/url]With the clips in place I installed all 10 pieces of trim around that back opening. Then I turned my attention to the door window fuzzies. I watched a Youtube video of someone installing this trim with the glass already installed so I knew it was possible but it just kept fighting me. There wasn't enough room to work and I didn't want to risk breaking the side glass. I ended up removing the three regulator bolts so I could lower the glass all the way down to the bottom of the door. That gave me enough room to work. After those inner and outer pieces were on, I installed the stainless trim on the top of the door.
[/url]I installed the foam gaskets around the convertible top and temporarily installed the tack strips to get them out of my way. The factory put some butyl over a couple seams in the rain gutter. I assume to insure no water would leak from the gutter into the interior/trunk. They put three layers of sealant over a couple of them. Butyl then some sort of tape on top and finally the foam seals. When I put the foam seals on, I didn't put any adhesive on the outer edges so they can be pulled back to install the tape if that's something I need to do. Any idea what kind of tape to use?
[/url][/url][/url][/url][/url]Then I got the convertible top frame out of the basement and on the car. I'll let a professional handle the adjustments when the top gets installed.
[/url][/url]
Last edited:
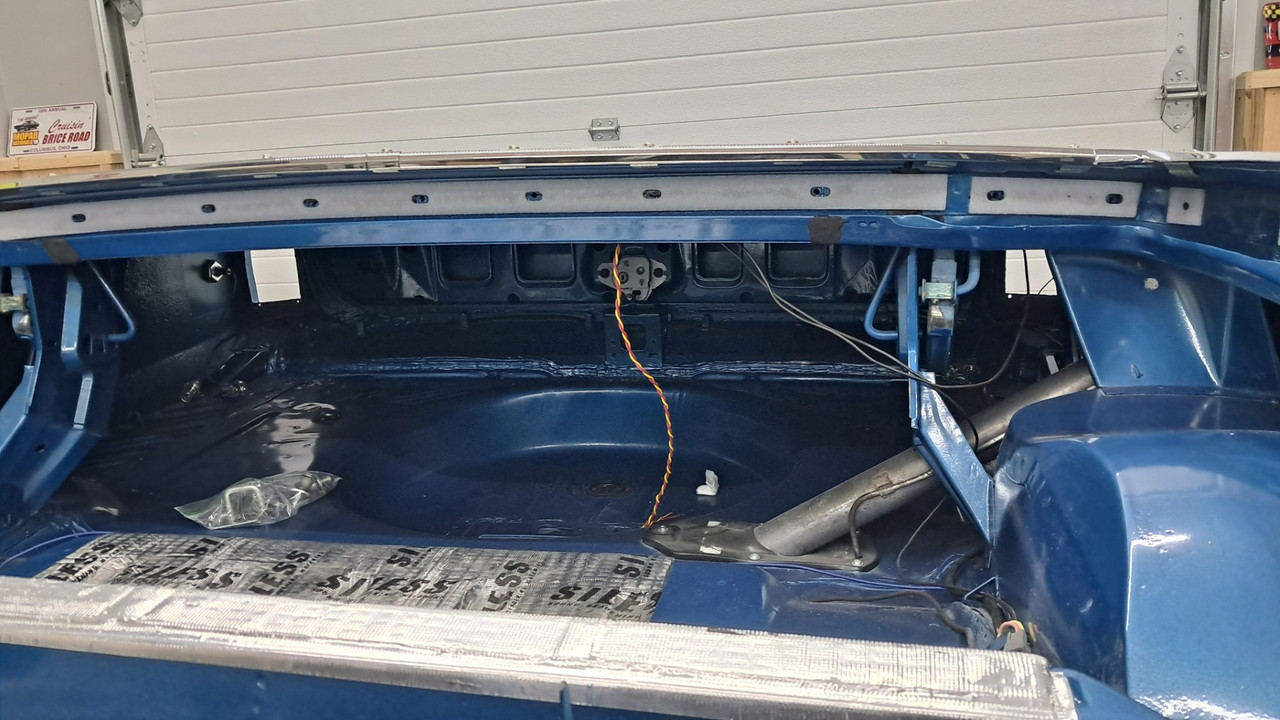
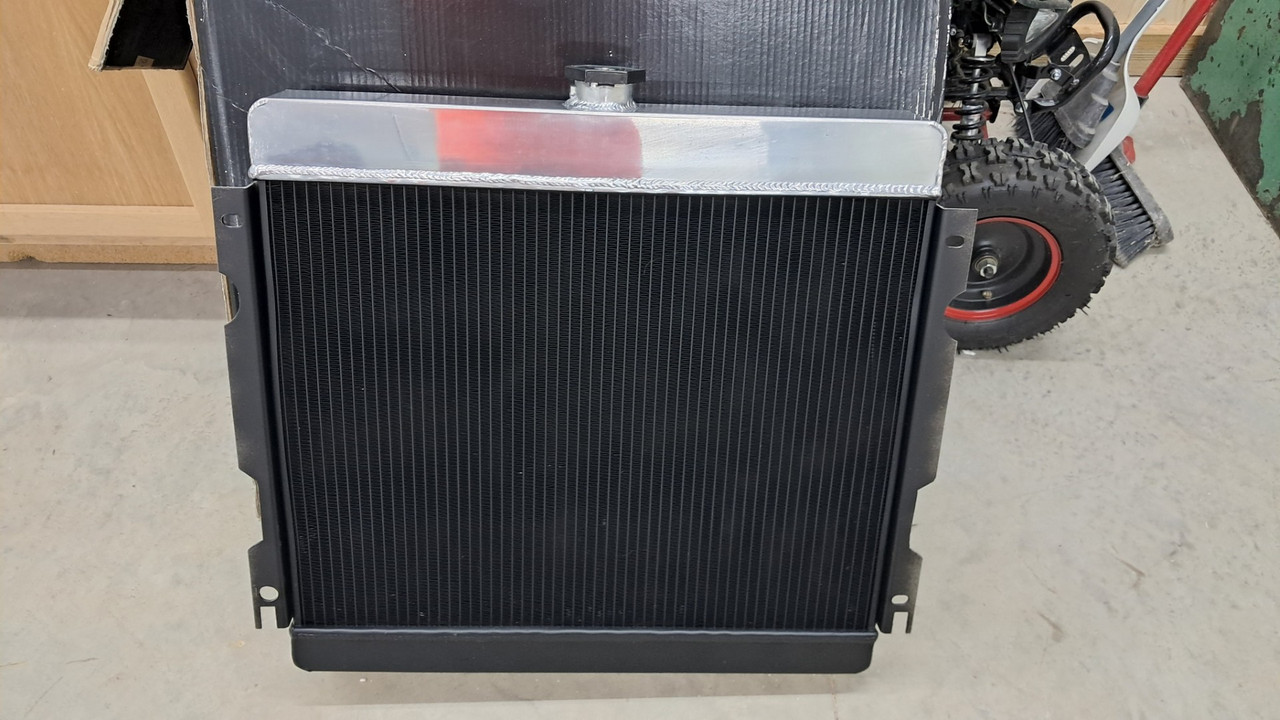
The radiator/shroud/overflow tank and all the hoses are installed. I painted the front of the radiator black so it wouldn't be visible through the grill. I also got the trans cooler lines made with AN fittings that connect the hard line to the radiator and external cooler. I routed the trans fluid to the external cooler first and then through the radiator.
 [/url]
 [/url]
I used some aluminum hose spacers on the heater hoses to keep them cleanly routed. I still need to install the fender to cowl braces but the brackets I made to install them are in place.
 [/url]
 [/url]
It's the slow season at work so I had one of the shop guys make me some wooden cribs out of scrap 2x4s. I've had a vehicle tip off jack stands on me before. Luckily it wasn't very high off the ground and the wheels were still on it. I don't really feel that comfortable around them any more. The cribs are super solid and I don't have to worry about the car going anywhere. Last weekend a couple old friends stopped by and gave me a hand installing the exhaust. Now it just needs fluids and it's ready to start. That will wait until spring when I can open up the garage doors and not lose all my heat.
 [/url]
 [/url]
 [/url]
I'm still waiting on Digi-Tails to get done with my LED tail lights. I sent them a tail light housing many years ago and still don't have anything in hand. Early last year they sent me a picture of the prototype so I didn't think it would be much longer...but here we are...another year has gone by.
 [/url]
 [/url]
[/url][/url]I used some aluminum hose spacers on the heater hoses to keep them cleanly routed. I still need to install the fender to cowl braces but the brackets I made to install them are in place.
[/url][/url]It's the slow season at work so I had one of the shop guys make me some wooden cribs out of scrap 2x4s. I've had a vehicle tip off jack stands on me before. Luckily it wasn't very high off the ground and the wheels were still on it. I don't really feel that comfortable around them any more. The cribs are super solid and I don't have to worry about the car going anywhere. Last weekend a couple old friends stopped by and gave me a hand installing the exhaust. Now it just needs fluids and it's ready to start. That will wait until spring when I can open up the garage doors and not lose all my heat.
[/url][/url][/url]I'm still waiting on Digi-Tails to get done with my LED tail lights. I sent them a tail light housing many years ago and still don't have anything in hand. Early last year they sent me a picture of the prototype so I didn't think it would be much longer...but here we are...another year has gone by.
[/url][/url]The last few month have been "1 step forward and 2 steps back". I filled the radiator with water in preparation to start the engine. Almost as soon as I started pouring the water in, it started leaking out. I messed up when I cut the lower rad hose to fit and it was leaking at the water pump. Also, the "new" 10 year old, but never run, water pump was leaking out the weep hole. So, I had to tear the front of the engine apart to replace that. Then, the engine paint I used has gone through a reformulation and is a completely different color now. Luckily I had a little bit of old paint left and was able to mist the old color over the new color so the water pump still matches the rest of the engine. Once I got it all back together I filled the trans with fluid, filled the carb bowls with gas and started the engine. It started right up which is good but both exhaust studs on the drivers side started leaking. I swear I sealed those up but I guess not. I drained the coolant down again, pulled the studs out and put sealer on them. After all that I needed a break.
I recently started researching wheels again. I looked up the wheels I'd found awhile ago and priced them out. The price for those wheels has gone up considerably. They were going to cost me about $1200 each for the fronts and around $1400 each for the rears. I couldn't bring myself to spend that much since my enthusiasm for this project isn't what it used to be. I started looking at other options and found something I liked for quite a bit less. The design isn't what I had originally planned but I think it still looks good. After measuring my clearances again I placed the order.
While those were being built, I had a friend come over and help me with a couple things. The back of the car seems to be sitting really high. I assumed the 0 arch MP Oval Track springs that I bought would sit flat and lower the rear end...I guess not. We pulled the rear end and springs out from under the car and moved the front spring eye to the upper hole in the Dr Diff hangers. That change lowered the rear by 1". Once that was done we assembled the front brakes, installed the master cylinder and blead the system. I've never had a car with manual brakes before. I'm not sure how they are supposed to feel. They feel strange so I'm not sure if there is an issue yet or not.
The wheels were supposed to take 4-6 weeks to be built but they were done in 3. The wheels I went with are a Shelby Cobra replica wheel with 18x7 in the front and 20x9 in the rear. I left the 2" drop spindles on the front which limited my wheel width to 7". I wanted a 5" backspacing but the maximum backspacing for this wheel is 4.75". They are very close to the fender lip so I will need to find a little bit of extra room there. I have a couple ideas on how I can do that.
https://postimg.cc/Z00wPcsw]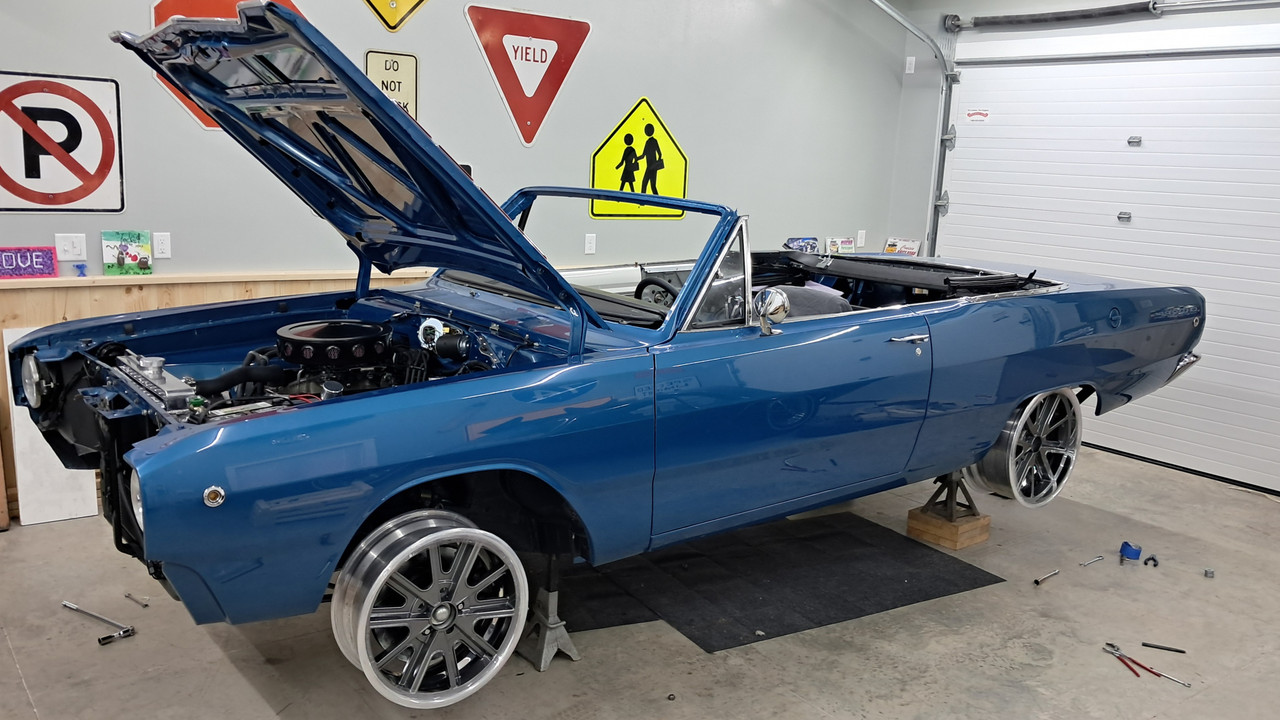 [/url]
https://postimg.cc/xNkg0fNw]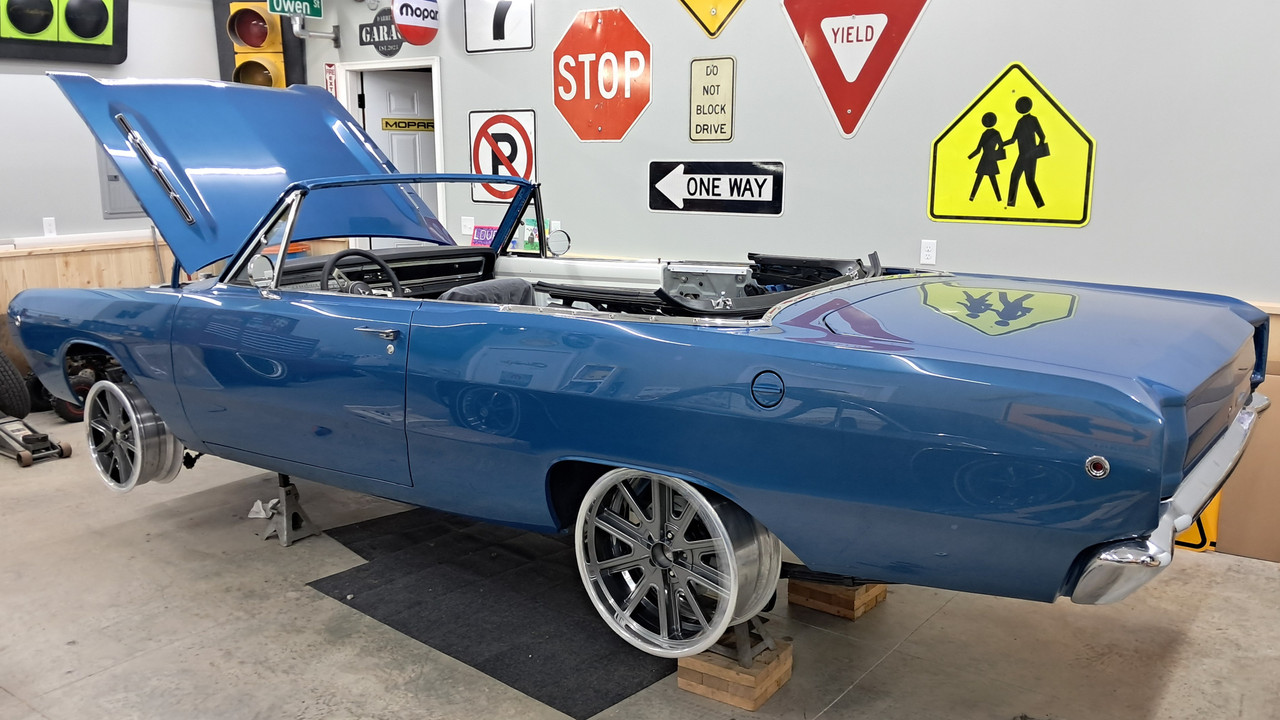 [/url]
The 7" wide wheel really limited my tire choices and I was worried the front would look really narrow. Now that the tires are on it's not bad at all. I'm not going to autocross this car so I don't need something super wide up front. I'm actually happy with how wide the fronts look. After the car was sitting on all 4s, it was apparent that the rear end is still up too high.(at least 1" maybe 2") Hotchkis sells lowering springs but they are over $500. I put 4 old wheels/tires in the trunk to try and lower the back to get a feel for how low it should be. That weight only lowered it a 1/2" so I'm still not sure how low it needs to go yet. I measured from the rocker to the ground at the front and at the rear. The rear is sitting up 2" higher than the front still. I'd be OK with a slight rake but 2" is too much.
https://postimg.cc/3dv9VwTp] [/url]
Yesterday I unboxed the new grill and headlight bezels. The new parts aren't painted correctly for a GT or GTS. Those models have some extra blackout done that the lower trim level cars don't have. I get why the reproduction parts were done that way. They only have to stock 1 part instead of 2. It still sucks that I had to paint brand new parts. Oh well. It turned out ok and the grill fits pretty good. The front end is starting to take shape.
https://postimg.cc/MX4d9Qhq] [/url]
https://postimg.cc/QFZS3r8z] [/url]
https://postimg.cc/YvNR2yjC] [/url]
Next will be installing the front bumper and tightening the front suspension components at the ride height I want. Then I need to figure out what to do with the rear end. It needs to come down some, but the rear end is really close to the gas tank and the snubber is fairly close to the floor pan already. I need to double check the pinion angle. If that is off(from the spring eye change) the snubber may need to be rotated down. That's all for now.
I recently started researching wheels again. I looked up the wheels I'd found awhile ago and priced them out. The price for those wheels has gone up considerably. They were going to cost me about $1200 each for the fronts and around $1400 each for the rears. I couldn't bring myself to spend that much since my enthusiasm for this project isn't what it used to be. I started looking at other options and found something I liked for quite a bit less. The design isn't what I had originally planned but I think it still looks good. After measuring my clearances again I placed the order.
While those were being built, I had a friend come over and help me with a couple things. The back of the car seems to be sitting really high. I assumed the 0 arch MP Oval Track springs that I bought would sit flat and lower the rear end...I guess not. We pulled the rear end and springs out from under the car and moved the front spring eye to the upper hole in the Dr Diff hangers. That change lowered the rear by 1". Once that was done we assembled the front brakes, installed the master cylinder and blead the system. I've never had a car with manual brakes before. I'm not sure how they are supposed to feel. They feel strange so I'm not sure if there is an issue yet or not.
The wheels were supposed to take 4-6 weeks to be built but they were done in 3. The wheels I went with are a Shelby Cobra replica wheel with 18x7 in the front and 20x9 in the rear. I left the 2" drop spindles on the front which limited my wheel width to 7". I wanted a 5" backspacing but the maximum backspacing for this wheel is 4.75". They are very close to the fender lip so I will need to find a little bit of extra room there. I have a couple ideas on how I can do that.
https://postimg.cc/Z00wPcsw]
[/url]https://postimg.cc/xNkg0fNw]
[/url]The 7" wide wheel really limited my tire choices and I was worried the front would look really narrow. Now that the tires are on it's not bad at all. I'm not going to autocross this car so I don't need something super wide up front. I'm actually happy with how wide the fronts look. After the car was sitting on all 4s, it was apparent that the rear end is still up too high.(at least 1" maybe 2") Hotchkis sells lowering springs but they are over $500. I put 4 old wheels/tires in the trunk to try and lower the back to get a feel for how low it should be. That weight only lowered it a 1/2" so I'm still not sure how low it needs to go yet. I measured from the rocker to the ground at the front and at the rear. The rear is sitting up 2" higher than the front still. I'd be OK with a slight rake but 2" is too much.
https://postimg.cc/3dv9VwTp]
[/url]Yesterday I unboxed the new grill and headlight bezels. The new parts aren't painted correctly for a GT or GTS. Those models have some extra blackout done that the lower trim level cars don't have. I get why the reproduction parts were done that way. They only have to stock 1 part instead of 2. It still sucks that I had to paint brand new parts. Oh well. It turned out ok and the grill fits pretty good. The front end is starting to take shape.
https://postimg.cc/MX4d9Qhq]
[/url]https://postimg.cc/QFZS3r8z]
[/url]https://postimg.cc/YvNR2yjC]
[/url]Next will be installing the front bumper and tightening the front suspension components at the ride height I want. Then I need to figure out what to do with the rear end. It needs to come down some, but the rear end is really close to the gas tank and the snubber is fairly close to the floor pan already. I need to double check the pinion angle. If that is off(from the spring eye change) the snubber may need to be rotated down. That's all for now.
JDMopar
Well-Known Member
It looks great Darren. Does it look as raked to you when it's sitting on the floor as it does sitting on the cribs? Maybe with some miles put on it when you're ready, the rear springs will settle a bit after some flex cycles.
I'm kind of leaning towards a 1" lowering block and then hoping the springs will settle a little. It looks better when you are seeing it from a higher vantage point. The wheels look tucked up into the wheel well more. I don't like lowering blocks but a 1" block might not be the end of the world.
The front bumper and front spoiler are installed. That spoiler from Spoilers by Randy looks awesome on there.
https://postimg.cc/JGLKzsg5] [/url]
https://postimg.cc/D4qgchWG] [/url]
https://postimg.cc/146JSGWz]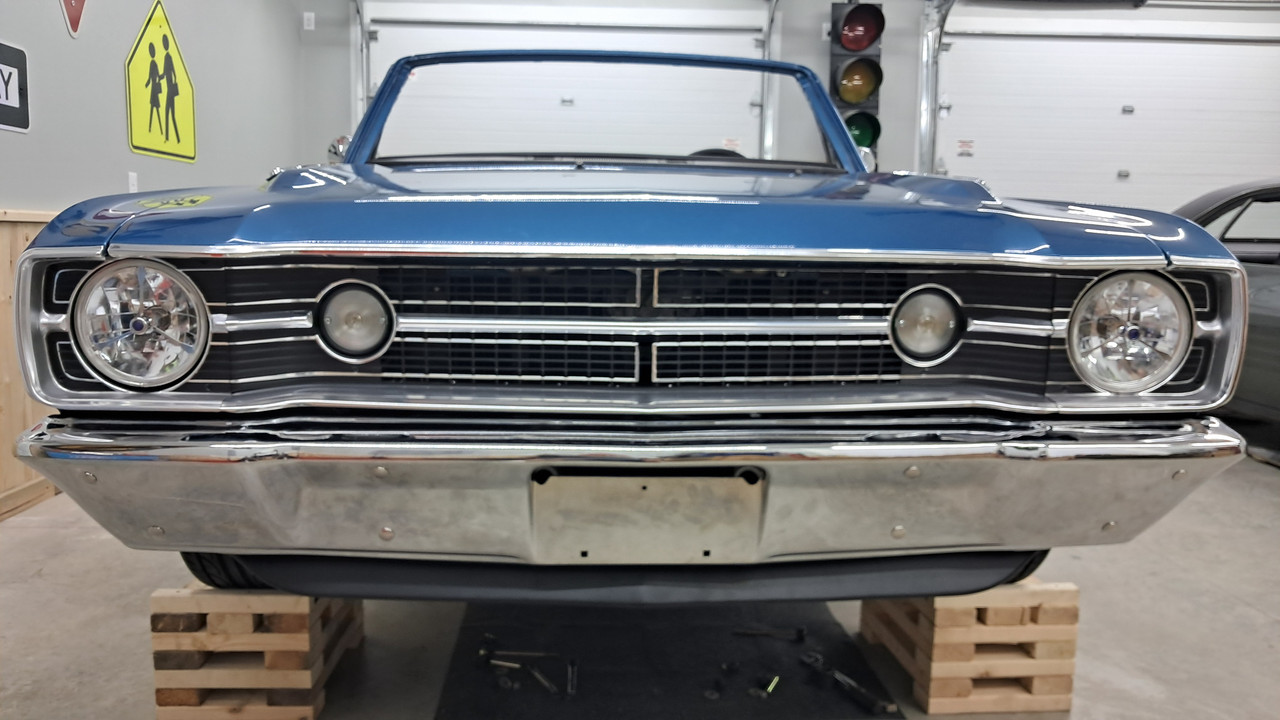 [/url]
https://postimg.cc/JGLKzsg5]
[/url]https://postimg.cc/D4qgchWG]
[/url]https://postimg.cc/146JSGWz]
[/url]
looks great ....sad i don't think my car will ever look that good ....just looking at your top frame stuff brings a little tear ...stuff that will be thinking about next year...
i did driver her yesterday ...top down
i did driver her yesterday ...top down
-
Similar threads
- Replies
- 3
- Views
- 482
- Locked
- Replies
- 15
- Views
- 2K
- Replies
- 5
- Views
- 2K
- Locked
- Replies
- 6
- Views
- 709
- Replies
- 1
- Views
- 2K


