dans4door1970
Well-Known Member
The lower linkage on the zbar is touching the tubes. it moves but is resting on the header. can I remove spacer between the bell housing and zbar with the 2 bolts or do they make a thinner one? I don't need much
Grind off the lower portion of the bar for clearance. You may need to bend it a tad for added clearance. I had to do this even w/TTI's.
Yes. Thanks againNope, not the proper procedure. I posted this in the OP's other thread already, and it's been discussed numerous times. The proper modification comes straight from the TTI website, both TTI's and Doug's instructions make it clear that z-bar modification is required for their long tube headers. TTI goes one further than posts the specs needed.
Here's what the modified z-bar looks like. Basically you take the arm for the clutch adjuster, cut it off the Z-bar, slide it down to the very end of the z bar and reverse it so that the clutch adjuster stud faces inside instead of out and weld the arm back on. It's a pretty simple operation if you have a welder. When it's done all the arms are straight and it's hard to tell it apart from stock unless you've got an original and a modified side by side.
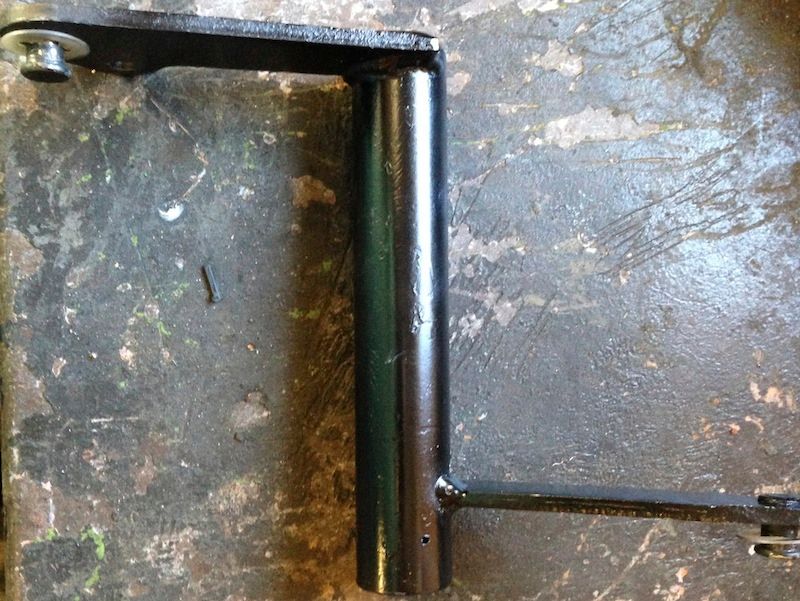
Here's the specs on the stock and modified Z-bars. I labeled it Doug's because that's what I have, but it's from the TTI website. The PDF is below, but here's a screenshot of it so you can see the picture without a download.
View attachment 1714966344
So the stud in the pic needs to be moved to the inside of the bar correct?Nope, not the proper procedure. I posted this in the OP's other thread already, and it's been discussed numerous times. The proper modification comes straight from the TTI website, both TTI's and Doug's instructions make it clear that z-bar modification is required for their long tube headers. TTI goes one further than posts the specs needed.
Here's what the modified z-bar looks like. Basically you take the arm for the clutch adjuster, cut it off the Z-bar, slide it down to the very end of the z bar and reverse it so that the clutch adjuster stud faces inside instead of out and weld the arm back on. It's a pretty simple operation if you have a welder. When it's done all the arms are straight and it's hard to tell it apart from stock unless you've got an original and a modified side by side.
Here's the specs on the stock and modified Z-bars. I labeled it Doug's because that's what I have, but it's from the TTI website. The PDF is below, but here's a screenshot of it so you can see the picture without a download.
View attachment 1714966344
All ya needed to do is bend the lower arm for clearance and grind a little off the end. Easy fix.
Sorry for posting on am old thread but I just ran into this issue. Aside from moving the arm over and revesing it; is there a specific angle it has to be in relation to the arm that connects to the pedal? Like arms on a clock?Nope, not the proper procedure. I posted this in the OP's other thread already, and it's been discussed numerous times. The proper modification comes straight from the TTI website, both TTI's and Doug's instructions make it clear that z-bar modification is required for their long tube headers. TTI goes one further than posts the specs needed.
Here's what the modified z-bar looks like. Basically you take the arm for the clutch adjuster, cut it off the Z-bar, slide it down to the very end of the z bar and reverse it so that the clutch adjuster stud faces inside instead of out and weld the arm back on. It's a pretty simple operation if you have a welder. When it's done all the arms are straight and it's hard to tell it apart from stock unless you've got an original and a modified side by side.

Here's the specs on the stock and modified Z-bars. I labeled it Doug's because that's what I have, but it's from the TTI website. The PDF is below, but here's a screenshot of it so you can see the picture without a download.
View attachment 1714966344
Sorry for posting on am old thread but I just ran into this issue. Aside from moving the arm over and revesing it; is there a specific angle it has to be in relation to the arm that connects to the pedal? Like arms on a clock?
I just bought the TTI z bar. Still hit the header so I had to tweak it a little. Now nothing hits anything and the clutch pedal still won't come all the way up.Sorry for posting on am old thread but I just ran into this issue. Aside from moving the arm over and revesing it; is there a specific angle it has to be in relation to the arm that connects to the pedal? Like arms on a clock?
I am trying bud. Just frustrating. It worked with the stock slant 6 z bar, stock exhaust etc. Now with a tti z bar and spring I got from Brewers it just won't come back up. I confirmed it has the 3 prong clutch disc just like stock. I may pull the pedals and lube them to see what happens.There are probably other issues causing that. There are so many variables with clutch linkage, that no one problem is an absolute fix for another. You just have to understand what is going on and adapt. Understand what the one or two springs that are there are for or what they actually do.
i had same issue on my modified clutch bar, i added a spring under the dash, to the pedal. hooked it to bottom of dash , works wondereful!!! just food for thought.


