Help with alternator wiring issue

-

69bronzeT5

My wife's car is faster.
Joined
Nov 15, 2008
Messages
932
Reaction score
58
Location
Mission, B.C
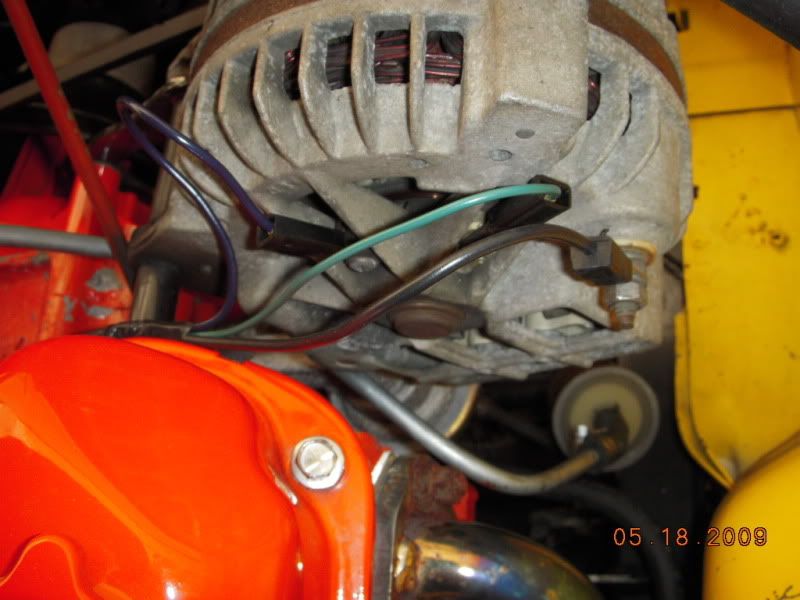
The wiring around my alternator dosen't look right to me. However, I don't have a close up picture of it currentley. Could somebody please post or take a picture of their alternator wiring? It would be much appreciated. The car in question is my '73 Duster with a 318 auto.
 
dartwiring001.jpg
 
Thanks for the picture. Yep thought so, somebody messed with mine. I'll try to zoom in on an engine picture I have of my 318.
 
This is the best I can do for a picture as the car is on the Mainland. Any suggestions on what to do? Looks like the last owner capped two wires together....

untitleddusterwires.jpg
 
one of the field wires gets battery power that is comon with the choke and ignition.does it charge properly.what is the running voltage. maybe its ok
 
Well, the reason I ask is because when we first tried starting it, a bit of smoke came from the alternator area. A friend said because of the colour of the smoke (light greyish white), it was electrical wires burning so I'm assuming this is the problem.
 
did it ever work.check for bad conections,warm wires.Of the three wires on the alternator one field wire should be tied in with the ignition ballast resistor voltage regulator and electric choke(12+v) the outher goes to the voltage regulator.the fat wire goes to the amp meter.a lose or bad conection can cause heat.Also make shure no wires are going to ground.good luck
 
Un cap those wires and ethier tie them togther in a cross twist and heat shrink wrap it or use a but connector and heat shrink wrap.
 
Well, the car started and ran. But the alternator area was smoking a bit at first.
 
It's the fat black wire that is capped at the end. Looks like a ground wire? My dad said the wires aren't getting hot. I got a question though. Right now we are shorting out the starter relay to start it (bad relay- replacing it very soon), could that cause the alternator to smoke?
 
The large black wire is the battery wire and belongs on the terminal marked batt There aren't any ground wires at or near the altenater. The altenater is chassis grounded through the mounting hardware, etc.. just like most everything else on the car.
If that wire smokes or melts there is a short circuit somewhere.
It wont be easy to hunt it over the internet. Good luck
 
The green wire in this pic is attached to my alternator, grounded. Why is that? My car is a '65 Barracuda. There do not appear to be any charging problems. The car starts fine, nothing smokes & my gauge shows it charging. Am I missing something? The wiring diagram only shows 2 wires at the alternator. Thanks for any help.
 
Different charging system on the early A's. The original alternators only had one field connection. My '66 Valiant is wired the same way. When you use the later 2 field alternator you have to ground one of the field connections.
 
Different charging system on the early A's. The original alternators only had one field connection. My '66 Valiant is wired the same way. When you use the later 2 field alternator you have to ground one of the field connections.
Thank you for the info. Are we still able to upgrade? I was looking to put in a 65 or 100 amp. I know we need to add some extra wiring so we don't burn things up.
 
Thank you for the info. Are we still able to upgrade? I was looking to put in a 65 or 100 amp. I know we need to add some extra wiring so we don't burn things up.


your best be in my opinion is to goto a dual fld system if you want to updrade. they just seem so much more stable.


its really. you already have the alt. to do it. you just have to add one wire.


the blue wire is th eone that gets added.


new0regulator2.jpg
 
Still Could Use Help!

1971 Plymouth Duster Alternator Test/Checks

1) Use a test light to check voltage regulator bolts for ground then run external ground with from voltage regulator bolt to stud of brake master cylinder:
(Added Ground Wire And Have Good Ground)

2) Check wires with meter from alternator to voltage regulator, should be less then 25 Ohms of resistances:
(Both Wires Going From The Alternator To Voltage Regulator Show Less Then 25 Ohms Of Resistances .7 )

3) Pull brushes from alternator to see what they should look like:
(Look To Be OK)

4) Alternator charging check using meter with all wires on the alternator connected:
(Results As Follows: Large Wire - 12.26 Volts; Middle Wire - 11.5 Volts; Top Wire - 7.6 Volts)

5) Alternator charging test disconnecting the center wire from the alternator and using a wire to ground the center post (Where Wire Was Removed) to a ground source, this should cause the alternator to charge up-ward from 12.9 to as high as 18 or 19 volts:
(Results As Follows: Large Wire - 12.24 Volts; Middle Connections - 10.9 Volts; Top Wire - 10.5 Volts)
 
OK, With The Help Of FABO Friends The Alternator Rotor Is Shorted Out. Would Anyone Happen To Have One Of These?
 
Think I got it fixed/working now! Just wanted to thank all the FABO folks that offered help with thread postings and PM.
 
Just went through this alternator thing with an old A and a new alternator. Mopar made 3 (used 4) different alternators in the early years 60-80. Essex first model looked just like the roundback alternator, then Mopar started making it themselves- that went through 70 ish then they added a horizontal field terminal to the old roundback design and used an electronic regulator with it , then the squareback dual field alternator came out from 71 ish to 80 and beyond. Easier to repair as the innards were bolt in, no soldering to repair. The round "1 field" alternators (all have 2 fields but the early ones 2nd field was grounded internally) had a variable positive voltage source as the exciter (blue wire) from the regulator, it turned the alternator + voltage on and off to keep the battery @~13.5V. The newer 2 field alternators (both late round backs and new sqaurebacks) had 2 fields that were insulated from ground. The first exciter was ignition 12V constant blue wire, the second field was a dark green wire that was a variable GROUND from the electronic voltage regulator (it needs a good case ground when you mount it, be sure to use star washers and scrape paint). These newer style alternators used a variable ground that was safer and more reliable than a points style on/off positive voltage regulator. You can use the later 2 field terminal alternators on an older Mopar by grounding one of the field terminals, either with a jumper to ground or taking the mica insulator washer out of the terminal and shorting it to the grounded case. Conversly, you can use an old alternator with a new system by adding the horizontal brush terminal where the ground lug is located (sort of depends on the rebuilt unit your working on as it may or may not have this provision, but youll still have an anemic 35A alternator). Hope this revival of a topic helps some one besides me looking up the info.

PS> brushes work on both models, L shaped brush is the one you need to add to the older alternator opposite the ground brush. There was a threaded socket on my Rebuilt unit for this 2nd field terminal. Remove ground brush and your set. Here is a few pics of the conversion: click thumbnails to make 'em big.

https://picasaweb.google.com/68pishta/Alternator?authkey=Gv1sRgCL7w6e2c-u_Sew&feat=directlink
 
-
Back
Top