jtolbert
Well-Known Member
So, for the holidays I got a lot of woodworking tools...A DeWalt 618 router with plunge and fixed bases, a Bosch router table to go with the router, a nice jigsaw, some nice router bits...All of this stuff generates dust. I don't like dust.
I have a small shop-vac...A Stanley [ame=http://www.amazon.com/Stanley-SL18017-8-Gallon-Stainless-Horsepower/dp/B0022AO92Q]SL18017[/ame] eight-gallon shop vac. It does the job. The problem is I killed the filter a few years ago and never bothered to order a replacement. Amy ordered a replacement for me, but I started looking for other dust-collection options in the meantime...And that's when I stumbled across the cyclone filter.
A cyclone uses inertia and gravity to separate dirt/dust particles out of the air. Think of it as a pre-filter that goes in front of your shop-vac...You hook a hose to the inlet on the cyclone filter. The other end of the hose goes to what generates dust/dirt, or already-generated dust/dirt. You then hook a hose from your shop-vac to the exhaust pipe of the cyclone filter. As the shop-vac sucks air through the filter, the air swirls around the exhaust pipe inside the filter and has to make a pretty severe turn to enter the exhaust pipe, so all the heavier stuff drops through the bottom of the cone into a collection bucket.
I could have just spent a hundred bucks and bought a Oneida Dust Deputy, but I thought it would be fun to implement my own...So that's what I started doing.
The first thing up was the cone. I figured that part would be hard...But after a bit of pondering I hit upon the idea of using a large traffic cone. I could have just "picked one up," but instead I shook the tree and a friend of mine already had one...He donated it for the project and I was off to the races.
The top plate and front pate are spare 3/4" MDF I had laying around. The screws are #10x1-1/2" wood screws I had laying around. I had the 2-1/2"-to-1-1/4" hose adapter laying around, too. I bought a chunk of 2" PVC to use for the intake and exhaust pipes, the no-hub hose couplers and a tube of PL Premium "FastGrip" type construction adhesive---by far the biggest expense of the whole project at a whopping $6.something---at Farm 'n Fleet, the bucket---the second-biggest expense at $5.something---and lid at Rural King. The closet flange came from Lowe's. These were all purchased on an as-needed basis since I was designing as I went.

The Mother of Cones. Free from a friend.
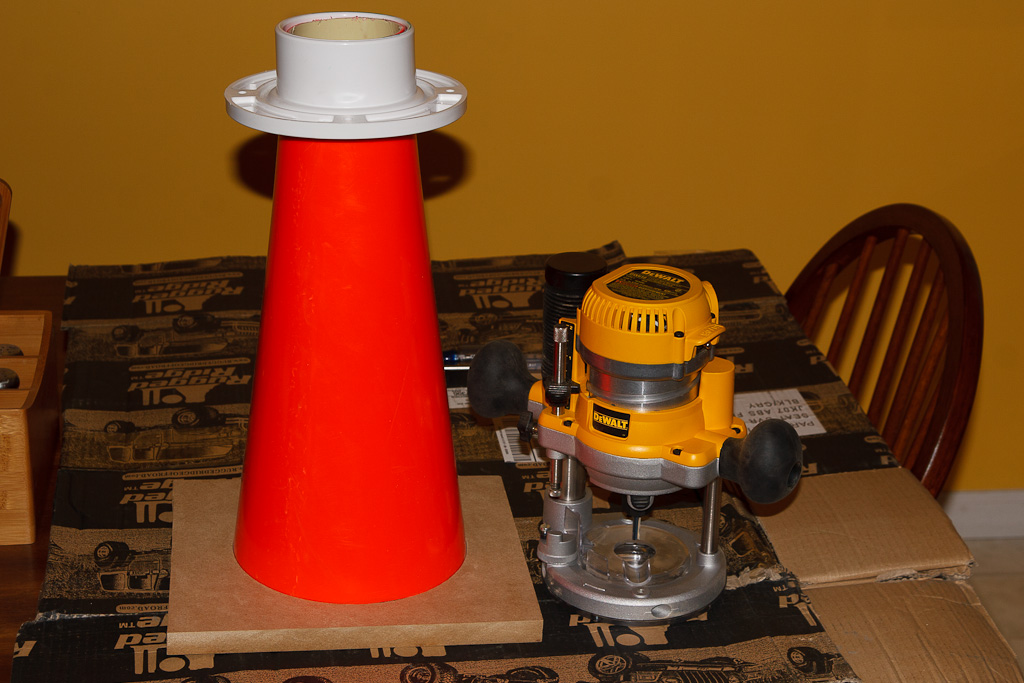
Cone cut down, spare piece of MDF routed with a circular channel to fit the wide end of the cone and closet flange test-fit onto small end of the cone.
I don't have many pics of the other construction steps, mostly cause I was figuring out things as I went. I routed the exhaust pipe hole in the top plate. Originally I was going to cut the top plate and use a right-angle elbow for the intake pipe so I wouldn't have to cut into the side of the cone for the intake, but I decided to just take a whack at it. I eyeballed the position so the intake pipe would flex the side of the cone a bit, marked a starting point and just had at it with a pocket knife. Don't judge...It worked.
After I cut the side hole, I verified that the pipe would fit and would flex the cone near the pipe ever so slightly to allow for better airflow, but wouldn't distort the big-end cone rim...So I glued the cone into the top plate using PL Premium.
The pipe fit, but needed to be flexed over a bit to get the intake to run along the sidewall of the cone...So that's when I hit upon the idea of using another piece of MDF as a front support for the intake. The support orients the pipe properly and keeps it in the right position, plus transmit any force applied to the pipe by the hose to the top plate instead of letting the cone flex more. I drilled pilot holes in the top plate after figuring out my location, clamped the front plate in place and used those pilot holes to drill the holes in the front plate, so alignment was perfect. I then stuck the pipe in the hole I'd cut in the side of the cone and marked the outline of the hole on the pipe. Pulled the pipe out and cut the pipe off at that outline, so the pipe is now profiled closely to the inside of the cone. There's a bit of protrusion, maybe 1/4", but not enough to really have a major impact on airflow inside the cone. Anyway, I slid the pipe back in to where I wanted the profiled end inside the cone and made some registration marks on the intake pipe and front plate...Pulled both off and glued them together with the PL Premium on the back side of the plate.
While the front plate/pipe joint was setting, I glued the exhaust pipe into the top plate. I cut the pipe off at around eight inches or so, approximated where I wanted the top plate to be in relation to the pipe, drew a line...Stuck a bunch of PL Premium a few inches above the line, then installed the pipe into the top plate by inserting it through the narrow end of the cone...This scraped a bunch of the PL Premium back to the inside of the pipe-plate joint, but left enough to make a good seal between the MDF and the PVC with only a bit showing through on the top side of the plate.
The next night, I applied PL premium to the top of the front plate and near the profiled edge of the intake pipe, slid it in to place in the cone, clamped the front plate in place against the top plate and ran the screws in...It wasn't going anywhere. I went around afterward and filled any gaps between the cone and the PVC intake pipe with more PL Premium. I found the gaps by looking inside the narrow end of the cone at the cone-intake joint and shining a flashlight in from the outside around the joint.
Tonight, I hooked everything up and tested it out. I didn't glue the cone into the closet flange and I didn't seal the bucket lid tightly, but once the vacuum was turned on the seals were good enough that picking the filter assembly up would also pick up the lid and the bucket. Sealing is not an issue.
Testing with some fine MDF dust (created when I routed the front plate hole and edges to the right size) and some aluminum dust generated by my miter saw, the cyclone filter worked amazingly well. I haven't yet installed the shop-vac's filter, so I stuck a wet paper towel on a board not far from the shop-vac's exhaust to catch any dust/dirt that might get blown out the exhaust...Nothing did. Nothing at all. EVERYTHING, including the fine MDF dust, ended up in the bucket. The shop-vac's can is spotless (except for the rust that was there before). I'm shocked at how well this thing works.
I'll install the filter in my shop-vac, but at this rate I'll never haven to change it again.
I'm probably going to make a little cart out of some plywood, some small bits of 2x4 and the casters off the shop-vac to hold the shop-vac and the cyclone filter. Since the fit/seal is so well without adhesive, I'll probably just bungee-cord the top plate to the underside of the can or the top rail of the cart and not worry about gluing them together. It's nice to not have to fight to take things apart, and the bungee-cord method would also be self-adjusting.
Total cost for the entire thing as it stands is about $35, and you could easily save $10 if you had the PVC and bucket already. If you have a big hunk of spare MDF, you could rout your own bucket lid and forego the closet flange entirely as well.
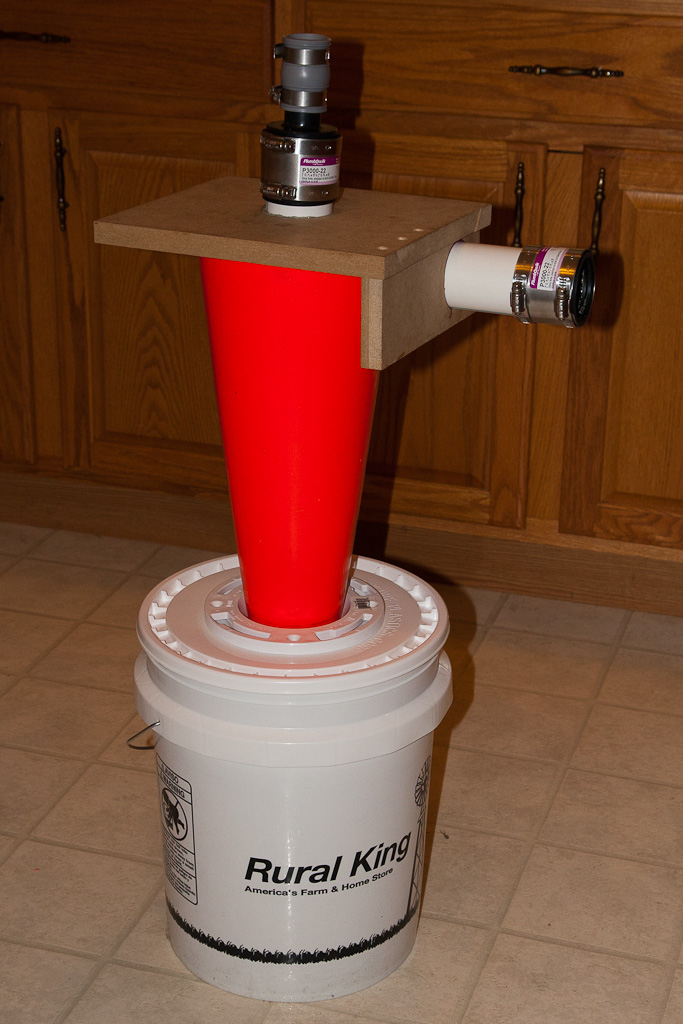
Setup as tested (but in the house, not the garage)...Just gravity and friction holding the cone in the closet flange and the lid to the bucket.
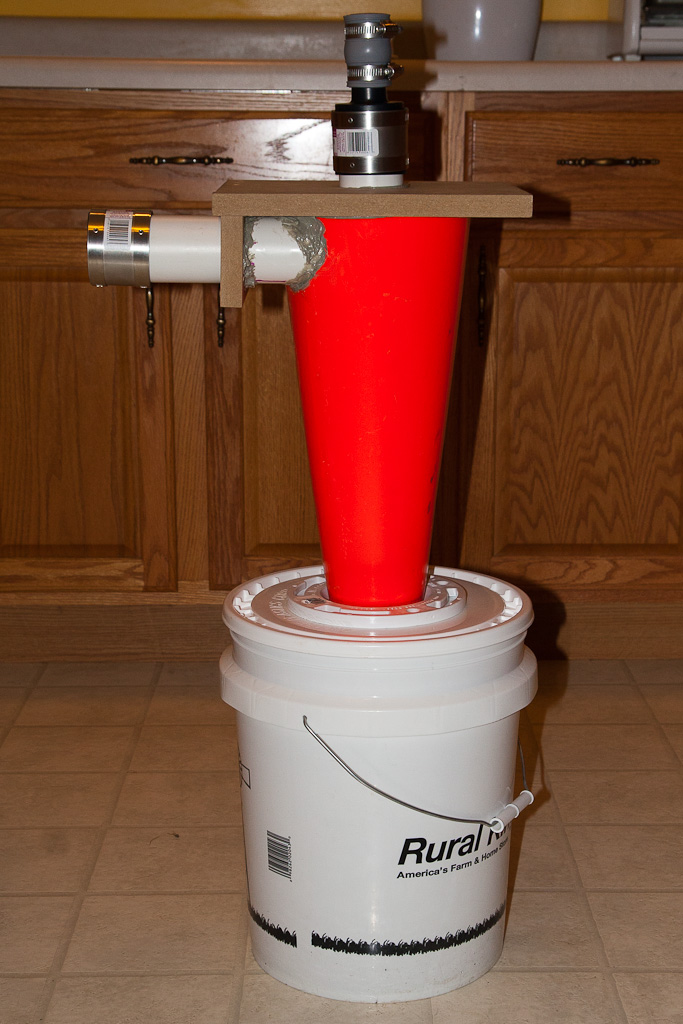
Lots of PL Premium used to seal the intake pipe to the cone.
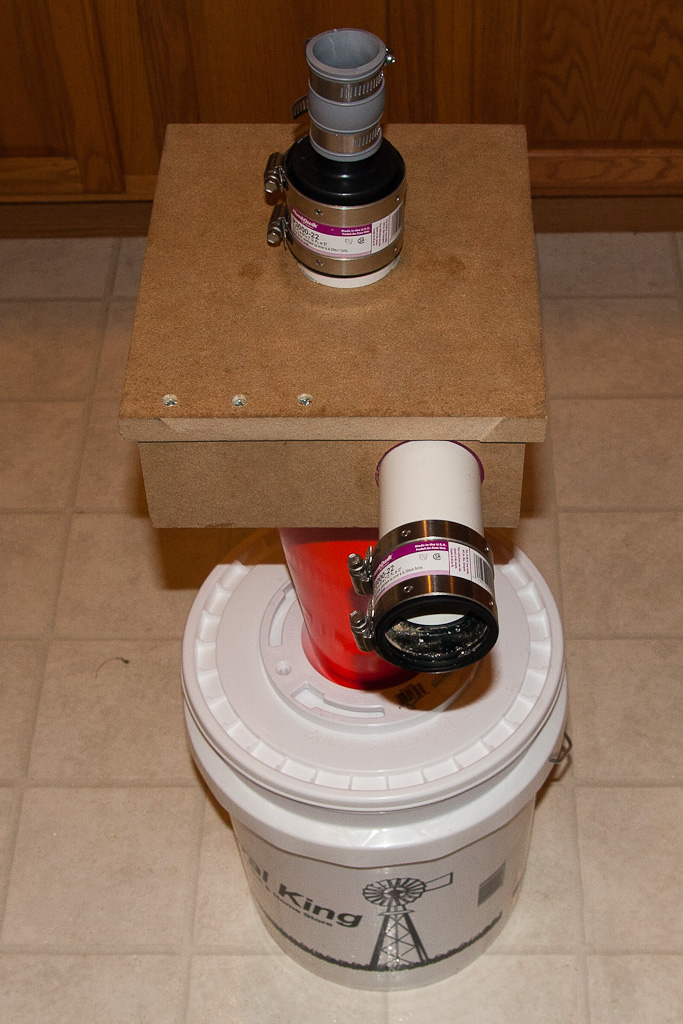
You can see the no-hub hose adapters, 2-1/2"-to-1-1/4" shop-vac hose adapter, front plate and countersunk screws nicely here. You can also see that it was, indeed a scrap piece of MDF.
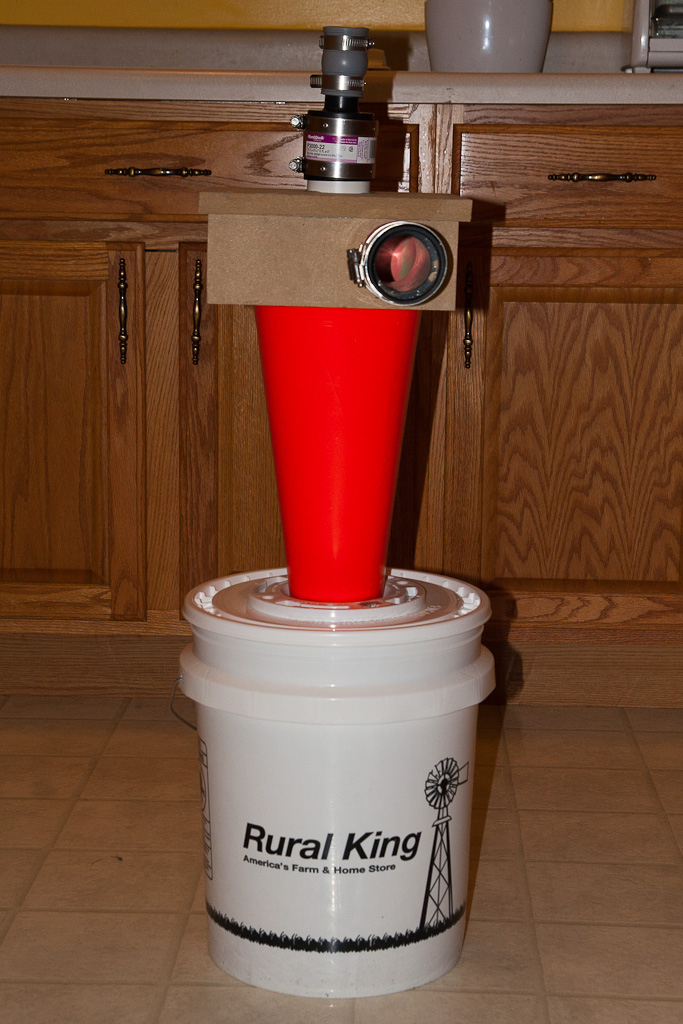
The Rural King bucket just seems right.
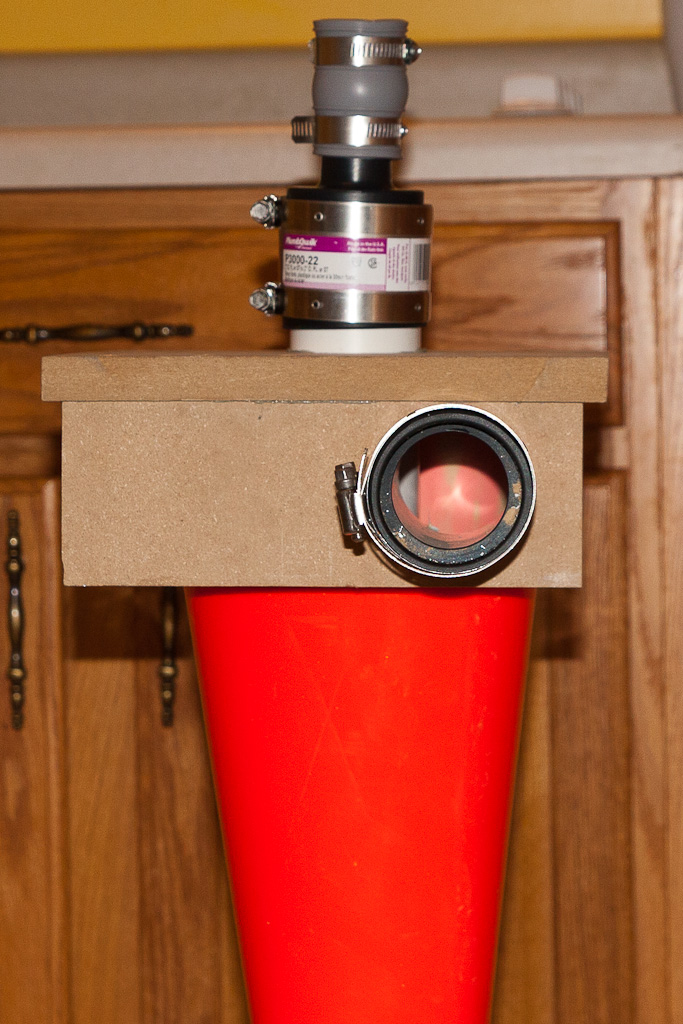
You can see some of the interior of the cone and part of the exhaust pipe through the intake pipe.
This was ridiculously fun to do...Recycling a traffic cone amused me. If it's stupid but it works, it's not stupid...This thing definitely works. I know I could have just bought a Oneida Dust Deputy for a hundred bucks or so, or maybe even a knock-off for forty bucks or so...But this was fun.
I have a small shop-vac...A Stanley [ame=http://www.amazon.com/Stanley-SL18017-8-Gallon-Stainless-Horsepower/dp/B0022AO92Q]SL18017[/ame] eight-gallon shop vac. It does the job. The problem is I killed the filter a few years ago and never bothered to order a replacement. Amy ordered a replacement for me, but I started looking for other dust-collection options in the meantime...And that's when I stumbled across the cyclone filter.
A cyclone uses inertia and gravity to separate dirt/dust particles out of the air. Think of it as a pre-filter that goes in front of your shop-vac...You hook a hose to the inlet on the cyclone filter. The other end of the hose goes to what generates dust/dirt, or already-generated dust/dirt. You then hook a hose from your shop-vac to the exhaust pipe of the cyclone filter. As the shop-vac sucks air through the filter, the air swirls around the exhaust pipe inside the filter and has to make a pretty severe turn to enter the exhaust pipe, so all the heavier stuff drops through the bottom of the cone into a collection bucket.
I could have just spent a hundred bucks and bought a Oneida Dust Deputy, but I thought it would be fun to implement my own...So that's what I started doing.
The first thing up was the cone. I figured that part would be hard...But after a bit of pondering I hit upon the idea of using a large traffic cone. I could have just "picked one up," but instead I shook the tree and a friend of mine already had one...He donated it for the project and I was off to the races.
The top plate and front pate are spare 3/4" MDF I had laying around. The screws are #10x1-1/2" wood screws I had laying around. I had the 2-1/2"-to-1-1/4" hose adapter laying around, too. I bought a chunk of 2" PVC to use for the intake and exhaust pipes, the no-hub hose couplers and a tube of PL Premium "FastGrip" type construction adhesive---by far the biggest expense of the whole project at a whopping $6.something---at Farm 'n Fleet, the bucket---the second-biggest expense at $5.something---and lid at Rural King. The closet flange came from Lowe's. These were all purchased on an as-needed basis since I was designing as I went.
The Mother of Cones. Free from a friend.
Cone cut down, spare piece of MDF routed with a circular channel to fit the wide end of the cone and closet flange test-fit onto small end of the cone.
I don't have many pics of the other construction steps, mostly cause I was figuring out things as I went. I routed the exhaust pipe hole in the top plate. Originally I was going to cut the top plate and use a right-angle elbow for the intake pipe so I wouldn't have to cut into the side of the cone for the intake, but I decided to just take a whack at it. I eyeballed the position so the intake pipe would flex the side of the cone a bit, marked a starting point and just had at it with a pocket knife. Don't judge...It worked.
After I cut the side hole, I verified that the pipe would fit and would flex the cone near the pipe ever so slightly to allow for better airflow, but wouldn't distort the big-end cone rim...So I glued the cone into the top plate using PL Premium.
The pipe fit, but needed to be flexed over a bit to get the intake to run along the sidewall of the cone...So that's when I hit upon the idea of using another piece of MDF as a front support for the intake. The support orients the pipe properly and keeps it in the right position, plus transmit any force applied to the pipe by the hose to the top plate instead of letting the cone flex more. I drilled pilot holes in the top plate after figuring out my location, clamped the front plate in place and used those pilot holes to drill the holes in the front plate, so alignment was perfect. I then stuck the pipe in the hole I'd cut in the side of the cone and marked the outline of the hole on the pipe. Pulled the pipe out and cut the pipe off at that outline, so the pipe is now profiled closely to the inside of the cone. There's a bit of protrusion, maybe 1/4", but not enough to really have a major impact on airflow inside the cone. Anyway, I slid the pipe back in to where I wanted the profiled end inside the cone and made some registration marks on the intake pipe and front plate...Pulled both off and glued them together with the PL Premium on the back side of the plate.
While the front plate/pipe joint was setting, I glued the exhaust pipe into the top plate. I cut the pipe off at around eight inches or so, approximated where I wanted the top plate to be in relation to the pipe, drew a line...Stuck a bunch of PL Premium a few inches above the line, then installed the pipe into the top plate by inserting it through the narrow end of the cone...This scraped a bunch of the PL Premium back to the inside of the pipe-plate joint, but left enough to make a good seal between the MDF and the PVC with only a bit showing through on the top side of the plate.
The next night, I applied PL premium to the top of the front plate and near the profiled edge of the intake pipe, slid it in to place in the cone, clamped the front plate in place against the top plate and ran the screws in...It wasn't going anywhere. I went around afterward and filled any gaps between the cone and the PVC intake pipe with more PL Premium. I found the gaps by looking inside the narrow end of the cone at the cone-intake joint and shining a flashlight in from the outside around the joint.
Tonight, I hooked everything up and tested it out. I didn't glue the cone into the closet flange and I didn't seal the bucket lid tightly, but once the vacuum was turned on the seals were good enough that picking the filter assembly up would also pick up the lid and the bucket. Sealing is not an issue.
Testing with some fine MDF dust (created when I routed the front plate hole and edges to the right size) and some aluminum dust generated by my miter saw, the cyclone filter worked amazingly well. I haven't yet installed the shop-vac's filter, so I stuck a wet paper towel on a board not far from the shop-vac's exhaust to catch any dust/dirt that might get blown out the exhaust...Nothing did. Nothing at all. EVERYTHING, including the fine MDF dust, ended up in the bucket. The shop-vac's can is spotless (except for the rust that was there before). I'm shocked at how well this thing works.
I'll install the filter in my shop-vac, but at this rate I'll never haven to change it again.
I'm probably going to make a little cart out of some plywood, some small bits of 2x4 and the casters off the shop-vac to hold the shop-vac and the cyclone filter. Since the fit/seal is so well without adhesive, I'll probably just bungee-cord the top plate to the underside of the can or the top rail of the cart and not worry about gluing them together. It's nice to not have to fight to take things apart, and the bungee-cord method would also be self-adjusting.
Total cost for the entire thing as it stands is about $35, and you could easily save $10 if you had the PVC and bucket already. If you have a big hunk of spare MDF, you could rout your own bucket lid and forego the closet flange entirely as well.
Setup as tested (but in the house, not the garage)...Just gravity and friction holding the cone in the closet flange and the lid to the bucket.
Lots of PL Premium used to seal the intake pipe to the cone.
You can see the no-hub hose adapters, 2-1/2"-to-1-1/4" shop-vac hose adapter, front plate and countersunk screws nicely here. You can also see that it was, indeed a scrap piece of MDF.
The Rural King bucket just seems right.
You can see some of the interior of the cone and part of the exhaust pipe through the intake pipe.
This was ridiculously fun to do...Recycling a traffic cone amused me. If it's stupid but it works, it's not stupid...This thing definitely works. I know I could have just bought a Oneida Dust Deputy for a hundred bucks or so, or maybe even a knock-off for forty bucks or so...But this was fun.


