Setting up a 489 with Richmond gears

-

DusterJoe410.4

Well-Known Member
Joined
Jan 17, 2019
Messages
65
Reaction score
22
Location
Northwest Ohio
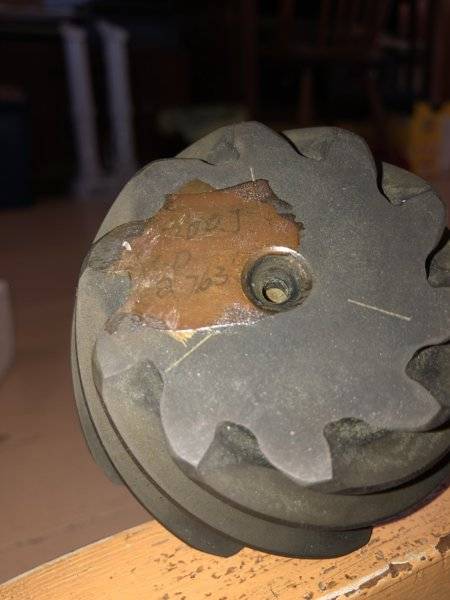
i have a 489 case that had 4:10 gears and a cone suregrip, both of which at junk( the pin in the sure grip broke and the pinion gear lost a tooth) I have a powr-lok and brand new Richmond 4:30s for it, my question is mostly about pinion depth. The 4:10s did not have a shim between the bearing and pinion head but did have a .032 shim between the case and bearing race. The new Richmond gear doesn’t have the expected +\- 1-2-3etc but has a 2.763” on the end (see picture). I DO NOT have pinion depth check equipment, so do I just reuse the shim between the race & the case and hope for the best? Thanks for any help you can give.

View attachment 1715414754
A173AB81-4F77-4955-8612-7709C8432DB0.jpeg
 
Last edited:
Without a pinion depth tool it is going to be a crap shoot. 2.763 is right in the ball park that most of them are. Shimming behind the pinion race is a way to get around pressing the bearing off and on. A better way is to buy or make a set up bearing by honing it larger so it just slides on and off. I invested in the T&D pinion depth tool many years ago and have used it many times. Good Luck
 
i have a 489 case that had 4:10 gears and a cone suregrip, both of which at junk( the pin in the sure grip broke and the pinion gear lost a tooth) I have a powr-lok and brand new Richmond 4:30s for it, my question is mostly about pinion depth. The 4:10s did not have a shim between the bearing and pinion head but did have a .032 shim between the case and bearing race. The new Richmond gear doesn’t have the expected +\- 1-2-3etc but has a 2.763” on the end (see picture). I DO NOT have pinion depth check equipment, so do I just reuse the shim between the race & the case and hope for the best? Thanks for any help you can give.

View attachment 1715414754

View attachment 1715414755
Borrow a depth micrometer and measure off the bearing cap surface
Till you get what is on the pinion. Does not matter how you get or where the shim is.
 
In leiu of the proper tool, a straight edge and a digital caliper will suffice for checking depth also.
 
If anyone knows, what should the radius of the castings be?
 
Those methods will get u close. U have to remember that the halves are not cut perfectly in the center. Well almost never. Kim
Agreed, I was assuming he knows that. He should take a measurement from the cap face down to the bottom of the bearing saddle and also measure the bearing race diameter. It would require some calculations.
 
So every casting is 1.631".
What exactly do you mean by radius of the casting?
I assume you mean the radius of the differential bearing saddles.
Since we are talking about setting up ring and pinion, I assume you want to know the radius to calculate your pinion depth from the
Bearing cap mating surface. If so, the measurement on the gears is from the centerline of the differential(carrier). The cap mating surface as Oldkimmer has said, may not always be right on the centerline due to manufacturing tolerances. To calculate how much it is off by, you can take a depth reading from the mating surface, down to the lowest part of the radius. This should be exactly half of the carrier race diameter. Bearings are made extremely accurate.
If the depth is not exactly half, you would adjust your depth reading down to the pinion face accordingly. As I said earlier the pinion depth needs to be calculated. Once you get the pinion depth in the ballpark, you then have to go by the tooth contact pattern to arrive at the ideal depth.
 
i have a 489 case that had 4:10 gears and a cone suregrip, both of which at junk( the pin in the sure grip broke and the pinion gear lost a tooth) I have a powr-lok and brand new Richmond 4:30s for it, my question is mostly about pinion depth. The 4:10s did not have a shim between the bearing and pinion head but did have a .032 shim between the case and bearing race. The new Richmond gear doesn’t have the expected +\- 1-2-3etc but has a 2.763” on the end (see picture). I DO NOT have pinion depth check equipment, so do I just reuse the shim between the race & the case and hope for the best? Thanks for any help you can give.

View attachment 1715414754

View attachment 1715414755
You could try that and then set the backlash and then look at the tooth contact pattern.
Setting up ring and pinion is not that difficult, but you do need some special measuring tools, and you must grasp the concept to get the crush sleeve and rotating torque correct. This requires a dial reading inch pound torque wrench to verify.
 
i have a 489 case that had 4:10 gears and a cone suregrip, both of which at junk( the pin in the sure grip broke and the pinion gear lost a tooth) I have a powr-lok and brand new Richmond 4:30s for it, my question is mostly about pinion depth. The 4:10s did not have a shim between the bearing and pinion head but did have a .032 shim between the case and bearing race. The new Richmond gear doesn’t have the expected +\- 1-2-3etc but has a 2.763” on the end (see picture). I DO NOT have pinion depth check equipment, so do I just reuse the shim between the race & the case and hope for the best? Thanks for any help you can give.

View attachment 1715414754

View attachment 1715414755
That number is the proper depth, those particular gear set was machined at. The number is from the carrier centerline to the face of the pinion head.
 
Bearing cap mating surface. If so, the measurement on the gears is from the centerline of the differential(carrier). The cap mating surface as Oldkimmer has said, may not always be right on the centerline due to manufacturing tolerances. To calculate how much it is off by, you can take a depth reading from the mating surface, down to the lowest part of the radius. This should be exactly half of the carrier race diameter. Bearings are made extremely accurate.
If the depth is not exactly half, you would adjust your depth reading down to the pinion face accordingly.
As I said earlier the pinion depth needs to be calculated. Once you get the pinion depth in the ballpark, you then have to go by the tooth contact pattern to arrive at the ideal depth.

That's exactly where I'm going with it. It may not be enough to just measure off the cap mating surface. Thanks Duane!:thumbsup:
BTW, The 1.631" dimension I specified is half the diameter of the setup standard I have.
upload_2019-10-30_8-42-10.png
 
That's exactly where I'm going with it. It may not be enough to just measure off the cap mating surface. Thanks Duane!:thumbsup:
BTW, The 1.631" dimension I specified is half the diameter of the setup standard I have.
View attachment 1715415987
Those are some nice pieces in the picture. Did you make those?
There are many tools on the market now that measure off the bearing cap mating surface. I just bought a used 1-6 inch depth micrometer in nice shape for $25.00. I thought I would get more use out of a depth mic than custom tools. I recently read somewhere that it requires a .003 thou shim change on the pinion to see a change in the contact pattern. Measuring off the bearing cap with careful measurements is close enough for a starting point.
Tooth contact pattern and proper backlash should have the final say imho. Honing out a pinion bearing to take away the press fit to make a dedicated setup tool is the best tip to make this job easier.
 
...Did you make those?
No actually. It's Miller Tool C758-D5. I was an only bidder on this kit off "Gold" bay. I believe it covers 9-1/4" thru 7-1/4". I was thinking the seller was not too happy with the sold price by the response I got back to a question on the kit after the close.


upload_2019-10-30_12-0-37.png
 
I got the gears assembled recently and tried to pattern it tonight but can’t seem to get a good read on it. I believe that I need to bring the pinion out more but I’m not entirely sure because as I said I can’t read the pattern as well as I’d hoped. So I decided to post some pictures in hopes of getting help from someone with more experience.

43317A9A-5C1E-4E01-8A26-D8EA2D49D011.jpeg


D51E06BA-0D11-45AF-808B-BC4F932C3685.jpeg
 
R u putting lots of resistance on the crown gear? What is the back lash? Looks like ur not even close. What does it look like on the pinion? Kim
 
R u putting lots of resistance on the crown gear? What is the back lash? Looks like ur not even close. What does it look like on the pinion? Kim

I was not putting any load on it at all just spinning it though, I checked backlash in 4 spots it was .008 in 2 spots .007 in one and .009 in the other the ring gear calls out .008 for backlash. What is the best way to put a load on the carrier?
 
I was not putting any load on it at all just spinning it though, I checked backlash in 4 spots it was .008 in 2 spots .007 in one and .009 in the other the ring gear calls out .008 for backlash. What is the best way to put a load on the carrier?
Just put pressure on the ring gear with your hand to create some resistance while turning your pinion gear.
Actually I think your pattern looks pretty good. IMHO
The contact patch will move toward the end of the tooth under heavy load so I like a pattern similar to what I think I see.
 
Opinions on pinions? What brand can I trust to be made correctly and give the least problems. Want to set up a set of 3:91s for my 489. What brand bearings?
Thanks FABO
 
-
Back
Top