Slant 6 Turbo 68Dart Project

-

Serj22

Well-Known Member
Joined
Feb 14, 2013
Messages
1,231
Reaction score
59
Location
Benicia, CA East Bay
After a lot -and I mean a lot of reading, I decided I had the basic idea down, to go ahead and put a turbo on my '68 Dart. Turbos are no longer scary sounding to me to put on, so I'm going to go for it. This is of course a budget build, and I am merely shooting for 200hp @ somewhere under 8-9lbs. This is still a daily driver so reliability will be prevalent. I am definitly not an expert and any help people can give along the way is incredibly appreciated. If I breech 200 hp, then awesome - but I am keeping the standards low, to be more excited in the end.

So far I have paid:
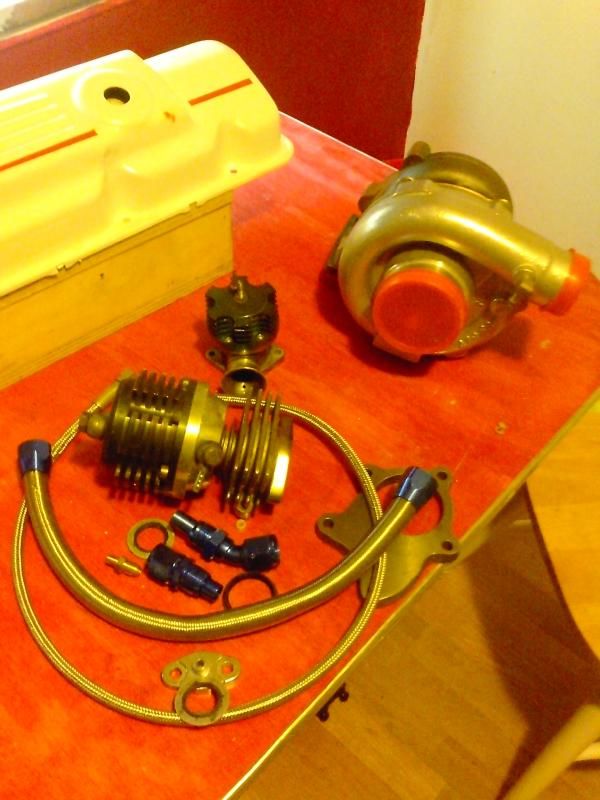
Motorcraft 2150: $40
Ebay T3/T4 Turbo new: $120
Blow Off Valve: $10
Wastegate: $10
Manual Boost Controller: $10
Downpipe for turbine: $free
Extra Stock exhaust manifold: $20

The plan is to run my 2bbl Supersix manifold adapted to fit a Motorcraft 2150 - or maybe something else if I determine later, but this is what I have for now. The exhaust I want to run a J-pipe off of to locate the turbo near where the A/C would have been on my motor, and then use the two bolt holes in the block to make a mount to support the turbo to. Then I will plumb the "cold" side directly to a ITB ram hat on top of the carb. I have not decided on an intercooler yet, but it will be a blow-through setup.

I then want to go simple on the oil and go from the filter fitting over to the turbo. Then drain out to a punched hole in the pan. I want to reference the stock fuel pump and hopefully it will meet my minimal boost demands. I will try and get the distributor limited to 18deg total advance since that's what everyone else seems to recommend, to limit the possiblity of detonation. I also will run a wideband sensor so I'm not in the dark with the carb and weather or not it is functioning.

(I got everything but the carb in a package deal off sl6.org. good deal)
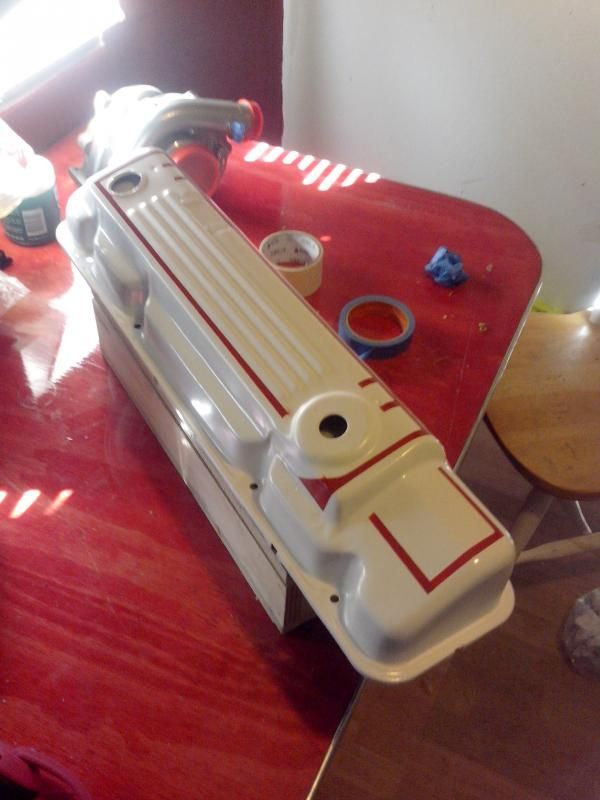
So far, I just have a carburetor to start with, that cost me a whopping $30, and rebuilt it for $15, added nitrophyl float, and a seat that allows more flow. I got rid of all the choke peripherals except for the actual choke coil which is the only axis available to make the cam for idle function unfortunately, otherwise I would have removed it all together. Then I filled the choke lever hole, and cut most of the choke riser off.


I got rid of a serious air leak on the bottom that I could not figure out how to adapt, so I J-b'd it and then drilled a couple holes underneath the filler to make it hopefully operate just the same as it did before.
The leak is what you see at the bottom furthest away from the power valve cover:

http://i43.photobucket.com/albums/e356/serj22/IMG_20140712_223451_zps3380b8fa.jpg

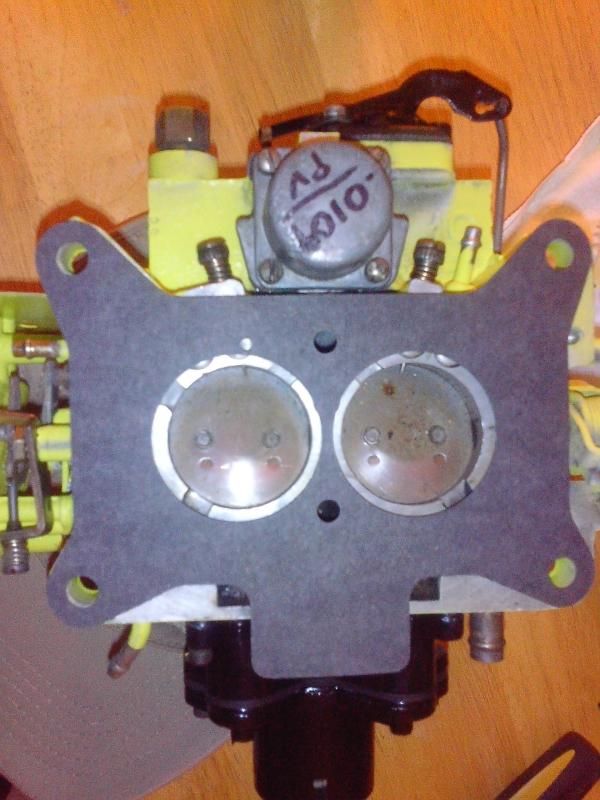
No doubt i possibly had to go buy the actual riser, but I figured this would work around it. I saw a thread where someone shoved a rag into the gap to cut the leak. I think this maybe a little more sophisticated. I leveled the area with JB weld in the carb, then knifed it flush and sanded it straight to be at the same level as the carb base. Hopefully it functions. Then I drilled two holes from each side underneath since this was originally a air passage. I was debating if I could just drill between the two barrels and just seal it up, but I figured that may mess something up somehow.

http://i43.photobucket.com/albums/e356/serj22/IMG_20140724_151030_zps98d64868.jpg

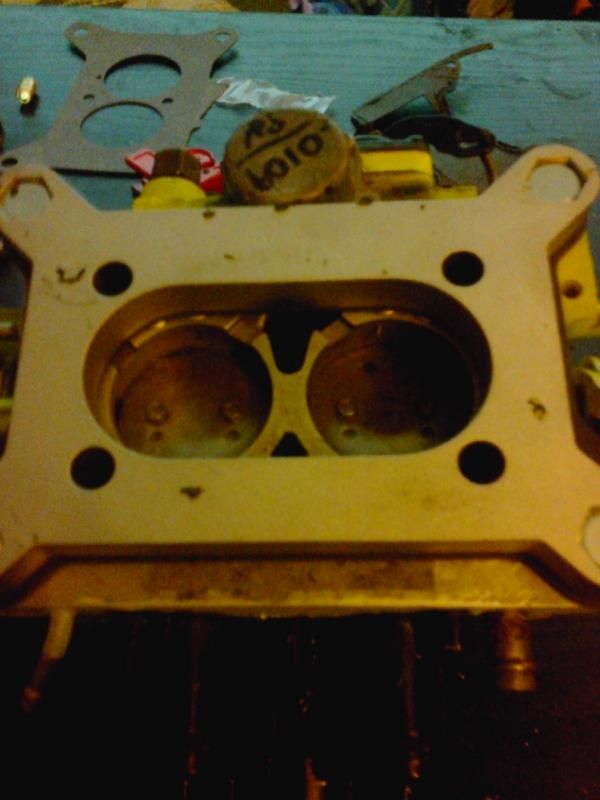
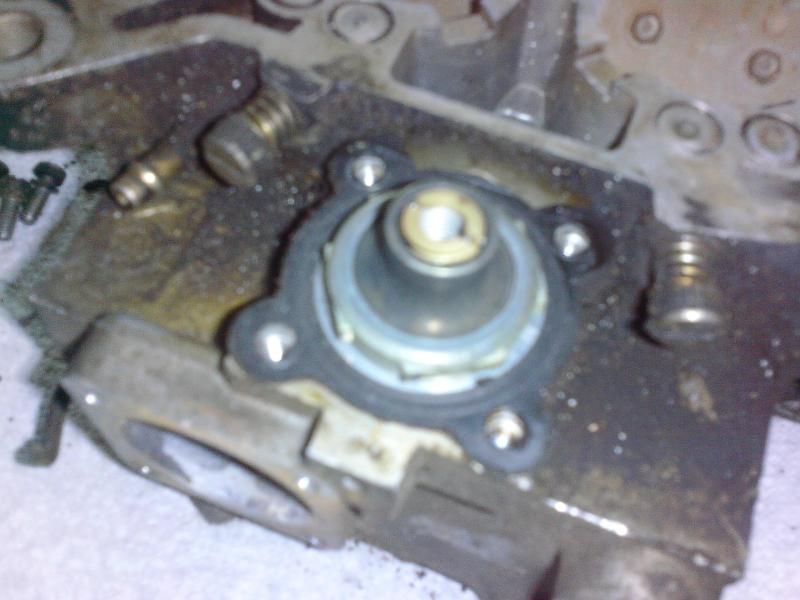
I wrote on the cover of the power valve what I drilled the passage to so I could keep track of what I do with it. I'm still trying to figure out how to convert the PV, since it looks similar to a Holley one, but the retainer on the spring is different. -I'm not sure if it would come apart the same to make a BRPV.

I'[m still trying to figure out what this side port is for in the picture (shown before cleaning)

http://i43.photobucket.com/albums/e356/serj22/Motorcraft Boost/IMG_20140708_121750_zps0fafe62d.jpg

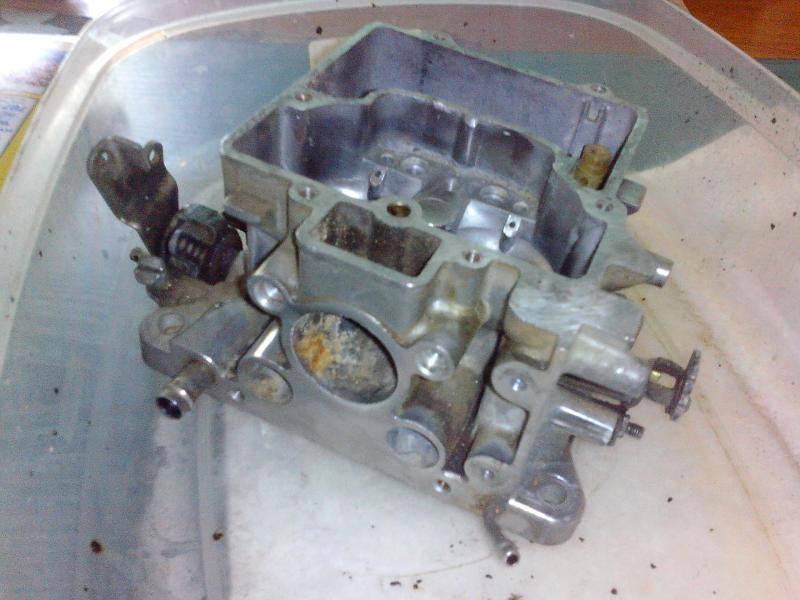
The large cirlce, two smaller ones below and the rectangular port at the top. Some kind of vacuum adjustable cylinder is attached to the outside of the three holes. I'm thinking it's some kind of economy device or a type of idle circuit, but nothing I've seen on the carb diagrams I can find say anything about it. I don't know if it will function anywhay since there won't be any vacuum up top for it. I'm debating if I can just leave it there, and seal up the opening (rectangular hole) or if it's needed for something. It had its own choke cover that operated with the normal choke.

http://s43.photobucket.com/user/serj22/media/IMG_20140709_192454_1_zps4d73f655.jpg.html

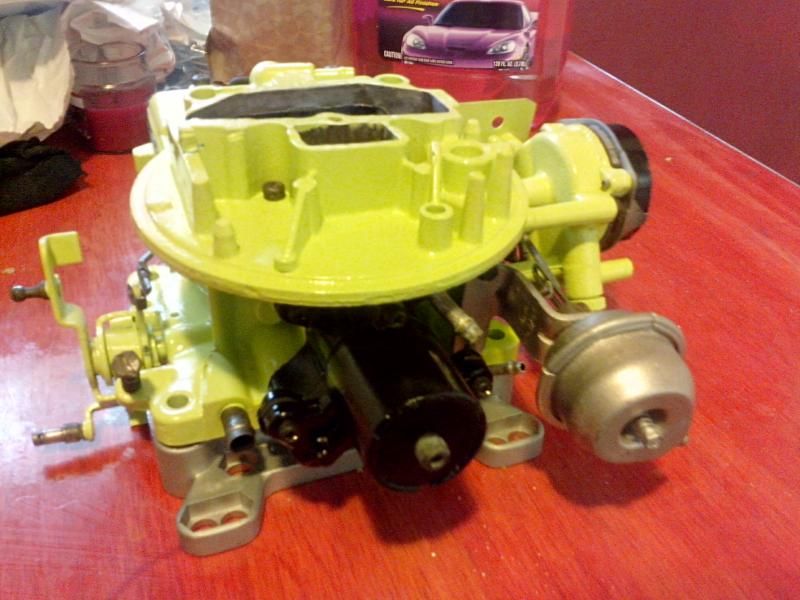
I'm still trying to figure out the power valve options i have, or if I want to seal it up, and get bigger jets, and operate without, since there will be no vacuum for it to operate. My other thought was I could maybe somehow put a nipple on the power valve cover and run that to the top of the carb hat (pressurized) and it would cause the diaphragm to operate the opposite way, but I'm probably wrong, and that wouldn't do anything.

Another shot of where the powervalve sits, before cleaning. This thing was nasty when I got it.


I am working on making some vent tube extensions and then I'll get on to plugging up different vacuum ports that wont be used so I don't have to rely on a rubber cap for them.

Still waiting on the actual turbo to get here, then I can get my J=pipe made up.
 
Well, still waiting for parts in the mail.

SO I went ahead and glass beaded the exhaust manifold I'll be using and cleaned it up a bit. I'm not sure what I'll have on it - be it coating, or a wrap. Has anyone used a manifold paint successfully? The last one I tried did not work at all, and I baked it and followed the directions as it stated.


And I wanted to dress up a different valve cover design to incorporate the turbo. Something simple but bright. Still don't have an idea yet, but I took one of my old VC's that had an older paint job I did, and am going to use that.


I cut the oil riser off, and the bracket that held the heater hoses, since mine run along the fender and this would be unused.


This way I don't have to go back to the old breather that had to attach to the air cleaner cover. I can still use my newer open element breather.

I put it in the blaster and got 90% of the paint off easily. ALl of the rustoleum came off, but the 1shot I used on the top to make the star design, would not budge. Impressive paint. I'll have to strip that part.


Just passing time...
 
My first batch of turbo parts came today. I paid $150 for everything here except the valve cover in the background. That's the one I'm currently working on.

The turbo was a brand new unit and never used. The rest looks like minor use except for the A/n lines and fittings which are also new looking.

Pretty good deal I think. It's a T04e snail.

http://s43.photobucket.com/user/serj22/media/IMG_20140730_132835_zps1aa4d17c.jpg.html

Now it's just a lot of thought to see how i want to run my wastegate. I'm really going to try and make it be "one" piece. I-e the J-pipe and downpipe connect underneath or above the turbo with the wastegate. It's too bad it isn't designed with a flange on opposing sides - would be easier. Oh well.
 
Please keep caught up on this. Some of us may not comment, but "we" are watching, LOL
 
I've been wanting to do the same with my 68 valiant and with the same goals. Budget build fun daily driver. Please don't leave anything out and lots of detailed pics please.
 
Having a couple dozen TurboDodges in the past, (GLHs, SCs, ShelbyZs, CSXs, etc.), all of which are counter flow heads like the slant, I've also dealt a lot with the intake and exhaust being on the same side. The intercoolers with the inlet and outlet on the same side are commonly used in TDs due to lack of room in the bay. I've used them in several of my cars and have no complaints.

That being said, I wasn't running over 20psi of boost or making ludicrous power. And really, while it won't hurt to run a FMIC, it's not necassary at that low of a boost level.

Matter of fact, my last GLH that I had wasn't inter cooled at all. I was running a junkyard 2.2 T1 bottom end with a slightly worked 782 head that made it right at 8.7:1cr! I used a MP314 cam, stock Garrett turbo off of a T2 Daytona, a 2.5" swing valve, and a 2.5" side exit exhaust. I ran a stock A525 trans with 3.87fd gears. I had it pushed to 15psi on a MP Stage 1 Logic Module and ran MP803 injectors. With this setup I NEVER had any spark knock issues and I beat on it profusely! It absolutely ripped! Hell, it'd hang with my buddy's LS1 6spd SS up until about 90mph. And with NO inter cooler!
 
Please keep caught up on this. Some of us may not comment, but "we" are watching, LOL

lol. I gotcha. I've got a lot to do. It's mostly going to be parts collecting, then finding a welder. Ideally, I'd have to install everything in a couple day span, so I could keep driving it to work, since unlike most people here I think - my A-body IS my car. So it usually has to drive somewhere every day. I want to have everything ready to go to drop in, that's why I have extra manifolds, etc... to mock everything up, then mount. I'm trying to decide now how i want to hold the weight of the turbo. Going to the exhaust is great and all with a secondary mount, but it is still held to the block with those little studs on the head. That's a lot of leverage suspended out there. Ideally, since I plan to keep my mechanical fan, putting the snail up front is not necessarily going to work. I forgot the fan existed. I may be mounting it more up towards the top of the engine bay on the same level as the carburetor. Lots of thoughts to go through.

Also I can never abandon projects since i live in a small place. I either have to bolt stuff to the car, or leave it in my way inside. Bolting to the car is easier.

http://i43.photobucket.com/albums/e356/serj22/IMG_20140730_172903_zps73997197.jpg

The only thing constant is change, and with that comes a new theme for the engine and stuff. Purple is a great color, but once again, I'm changing it. Got some bleed to contend with here, but this cover is mostly done.

Anyone know off-hand what threading is on the low oil sender on the block? I want to T off that to get to the inlet on the turbo.

I've been wanting to do the same with my 68 valiant and with the same goals. Budget build fun daily driver. Please don't leave anything out and lots of detailed pics please.

Absolutely. I'll hopefully make something that's easily copied. Like said above with running 15lbs and not needing an intercooler, I don't know if this build will have one or not, since I'm just shooting for about 8.

And then one last Q to anyone with experience, I'm thinking of just walling off the powervalve so it is unused, and going for larger jets. What would be a good size to start with for a slant and this carb, assuming it is Naturally Aspirated? I can then go from there to get some larger ones to run.
 
Went to an exhaust shop today to get a rundown on a price for putting some stuff in. -namely the J, downpipe, and waste tube. I couldn't even get a ballpark estimate out of him, and while he seemed super interested in the project, I can tell not really into doing the work. I have a few other shops in mind, but I might wind up going to pleasanton and learning to weld a bit. Since I'm a member of the UBOC we have a free weld shop where they teach you to weld, and you can use it if need be. I'm thinking if need be, I'll learn and buy some piping and go to town. lol.

Otherwise it might be difficult to do what I want to do. I am going to document everything I do to hopefully help others out here.

But the general consensus is that I should not start with the exhaust if I want to minimize downtime. I figured logically the first thing to do would be to start at the beginning - the exhaust, then intake, etc...

I may have to buy piping, mock up where it goes in the engine bay with wood (not a big deal) figure out the intake piping i need, where the oil lines go- etc... then I'd route the oil lines, cap them off, adjust the timing, toss the piping i need in the trunk, dropping the carb I'm making in the trunk - which I am now thinking of going with a Holley 2300 since the instructions for modifying it for boost are READILY available and everywhere. The motorcraft I am just applying what i can see for channels on a holley, but this damn powervalve circuit I can just not get to do what I want. Anyway, then I'd have to pre-route basically everything I want, drive to a good exhaust guy in Fairfield (20 minute drive) and then have the piping made up, and bolt everything together in the parking lot. I'm sure he wouldn't mind if i did that, and I don't mind either, but I'm seeing preperation as being the best way to go about doing this for a daily driver. If the car sat in a garage and I had time every day to just mess with it, that'd be a different story.

WIth all that in mind, I have a solution for the oil feed that does not involve any adapters, and will allow me to run a oil pressure line nearby easily.

I have $100 more worth of stuff I'm ordering that will be put into use - namely flanges for everything, more oil line, vacuum hoses, etc... I'll document prices and exactly what I buy from here on out for a realistic (budget) expectation of what I'm doing.
 
I figured it couldn't hurt to play with what I have here, so I decided to tear down the cheap blow off valve and wastegate. I wanted to make sure they will seal and be "bulletproof" so to speak - though not really. The blow off valve I'm surprised sealed at all and probably didn't. Nothing was straight. The wastegate was surprisingly clean and well built. The mounting flanges however, are nowhere near decked nicely.


The blow off was what I started with. I am going to say this, weather you buy this stuff new or used, but INSPECT the ebay stuff real good before you bolt it on. Take it appart if you have to.

Here's what's inside:


There's a diaphragm and 2 springs inside. The diaphragm attaches to the valve at the bottom via a secondary insert under the diaphragm. I noticed there was a small hole that went through the inner bushing in 4 places, then had a spot to line it up to a hole to outside air.


You can see it in the picture. I have no idea what this is for as it's vented to outside air when the valve is opened anyway. The only thing I can come up with is a flaw. so I sealed it. IF I can find a reason not to seal it, I'll redrill the hole before I install it on the car.

The flange part that mounts to the intake was (unsurprisingly) nowhere near flat at all.


In other news, neither was the face that seals against the diaphragm. I flattened both against a flat surface with some 400 gritt. Came out real nice. what you see in the pic is after I flattened it, before smoothing it out.

The air horn that attaches to the valve had an O-ring on it. I saw no purpose in it, but did notice the horn was only hand tight. Upon trying to tighten it, the O ring expanded and failed. Ah, makes sense now. Crappy O-rings. I removed it and put fuel safe sealant around the threads and tightened it down good. It doesn't necessarily need to be sealed at all, but this may help keep it from unscrewing due to vibration in the future.


Once it was all set, I cleaned a casting flaw off of the top cap that holds the spring in, repainted it and let it dry and then reassembled. I'll test it out somehow to see if it holds pressure. Hopefully it's just good to go.


Don't worry, I wiped the dirt off the fresh paint. lol.

I disassembled the wastegate, which was surprisingly clean.


The diaphragm and everything still functioned and the surfaces were smooth, except for where it mounts to the piping. Those were way off, but a simple flattening fixed those up. The exhaust sealing valve is still nice and seals against the bushing well.
 
A straight through intercooler would most likely be more efficient but most any reasonably sized intercooler would be better than no intercooler.
 
under 9lb I believe you dont need an intercooler (your not compressing enough to raise the inlet temp that much) and you can run a non indexed fuel pump, but if you already did it, good to think ahead. Where did you get a wastegate for $10, thats the part I need and they are more than the turbo I bought! The small hole in the casting that looks like a flaw is there to vent the area between the 2 seals as it varies in volume when its working, if you seal it, you might get a "harder" spring pressure is youll be compressing air too. I mounted the blow off valve behind the carb so as to keep the flow in that direction. If you blow off before the carb (like on another leg of the ram tube) it will change the direction of the flow and may effect the next time you mash it like off a turn. keep showing and telling!
 
under 9lb I believe you dont need an intercooler (your not compressing enough to raise the inlet temp that much) and you can run a non indexed fuel pump, but if you already did it, good to think ahead. Where did you get a wastegate for $10, thats the part I need and they are more than the turbo I bought! The small hole in the casting that looks like a flaw is there to vent the area between the 2 seals as it varies in volume when its working, if you seal it, you might get a "harder" spring pressure is youll be compressing air too. I mounted the blow off valve behind the carb so as to keep the flow in that direction. If you blow off before the carb (like on another leg of the ram tube) it will change the direction of the flow and may effect the next time you mash it like off a turn. keep showing and telling!

I got the wastegate off slant6.org.

The new turbo, BOV, used wastegate, oil return line, feed line, flange, etc... was $150 package deal.
Also what do you mean on mounting the BOV behind the carb? Like the other side of the carb hat? I still need a carb hat...
 
Too bad we aren't closer, LOL. I have a stripped 67 body and both /6 and V8 K frames that's just BEGGIN ta be a test monkey....................
 
Too bad we aren't closer, LOL. I have a stripped 67 body and both /6 and V8 K frames that's just BEGGIN ta be a test monkey....................

That would be awesome. We could mock up whatever we want!

Well, good news today. More breakthrough on the motorcraft carb turbo issue. As it turns out motorcraft had a 5200 carb that was intended for turbo use, so I will be referencing the differences. I also came across a lot of forum posts of people using a 2150 off of a "302 or 360" etc. Which is the one i have, and most of them just bolted it on, and went. No modification since it comes with nitrophyl float already. Maybe I'm onto something and this $30 carb will be the right fit after all. I guess only time and work on it will tell.

I ordered a grouping of $80 more worth of turbo parts, and more on those when they get here. The main focus this weekend and beginning of the week is to nail down this carburetor, reassemble it all the way permanently and then make sure it is ready to run.
 
Well I went to clean up the engine bay today of the wiring that was just draped in space - which is where I want turbo stuff to go, so it can't be there.

I did manage to clean up the wiring when something occured to me... my carburetor used to sit level with the body...


Now it's leaning over towards the passenger side... and the distributor vacuum pod is touching the rubber mount... the mount failed I think... I need to open the hood more often. My car has just been running so good lately, that I neglect to open the engine bay and look as often as I used to. Well, $7.00 at the parts store and they can only get the insert, not the whole mount. I think it'll at least put the motor back up where it's supposed to be, and this replacement seems pretty straightforward.
 
Looking forward to seeing more. Have you considered draw through?

IT was actually my first choice. Here's the problem:

I can not figure out for the life of me how to find a base that the carburetor sits on, and then pulls through the intake tube. I have no idea what it's called, and can't find one anyway. It's similar to the part used for the GNX turbo. Once I gave up on finding it, I decided blow-thru was the way to go. I see a lot of stock turbo carb setups are draw-through though.
 
Had a weird issue the other night when I was coming home from alameda, but I got back into town, and heard a ticking, pretty loud that was related to engine speed. Uh-oh, I thought, it's knocking...

I got home and opened the hood, and lo and behold - the coolant catch can came unbolted, and was on the opposite end of the engine bay being struck by all the fan blades. I moved it, started the car, and no noise. Somehow this thing came unbolted, which also meant my radiator came unbolted on the same side. I have no idea how that happened.

But needless to say my 7 bladed fan is bent on every blade end, and one blade the metal seperated for about 1/4" gap. The paint was all blown off the fan as well. The $10 catch can is absolutely fine. I am moving the catch can to the front of the radiator support, so I painted it black, and I still have no idea how two torqued down bolts came undone so quickly. I would think sabotage, maybe someone trying to steal the radiator, but ran out of time, but I think that's highly unlikely.

Once again, the car is forcing me to not cheap out, and I will just pull the 7 blade, see if I can fix it, and will be running two electric fans with a thermostat switch instead - to free up room for turbo stuff. Ugh...

The fan setup is $40 for the two fans, and $20 for the switch/relay/sensor setup. It will come on at 185* and turn off at 170*

Not exactly part of my build initially, but it's going to be pretty much necessary now. Might as well.
 
i wound up going with electric fans for room too. used two 10" fans and the cheap $16 thermostat/switch. works like a charm. mine comes on at 190 and goes off at 180. seems to like running there.
 
-
Back
Top