I finally got around to pulling the wiper pivots on my 67 Dart Convertible.
I have a water leak in the general area so I figured I would start with the pivots.
I learned everything not to do on the driver's side (and the least accessible)
The pass side was a piece of cake.
I did not take any photos of the driver's side but the process is the same just slightly more complicated by the location.
Remove the wiper arms
I'm a firm believer in the right tool for the job. I bought a wiper arm remover tool, it sure helped. At the last paint job they did not tape over the splined. The arms were well attached.
I used a piece of fish line to pull the lock tab back then used the tool ot pop the arm off.


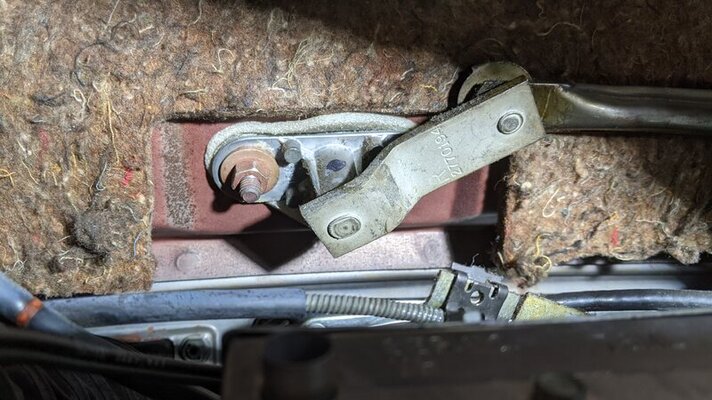
Note how well centered the pivot is

On to removing the front seat
4 bolts and I can lay down in the job


This is the view from under the dash, if you have AC.... sucks to be you!
Passenger side (heavy black cable is the radio antenna, I unplugged it and layed it out of the way)

Red arrows point to felt washers
Green arrow the keeper

The keeper is removed by lifting the tab with a small screwdriver, then sliding the keeper to one side and off.

Once the linkage arm is off you can get to the retainer nuts.
On the driver side I had to use a ratcheting box wrench, on the pass side a 3/8 drive ratchet and 1/2" socket worked great.

Once removed you can wiggle the pivot out. The upper most seal will probably be brittle and fall apart. Not to worry, if part of it falls inside the cowl, it's easily removed.


Here is the pivot, complete with over spray from 2 paint jobs.
An interesting thing I noted... There was some sort of sealer? on the pivot. It was not stuck to the gasket and came off easily. The drivers side did not have anything like it.


Now for the Zerk...
I had marked a suitable location on the pivot before removal.
The drivers side I did by brute force.
The pass side I used the right tool for the job.
I used a #3 drill bit and a 1/4 - 28 end tap
To locate the hole I used the mark I made earlier and my grease gun to be sure it would fit on after install.
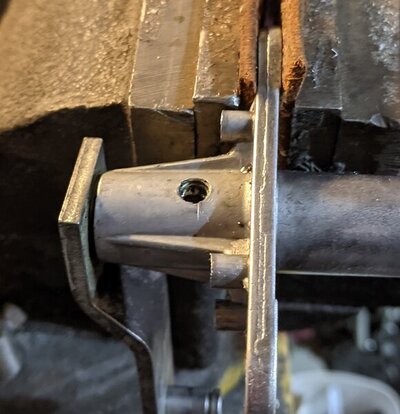
0.400" from the flange was good

The drill bit will stop on the wiper shaft so don't keep going or you will drill right through it.
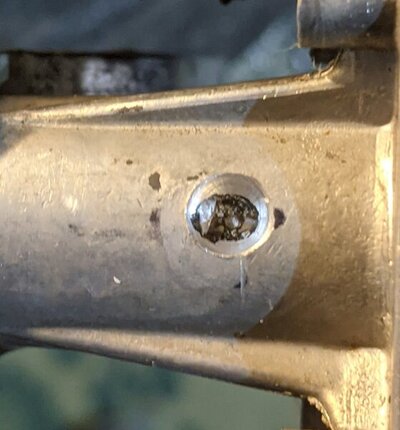
The bottom of the hole is not square since the bit can not drill far enough. It is of no concern as the hole is about 0.2" deep and the zerk is only 0.15" deep.

Hard to see but the tap did an awesome job of cutting threads

The drivers side pivot spun freely, the pass side on the other hand was very stiff.
By spinning the pivot some very hard old grease would come up from the hole.
I decided to put a few drops of paint thinner in the hole and work the shaft for a while.
Rapidly the shaft became free.
I cleaned out the hole and installed the Zerk.
I know I will regret this but I used chassis lube, silicone lube would have been a better option but I did not have any.
I pumped the grease in till it oozed out the top end. On the driver's side I stopped right when the grease started to come out. On the pass side I went a bit more. My thinking was to push out the old grease and paint thinner.

Next is the upper black seal.
I used a long 3/8 drive socket. Starting the seal on it, then sliding it over the splines.
I added white lithium grease as the seal becomes stationary and the shaft turns inside it.

I put on the white gasket and the rubber calking. (The white gasket should be installed before the black end seal but it was not hard to slide it on over the black end seal)

I made sure the mounting area was clean

I inserted the pivot insuring the Zerk was pointing the correct direction.

I learned on the driver's side that the locking nuts are there to adjust the pivot and center it in the hole. Get the nuts snug but not too tight. Have a helper watch the pivot as you tighten the nuts.
Tightening the pass side nut causes the shaft to point toward the drivers side and the drivers side nut to the passenger side.

Clean the pivot bushing on the linkage and lube it.
Be sure one felt washer is on the pivot post then the linkage, then the second washer, then the retainer clip.

I have a water leak in the general area so I figured I would start with the pivots.
I learned everything not to do on the driver's side (and the least accessible)
The pass side was a piece of cake.
I did not take any photos of the driver's side but the process is the same just slightly more complicated by the location.
Remove the wiper arms
I'm a firm believer in the right tool for the job. I bought a wiper arm remover tool, it sure helped. At the last paint job they did not tape over the splined. The arms were well attached.
I used a piece of fish line to pull the lock tab back then used the tool ot pop the arm off.
Note how well centered the pivot is
On to removing the front seat
4 bolts and I can lay down in the job
This is the view from under the dash, if you have AC.... sucks to be you!
Passenger side (heavy black cable is the radio antenna, I unplugged it and layed it out of the way)
Red arrows point to felt washers
Green arrow the keeper
The keeper is removed by lifting the tab with a small screwdriver, then sliding the keeper to one side and off.
Once the linkage arm is off you can get to the retainer nuts.
On the driver side I had to use a ratcheting box wrench, on the pass side a 3/8 drive ratchet and 1/2" socket worked great.
Once removed you can wiggle the pivot out. The upper most seal will probably be brittle and fall apart. Not to worry, if part of it falls inside the cowl, it's easily removed.
Here is the pivot, complete with over spray from 2 paint jobs.
An interesting thing I noted... There was some sort of sealer? on the pivot. It was not stuck to the gasket and came off easily. The drivers side did not have anything like it.
Now for the Zerk...
I had marked a suitable location on the pivot before removal.
The drivers side I did by brute force.
The pass side I used the right tool for the job.
I used a #3 drill bit and a 1/4 - 28 end tap
To locate the hole I used the mark I made earlier and my grease gun to be sure it would fit on after install.
0.400" from the flange was good
The drill bit will stop on the wiper shaft so don't keep going or you will drill right through it.
The bottom of the hole is not square since the bit can not drill far enough. It is of no concern as the hole is about 0.2" deep and the zerk is only 0.15" deep.
Hard to see but the tap did an awesome job of cutting threads
The drivers side pivot spun freely, the pass side on the other hand was very stiff.
By spinning the pivot some very hard old grease would come up from the hole.
I decided to put a few drops of paint thinner in the hole and work the shaft for a while.
Rapidly the shaft became free.
I cleaned out the hole and installed the Zerk.
I know I will regret this but I used chassis lube, silicone lube would have been a better option but I did not have any.
I pumped the grease in till it oozed out the top end. On the driver's side I stopped right when the grease started to come out. On the pass side I went a bit more. My thinking was to push out the old grease and paint thinner.
Next is the upper black seal.
I used a long 3/8 drive socket. Starting the seal on it, then sliding it over the splines.
I added white lithium grease as the seal becomes stationary and the shaft turns inside it.
I put on the white gasket and the rubber calking. (The white gasket should be installed before the black end seal but it was not hard to slide it on over the black end seal)
I made sure the mounting area was clean
I inserted the pivot insuring the Zerk was pointing the correct direction.
I learned on the driver's side that the locking nuts are there to adjust the pivot and center it in the hole. Get the nuts snug but not too tight. Have a helper watch the pivot as you tighten the nuts.
Tightening the pass side nut causes the shaft to point toward the drivers side and the drivers side nut to the passenger side.
Clean the pivot bushing on the linkage and lube it.
Be sure one felt washer is on the pivot post then the linkage, then the second washer, then the retainer clip.