You are using an out of date browser. It may not display this or other websites correctly.
You should upgrade or use an alternative browser.
You should upgrade or use an alternative browser.
Vinyl top installation .....
- Thread starter rebeldart
- Start date
-
AdamR
Big Member
I planning on doing mine myself also. Doesnt look bad. I would pick up a quart can of 3M trim glue and brush it on instead of using the spray cans and pick up some clamps from Home Depot to clamp down the top while you stretch it out.
lawndart360
Well-Known Member
Having only done it twice, I am far from being an authority on the subject. If I had to do it again, which I may, I wounld only stretch it tight enough to lay down without wrinkles. Once it is applied and sets in the sun a week or so, it will shrink, and if initally applied too tight, it will pull up from the drip rails.
I used a can of 3M adhesive and rolled it on with a small paint roller. Take the time to mark the roof centerline and be very careful to assure the seems are straight front to rear. Shrinking and crooked seems are the two biggest flaws I have seem with do it at home jobs. Both of mine turned out very well.
I used a can of 3M adhesive and rolled it on with a small paint roller. Take the time to mark the roof centerline and be very careful to assure the seems are straight front to rear. Shrinking and crooked seems are the two biggest flaws I have seem with do it at home jobs. Both of mine turned out very well.
Having only done it twice, I am far from being an authority on the subject. If I had to do it again, which I may, I wounld only stretch it tight enough to lay down without wrinkles. Once it is applied and sets in the sun a week or so, it will shrink, and if initally applied too tight, it will pull up from the drip rails.
I used a can of 3M adhesive and rolled it on with a small paint roller. Take the time to mark the roof centerline and be very careful to assure the seems are straight front to rear. Shrinking and crooked seems are the two biggest flaws I have seem with do it at home jobs. Both of mine turned out very well.
Back in 1985 my younger brother and I put a new top on my challenger.
We stretched it to tight and it shrunk at the back window trim.:angry7:
I already bought the 3M spray as recommended by an article I read - can't return it so I'll be using the spray cans. Thanks for the tips. One other thing - I should do the vinyl BEFORE glass, correct?
Speaking of Vinyl Top Replacement......
I have never personally installed one, but have read a couple of magazine articles about it.
I am curious to ask those who have done this installation before:
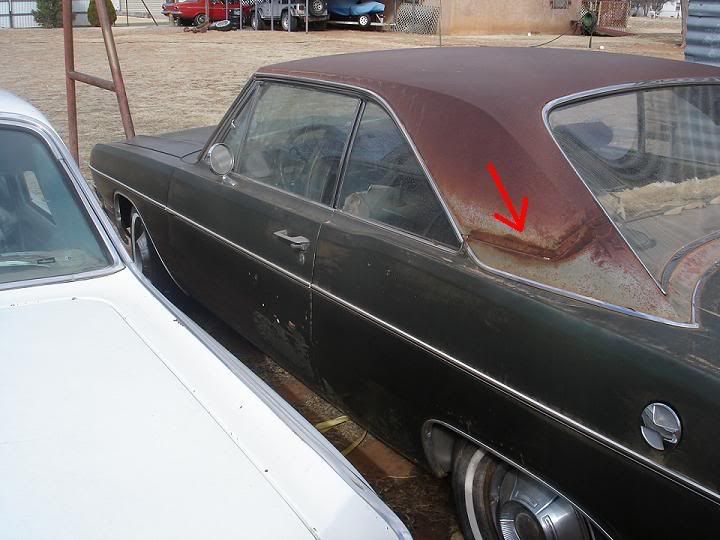
Is there some type of filler inbetween the Vinyl Top in this seam?, or does the Vinyl top have extra mat there for a smooth appearance, I do not want to have a low spot where the Quarter Panel joins the Top.
I have never personally installed one, but have read a couple of magazine articles about it.
I am curious to ask those who have done this installation before:
Is there some type of filler inbetween the Vinyl Top in this seam?, or does the Vinyl top have extra mat there for a smooth appearance, I do not want to have a low spot where the Quarter Panel joins the Top.
I already bought the 3M spray as recommended by an article I read - can't return it so I'll be using the spray cans. Thanks for the tips. One other thing - I should do the vinyl BEFORE glass, correct?
Yes, vinyl top needs to be installed first, then the chrome trim clips and then the glass.
Speaking of Vinyl Top Replacement......
I have never personally installed one, but have read a couple of magazine articles about it.
I am curious to ask those who have done this installation before:
Is there some type of filler inbetween the Vinyl Top in this seam?, or does the Vinyl top have extra mat there for a smooth appearance, I do not want to have a low spot where the Quarter Panel joins the Top.
You need to fill that seam in with body filler, duraglass, etc. Do not attempt to fill it with an extra layer or two of fabric/vinyl!!
AdamR
Big Member
The factory used a plastic filler I believe if the car had a vinyl roof. Cars with out had lead in the seam.
The factory used a plastic filler I believe if the car had a vinyl roof. Cars with out had lead in the seam.
Would you fiberglass resin them in AdamR? Or how is the proper way to do this seem? I did glass on one years ago , But I was only around it for about two years. Don't know if it held up or not. :dontknow:
AdamR
Big Member
I would use some fiberglass reinforced plastic filler.
65s
Well-Known Member
I'm gearing up to attempt the canopy roof on my Dart Sport myself. Upholstery guys I've talked to laugh at me and say it'll never work with the vinyl I have bought, which is thick and made for vinyl roofs. It's got a fuzzy felt like backing. I think it will be thick where the drip rail has to cover it, but I can shave the backing off with a sharp knife I've discovered. The funny thing is, they follow up their comments with an invitation to bring the car to them and just have it done quickly and properly by them. Is their skill really that hard to duplicate?
They say 3M glue and contact cement won't work, ONLY use this product called Helmitine. Of course it's hard to find, but I've found it. About $50 for 4 litres. You have to spray it on with a gun. Maybe they say to only use that glue because they know it's hard to find? I don't trust anyone.
What do you think? Can I do it? My buddy and I are willing to attempt it anyways. The vinyl cost me $22. If we use contact cement, that's another $10-20 maybe. The whole idea here it try and do it cheaply.
If we use Contact Cement we're thinking we'll put waxed paper down on the roof, then lay the glue covered vinyl on it, then pull the waxed paper out starting in the center I guess and push the vinyl down, working our way out. I think two large pieces of waxed paper overlapped in the center, so when we pull it out from the side the overlap will get smaller and smaller until the vinyl is touching the roof, then it will begin to stick.
If the whole thing goes bad, we'll have to scrap and sand the roof again, and paint it again with a rust encapsulation product again.
I've heard to put the vinyl right under the trim, install the trim, then cut the excess off, being careful not to cut into your paint.
Does all this sound right? I think the whole thing could be cheaper than spraying on rock guard...which probably wouldn't look very good anyways.
whitey
Well-Known Member
1. have plenty of 3m glue.
2. make sure you have even coverage of glue.
3. Spray roof and vinyl and allow a few min to tack.
4. Use a rolling pin to roll out.
5. get a few friends and make sure they pull vinyl tight.
As far as that seam, I'd use All metal.
I like using Stoner's Trim Shine (stoner.com), it's an aerosol spray, but when it drys it's an awesome shine.
65s
Well-Known Member
Does anyone know what the vinyl top trim clips look like? It's a canopy style vinyl top ('75 Dart Sport) that has the rear trim across the top of the roof...I need the clips that hold the trim on.
71DDSwinger
Well-Known Member
Here is a useful article.
I was going to try this myself. A few thing I not sure of though. How does the trim around the rear window fit?? More importantly, How do I fit the vinyl? Does the glass have to be removed?
http://www.moparmusclemagazine.com/howto/25738_horse_skinning/index.html
I was going to try this myself. A few thing I not sure of though. How does the trim around the rear window fit?? More importantly, How do I fit the vinyl? Does the glass have to be removed?
http://www.moparmusclemagazine.com/howto/25738_horse_skinning/index.html
BigRichieO
Colorado Mopar
65s take a look at this web site. I'm guessing the clips that hold the vinyl top trim look like a CH-657. I'm doing my 69 Dart and it has "c" channel type trim that finishes the top in the back between the rear glass and the deck lid.
If you scroll down they have some pictures about have way down the page.
https://www.jimsautoparts.com/molding_clips.htm#vinyl top mldg clip kits
If you scroll down they have some pictures about have way down the page.
https://www.jimsautoparts.com/molding_clips.htm#vinyl top mldg clip kits
MOBodyman
Well-Known Member
I used to help an old timer install tops many years ago. He did car dealer work so he took some shortcuts I wouldn't necessarily recommend but the tops looked good and stayed on. He even sewed his own tops, the center seam ones were easy.
I won't go into great detail as I type too slow but I'll hit some highlights so maybe someone will find a useful hint.
He first laid the vinyl on the roof and centered it. He then took a razor blade and cut some of the excess vinyl away over the windshield and back glass. He kind of cut an upside down 'u' area away, leaving the top a couple of inches long in the center, front and back. He then taped the top to the glass with 2 or 3 strips of tape in the front. Then he went to the back and pulled the top center just to stretch it a little and taped it to the back glass. The tape front and rear was just off the center of the top. This enabled him to fold half of the top over on itself. He then sprayed the glue on the exposed half of the roof of the car and the folded over vinyl. He swore by Formica brand countertop glue (said nothing else would stick) and sprayed it on with an old paint gun. He would then spread his arms wide and start at the center kind of roll the top toward himself. By spreading his arms out he could kind of stretch the top toward the front and rear as he rolled it to him. Going down the sail panel was a little tricky as the top would sometimes have to be stretched forward or backward to get it to lay right. Sometimes he would have to pull a spot loose and stretch it a little more to get a wrinkle out but he seldom had to. Besides the glue held so good you could hardly pull the top loose. When he got one side glued down he went to the other side, folded it over the half he just glued down, sprayed the glue on the top and the roof and then rolled it toward himself just like the other side.
He hand folded and glued the seams on the a pillars and below the rear window if the car had them. He never removed any of the trim. When he finished sticking the top down he just trimmed it with a razor blade to where it overlapped the mouldings a quarter of an inch or so. He then took a putty knife and stuffed the top under the mouldings. A shortcut I wouldn't recommend but he was doing dealer work so the faster, the better. In his prime he could install a top in about an hour, sometimes less.
Dallas
missourimopar.com
65s
Well-Known Member
That IS helpful, thanks a lot! In another thread (or is it earlier in this one? can't recall) there are the scanned images from a service manual showing a lot of this stuff. Very useful!
I've decided on thinner vinyl, so I'll keep the thick fuzzy backed stuff as a trunk mat or something. I've now got some thinner marine vinyl, looks like it'll be a lot easier to get under the mouldings.
Anyone have photos of the clips under the rear trim that goes over the roof?
I've decided on thinner vinyl, so I'll keep the thick fuzzy backed stuff as a trunk mat or something. I've now got some thinner marine vinyl, looks like it'll be a lot easier to get under the mouldings.
Anyone have photos of the clips under the rear trim that goes over the roof?
Sparky
Well-Known Member
As usual, great informative thread. I to will be putting on a new vinyl top, I had no idea that the glass had to be removed, I thank you for that. Now, about the glass, any insider tips on removing it. Somehow I picture myself on my back booting it out from the inside, a no no maybe? I guess having those suction cups would be ideal.
By the way as I will not be doing this job for a long time, what's the best way to save this thread without missing any future additions? just bookmark it like normal?
By the way as I will not be doing this job for a long time, what's the best way to save this thread without missing any future additions? just bookmark it like normal?
clhyer
Well-Known Member
- Joined
- Feb 24, 2007
- Messages
- 3,734
- Reaction score
- 320
My son & I completed a restore last year. I think some of our best money spent was in having the pro do the vinyl roof. You don't get a second chance (without starting over with a new piece of vinyl). After watching and helping the guy do ours, I wouldn't care to attempt it myself.
C
C
65s
Well-Known Member
Okay, upon inspection I found one lonely clip under a piece of the roof top stainless trim! Yay! So now I know what I need. They're more like CP-774513 at Jim's, but not quite. I'll have to look in the Layson's Catalog (but I won't buy from them unless they are the only choice) and I think the Dodge Dealerships might actually have some of these...we'll have to see.
67gtx
Well-Known Member
I replaced the little studs with clips that use the screw nuts under it. It was very easy with those and you can remove the trim without tearing up your paint or trim. It holds the trim very tight to the body.
65s
Well-Known Member
Tonight my buddy Tom and I went ahead and tackled the canopy vinyl roof on my '75 Dart Sport. I had purchased a twenty dollar chunk of marine vinyl at a fabric store, the kind with a webbed backing. Originally I had some thick stuff with a fuzzy backing but realized it would be too thick to fit under mouldings. I didn't take any photos, but I'll take some of the finished product.
I searched high and low for Formica brand glue, can't seem to find it. I did find their website where it's listed, but couldn't find anyone selling it. I contemplated Helmitin, which is the correct glue for doing vinyl roofs, but again the only place I could find that carries it would have to ship it and it would cost more money than I was willing to spend on this particular car a this particular time.
I ended up with 2 large spray cans of 3M 90 spray adhesive and a small can (with built in brush) of Lepage contact cement.
We cut the vinyl oversized and laid it on the roof (which had been sanded down, pits filled, painted with rust encapsulation type paint...sanded some more, filled some more...blah blah....it was looking pretty smooth I must say). We folded it over half way down the middle and sprayed the glue on the half of the roof that was exposed (the car was covered in masking tape and paper) and sprayed the exposed part of the vinyl. Then when the glue was ready we slowly folded the vinyl over on to the glued roof, working the air out and smoothing it over with our hands. We did the other side the same way. We stopped at the drip edges.
We did the drip edges with the contact cement and brush just for more control, same with the A-pillars. We worked the vinyl down into the drain trough with a finger...not worrying about it being too perfect, then up and over the drip rail. We cut it so that it only goes over the top part of the drip rail, not under the bottom edge.
At the A-pillars we lifted the flap of the roof portion and glued the A-pillar portion to it, then folded it over and down to create a waterproof fold, right where the natural dent in the car is. It's hard to explain, but it's like an S fold. I did one side and Tom did the other. I think mine turned out better! They both look a little different, but your average joe isn't going to notice.
Around the windshield we cut the vinyl out to fit around the trim clips and worked it in, then trimmed it so it will hide under the trim.
We put all the trim back and we're done! The over the top trim was missing all the clips so we made some from really small cotter pins. We just wedged them over the roof studs, pinched them tight then spread the bars open so they were like a spring and slid the trim on....they work great! Spring steel would work better though. Total time was about 3.5 hours, and we didn't rush...just took our time.
We wore some gas masks as it's still winter outside so we didn't want to open the heated garage door.
Would I do it again? Yes. What would I do differently? I would leave one person to do both A-pillar seams so they're both the same. I would probably get the Helmitin glue because it's made for this, I'm not sure how well the 3M will hold up in the weather. I think I'd also make sure the seam sealer in the drip trough is smoothed over evenly then work the vinyl in to the shallow trough a little better. I'd probably get the proper clips for the over the top trim too.
I've never done a vinyl roof before but it was cool...you can do too ya know! It wasn't rocket science.
Tools you will need: a good sharp pair of scissors, exacto knife, masking tape and paper, glue, thinner to clean up glue.
Good luck!
65s
Well-Known Member
Oh ya, the glue seems a little thick where it was overlapped when spraying. You can see small bumps in the finished product in the same pattern as the spray. I think these might go away, but they might not. They're not unsightly, but just something I noticed.
I suspect Helmitin http://www.helmitinadhesives.com/contactcements.htm glue will smooth over a little better.
I suspect Helmitin http://www.helmitinadhesives.com/contactcements.htm glue will smooth over a little better.
65s, I'm glad you chose not to use that thick vinyl. My son's Dart had that on it it, when I pulled it off last fall it was soaking wet underneath. It hadn't rained here in months. That stuff makes for a nice wet blanket but not a good top.
-


