72 duster Build progress

-
Well, got a late start today so I didnt get much done really. BUT, I do have some picture updates.

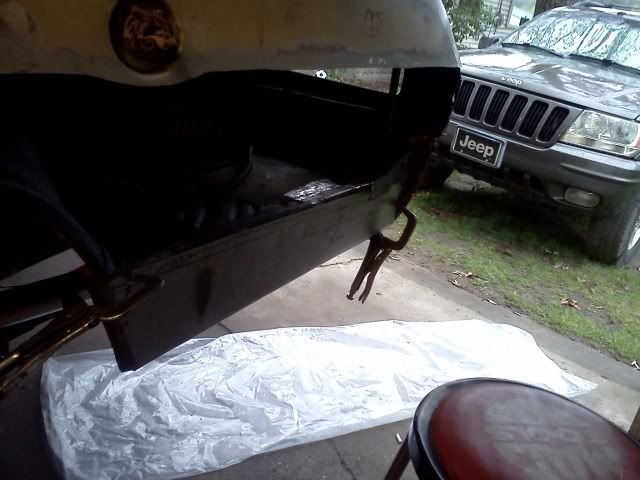
I played hell with getting the old tail panel off......first of all, the easy part was melting the led out of the seems.

finding all the spot welds was a little bit tricky but nothing major.

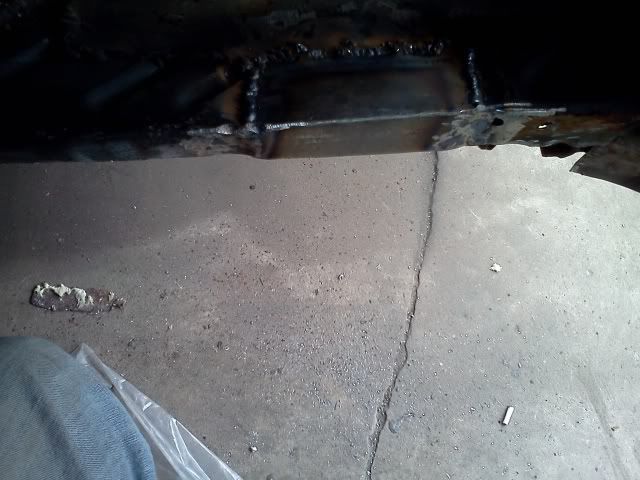
the worst part was .....the previous owner removed the trunk pan and replaced it with a flat sheet of steel.....and when he welded it in, he welded it to the back side of the tail panel.

which made it extra work for me to remove it.

he also used spray foam everywhere ( I hate that stuff ) it holds moisture and is a B!t#h to get out of the nooks and crannies.

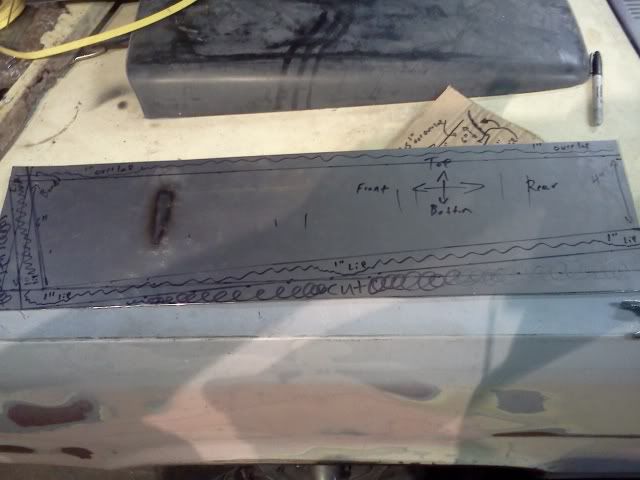
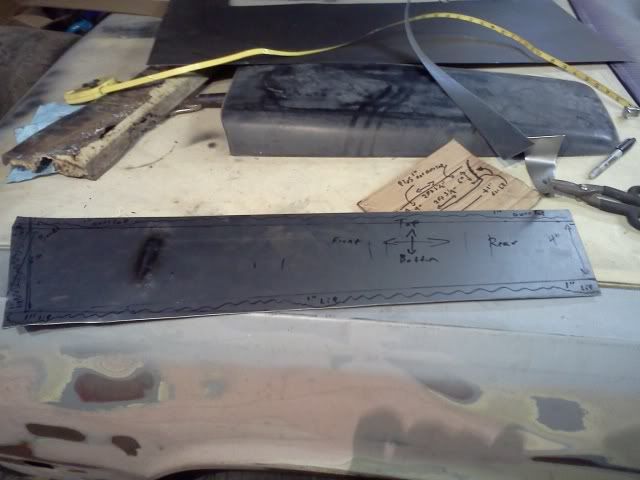
now I need to get some steel so I can rebuild the little end caps that go in the lower corners of the tail panel that connect the tail panel to the quarter panels ( slipping my mind on what the exact name for the little panels are at the moment ).

I also need to get some steel and make a channel out of angle iron to connect the floor to the backside of the tail panel because when the previous owner replaced the trunk pan he left the steel that connects the pan to the tail panel and its pretty weak and rusty so I am going to get rid of it and make my own.

then I am going to use rust converter on everything .

then I will install the new tail panel and move on to installing the new lower quarter panel patches.

it doesnt look the prettiest at the moment but in time ill have her looking good.

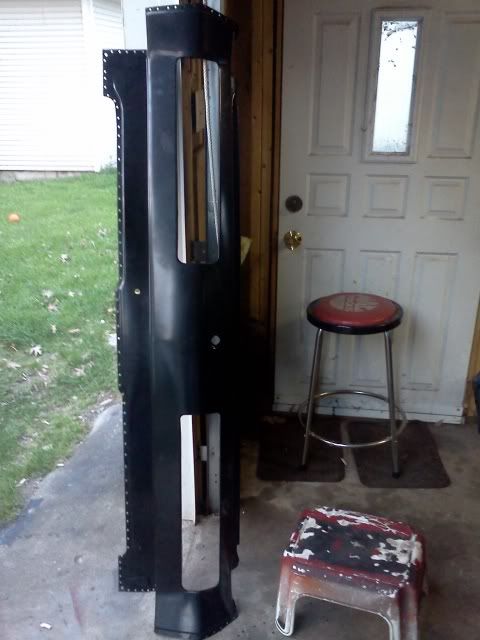
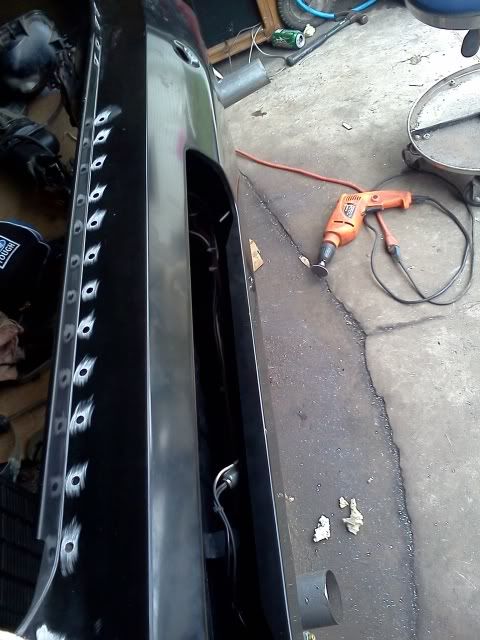
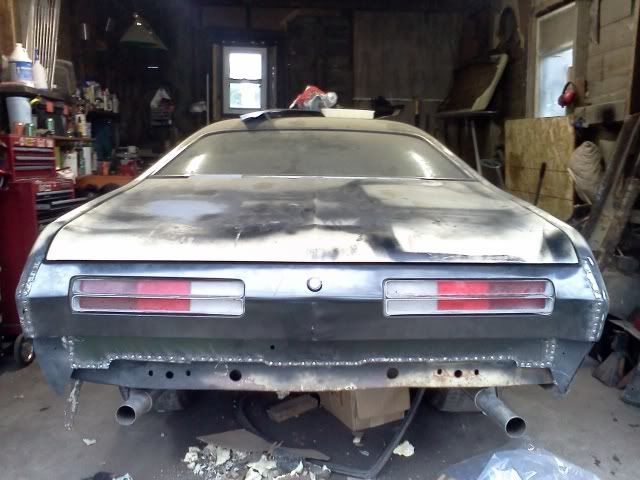
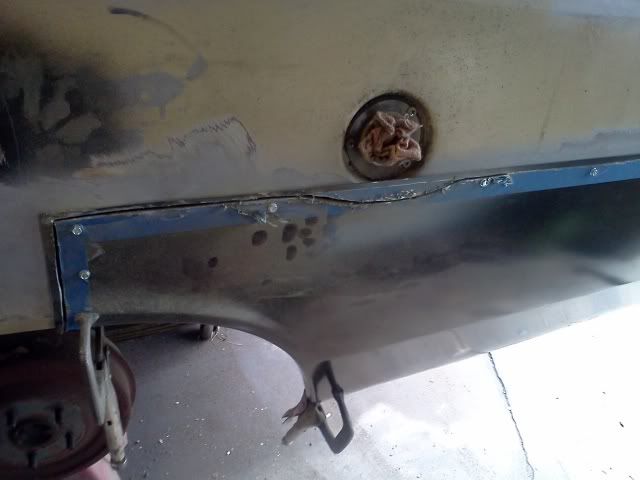
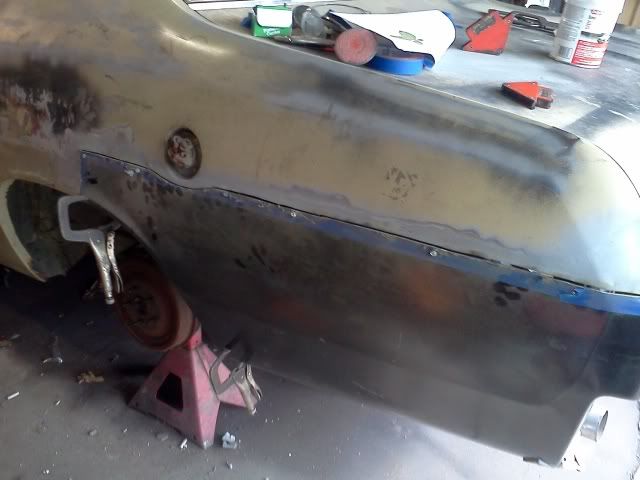
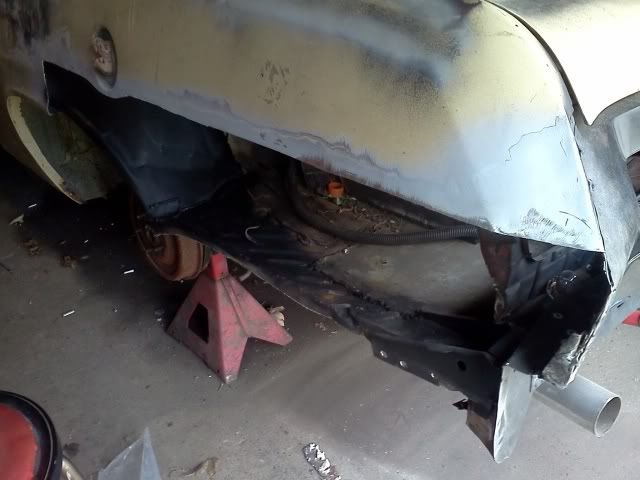
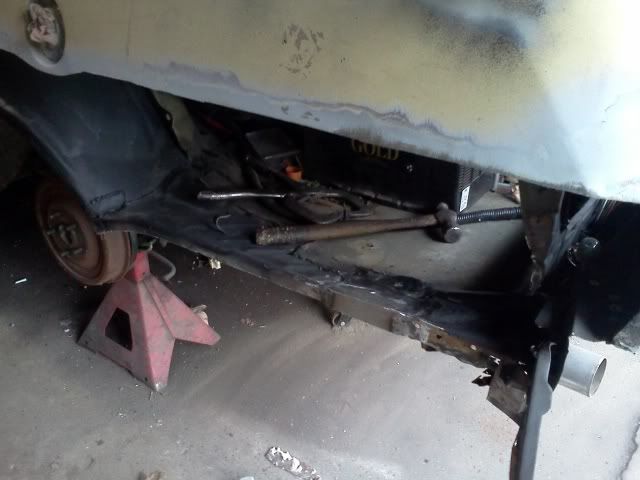
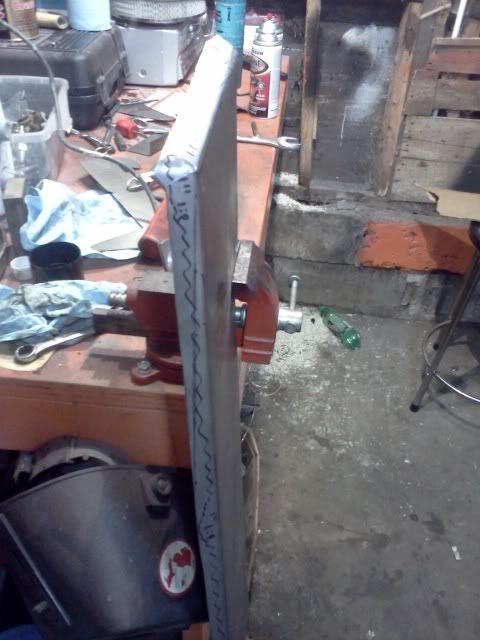
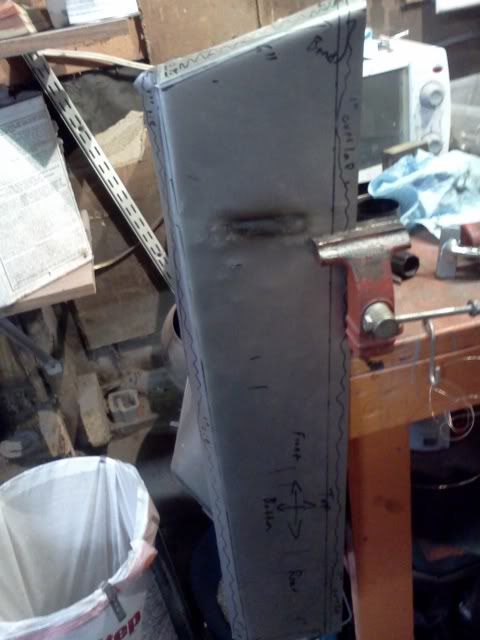
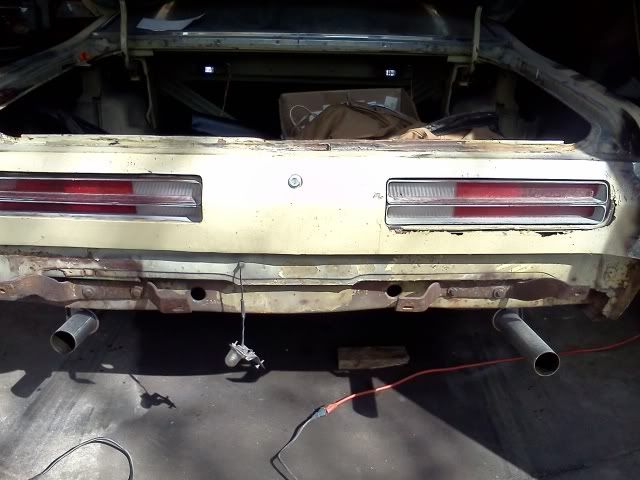
here is a picture of the old panel (don't let it fool you, 50% of what you see has bondo under it...plus the rust.....was definitely time for a new panel!)
IMG_20110506_170906.jpg


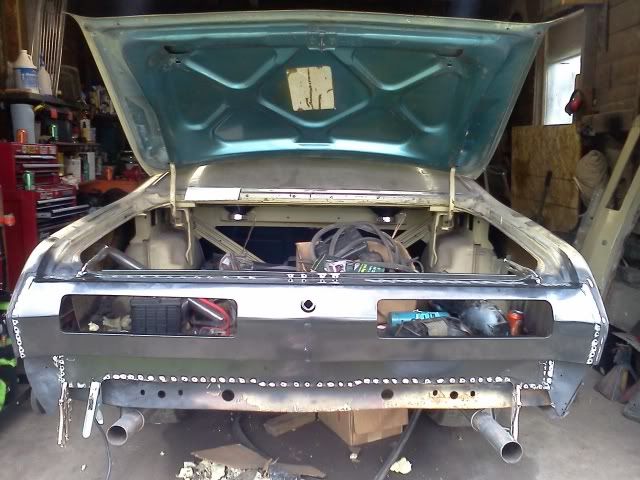
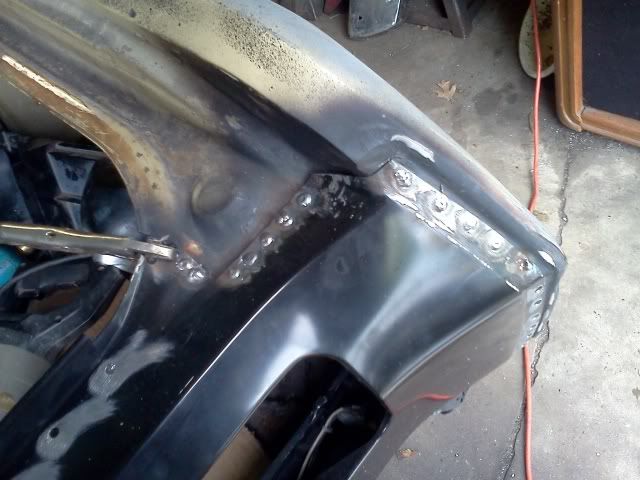
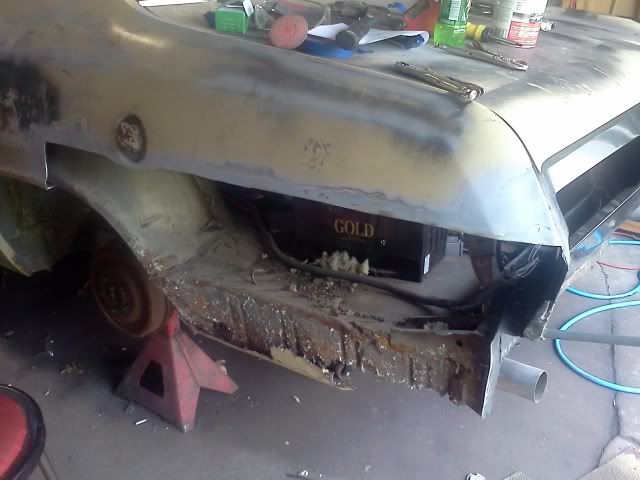
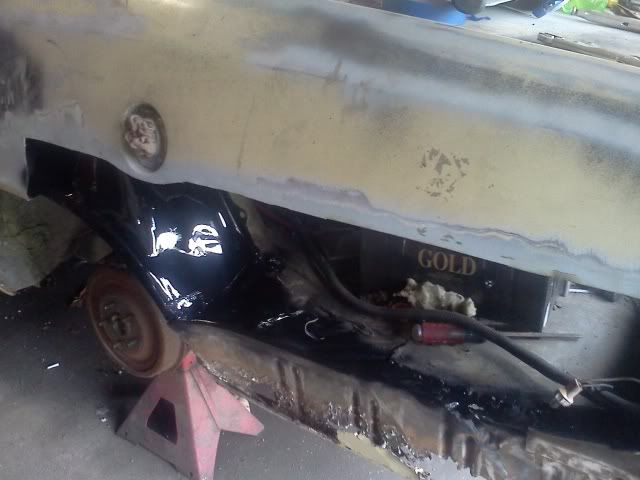
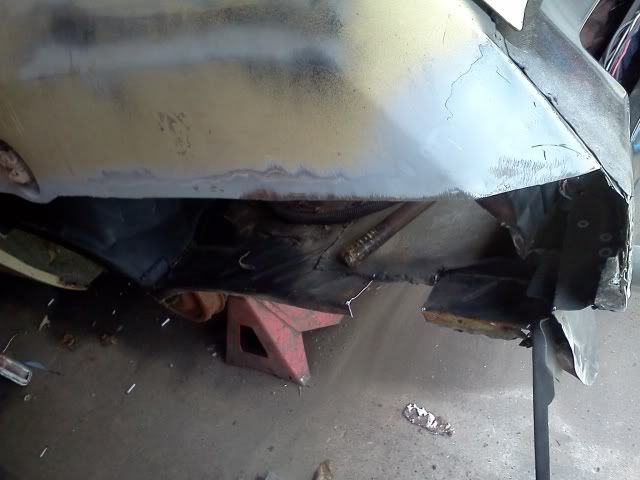
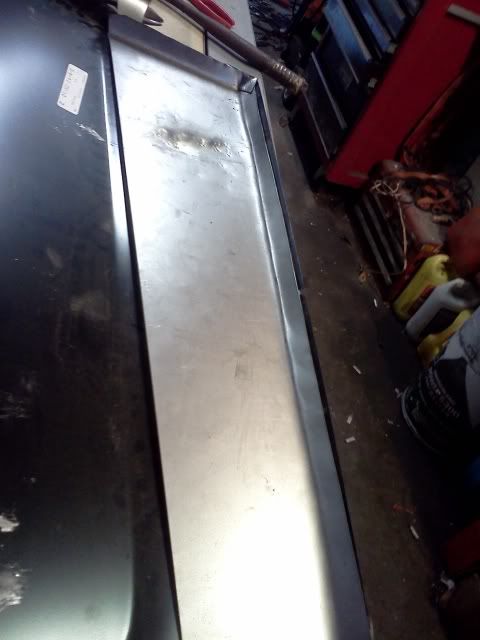
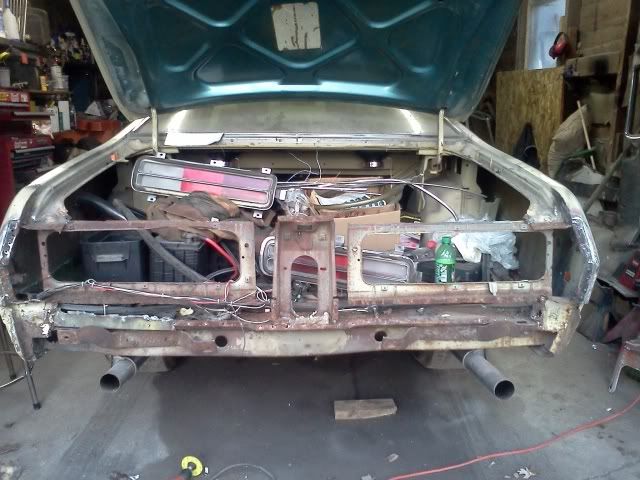
and another picture of right after I pulled the panel (don't mind all the crap in the trunk ....thats the "duster parts/overflow storage compartment" lol).
IMG_20110508_201456.jpg


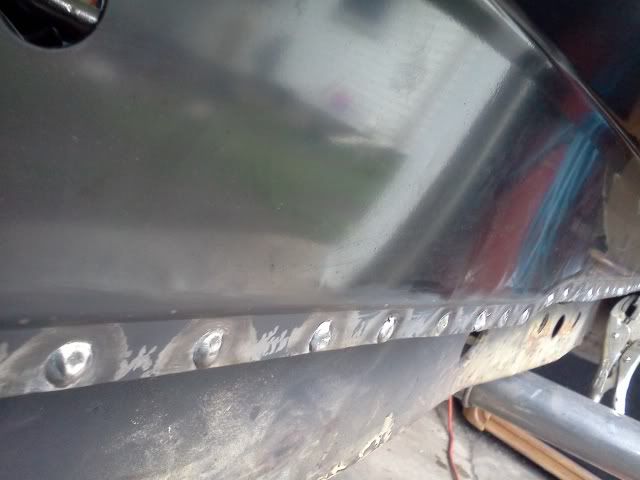
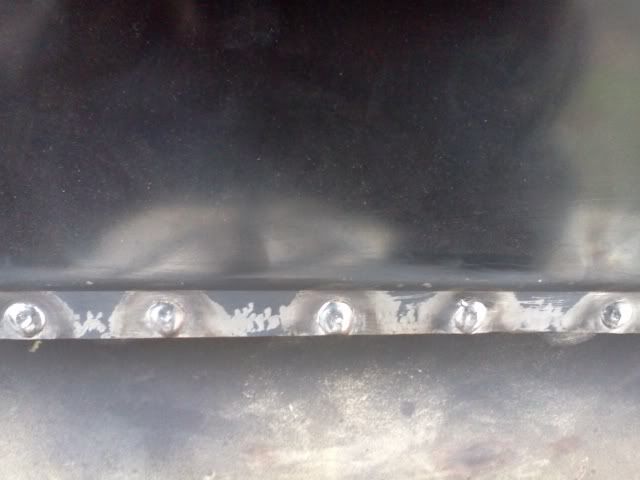
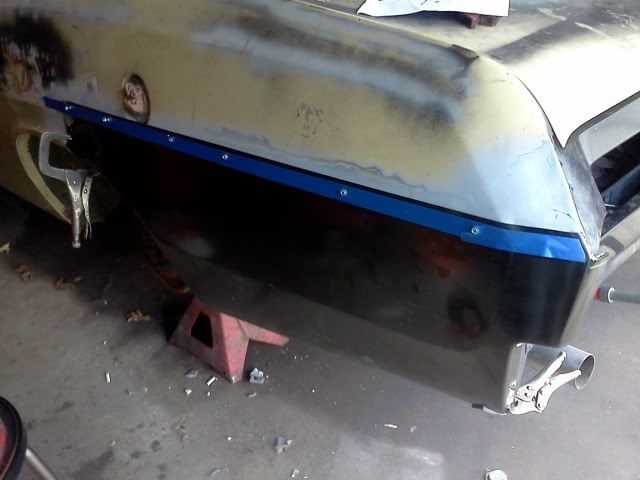
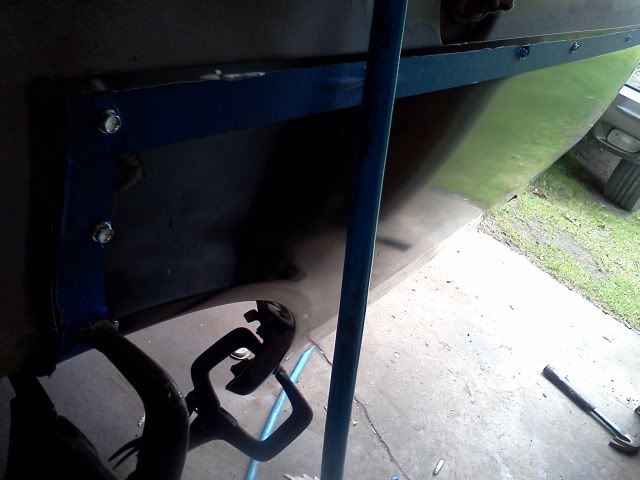
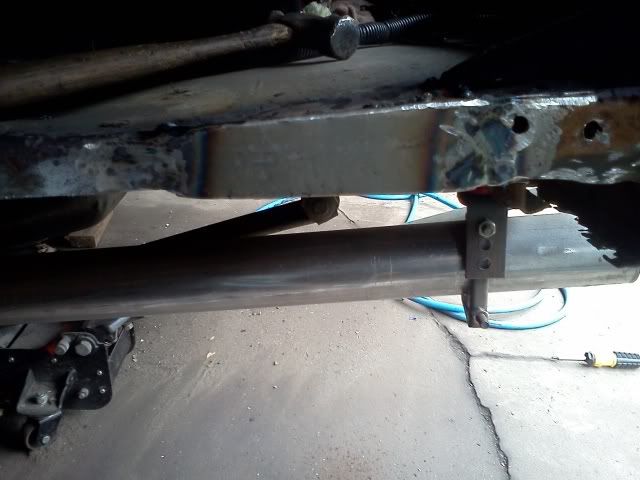
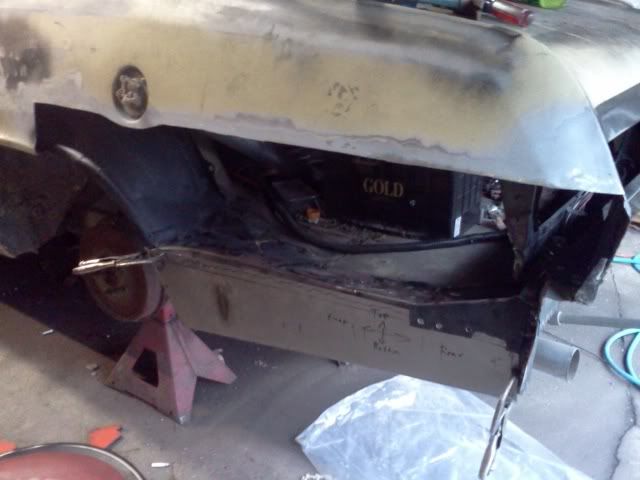
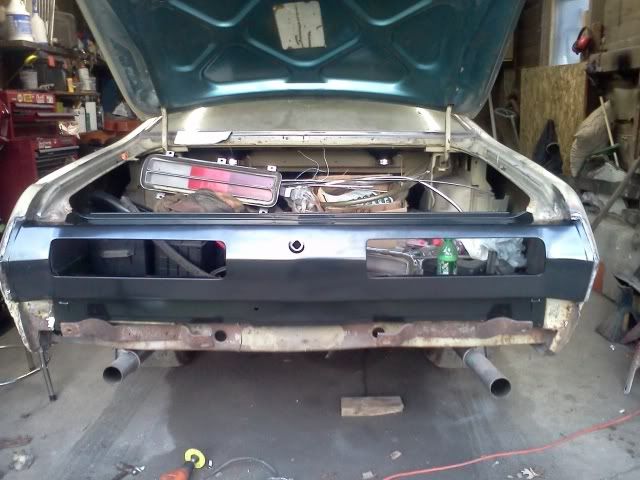
and another picture where I placed the new panel in the opening just to get an idea of what it would look like!.
IMG_20110508_201915.jpg
 
Well, this damn Michigan weather goes from 80 degrees one day to 30 degrees the next lol and all this hot and cold temp changes and rain landed me with a cold.

BUT I have still managed to sneak out to the garage for a bit here and there (with the wifes permission and a thermos full of hot coffee to keep me warm lol) and I wanted to share some pictures so you guys and gals can see I have still been doing a little bit.

I picked up a new still in the package windshield gasket from a member for about $60.00 shipped which worked out great being that EVERYONE had them on back order.

also picked up a mopar performance air cleaner with filter from a member for $35.00 shipped and I picked up a set mopar performance "polished" valve covers from a member that I traded a carburetor I had laying around for.

SO that means that the Holley (M/T) style valve covers I currently have will be up for sale soon if anyone is interested and also the brand new edelbrock chrome air cleaner and filter will be up for sale aswell.

So this is a picture of how it started out.....just a regular old wrinkle black MP air cleaner
get-attachmentaspx.jpg


Here it is after I stripped all the wrinkle coating off
IMG_20110414_180755.jpg


ENJOY!

Was this my old air cleaner? Turned out great if it was, now I wish I still had it to make it look like that haha. Nice work on the car, keep it up.
 
good ole Michigan, yesterday was 90 degrees and today it was 50 and rain!.

I have been working on the duster pretty steady but most of what I have been doing is pretty boring to post pictures of (wire wheeling metal and spraying primer and blah blah blah).....yesterday I didnt get to work on the duster because first our dryer broke which put me in a crappy mood because we can't afford another one with my wife being laid off and bills stacking up and not getting and bites here on fabo on my parts for sale thread....and then to top it off a caliper froze up on our jeep and I had to rip it all apart and it ended up having 2 frozen slides and one frozen piston ,so I ended up getting a new caliper and bracket and installing them and that fixed the problem!.

anyhow.....that stuff aside.

today I got busy on the duster!!!

first I busted out my air punch tool and made all my spot weld holes
IMG_20110512_200229.jpg


Then I wheeled off all of the coating on the panel around all my spot weld areas (and on the car where all my spot welds would be going) and then I stick it into place and did some tweaking here and there until things looked the way I wanted and I clamped vise grips around it to lock it in place where I wanted it.
IMG_20110514_151613.jpg


IMG_20110514_151637.jpg


Then I tack welded the corners of the panel so it would not move any during any hammering I had to do.......and then when I started welding it all up I started on the very ends and then on the bottom I worked my way from the center out until I had all my plugs welded....in between each weld I took out my hammer and tapped the metal down so I would get a nice flush panel to panel fitment.

IMG_20110514_153652.jpg


I got it all welded in place but I still have to weld all my spot weld holes that hold my tail light brackets in but that shouldn't take long at all. and then I just have to grind down my welds and spray some primer and move onto the quarter panel patch installs.

I had the new welder buzzing pretty good! so I don't have a ton of grinding to do thankfully!

IMG_20110514_164748.jpg


IMG_20110514_164824.jpg


then I tossed the lock back in it so I can get in and out of it incase the trunk drops and the latch locks on me ( I keep having to reach through the tail light hole with a screw driver on the back side of the lock mechanism to pop the trunk and it was getting annoying lol).....and I tossed the tail lights in real quick to get an idea of how it looked and how everything was lining up.
all looks good!
IMG_20110514_174654.jpg


I did the tail panel prior to tackeling the quarter panels because I thought it would be the "easier job" HA.....so far I have proved myself wrong.....reason being is because the car had been hit in the corner of the tail panel before and it had some rust issue and I had to do alot of straightening and I had to make my own trunk extension end caps and I had to rebuild the lip of the trunk floor that the tail panel is welded to and it has been tricky to say the least ....but it is coming along anyhow!

I still have to cut the old lower quarters off,rebuild the trunk extensions out of new metal and then I can weld the new panels in.

Here is a quick video I took that just shows the tail panel welds and stuff......click the picture to see the video.


let me know what you guys think!
 
Awesome job. Great work. :thumrigh:

Any pics of the air punch anywhere? Sounds like a tool one must have. MORE POWER!!! ARRR, AAAAAR, AAAAAAAAARRRRRRRRRRRRR!!!!!!


Wylde1.
 
looking good

Thanks!

Awesome job. Great work. :thumrigh:

Any pics of the air punch anywhere? Sounds like a tool one must have. MORE POWER!!! ARRR, AAAAAR, AAAAAAAAARRRRRRRRRRRRR!!!!!!


Wylde1.

Thanks, and no I don't have pics of it right now but I got it from harborfreight for like $28.00 on sale and its an AWESOME tool to have, its and air flanging tool that has a flange head on one side so you can flange panels and on the other side has a punch tool. just put it on your panel, pull the trigger and PFFFFSSST it pops the hole in the panel like no ones business
 
Love the progress your making DusterDude, specialy like avenged sevenfold playing in the video on the radio. Great Job!!!!

Brad
 
Thanks.

yup...That's where I am at!

I caught that thread once before but since the last time I looked it appears they have covered alot of ground, they are doing great work!
 
Want to do my car? I need my tail panel cut out and replaced. Awesome work BTW.

If you were closer id be glad to help you!

Its really not THAT bad of a job to be honest, it just seems a lot harder when its staring you in the face but as soon as you start getting your hands dirty its not so bad.

I have a total of about 12. Hours into mine probably but that's only because I had to screw arou d with hammering and tweaking crinkled metal and cutting out rust andfabbing up fresh steel replacement.

If you need any tips or a heads up on what your getting into just let me know and id be glad to help. Thanks by the way
 
took a couple days off because I was busy with other stuff.

but had a chance to work on the duster for a little bit today and made some progress!.

first, I stuck the new panel over the factory panel,then I positioned it where I wanted it and I clamped it down with vise clamps. Then since my factory body line was pretty weak looking towards the middle of the wheel well all the way back due to getting side swiped or something and then having poor body work done once upon a time.....I decided to use as much of the new panel as I could, so I took masking tape and masked off the panel so that I would only be cutting off roughly a 1/4" around the perimeter of the new panel ( I also scribed the tape line just incase the tape pealed up during cutting so I would not lose the line I decided on cutting on).

once I had that straightened out I then took self tapping screws and drilled them BELOW my cut line so that the new panel would stay put as I cut it so my lines would be exactly the same ( Ill weld the holes over where the self tappers went later on).
IMG_20110520_150328.jpg


doing it this way insures that the new panel will be a direct fit to the factory panel I cut out....since I cut them both at the exact same time rather than cutting the replacement panel and then laying it on the car and then scribing a cutline into the factory panel and cutting it seperate.

IMG_20110520_160350.jpg


you can see by the pictures that I cut through both panels at the same time so the new panel will fit right in where the old one comes out. I used cut off wheels that were about 1/16th" thick .....so I have a good gap all the way around the panel to prevent any warping from expansion/contraction during the heating and cooling process of welding.

IMG_20110520_162633.jpg


I also brought my cut line down below the filler neck because when utilizing almost the hole panel like I am...the panel came right across the filler opening.

IMG_20110520_164822.jpg


you can see the fitment here.

sorry I forgot to take a picture while the panel is off but I will get one ( still have to fab up a trunk extension panel before I can start on welding in the new panel anyhow.

more pictures to come as I make progress!
 
Did some more work on the duster today!

cut out the old trunk extension, drilled out some spot welds in a couple spots,wire wheeled the wheel house,cut out a bad spot in the top of the trunk floor extension and made up a patch and welded it in place, ground everything down,sprayed rust reformer on to all the bare metal and anything that had surface rust in the area.

IMG_20110521_124309.jpg

IMG_20110521_132920.jpg

IMG_20110521_150621.jpg

IMG_20110521_151043.jpg

IMG_20110521_161037.jpg

IMG_20110521_161054.jpg

IMG_20110521_162936.jpg


sat the quarter patch panel up in place and got under the car and made some measurements from the back side for my trunk extension....also made measurements from the front. and then made measurements of the replacement panel.

then after racking my brain for a little bit because of all the numbers I had flying around in my head from all the measurements ...I finally drew up a little sketch of how I was going to tackle my next task (I did not see the sense in spending so much money on the replacement panels when I could just make my own!).

Here is what I came up with (dont feel bad if you can't understand what all my primitive scribbling is lol.....I didnt even know what it meant HAHA)

IMG_20110521_183609.jpg

IMG_20110521_184737.jpg


I cut it 1" larger so I could fold the lip over where my quarter panel spot welds to the bottom of it.

a problem that I came across however is that I did not have a fancy shmancy tool to aid in getting nice crisp bends in the panel I was making and I am to cheap to go to a store and buy what I need.....so what did I do? I took some 1/8" steel plate and cut a couple sections off, then I locked a pair of vise grips onto the chunks of steel,then I busted out the welder and welder each chunk of steel to each jaw on the vise grips,ground down the welds a bit,did a quick powder coat job on them so they looked like a nice presentable tool ....and TADA here is what I wound up with!

IMG_20110518_184404.jpg


THEN I put the tool to use!

IMG_20110521_190819.jpg

IMG_20110521_190839.jpg


and here it is sitting in the back of the patch panel

IMG_20110521_190739.jpg


and here it is sitting in place while I tweak it a bit and keep holding the new panel up to check fitment

IMG_20110521_191303.jpg

IMG_20110521_191325.jpg


and thats what I did today.....Ill post more updates as I go.
 
Wow! you are giving me the courage to do my panels myself. I will be following your thread and looking forward to the finished product.
 
Wow! you are giving me the courage to do my panels myself. I will be following your thread and looking forward to the finished product.

It can be overwhelming when you find yourself sitting there staring at it....but if you have decent knowledge and most of the right tools....you can pull it off at home.

I have a good portion of the metal work done but it can still get overwhelming when I think of what I have left to do....but I still find myself heading out the the garage and getting things done and the more I get done....the smaller the list of things to do becomes.

I just keep telling myself "once the metal work is done you are in the home stretch of the body work" .

I find myself forcing myself to do ALOT of thing with the duster....I have done almost every single aspect of the build myself with the exception of the windshield install and that was only because I got such a good deal on it and installation was included in the price.

but being that I have limited to no funds to spare on the duster most of the time ....I will only buy new what I HAVE to have (tail panel and quarter panel patches)....otherwise I will buy used and clean it up to my specifications (valve covers and air cleaner for example) or if something is priced to high and I think it is something I can make my own of and get just as good of a result I will do just that (trunk extensions) .

you need to psych yourself up and break down the barrier and once you start moving ...things started going pretty smooth (most of the time lol).

if you decide to take the job on yourself and need some tips just let me know or as one of the other countless members who are good with metal/body work.

I should have the driver side quarter installed in the next day or 2 depending on how much I decide I want to work on it and what not....so stay tuned.
 
-
Back
Top