- Joined
- Jun 2, 2004
- Messages
- 5,034
- Reaction score
- 39
Here we go with the first Cuda Caper post of 2008! While there is no dramatic progress, a ton of little things got sorted out today.
First things first, I finally did something about the rear axle in my car. I scraped it, cleaned it, and gave it a quickie coat of satin black. Nothing fancy but hey...looks better than the 40 years of crap that built up on it....

Next up was my tach bracket. I finally got THAT sorted out and mounted. The base I fabbed up out of scrap metal from work. It mounts in place of the drivers side defroster vent and the wires are routed through the bracket and into the defroster opening. Clean & simple. A small rubber block will be installed towards the edge of the dash pad in case that monster tach decides on doing a little dance.

Yes... I sat there making engine noises.

I installed the mount I made for my MSD box. It's an aluminum base mounted on rubber isolators. I still have to wire it all up.


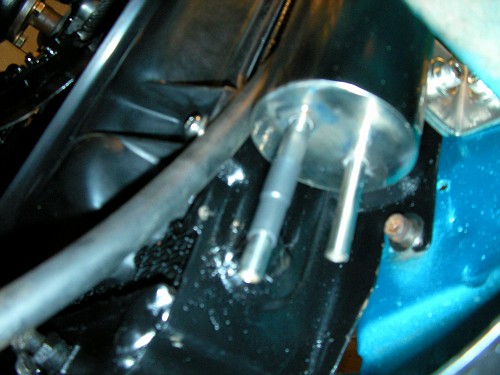
And just to add a bit of insulation from the headers, and provide some visual balance, I also fabbed up a heat shield for my master cylinder.

But I think I may have had too much spare time on my lunch hours..... I also fabbed up these little filler plates that go under the hood bumpers.
Am I getting too crazy here?


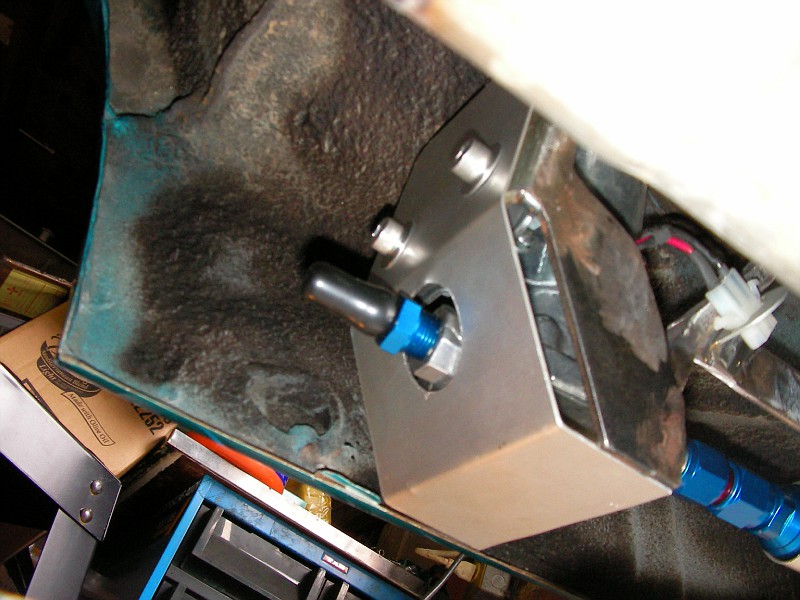
Speaking of crazy.... I finally mounted my fuel pump & filter. I welded up a mount and designed a shield to protect everything from debris being kicked back off of that right rear tire.

Mounted it looks like this....

I still have to finish undercoating the inside of the quarters....

And that was today's fun & games.... I still have to paint the bracket for the pump. I'll also finish up the shift linkage and starter wiring. I also have to paint the driveshaft and install the speedometer cable. After I bleed the brakes I can drop her back on her feet and finish up that $#@#$% headliner, pop in the glass and interior, fire her up, and go cruising.
Yeah... "just like that"!
Updates WILL come fast & hard now.... I want to enjoy this sucka ! :cheers:
First things first, I finally did something about the rear axle in my car. I scraped it, cleaned it, and gave it a quickie coat of satin black. Nothing fancy but hey...looks better than the 40 years of crap that built up on it....
Next up was my tach bracket. I finally got THAT sorted out and mounted. The base I fabbed up out of scrap metal from work. It mounts in place of the drivers side defroster vent and the wires are routed through the bracket and into the defroster opening. Clean & simple. A small rubber block will be installed towards the edge of the dash pad in case that monster tach decides on doing a little dance.
Yes... I sat there making engine noises.
I installed the mount I made for my MSD box. It's an aluminum base mounted on rubber isolators. I still have to wire it all up.
And just to add a bit of insulation from the headers, and provide some visual balance, I also fabbed up a heat shield for my master cylinder.
But I think I may have had too much spare time on my lunch hours..... I also fabbed up these little filler plates that go under the hood bumpers.
Am I getting too crazy here?
Speaking of crazy.... I finally mounted my fuel pump & filter. I welded up a mount and designed a shield to protect everything from debris being kicked back off of that right rear tire.
Mounted it looks like this....
I still have to finish undercoating the inside of the quarters....
And that was today's fun & games.... I still have to paint the bracket for the pump. I'll also finish up the shift linkage and starter wiring. I also have to paint the driveshaft and install the speedometer cable. After I bleed the brakes I can drop her back on her feet and finish up that $#@#$% headliner, pop in the glass and interior, fire her up, and go cruising.
Yeah... "just like that"!
Updates WILL come fast & hard now.... I want to enjoy this sucka ! :cheers:


