Hello everyone, it's Krazykuda here to show you how to rebuild a small block... This article is to help any newbies through rebuilding a small block Mopar LA engine, but may have a few tips that some of you seasoned builders may find useful... If you haven't ever built an engine, I will show you what you need to know to do it yourself...
The goal of this series is to show what you can do at home in your own garage... Go at your own pace and ability and then take it to someone knowledgeable for what you are not capable of doing yourself or don't have the proper equipment/tools for...
I encourage you to keep trying different things that may be out of your comfort zone... You can only get better by trying to go that next step... Besides if you make a mistake, you can learn from it whether you are able to fix it yourself afterwards by studying up on the internet or take it to someone and pay them to fix it... I have made many mistakes in my past to get to where I'm at today and have always learned from them...
Keep checking back in from time to time as this is a work in progress and I plan to keep updating it as I build more engines and can show you more variations...
I am going to break this into sections that you can follow along with and make sense to do in 'stages' when you build... Plus you can then jump to the section that you are working on to help keep from sorting through one very long thread to find what part that you are working on when you are doing it....
*************************************************************************
Background:
I have been rebuilding small blocks for almost 40 years now and have seen a few variations of the front of the engine for the timing chain oiling and will try to show the different ways... I started building engines when I was 13 years old and have been doing all of my own engines since... I used to drive them daily to get to work and back and wanted durability and reliability in my engines... I had one engine in particular that I rebuilt that had 60,000 original miles and I had it in three different cars and refreshed it a few times along the way to keep it as efficient as possible... I drove that engine to 500,000 miles after two refreshes...
Besides building my own daily driver engines, I was an engineer at an engine factory for 9 years and was in charge of an engine assembly line, two block lines, three head lines, and the head assembly line... I learned some good tips on building engines while I was there and will pass them along to you...
I am a perfectionist and try to make it the best that I can... You can do it right the first time, or do it over later when it breaks... I prefer to do it right the first time, because it's my @ss that will be walking if it breaks down....
*************************************************************************
My youngest son and I are building a 360 to swap into his 68 Valiant 4 door, so I am using that as my main topic for this thread... Don't be surprised if I use some other engines as examples to show other variations or more examples... I have many engines laying around in different stages of assembly to refer to...
In this section we are going to go through prepping the block before assembly... For this engine, we are starting with a good running engine that I bought from another member of the forum here many years ago... It is not damaged or need any particular repairs, but I like to refresh it and make sure everything is good and up to my standards (I'm picky)... This way if anything goes wrong, it's all on me and I can't blame anybody else...
*************************************************************************
*** Important Note *** Sometimes things may not go right and you will run into a snag/road block... Do not get in a hurry to finish and take short cuts that may compromise your build...
Step back, take a break, and think about it for a while, or seek help from other experienced people or professionals to overcome the problem... Do it right and don't take any unnecessary chances that may compromise the integrity of your build...
If you don't fix the problem correctly, it may come back to haunt you and cost even more time and money than if you took the time to think about it and research it to fix the problem correctly...
This has been a public service announcement from krazykuda....
*************************************************************************
Engine ID:
You can decipher this information using my how to ID a small block thread:
How to ID a Small Block Engine Block:
First you start out with a torn down bare block... You will want to look at the markings on the block to see what you are working with... For most small blocks, they cast the engine size in the block just after the casting number on the left/driver's side of the block...

Here I have circled the information that you need to look at:

Next you want to see what year the engine is... To find that look on the passenger side of the block here to see the casting date and shift that the block was cast on at the casting foundry....

Here is the information in the circles:

From this information we can say that this is a 360 block cast on the day shift of 4/27/72...
Next you want to see the engine factory information that is stamped on the front of the block just under the left (driver's) side head... In some cases the stamps are very light/faint and it's hard to see or read them, but try your best... This case is hard to see...


Here's one from a 340 that I am also working on, it's are a little better, but still difficult to read...


The engine factory number on this 340 is:
GM340P 3496 0046
This translates to:
G = 1971 Model Year
M = Mound Road Engine Assembly Plant
340 = 340 Cubic Inch Engine
P = Premium Fuel as 1971 340's had 10.5 compression
3496 = Julian Date that the engine was assembled on... In this case it was 3496 - 3260 = 236th day of production....
0045 = This was the 45th engine off the line that day...
Here's the chart to decipher the engine factory stamping number:

The last bit of information that you will want to see is the VIN number stamped on the passenger side of the block near the motor mount on the pad just above the oil pan... They started this in 1968 and it may be just the last 8 digits of the VIN number that is on the dash pad, or sometimes they stamped the whole VIN number... This can be used to see if it's the original number's matching engine for your car and also can tell you what year, assembly plant, and the last 6 sequence numbers of the car that the block originally came out of... This will match the full VIN number from the dash, or at least the last 8 digits...


This 360 block reads:
2F260312
This translates to:
2 = 1972 Model Year
F = Newark Assembly Plant
260312 = The last 6 digits in the VIN number on the Dashboard
So this 360 came in a 1972 Model Year vehicle that was assembled in the Newark Assembly Plant...
Here is a chart to decipher the VIN number:

*************************************************************************
Teardown:
Freeze plugs:
Now it's time to start removing the freeze plugs and oil galley plugs so you can bring it to the local do-it-yourself car wash and pressure wash the block and all of it's passages...
There are three freeze plugs and a drain plug on each side of the block, two freeze plugs on the front, and two freeze plugs on the back with one other plug for the cam tunnel that you will want to remove...
Here's the right (passenger) side (the one with the oil filter)...


Here's the left (driver's) side:


Here's the front of the block:


Here's the back of the block:


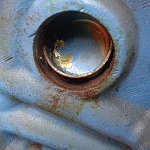
To remove the cup plugs use a large punch about 1/4" - 5/16" diameter and hammer it on one side of the plug to **** the plug... Don't worry if the plug falls into the water jacket, you can fish it out with a screwdriver and some pliers/vise grips... I like to use vise grips with the top of the tool to the block and grab the lip of the cup plug and use the top of the vise grips as a pivot to help pry the plug out of the hole...
Here's the punch end...

Now go to an edge of the cup plug and hammer it so it tilts/cocks sideways...

This one fell into the water jacket, so we will fish it out... First get it aligned with the hole using the punch or a screwdriver...

Then grab the lip of it with the vise grips with the top of the grips toward the block to use for leverage....

Pry it out as much as you can...
Now if it won't come out all the way and you run out of "leverage" you can use a flat blade screwdriver behind the vise grips to help give more leverage until you get the cup plug removed...

Here we got it out...

You can see some of the rust that came out with this one.... That is what we are trying to clean out before washing and then wash it out real good at a pressure car wash to get the rest out....

*************************************************************************
Oil Galley Plugs:
If you are going to do a complete build, you will want to remove most of the oil galley plugs... There are two on the front of the engine under the camshaft thrust plate that are press in... They are already removed on this block...


Next there is one under the oil filter plate that is a pipe thread...
The pipe thread plugs may be difficult to remove as they are pretty tight, you may need to use a propane torch to heat up the area around the plug to expand the metal some to help loosen it to get it out... I like my trigger start propane torch as it's easy to use and light...
This is a square drive plug and you will need a 3/8" ratchet extension to remove them...


Here's my trusty trigger start propane torch:


There are three pipe plugs in the back of the block and one hidden on the back of the driver's side lifter galley just inside the distributor hole... You also may need propane to heat them up to get them loose...
Here's the three in the back of the block... Again they should use the 3/8" extension on a ratchet to remove...


Here's the hidden one in the back of the left side lifter galley under the distributor hole... You need to remove the plug on the back of the block to access this one...
Also a 3/8" extension to remove...


There is one last hidden one under the rear main bearing cap... It's about 2 1/4 inches down and I would not recommend removing it if you are just doing a refresh and not a complete rebuild as it may be difficult to remove and install a new one to the proper depth...


*************************************************************************
Remove any flash:
Another step that I like to do is to remove any flash from the oil drain back holes in the lifter galley to help the oil drain back into the oil pan better... I use my die grinder and Snap-On carbide burr set to remove the flash...
Here's my die grinder and carbide burr set...


Here's the holes to focus on for the driver's side of the block...


Here's the holes to focus on for the passenger side of the block...


I also like to grind any other casting flash off that I can find, like inside the holes shown here and any flash on the outside of the block also... It's good to remove it to keep stress concentrations down and minimize the chance of cracks... The sharp edges are stress points that make cracks easier, so grinding them off reduces the chance of them causing cracks under stress...


*************************************************************************
Hone the cylinders:
For this build since I have a good block and it doesn't need any machining/boring, I will give it a quick hone to knock any ridge off the cylinders at the top and put a fresh clean surface finish on the bores... Doing this before the wash will help get any chips and dust out when you pressure wash the block....
I use this flex hone from NAPA part number 2488 that is made for a 4 1/8" bore... You want the hone to be slightly larger than your bore so it cleans the walls up all sides evenly...


Here's the cylinder wall with a little surface rust from sitting in the garage for a while...

Here's the hone on the drill... Stroke it up and down once or twice per second for about 20 - 45 seconds to get the walls cleaned up and a cross hatch in the bores... It's not too difficult once you get the hang of it...


Here's the finished cylinder walls with a nice clean surface for the rings...


Here's a YouTube video on how to use a flex hone...
*************************************************************************
Remove the cam bearings:
Now remove the cam bearings with a cam bearing removal/installation tool... I picked this one up from a member of FABO a while back and have started learning how to use it...

Here's a YouTube video on how to remove the camshaft bearings with the bearing tool...
If you are not comfortable removing the cam bearings or don't have the proper equipment, have a local machine shop do that for you...
*************************************************************************
Wash the block:
Ok, now with all of the freeze plugs, oil galley plugs, drain plugs, and oil filter plate removed, flash deburred, cam bearings removed, and block honed, its time to clean the block... Scrape any scale and grime out of the water jackets with a long flat screw driver to loosen them up making sure not to pry and put too much pressure on the outside of the cylinder bore walls and damage them... I recommend going in through the plug holes on the front and rear of the block to access the water jacket...
Also, if you haven't cleaned up all the gasket sealing surfaces, take a razor blade scraper and scrape them clean and then use a wire wheel on a drill to get any stubborn material off... I have used wire wheels on all mating gasket surfaces and it cleans them up very well...
Here is the razor blade scraper that I like best.... I like the notches for the blade to lock into place and not slip while you are scraping...

I like these cheap Harbor Freight wire wheels... The assortment is good and then I like to also use a 4" wire wheel for most flat sealing surfaces like head gasket, timing chain cover gasket, oil pan gasket, etc... The 4" wheel doesn't come in the assortment so you have to buy it separately...


You can use your garden hose, pressure washer if you have one, or take it to a local do-it-yourself car wash and blast it real good making sure to get all of the dirt and grime off... Wear some clothes that you don't mind getting grimy as there will be some spray back that will get you dirty...

Spray all of the water jacket holes, cam tunnel, and also get the oil passages that you can reach with the wand...


You can see the spray through the water jacket on the other side of the block...

Here we are cleaning the oil passages from the cam tunnel to the crank mains... See how the water is coming out the oil hole in the main bearing support... That's cleaning it out real good and blowing anything out of those passages...

*************************************************************************
Dry and protect the block:
When you are done washing the block, take it home immediately and blow it all dry with compressed air from an air compressor making sure to get the whole block and all of the passages with the pressurized air nozzle.... Then use a clean dry rag to dry any other water off...

After drying the block with compressed air and a clean rag, spray it with a coat of WD-40 to help keep it from rusting...

*************************************************************************
Congratulations, your block is now stripped and cleaned and now ready to assemble... Now go on to part 2 for block reassembly....
How to Rebuild a Small Block Part 2: Cam Bearing Install
The goal of this series is to show what you can do at home in your own garage... Go at your own pace and ability and then take it to someone knowledgeable for what you are not capable of doing yourself or don't have the proper equipment/tools for...
I encourage you to keep trying different things that may be out of your comfort zone... You can only get better by trying to go that next step... Besides if you make a mistake, you can learn from it whether you are able to fix it yourself afterwards by studying up on the internet or take it to someone and pay them to fix it... I have made many mistakes in my past to get to where I'm at today and have always learned from them...
Keep checking back in from time to time as this is a work in progress and I plan to keep updating it as I build more engines and can show you more variations...
I am going to break this into sections that you can follow along with and make sense to do in 'stages' when you build... Plus you can then jump to the section that you are working on to help keep from sorting through one very long thread to find what part that you are working on when you are doing it....
*************************************************************************
Background:
I have been rebuilding small blocks for almost 40 years now and have seen a few variations of the front of the engine for the timing chain oiling and will try to show the different ways... I started building engines when I was 13 years old and have been doing all of my own engines since... I used to drive them daily to get to work and back and wanted durability and reliability in my engines... I had one engine in particular that I rebuilt that had 60,000 original miles and I had it in three different cars and refreshed it a few times along the way to keep it as efficient as possible... I drove that engine to 500,000 miles after two refreshes...
Besides building my own daily driver engines, I was an engineer at an engine factory for 9 years and was in charge of an engine assembly line, two block lines, three head lines, and the head assembly line... I learned some good tips on building engines while I was there and will pass them along to you...
I am a perfectionist and try to make it the best that I can... You can do it right the first time, or do it over later when it breaks... I prefer to do it right the first time, because it's my @ss that will be walking if it breaks down....
*************************************************************************
My youngest son and I are building a 360 to swap into his 68 Valiant 4 door, so I am using that as my main topic for this thread... Don't be surprised if I use some other engines as examples to show other variations or more examples... I have many engines laying around in different stages of assembly to refer to...
In this section we are going to go through prepping the block before assembly... For this engine, we are starting with a good running engine that I bought from another member of the forum here many years ago... It is not damaged or need any particular repairs, but I like to refresh it and make sure everything is good and up to my standards (I'm picky)... This way if anything goes wrong, it's all on me and I can't blame anybody else...
*************************************************************************
*** Important Note *** Sometimes things may not go right and you will run into a snag/road block... Do not get in a hurry to finish and take short cuts that may compromise your build...
Step back, take a break, and think about it for a while, or seek help from other experienced people or professionals to overcome the problem... Do it right and don't take any unnecessary chances that may compromise the integrity of your build...
If you don't fix the problem correctly, it may come back to haunt you and cost even more time and money than if you took the time to think about it and research it to fix the problem correctly...
This has been a public service announcement from krazykuda....
*************************************************************************
Engine ID:
You can decipher this information using my how to ID a small block thread:
How to ID a Small Block Engine Block:
First you start out with a torn down bare block... You will want to look at the markings on the block to see what you are working with... For most small blocks, they cast the engine size in the block just after the casting number on the left/driver's side of the block...
Here I have circled the information that you need to look at:
Next you want to see what year the engine is... To find that look on the passenger side of the block here to see the casting date and shift that the block was cast on at the casting foundry....
Here is the information in the circles:
From this information we can say that this is a 360 block cast on the day shift of 4/27/72...
Next you want to see the engine factory information that is stamped on the front of the block just under the left (driver's) side head... In some cases the stamps are very light/faint and it's hard to see or read them, but try your best... This case is hard to see...
Here's one from a 340 that I am also working on, it's are a little better, but still difficult to read...
The engine factory number on this 340 is:
GM340P 3496 0046
This translates to:
G = 1971 Model Year
M = Mound Road Engine Assembly Plant
340 = 340 Cubic Inch Engine
P = Premium Fuel as 1971 340's had 10.5 compression
3496 = Julian Date that the engine was assembled on... In this case it was 3496 - 3260 = 236th day of production....
0045 = This was the 45th engine off the line that day...
Here's the chart to decipher the engine factory stamping number:
The last bit of information that you will want to see is the VIN number stamped on the passenger side of the block near the motor mount on the pad just above the oil pan... They started this in 1968 and it may be just the last 8 digits of the VIN number that is on the dash pad, or sometimes they stamped the whole VIN number... This can be used to see if it's the original number's matching engine for your car and also can tell you what year, assembly plant, and the last 6 sequence numbers of the car that the block originally came out of... This will match the full VIN number from the dash, or at least the last 8 digits...
This 360 block reads:
2F260312
This translates to:
2 = 1972 Model Year
F = Newark Assembly Plant
260312 = The last 6 digits in the VIN number on the Dashboard
So this 360 came in a 1972 Model Year vehicle that was assembled in the Newark Assembly Plant...
Here is a chart to decipher the VIN number:
*************************************************************************
Teardown:
Freeze plugs:
Now it's time to start removing the freeze plugs and oil galley plugs so you can bring it to the local do-it-yourself car wash and pressure wash the block and all of it's passages...
There are three freeze plugs and a drain plug on each side of the block, two freeze plugs on the front, and two freeze plugs on the back with one other plug for the cam tunnel that you will want to remove...
Here's the right (passenger) side (the one with the oil filter)...
Here's the left (driver's) side:
Here's the front of the block:
Here's the back of the block:
To remove the cup plugs use a large punch about 1/4" - 5/16" diameter and hammer it on one side of the plug to **** the plug... Don't worry if the plug falls into the water jacket, you can fish it out with a screwdriver and some pliers/vise grips... I like to use vise grips with the top of the tool to the block and grab the lip of the cup plug and use the top of the vise grips as a pivot to help pry the plug out of the hole...
Here's the punch end...
Now go to an edge of the cup plug and hammer it so it tilts/cocks sideways...
This one fell into the water jacket, so we will fish it out... First get it aligned with the hole using the punch or a screwdriver...
Then grab the lip of it with the vise grips with the top of the grips toward the block to use for leverage....
Pry it out as much as you can...
Now if it won't come out all the way and you run out of "leverage" you can use a flat blade screwdriver behind the vise grips to help give more leverage until you get the cup plug removed...
Here we got it out...
You can see some of the rust that came out with this one.... That is what we are trying to clean out before washing and then wash it out real good at a pressure car wash to get the rest out....
*************************************************************************
Oil Galley Plugs:
If you are going to do a complete build, you will want to remove most of the oil galley plugs... There are two on the front of the engine under the camshaft thrust plate that are press in... They are already removed on this block...
Next there is one under the oil filter plate that is a pipe thread...
The pipe thread plugs may be difficult to remove as they are pretty tight, you may need to use a propane torch to heat up the area around the plug to expand the metal some to help loosen it to get it out... I like my trigger start propane torch as it's easy to use and light...
This is a square drive plug and you will need a 3/8" ratchet extension to remove them...
Here's my trusty trigger start propane torch:
There are three pipe plugs in the back of the block and one hidden on the back of the driver's side lifter galley just inside the distributor hole... You also may need propane to heat them up to get them loose...
Here's the three in the back of the block... Again they should use the 3/8" extension on a ratchet to remove...
Here's the hidden one in the back of the left side lifter galley under the distributor hole... You need to remove the plug on the back of the block to access this one...
Also a 3/8" extension to remove...
There is one last hidden one under the rear main bearing cap... It's about 2 1/4 inches down and I would not recommend removing it if you are just doing a refresh and not a complete rebuild as it may be difficult to remove and install a new one to the proper depth...
*************************************************************************
Remove any flash:
Another step that I like to do is to remove any flash from the oil drain back holes in the lifter galley to help the oil drain back into the oil pan better... I use my die grinder and Snap-On carbide burr set to remove the flash...
Here's my die grinder and carbide burr set...
Here's the holes to focus on for the driver's side of the block...
Here's the holes to focus on for the passenger side of the block...
I also like to grind any other casting flash off that I can find, like inside the holes shown here and any flash on the outside of the block also... It's good to remove it to keep stress concentrations down and minimize the chance of cracks... The sharp edges are stress points that make cracks easier, so grinding them off reduces the chance of them causing cracks under stress...
*************************************************************************
Hone the cylinders:
For this build since I have a good block and it doesn't need any machining/boring, I will give it a quick hone to knock any ridge off the cylinders at the top and put a fresh clean surface finish on the bores... Doing this before the wash will help get any chips and dust out when you pressure wash the block....
I use this flex hone from NAPA part number 2488 that is made for a 4 1/8" bore... You want the hone to be slightly larger than your bore so it cleans the walls up all sides evenly...
Here's the cylinder wall with a little surface rust from sitting in the garage for a while...
Here's the hone on the drill... Stroke it up and down once or twice per second for about 20 - 45 seconds to get the walls cleaned up and a cross hatch in the bores... It's not too difficult once you get the hang of it...
Here's the finished cylinder walls with a nice clean surface for the rings...
Here's a YouTube video on how to use a flex hone...
*************************************************************************
Remove the cam bearings:
Now remove the cam bearings with a cam bearing removal/installation tool... I picked this one up from a member of FABO a while back and have started learning how to use it...
Here's a YouTube video on how to remove the camshaft bearings with the bearing tool...
If you are not comfortable removing the cam bearings or don't have the proper equipment, have a local machine shop do that for you...
*************************************************************************
Wash the block:
Ok, now with all of the freeze plugs, oil galley plugs, drain plugs, and oil filter plate removed, flash deburred, cam bearings removed, and block honed, its time to clean the block... Scrape any scale and grime out of the water jackets with a long flat screw driver to loosen them up making sure not to pry and put too much pressure on the outside of the cylinder bore walls and damage them... I recommend going in through the plug holes on the front and rear of the block to access the water jacket...
Also, if you haven't cleaned up all the gasket sealing surfaces, take a razor blade scraper and scrape them clean and then use a wire wheel on a drill to get any stubborn material off... I have used wire wheels on all mating gasket surfaces and it cleans them up very well...
Here is the razor blade scraper that I like best.... I like the notches for the blade to lock into place and not slip while you are scraping...
I like these cheap Harbor Freight wire wheels... The assortment is good and then I like to also use a 4" wire wheel for most flat sealing surfaces like head gasket, timing chain cover gasket, oil pan gasket, etc... The 4" wheel doesn't come in the assortment so you have to buy it separately...
You can use your garden hose, pressure washer if you have one, or take it to a local do-it-yourself car wash and blast it real good making sure to get all of the dirt and grime off... Wear some clothes that you don't mind getting grimy as there will be some spray back that will get you dirty...
Spray all of the water jacket holes, cam tunnel, and also get the oil passages that you can reach with the wand...
You can see the spray through the water jacket on the other side of the block...
Here we are cleaning the oil passages from the cam tunnel to the crank mains... See how the water is coming out the oil hole in the main bearing support... That's cleaning it out real good and blowing anything out of those passages...
*************************************************************************
Dry and protect the block:
When you are done washing the block, take it home immediately and blow it all dry with compressed air from an air compressor making sure to get the whole block and all of the passages with the pressurized air nozzle.... Then use a clean dry rag to dry any other water off...
After drying the block with compressed air and a clean rag, spray it with a coat of WD-40 to help keep it from rusting...
*************************************************************************
Congratulations, your block is now stripped and cleaned and now ready to assemble... Now go on to part 2 for block reassembly....
How to Rebuild a Small Block Part 2: Cam Bearing Install