67 Dart Rear Brake Help

-

Grinder

Banned
Joined
Nov 11, 2005
Messages
590
Reaction score
2
Location
Round Rock,TX
Hey guys, my 67 Dart with 9 in. drums in all corners,decided to blow the rear brake hose.I bought the new hose and am looking for advise on how to bleed the rear brakes? Im low on cash and my bro will be helping me,so we will be doing it the old pump pump bleed way. I have never done this on an old Mopar before,any suggestions?
 
Fill master cylinder

open bleeder screw on passenger side. take a piece of vaccum line and push it to the problem of a glass jar. the jar will start filling with fluid. Once you stop seeing bubbles coming out of the end, close the bleeder and move to the other side. Check the fluid level often. Once the driver's side is done, check the pedal feel. If it still feels squishy, you'll have to repeat the whole process.
 
Thanks! Any pics of what the bleeder screw looks like on these drums? I am used to dealing with Calipers,and am not familiar with the drums. The 67 has a center rubber brake hose,and then it splits into two metal lines going to each rear drum.I can see a little zerk fitting,is this what I run the vaccum line from to the jar? Sorry for the dumb questions,just want to make sure I am doing this right!
 
On your rear drum back plate it is the zerk fitting looking thing right overtop of your brake line. Your looking at the right thing. Don't worry it's not a dumb question. Everybody is happy to help.
 
Thanks! Any pics of what the bleeder screw looks like on these drums? I am used to dealing with Calipers,and am not familiar with the drums. The 67 has a center rubber brake hose,and then it splits into two metal lines going to each rear drum.I can see a little zerk fitting,is this what I run the vaccum line from to the jar? Sorry for the dumb questions,just want to make sure I am doing this right!
yup on each drum little zerk , becaureful they strip real easy
after 40+ years and maynot even bleed if they are rusted from moisture in the barke fluid~
 
Yes, that "zerk fitting" is the bleeder screw. Use some penetrating oil and a six point deep socket to break it loose if you don't have a bleeder wrench.

Another bleeding method is to pump up the brakes and keep pressure on it while another person opens the bleeder til air/fluid quits coming out, then tighten bleeder back up. Repeat as necessary until fluid only comes out, no more air. It's a little messier, but it has always worked for us.
 
Thanks so much everyone for your help! The zerk looks clean,and this is a low mileage So.Cal car,so I am hoping that everything goes smoothly.Once again you guys rock:cheers:
 
If you got $30 Bucks get a vacuum bleeder kit... It sucks out of the bleeder instead of pumping into a jar. I have had faster and less frustration this way. If you like modifying and working on cars just go get one.

my .02

Otherwise the "Pump em up & Hold em" with two guys works allright... Always start with the longest line they say... (IE Furthest from master. Pass rear on A-bodies)
 
I know about this tool:-D But I am out of work as of late,and dont have the 30 bux to spend,especially when my brothers right leg is free:toothy10:
 
Here is a pic of a cheapo bleeder kit in action. Using this type is just like using a can, bucket or glass jar. The only difference is that this one has a cap to hook the line to along with a vent hole. Very simple set-up.
aIMG_0099zzz.jpg

The tube attachs to the lid with another tube attached to the same point on the underside of teh lid to keep it submerged.
The other port is just a vent hole, but you can hook another tube up to the vent and then any fluid that is too much for the cup can flow into another cup.....
The old pump and open the bleeder method is probably still the best, except for injecting it in from the brake.:toothy10:

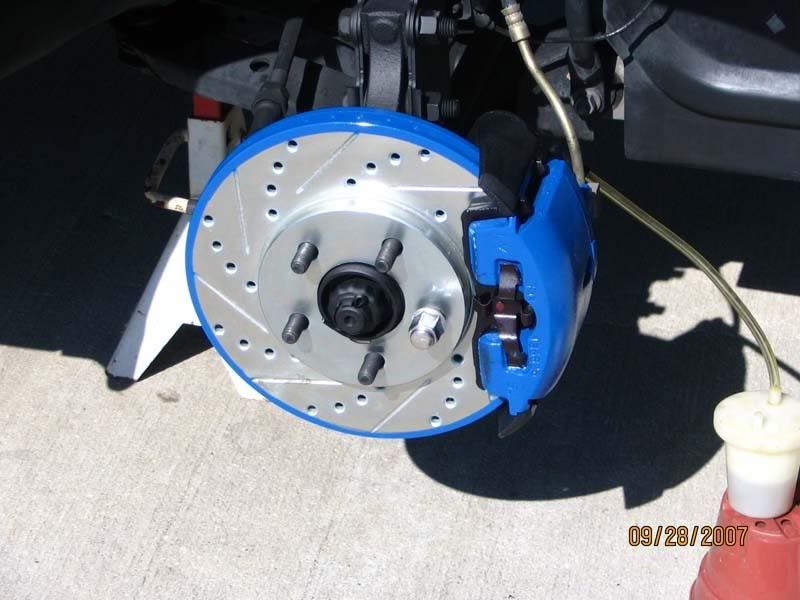
Incredible Brake paint job! That is redic...
 
The rotors are from R1 Concepts. They are the E-line drilled and slotted rotors. They come zinc plated and that is the silver you see. I painted the rest of the non-wear surfaces the same color I painted the calipers to keep them from rusting. I live near the ocean so rust is a major issue. The Duplicolor caliper paint works great. A nice feature of R1's rotors is that the champfer on the holes in the scrub area have a slight burr sticking up when you get them. The pads wear in and smooth the rotors off real quick and they stop great. All the flat black you see is Rustoleum Rust Reformer. The wheels on my 04 Neon SXT are star shaped so the paint job on the rotors, caliper and drums really improve the overall look.

IMG_0101.jpg

IMG_0098.jpg

IMG_0375.jpg

IMG_0376.jpg

IMG_0374.jpg


Madminimum, the word is spelled ridiculous. I saw you were having trouble with that.:thebirdm:
 
She is back on the road! Thanks again for all the tips,it was a quick and easy job.
Good job now Grinder now lets move on that HEMI install!
That brake paint isn't my thing but took some attention to detail
and adds a nice custom toutch {IMO}
Needs big Fat *** Tires though..but Im bias I put BFAT's on everything.
 
Tell me about it.Me and the wife have been watching a lot of 68 SS/AA Dart vids on the tube.A HEMI would be one sick daily driver!
 
-
Back
Top