You are using an out of date browser. It may not display this or other websites correctly.
You should upgrade or use an alternative browser.
You should upgrade or use an alternative browser.
72 duster Build progress
- Thread starter Dusterdude72
- Start date
-
Dusterdude72
IN MOPAR MUSCLE MAGAZINE
Thanks guys and yes I will be in the Young guns section
Dusterdude72
IN MOPAR MUSCLE MAGAZINE
Well.....lately I have been going at the project alone and it has been very overwhelming along side money issues and normal every day stuff and I havent been working on the duster as much as I was before.
Plus summer is winding down into fall and I know just after fall is winter which means the project will slow WAY down most likely because I hate working in the cold lol.
so I have been depressed alot about things and havent wanted to do a hole lot......I GET ALOT OF STARING AT THE DUSTER DONE!! LOLOLOL
BUT I think tonight things changed a bit.
I was sitting out in my garage and a feeling just came over me ....not sure how to describe it but I pretty much told myself to bust as and get everything but paint and a bit of body work done by the end of september for the most part.
alot of it is more labor than cash ....so ill see what I can accomplish .
I still need to buy a windshield, head liner , speedo gear......and thats basically the things I would LIKE to have right away but the headliner is not a MUST right now.....I need a bunch of odds and ends,tail panel , cd player , odds and ends for body work, windshield molding clips and a ton of other stuff but ill see what I can make happen WHEN I can make it happen.
I am hoping to make a bunch of sticker sales so I can safe up and get some of the things I need but most of my sales are here on fabo and only a few here and there.
im determined to get what I can done with my time and my budget....wish me luck guys
Dusterdude72
IN MOPAR MUSCLE MAGAZINE
quick little update.
got bored tonight and my wife got out of work early so I had some extra time to work on the duster.
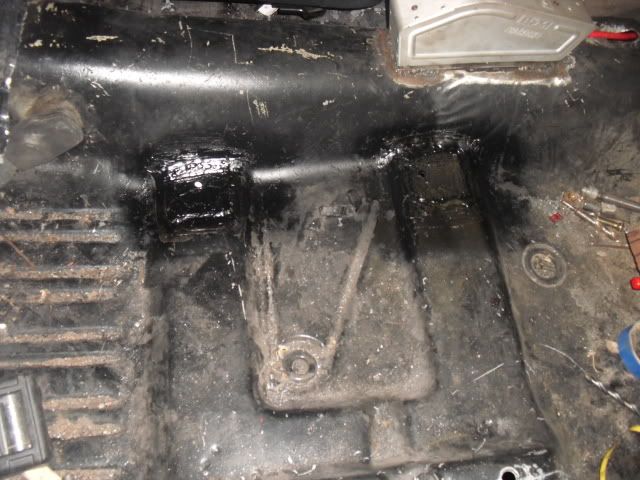
I went out and painted the floor where I welded in my reinforcement plates and sealed it.
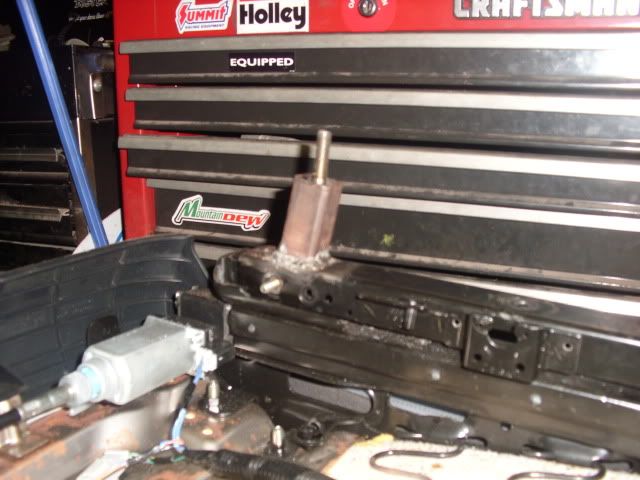
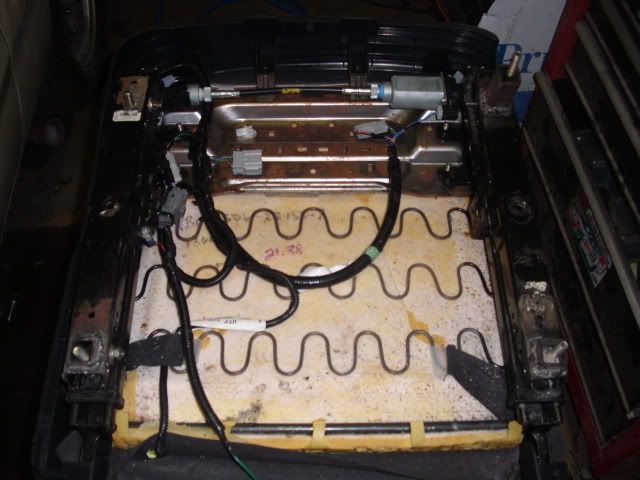
I also took some pictures of the risers I made for my seat tracks and after I painted the tracks and risers I made and a picture of the wiring (SIMPLIFIED rather than how they came factory with wires everywhere) you can see how they looked originally a page or two back in this thread.
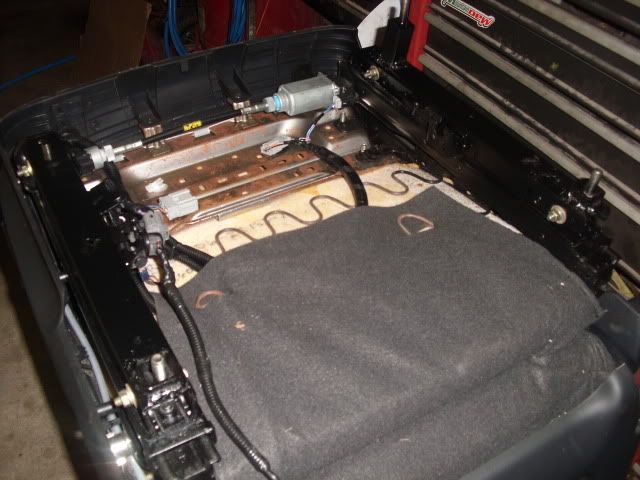
ONE SEAT DOWN!!!!
I already started on the other seat but it was already 6 am so I decided to call it a night but i will get back on it soon and get it finished.
heres some pictures of the progress...let me know what you guys think!


got bored tonight and my wife got out of work early so I had some extra time to work on the duster.
I went out and painted the floor where I welded in my reinforcement plates and sealed it.
I also took some pictures of the risers I made for my seat tracks and after I painted the tracks and risers I made and a picture of the wiring (SIMPLIFIED rather than how they came factory with wires everywhere) you can see how they looked originally a page or two back in this thread.
ONE SEAT DOWN!!!!
I already started on the other seat but it was already 6 am so I decided to call it a night but i will get back on it soon and get it finished.
heres some pictures of the progress...let me know what you guys think!
Dusterdude72
IN MOPAR MUSCLE MAGAZINE
Just did some more work on getting the other seat done.
I got all the old seat mounting brackets air hammered off (had to drill out all the spot welds and chisel off the pressed in riveted slugs that hold the brackets on .....WHAT FUN LOL).
I had to air hammer all the nuts and bolts off because they were some sort of specialty head that I had never seen before that they used at the factory and I wasnt having much luck trying to smash a 12 point socket on them lol.
then I replaced them with standard grade 8 bolts.
measured everything up and drilled all my new mounting bolt holes.
now all I have left to do is to cut my steel for my risers and weld them to the tracks and weld my two plates into the drivers floor pan where the inner seat bolts mount for added strength.
should be all done with the seats soon!
Dusterdude72
IN MOPAR MUSCLE MAGAZINE
I stayed up 27 hours straight yesterday so I could try to get some thing accomplished and I managed to finish welding in seat track brackets and reinforcement plates to the floor and painting the tracks and plates and sealing the plates and drilling holes and bolting the seats in and wiring the other seat and a few other things.
so....MY SEATS ARE DONE!!!! other than I have to make a couple spacers for my drivers side seat on the inner bolt holes because the seat tilts SLIGHTLY ....I made all my seat risers to match the passenger side and the drivers side angles slightly different than the passenger side....but no big deal.
NOW, I can focus on painting more interior doors and sail panels and some other odds and ends and my interior can go back together!.
after thats done I can PRETTY much focus on just the body work.
I think I can have almost everything but the body work done by the end of september, atleast thats what I am hoping for.
P.S. ,sorry I forgot to take pictures of the seat risers and stuff but it basically looks the same as the other side lol
PanGasket
has cork sides
looks real comfy!
Your Duster looks really good! Keep at it even if it's just a little at a time it will all pay off in the end!
My Duster sat untouched for almost 2 years and now it's almost done, just got my hood back last night which i will be bolting on today!
Heading out to the garage to bolt it on now! :snakeman:
My Duster sat untouched for almost 2 years and now it's almost done, just got my hood back last night which i will be bolting on today!
Heading out to the garage to bolt it on now! :snakeman:
The seats look good in there. Nice job on the fabrication work to get them to fit.
daredevil
Well-Known Member
Great progress. One thing is bothering me though. With the build date on your motor it probably came out of a 67 coronet. All the 66 nets i,ve had with 318s were poly style.Not 100 % positive but dont think la nets came out till 67
Dusterdude72
IN MOPAR MUSCLE MAGAZINE
Your Duster looks really good! Keep at it even if it's just a little at a time it will all pay off in the end!
My Duster sat untouched for almost 2 years and now it's almost done, just got my hood back last night which i will be bolting on today!
Heading out to the garage to bolt it on now! :snakeman:
I have been keeping tabs on your duster thread! it sure has came along great!
And thanks for the words of encouragement !
Dusterdude72
IN MOPAR MUSCLE MAGAZINE
Great progress. One thing is bothering me though. With the build date on your motor it probably came out of a 67 coronet. All the 66 nets i,ve had with 318s were poly style.Not 100 % positive but dont think la nets came out till 67
Your right!
it was a typo I made at the time and realized it much later but I can't edit my original post since its so old and I never bothered correcting it as I had hoped most of you would understand where I was coming from lol.
I believe the block year was a dated as a late 66 making it a 67 (if I remember correct) but was from a 67 coronet.
Dusterdude72
IN MOPAR MUSCLE MAGAZINE
looks real comfy!
Yes they are very comfy and feel like they will keep you centered in your seat when taking corners.
The seats look good in there. Nice job on the fabrication work to get them to fit.
THANKS, the fabrication wasnt "hard" to do ....it was pretty straight forward stuff.....just not easy on the back, I had to take each seat in and out of the car a good half a dozen times a piece and there no light weights being all power with side air bags on each side and all the other BS that were in them (cliped the wires for air bags and heated seats and memory though because I didnt need all that stuff). But I figured the couple extra pounds was worth the power option and luxury of leather PLUS I only paid $80.00 for the set! so I couldnt pass it up lol.
Dusterdude72
IN MOPAR MUSCLE MAGAZINE
well, today I think I am going to mask my interior off and clean up my ceiling and spray some sound deadener on it which will reduce some heat and noise AND will also keep it looking semi clean until I can round up the cash for headliner ( I think I am going to use my gift certificate I won from Mopar Muscle Magazine at yearone to buy my headliner though) ....also I will be cutting and gluing sections of sound deadening material to the ceiling prior to installing a headliner (as I am doing the same to the floors).
THEN, once all that is dried I will finish up the minor sanding I have to do to my doors and sail panels and what not and squirt them with my gloss black and THEN I can start putting my interior back together! (speaker wires,seat wires,carpet,door panels,door emblems, the hole shabang.
so keep your eyes peeled because in the next week or so i should be putting the interior all back together!
Dusterdude72
IN MOPAR MUSCLE MAGAZINE
WHOAAA , Just realized my thread has passed the 10,000 mark for views!!!! 10,322 I believe.
GO ME!
thanks guys :cheers:
GO ME!
thanks guys :cheers:
Dusterdude72
IN MOPAR MUSCLE MAGAZINE
Which headliner are you gonna put in the cardboard or the older perferated material type?
The factory one I took out was cardboard and was junk, I see they remake the hardboard liners for these dusters in abs plastic but allcriptions say "uncovered" I don't know if that means you get just a textured black plastic headliner that is not covered in any sort of material or what? I am not sure exactly what I will be needing and what route I should take? Any suggestions?
highwaystar
Well-Known Member
Looks good Duster Dude.
Dusterdude72
IN MOPAR MUSCLE MAGAZINE
Forgot to update you guys on some of the stuff I did to the duster the other day (took a break from working on it yesterday to try to catch up on my sleep) ....didnt do a hole lot.....put the hood back on, masked all the interior off and sound deadened the ceiling and than unmasked it basically.
I MIGHT do some sanding on the doors today and MAYBE paint them....depends on how much I feel like doing lol.
the one pictures is just after I started unmasking the interior, the other pic is of the ceiling done, the other is a quick picture with the hood on and the other picture is of what a quick tap of the gas does in the ole girl LOL
Dusterdude72
IN MOPAR MUSCLE MAGAZINE
P.S. don't mind the ugly tail panel, I need a new one....just don't have the extra cash for one right now and I was working on getting on from a member but they havent been on fabo in awhile so it looks like thats out the door.
and don't mind the exhaust hanging down, none of it is bolted together right now....just sitting there for a test fit.
and don't mind the exhaust hanging down, none of it is bolted together right now....just sitting there for a test fit.
frank.puglia
Frank Demon
Looking great! Nice work!
Dusterdude72
IN MOPAR MUSCLE MAGAZINE
Thanks
Dusterdude72
IN MOPAR MUSCLE MAGAZINE
Well, yesterday I traded an old gun I had that I never use and that has just been stuffed in the top of my closet for months......I traded it for a brand new pioneer CD player.
Not only is Pioneer my favorite brand of cd player, it has green lights like I have been looking for so it matches my stock gauge lighting and doesnt look funky in the dash.
so today.....I started on installing it.
first off, there was no factory stereo wires I could find besides the antenna wire.....so I ended up running all new constant 12 volt and key on and 12 volt wires....I ran a constant 12 volt directly from the fuse block and I put an inline fuse in the wire because I did not to strictly rely on the fuse in the back of the stereo, then the key on hot I found a plug under the dash that was not being used for anything and I put a spade connector on the end of my key on wire and pluged it into that plug in I found under the dash and I then ran a new ground wire from one of the column bolts up to the stereo.
so now all of that is hooked up and working other than I still need to run my speaker wires but I will lay them in just before I install my carpet.
only bummer is,someone tried steeling the old turn dial FM radio back in the day and bent the heck out of the dash around the radio and I had to cut out the opening for a cd player to fit a few months ago and was forced cut it SLIGHTY bigger than I wanted it, so you can see a LITTLE bit of the cd player cage sticking out passed the beauty trim, so EVENTUALLY I would make some kind of a backing plate to cover what can be seen behind the beauty trim and keep it clean looking.......but it doesnt look bad as it is, im just picky I guess lol.
OH, and I masked off some stuff and sanded the drivers side door down and primered it and I have to sand it one more time and then I can paint it with the gloss black.
still have to do the same to the passenger side, my sail panels are done other than I have to paint them black and I still have to paint the little section of metal in back that shows under the rear trim panels.
so its coming along, I think I can have the interior all paint by this weekend and then start reinstalling all my interior components.
OH, plus I still have to repaint my dash pad and a few other peices because they got scuffed up sitting on my bench...but thats no biggy.
Here is a few pictures for you guys and gals!
dusterbd13
Well-Known Member
somewhere i may have missed it, but what are the seats out of? im about to do some to my duster, and like the looks of yours. also, what were youre measurements on the risers?
thanks
Michael
thanks
Michael
Dusterdude72
IN MOPAR MUSCLE MAGAZINE
somewhere i may have missed it, but what are the seats out of? im about to do some to my duster, and like the looks of yours. also, what were youre measurements on the risers?
thanks
Michael
The seats were out of ( I BELIVE ) a 2009 accura TL type S , I lucked out and found the set for $100.00 ....but I can't say the same deal could be found again lol.
the seats are about 4" over all wider than factory buckets would be ...so there was no way of mounting them to the flat part of the floor pan, so I utilised the factory bench mounts on both sides....but in doing so , I had to make risers to keep the seat at level height all the way around.
on the front right passenger side corner I used no riser, front left drivers side corner I used no riser, front left passenger side I used a 2 1/4" riser angled to the degree of the track and same thing on the drivers side, and then on both rears of the seats I used half inch risers.
I of course had to use bolts to match the lengths of each riser which was no big deal.
It wasnt a HARD job by any means but I hope you have a good back because I had the seats in and out of the car a TON of times lol.
hope that helps and if you have any more questions about it, just ask.
-
Similar threads
- Replies
- 140
- Views
- 4K


