Bonding a Six Pack hood scoop to a fiberglass Duster hood

-

rmchrgr

Skate And Destroy
Joined
Apr 15, 2008
Messages
4,478
Reaction score
2,065
Location
Stamford, CT
As the title says, I'm starting to work on my fiberglass pin-on hood and need to bond the scoop to the hood. The hood is from AAR and I've had it for years. The scoop is a 4" tall one from Unlimited. Yes... it's fine. They are the only ones that make this height. The factory style 3" is too short for my taste and the Ricky Racer 5" tall ones look silly to me.

So far, I've located and cut a hole for the air cleaner. It actually came out pretty nicely if I don't say so myself. But...
IMG_0016.jpg


...the scoop itself has a flange around it that gets bonded to the hood. Most aftermarket scoops are made like this to provide extra support.
IMG_0018.jpg


Here's what I'm thinking - the scoop should be installed with the flange facing up on the underside of the hood surface. Obviously my nice sanitary air cleaner hole would be gone and I'd be getting a ton more fresh air in through the scoop. However, I feel like installing the flange on the underside would be the cleanest way to do this. The flange in the front/middle looks like it's bent upwards meaning that it was almost made to lay into the center bulge from below. And actually, the pictures of aftermarket Six Pack hoods I've seen generally seem be open around the underside of the scoop.

This pic. is from the AAR/Stinger website. Note there's no dedicated air cleaner hole, just open area. I have the same hood though mine is flat. To install the scoop I'd have to remove some of the strengthening rib on the rear of the hood like shown below.
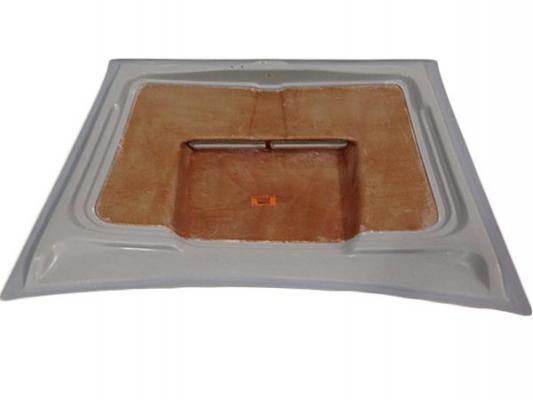
Duster6pack7072U2.jpg


Installing the scoop from the bottom with the flange facing up would seem to minimize a good deal of body work. I will probably have to put some screws into the flange to get it to sit flat then remove them and fill the holes once the resin is dry but that's not a huge deal. Coming from the bottom there would obviously be a seam between the outside of the scoop and the inner edge of the hole but that seems minimal compared to dealing with that flange sitting on top of the hood surface. If the flange was on top, to get it to sit flush would require building up a large area of resin/fiberglass mat that would have to be feathered out pretty far. That just seems like it will never look good and will require a ton of extra material and work to cover up.

Despite having to cut out the larger opening, I'm leaning towards installing the scoop from below. Anybody else done this or at least agree that this would be the best way to do this?

Thanks for any input.

- Greg
 
Do it how YOU want.
I think that if It was me, (and I was familiar with fiberglass work) I'd bond a bunch of bolt bosses into the inside of the scoop, use studs, and cut off the flange. I also think I'd open the hole around the air cleaner a bit more.

I riveted a Sixpack scoop with a flange to my steel hood, I knew I wasn't gonna try to blend it in. When it started cracking up, I replaced it with a genuine dart raisin bran scoop that bolted to the hood very nicely. Big improvement.
I'm not familiar with the quality of the aftermarket raisin bran scoops.
 
As the title says, I'm starting to work on my fiberglass pin-on hood and need to bond the scoop to the hood. The hood is from AAR and I've had it for years. The scoop is a 4" tall one from Unlimited. Yes... it's fine. They are the only ones that make this height. The factory style 3" is too short for my taste and the Ricky Racer 5" tall ones look silly to me.

So far, I've located and cut a hole for the air cleaner. It actually came out pretty nicely if I don't say so myself. But...
View attachment 1716531429

...the scoop itself has a flange around it that gets bonded to the hood. Most aftermarket scoops are made like this to provide extra support.
View attachment 1716531431

Here's what I'm thinking - the scoop should be installed with the flange facing up on the underside of the hood surface. Obviously my nice sanitary air cleaner hole would be gone and I'd be getting a ton more fresh air in through the scoop. However, I feel like installing the flange on the underside would be the cleanest way to do this. The flange in the front/middle looks like it's bent upwards meaning that it was almost made to lay into the center bulge from below. And actually, the pictures of aftermarket Six Pack hoods I've seen generally seem be open around the underside of the scoop.

This pic. is from the AAR/Stinger website. Note there's no dedicated air cleaner hole, just open area. I have the same hood though mine is flat. To install the scoop I'd have to remove some of the strengthening rib on the rear of the hood like shown below.
Duster6pack7072U2.jpg


Installing the scoop from the bottom with the flange facing up would seem to minimize a good deal of body work. I will probably have to put some screws into the flange to get it to sit flat then remove them and fill the holes once the resin is dry but that's not a huge deal. Coming from the bottom there would obviously be a seam between the outside of the scoop and the inner edge of the hole but that seems minimal compared to dealing with that flange sitting on top of the hood surface. If the flange was on top, to get it to sit flush would require building up a large area of resin/fiberglass mat that would have to be feathered out pretty far. That just seems like it will never look good and will require a ton of extra material and work to cover up.

Despite having to cut out the larger opening, I'm leaning towards installing the scoop from below. Anybody else done this or at least agree that this would be the best way to do this?

Thanks for any input.

- Greg
I do fiberglass and make my own molds and build a lot out of glass. Yes I agree with your idea 100%.
Give us some pictures of when you get it done. :thumbsup:
 
Do it how YOU want.
Obviously but my choice is to use the method that will give me the best chance at success and prevent it from cracking in the future.

I think that if It was me, (and I was familiar with fiberglass work) I'd bond a bunch of bolt bosses into the inside of the scoop, use studs, and cut off the flange. I also think I'd open the hole around the air cleaner a bit more.
There's not enough material inside for that, it was made to use the flange. There are bolt-on scoops out there but this is what I am working with. Cutting off the flanges would weaken it and it's already flimsy.
 
I have done some fiberglass work, too
I mixed it slow curing, and had cut plastic strips
(can't remember what kind, it makes a difference)
but I layed the glass, and carefully used the plastic to push all the air out
then set flat boards on top to minimize the coarse body work
I found the technique from how homebuilt airplanes are made
when almost fully cured (cheesegrater state) I'd pull the plastic
did a cowl scoop, metal on metal for a 74 charger
used 2 hoods.
the fiberglass technique is how I straightened the lines
 
You are correct that the glass 6-pack hoods have a rectangular opening underneath. Not sure if you can zoom in and see the underside of the hood on my avatar in this pic (which was taken before the Demon side stripes were installed!). The large rectangular opening is where my air cleaner fits up into it. This is an older AAR glass hood.

650146244.jpg
 
Alright, been working on this for the last couple days. For better or for worse, the decision was made to install the scoop from the bottom, flange side up.

IMG_0026.jpg


First thing was to cut out a larger hole in the hood. Did that.
IMG_0020.jpg


Next was to lay the flange on the underside of the hood and see where it was at. The initial cuts were too narrow and the existing hood was resting on the transition part of the scoop. It needs to lay flat to minimize the step between the two surfaces so the hole was made larger until that was achieved.

Note the minimal step. This is what I'm looking for.
IMG_0027.jpg


It's not so easy to get the hood to lay flat on the flange all the way around the scoop though because the hood is "domed" and the scoop is flat. I glued a piece of foam under the center hump to make the bottom level with the scoop flange but I probably need to glue some to the sides now. Currently there is still a gap between the bottom of the hood and the top of the flange on either side of the center hump.

The center is solid but I can push this area down. If I screw it down it creates a depression so that's not going to work. Yes, I can raise the flange to the hood from underneath but there would still be a gap between the top of the flange and the bottom of the hood because of the curvature of the hood. Also, the center hump does not go all the way to the front of the scoop opening. Not sure how to handle that. Maybe cutting the flange to make a pie shape on the sides of the center hump but I'm not sure how well that will turn out. Unfortunately you'd have to really look to see the gap it but it will bother me.
IMG_0028.jpg


I think it's going OK so far. Trying not to cut too much more material as I don't want to weaken the hood any further. Looks like I may have to ditch the center rear hood pin but I'm not throwing in the towel on that just yet.

There will be some final fitting then I'll go get the materials to finish the job. I might use panel bonding adhesive to bond the scoop to the hood but there will be some work on the top to smooth it out.
 
It would be a lot of extra work but it might be worth entertaining the idea of adding some reinforcement around the edge using some aluminum bar stock bent to shape and glassed in.
 

You're gonna have to notch the scoop because of that center raised area
 
It would be a lot of extra work but it might be worth entertaining the idea of adding some reinforcement around the edge using some aluminum bar stock bent to shape and glassed in.
I've actually considered doing that or at least something along those lines. Once the scoop is bonded on it will stiffen up but probably a good idea to prevent it from flexing too much.

You're gonna have to notch the scoop because of that center raised area
Do you mean cutting a relief the shape of the center bulge out in the front of the scoop? You really can't do that because removing the flange would leave nothing to bond to. I could probably figure something out but it would be a bit of work. A glassed-in piece of foam between the two faces would work but it's not going to be easy to finish that area, it's tight.
 
Any way to plug the scoop in from the bottom of the hood?
 
Any way to plug the scoop in from the bottom of the hood?
Yes, I said in post #8 that it is being installed through the bottom. The flange is facing up and will bond to the underside of the hood. Again though, the hood is curved from side to side which is what is making the fitment a little trickier.
 
I have used this for "in place" mold making

1776288900540.png

use it under where you pour
also pack loose fibers into the cracks before you put the tape on
the resin has no real strength w/o the fibers
I'd cut over a clean pail and mix fibers into resin to loosely "spot weld" little spots to hole it in place
remove gel coat/primer on all bonding surfaces

use no metal, wood, plastic as reinforcing. temp changes will make it show in no time at all
if you use screws/bolts remove after it ls staple, pack w/ fibers, and fill the hole

rumor/war story: I heard the funny car bodies of the day were slow cured, aka not much hardener
supposedly many were soft and sticky to avoid cracking from the engine vibration

I'd also suggest a scale for small batches will give you precise consistant resin>hardener ratio, and mix in 2-3 cups,
(stuff not mixed stickes to the walls of the mixing cup)
then some spots won't be brittle, and others gooy

good luck,
 
My friend is a body guy and he said to use these products;

Marine Tex

Kitty Hair

I figure on using some regular mat with resin along the edges where the hood meets the scoop and along the outside edge of the flange on the underside so it's flat. Either way there is going to be a lot of sanding.
 
kitty hair rocks

puurrr fect for the spot welding, and all structural

get a bunch of the big disposable shot glasses at the booze store
a crap load of skewers, both big and small for packing it in
never re-use either, break the skewer, drop into shot glass,
and use it for testing "curedness" without having to touch the piece
always work in small packed batches, just like butt welding
let each cure for a day or so because they slow shrink
if it's f'kd, less to cut back out
it will get stronger the more "butt glass welds" you put in
sneak up on it, you'll rock it!
 
This is pretty cool. I'm curious how you're going to attack the center raised area.
he's doing good so far
the initial fit looks real good
'glass stuff is a challenge
but worth it to make unique stuff
 
This is pretty cool. I'm curious how you're going to attack the center raised area.
I'm really not sure how to execute that particular section. I thought gluing the foam under it was a good idea but it needs more to accommodate the crown of the hood. Might need to cut the flange somehow but doing that could create more problems than it's worth.

I already see that the opening on the passenger side needs to be widened by 1/4" more, the cut edge of the opening is still sitting on the curved transition part of the scoop. That could help the front part.

he's doing good so far
the initial fit looks real good
'glass stuff is a challenge
but worth it to make unique stuff
Thanks!
 
Made some progress on the hood.

Took a while to get the fit where I wanted - lots of shaping. The hole for the scoop ended up larger than expected. The rear of the hood was getting pretty flimsy but it should be solid with the scoop bonded in.
IMG_0085.jpg


The half circle in the back was a hood pin hole. I'm looking at a Quik-Latch type since they take up a little less space.
IMG_0086.jpg


The panel bond is a two-part adhesive that requires a specific applicator tool. The tool is basically a caulking gun but it has two pucks to push the additives out of the tubes. The glue mixture is not straight 50/50 so to do it by eye would be a little difficult because the tubes are different volumes. Either way, If you buy the 3M brand name one it's like $130. I bought an off-brand for $70. It's the exact same thing just painted blue. The adhesive comes with two single use nozzles.

I'll probably use this tool once.
IMG_0087.jpg


Glue gun.
IMG_0088.jpg


So with panel bond adhesive you basically just prep the two surfaces and press them together.

I spread out the beads with a single use acid brush. You put the glue on both parts then just squeeze them together.
IMG_0089.jpg


The most important thing is obviously to make sure there's no gaps between the mating surfaces or it's f•cked. I had to figure out how to do that around the entire perimeter. The glue takes a while to set up so you have some time to get it clamped. I did a dry run with the clamps beforehand but once the glue was on it didn't go exactly as planned. I ended up with some larger gaps and had to use more screws than I wanted to get the two surfaces pressed flat. Eventually I got it under control and didn't make a huge mess but it was getting a little dicey for a few minutes.

There is one spot underneath where the flange sort of buckled. I'm not sure how that happened. It's only a small area though so I'll cut it out and re-glass it after the glue cures.
IMG_0090.jpg


The panel bond adhesive dries in a couple hours and fully cures overnight. Tomorrow the clamps come off and the screws come out and I can start adding filler to cover the holes and seams. The auto body supply place I use suggested mixing some fiberglass resin into the filler to make it easier to spread. It's the same stuff basically. People will argue for and against doing that but it makes sense to me if you don't add to much resin.

Feeling OK about this so far.
 
that looks great so far. I used screws too.
what is the panel bond? Maybe the tool could be reused by others, too
I am so liking this thread. nice fit job, thats not fun
 
Hood is coming along.

Before working on the top I decided to try and reinforce the flange to the bottom of the hood with a strip of fiberglass mat. Unfortunately, I screwed up the resin by putting too much hardener in it. The instructions on the can say "18 drops. per oz. @ 60-70º which was about where the temp was. I poked a hole in the hardener tube and it was too big so it came gushing out. Because of that I had no clue how much went in. I mixed 6 oz. and it started catalyzing almost instantly. I got the mat down along the seam but it turned into a mess. Thankfully I was able to remove most of it today. Turns out it's not needed anyway, the panel bond is crazy strong.

This is after bonding but before the fiberglass resin disaster. The scoop is now effectively a structural part of the hood.
IMG_0095.jpg


Started on the filler yesterday and did some more today. So far, so good. Based on my previous resin mishap, I didn't mix any in with the filler. I've learned that Bondo has a quick working time so it pays not to mix too much. Adding resin will make it easier to spread but it's really not that bad if you do it in small batches.

Probably the most inefficient application of Bondo ever. Most of this got sanded off.
IMG_0096.jpg


I have not used my DA. sander in years but it still works. I used that and a cheese grater file to knock the excess down quickly then I went to a rubber block and then by hand. The transition area between the scoop and hood had to be built up but after two rounds it seems pretty close. There are still some low spots at the rear corners that will need more filler to get it level with the hood.

Not bad, eh? The seam is mostly invisible now.
IMG_0098.jpg


The bottom left corner of the scoop where the rough area is is a low spot.
IMG_0102.jpg


I did the second application of filler with my fingers to follow the contour of the transition. The spreader kind of worked but my fingers were better. Thinking one more round of filler then an application of glaze. My arms are going to fall off though, Bondo can be tough to sand once it sets up.

I need to work on the front part next. The sections next to the center hump under the scoop did not bond perfectly flat so it's requiring more filler than I'd like. It's also a little difficult to get the sandpaper in there. This stuff just takes time I guess.

IMG_0099.jpg


Also still have to finish cutting out the pieces in the openings that were left in when the mold was made. It will require a lot of shaping and finishing after the remnants are cut away. A small hand-held hacksaw works OK for the straight parts but the curves on the outside edges are a bit too sharp for it. Kind of annoying to have to waste time on this but has to get done one way or another.

The plan is to get the body work completed and then do the final fit up on the car before paint. Some of the hood pin holes will need to be repaired as they ended up slightly off center. The hood pin scuff plates will mostly cover them but I'd prefer them be more centered than they are now. And again, I will need to figure out a center-rear hood pin.

To be clear, I'm just kind of winging this whole deal. My good friend is a very good body man so if needed I can foist it on him for final finishing. He told me it looks good though so that was reassuring.
 
Man, I can't believe how long this is taking. I can understand why paint and body work is so expensive - I've been shaping and sanding for weeks and it's just one panel. It's pretty close to primer now though.

Have to finish sanding in front of the scoop on the passenger side. It needs one more round of glaze for some pinholes and to level one corner in the passenger side front. The glaze stuff is a bit easier to apply than straight filler but it hardens up quicker so you have to work fast.

Had to enlarge a few of the hood pin holes to be able to adjust the hood from side to side and get the gaps even. I'm a bit bummed about that. The front ones are worse than the rear for some reason. I may put some sort of insert in them to prevent the holes from getting destroyed when taking the hood on and off.

Also, I finally got the front openings cleaned up and decently shaped. Let's say it's close enough for horseshoes and hand grenades. I need to put some filler in a couple spots where the grinder got loose but nothing major.

Here is the hood mocked up. The scuff plates are blue because they still have the protective film on them. I really need to finagle another pin in the back, it's easy to see how the hood would want to lift at speed.
IMG_0114.jpg


Seems like this is going to turn out OK. I'm stoked to see the final product.
 
-
Back
Top Bottom