I know this is a long shot because there's not that many 65's out there I guess. But I've got a new dash harness from Year One for my 65 Valiant. I've already installed it and started hooking everything up. But even laying out the harness under the dash I can't seem to follow how they properly would've routed this harness back off the assembly line. Especially around the instrument cluster area. It's got to looms welded at the top of the dash for the harness to hang but I can't determine the proper routing so I can get the harness to fall into those looms. It looks kinda ugly under there even although the wiring is all new. So if anyone is working on their 65 Barracuda or Valiant and hasn't removed the dash harness and has pictures I'd like to see. I'll keep moving on trying to figure it out on my own but if anyone has already taken pics it would be cool if you post them so I can figure this out.
You are using an out of date browser. It may not display this or other websites correctly.
You should upgrade or use an alternative browser.
You should upgrade or use an alternative browser.
Can anyone post 65 Barracuda/Valiant dash wiring pics?
- Thread starter wh23g3g
- Start date
-
Here's a link to a page on Mymopar that you can download the whole 65 Plymouth service manual in pdf format.
http://www.mymopar.com/index.php?pid=109
I'm not sure how to cut and paste the wiring diagrams, buy you can just open in up and print the pages that you need. There are also other manuals there that you may be interested in also.
http://www.mymopar.com/index.php?pid=109
I'm not sure how to cut and paste the wiring diagrams, buy you can just open in up and print the pages that you need. There are also other manuals there that you may be interested in also.
Yeah I've got the service manual already. I'm trying to actually figure out how the harness is layed out under the dash. I've installed it hooked everything up and it doesn't look right. There's two looms made into the top of the dash right in the middle where the instrument panel goes. I can't get the harness to lay right in order to use those looms. So I know I've got it in there wrong. Eventhough I can get everything hooked up it doesn't look right there's a lot of wires hanging. I can't even see how to properly route the passenger side door jamb switch. The way I have it is the yellow wire would always be visible hanging down. So I was looking for pictures of others who may have taken photos of their wiring before they removed everything. Mine was all hacked up in the first place so it was no help taking pictures.
BillGrissom
Well-Known Member
Photos of my 65 Dart first (yellow) and 64 Valiant (red). I fixed all the prior owner hacks and sheathed the wires. In both cars, the main harness routes high, looping above the instrument cluster. The 64 harness is much different since dash components are in different places, plus the dash shift buttons make the dash different from the floor shift Dart's.
The Dart had many more "fixed 'er" repairs, like butt-crimps w/ whatever color wire was at hand. The add-on ammeter is gone. Not sure why I painted the under-dash with the harness and wipers in, since I later took them out and finished painting (polyurethane w/ foam brush). Working smarter on the Valiant.
I include the wiper switch wiring of both, since complicated. Some terminals are simply a convenient 12 V junction, nothing to do with the wiper itself. Also varies between 2 spd and variable wipers.
I had the Dart's plastic "re-chromed" at Sacramento Chrome ($110 for all plastic pieces). It is a spray technique which the guy claimed is more rugged than actual chrome. The first method he used wasn't satisfactory, so using a better method. I stripped them first using Walmart's SuperClean. I left it all chrome since looks better and trying to black the "weave" would take more time than I have. Cleaned the cluster circuit board, added electronic Vreg, LED bulbs.
Your 65 has the nice "buss bars" to feed-thru the thick ALT and BATT wires in the bulkhead, which keeps from melting the connectors. Don't lose that with your Year One harness. Indeed, I changed to that in my 1964 (http://www.forabodiesonly.com/mopar/showthread.php?t=228908).
The last 2 photos are re-working my 64 dash harness. You need a lot of table space for all the materials. Nice winter project while you watch TV. Buying a new harness sounds smart if you don't have to customize it much. I upgraded the factory design, adding a relay for ACC, jumpered IGN1 & IGN2 since I have no ballast and those simply trigger an IGN relay under the hood (relay box from 90's Jeep).
Attachments
-
dash wiring 1.jpg56.1 KB · Views: 472
-
dash wiring 2.jpg77.8 KB · Views: 442
-
wiper switch wiring.jpg68.6 KB · Views: 338
-
rechromed cluster 2.jpg45.3 KB · Views: 272
-
dash wiring.jpg64.6 KB · Views: 358
-
wiper switch 1.jpg43.4 KB · Views: 288
-
Valiant harness rebuild 1.jpg56.7 KB · Views: 315
-
Valiant harness rebuild 2.jpg71.5 KB · Views: 315
396 Signet
Well-Known Member
Here's an original un-butchered harness from my 65, much easier to do with dash out-
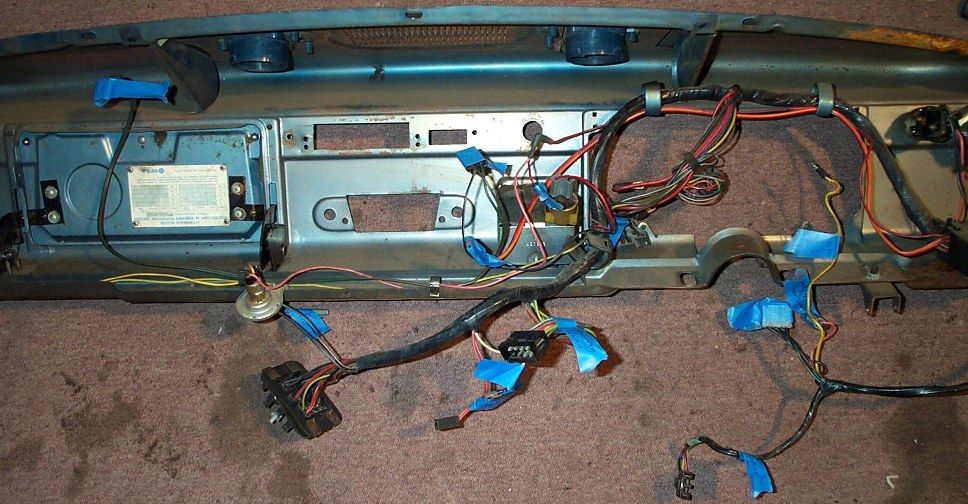
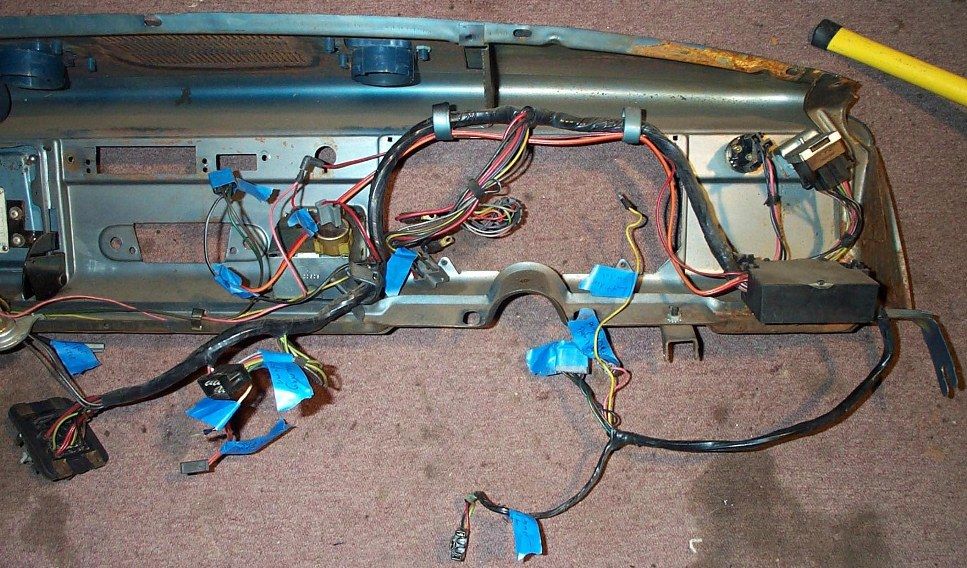
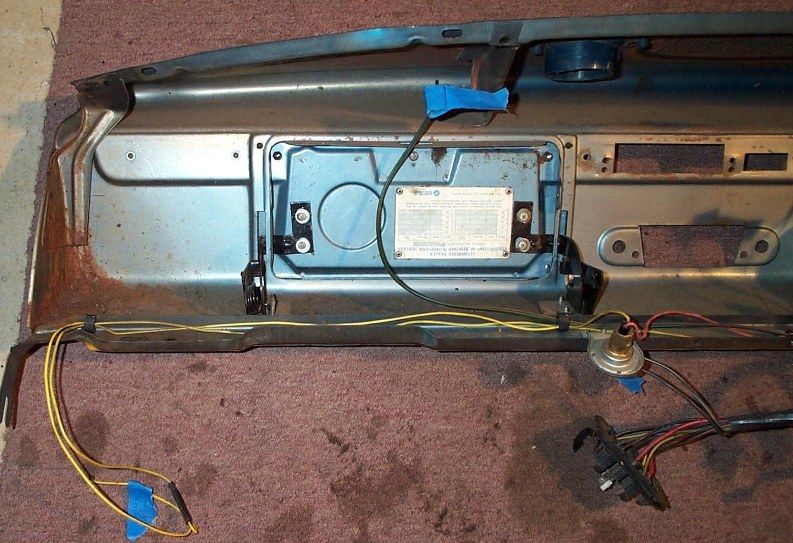
These definitely should help me out some. According to 396 Signet's photos I had my wiring pretty much right then. I just wasn't sure if the instrument cluster plug, ammeter wires, and ignition switch wires should go through the square hole in the center where the steering column support is. It looks obvious that you would route the cluster plug through that hole but according to everyone's photo's here it goes to the right side. The Year One harness I had has the ammeter lugs in the bulkhead connector already. The original harness was in fact melted and the ammeter burned beyond repair. I got my gauges rebuilt by Instrument Specialties. I'm not actually doing any upgrades but may decide in the future to add a small underdash A/C unit if it's not too complicated to hook up. But the only options on this car were reverse lights and variable speed wipers. I added a correct AM radio. So the wires for the reverse, heater, cigarette lighter, and radio I had to add onto the fuse box. But I added them just like they would hook up, no cutting or splicing. It also didn't come with the wire for the shift indicator dial light. It was the most expensive harness I saw listed. Do you'll remember how the passenger side courtesy switch wire ran through the cowl? It looks like it's going to hang down in sight because I don't see an access hole up high enough to drop the wire through.
Cool, thanks for the helpful pictures. It's amazing how many times I installed and removed and reinstalled the new harness. I could never figure out how they used the looms at the top of the instrument cluster hole because I didn't know the factory routing to begin with. As soon as I followed the routing of the pictures posted here everything fell into place and the connectors ended up close to their specific switch. The only difficulty is that it seems the wire for the cigar lighter is kinda tight, like it's not long enough. But it still hooked up. I only have a correct AM radio, heater, and reverse light that I had to wire into the new fuse panel. Now I'm going to order one of those electronic instrument regulators before I install the instrument cluster.
-


