Head Porting basics

-
Xheads will handle it, mildly ported they'll flow 230-245cfm and will go as much as any j head in ported form.

I like the Xhead exhaust floor, it seems higher in comparison, but it could just be the castings I have.:read2:


I'm up to 237 at .500 so far........but my bench may be a little.......Happy:toothy10:
(1.88 cut to 2.02 with porting)
 
Don't open the bowl as wide as the seat!! it should be only about 75% of the valve size.
 
Xheads will handle it, mildly ported they'll flow 230-245cfm and will go as much as any j head in ported form.

I like the Xhead exhaust floor, it seems higher in comparison, but it could just be the castings I have.:read2:

I thought the x heads were the better/flowing performing head, not the j heads? so it is cfm of the heads that determines how much lift you can run in the cam?
 
Well the plan right now is to practice on an old set of heads and if I feel confident enough with what I've done I'll try it on the X heads, if not my dad and I both have heads we'd like ported and a local guy does nothing but porting, we may try to work a deal with him on some work just to know that our heads will be right, with how rare these heads are and desirable for resto guys I'd feel bad about ruining some, and worse about ruining two sets lol
 
I thought the x heads were the better/flowing performing head, not the j heads? so it is cfm of the heads that determines how much lift you can run in the cam?

Well no, you need them to flow at least to .050 less than max lift of cam.jmo

As in, if the heads don't flow past .450 lift, then a .550 lift cam is a wash no matter how much opening/under curve flow there is[to a certain point] the valve is held open during the reversion stage too long and will hurt performance.

Hope you understand.
 
I'm planning on running a Comp Cams 507/510 lift that I can't remember the duration of right now, I think 24X. I'm not real sure what the max lift is for X heads, but I think I'm alright with this cam. Not sure tho.

In stock configuration you'll be lucky if X heads can accept anything over .500 lift. The retainer usually hits the valve guide. You need to have it machined down then you can run a pretty decent size cam.

Just for reference I tested 2 sets of stock heads to see how much lift they could take before retainer/guide interference became a problem. One set went to .510 and the other set only went to .475 lift before it was a problem.
 
O.K. Splitter, here's my suggestion. I bailed off into this myself with very minimal knowledge of the project , but by researching here's what i did. Right or wrong my 318 J headed screamer speaks for itself. Dont have a clue what #'s it flows but does a damn good job of getting down the road in a hurry. Try this for starters untill you get good or want to dive deeper. Get you some prusian blue dye and take a set of gaskets, both intake and exhaust. Line em up with the bolts on the correct side after painting the surface with the blue stuff and scribe the outline of the gasket on both surfaces with the proper gasket. You will see the amount of metal beyond the gasket that is obstructing the flow. Cut only to the line you scribed then only cut at a bevel into the port about 1/4". Take then and merely take out any rough casting marks that you can see that are obvious then smooth out the remainder of the normal casting marks with your grinder. Keep in mind that you can get em too smooth as the proper turbulents can and will have a positive effect in the mixture process. Get you some long shaft cutters and a good air die grinder and wear gloves and safety glasses or goggles. You can do it and will be glad you tried. Practice on aset of junk heads if you want first to get the feel of it all. Good luck. Dont tell me i cant do it...
Small Block
 
In stock configuration you'll be lucky if X heads can accept anything over .500 lift. The retainer usually hits the valve guide. You need to have it machined down then you can run a pretty decent size cam.

Just for reference I tested 2 sets of stock heads to see how much lift they could take before retainer/guide interference became a problem. One set went to .510 and the other set only went to .475 lift before it was a problem.

Thanks for the info, I know of a shop near me that can do this so looks like I'll be giving him a call. If you were to pick a number for how much to take off what might you go with?? I realize your number may not be ideal as there are differences from head to head but a ball park would be good.

O.K. Splitter, here's my suggestion. I bailed off into this myself with very minimal knowledge of the project , but by researching here's what i did. Right or wrong my 318 J headed screamer speaks for itself. Dont have a clue what #'s it flows but does a damn good job of getting down the road in a hurry. Try this for starters untill you get good or want to dive deeper. Get you some prusian blue dye and take a set of gaskets, both intake and exhaust. Line em up with the bolts on the correct side after painting the surface with the blue stuff and scribe the outline of the gasket on both surfaces with the proper gasket. You will see the amount of metal beyond the gasket that is obstructing the flow. Cut only to the line you scribed then only cut at a bevel into the port about 1/4". Take then and merely take out any rough casting marks that you can see that are obvious then smooth out the remainder of the normal casting marks with your grinder. Keep in mind that you can get em too smooth as the proper turbulents can and will have a positive effect in the mixture process. Get you some long shaft cutters and a good air die grinder and wear gloves and safety glasses or goggles. You can do it and will be glad you tried. Practice on aset of junk heads if you want first to get the feel of it all. Good luck. Dont tell me i cant do it...
Small Block

That all sounds simple enough, I should be able to handle that. Sometimes I overthink things and start to question whether or not I should do it lol just the way I am.
 
To add to Bill/smallblock's comment:

Get the gasket that works for your exhaust/headers. There have been issues using a FelPro/Victor exhaust gasket with tti headers. The sealing bead on the tti's isn't really in the correct spot on #1, 2, 7 & 8 compared to the gasket. Open up the port to the gasket and you'll have a serious leak. 340sFastback had an issue with this on his ede's/tti when they were ported to the FelPro size.
 
Thanks for the info, I know of a shop near me that can do this so looks like I'll be giving him a call. If you were to pick a number for how much to take off what might you go with?? I realize your number may not be ideal as there are differences from head to head but a ball park would be good.

You need to machine them to give the proper valve spring installed height that your springs call for. Find that spec from the spring manufacturer and take the heads to your machinist along with the retainers and locks and he should be able to figure it out easily enough. When he does it the guide gets cut down at the same time and you have to run poly lock valve seals. With mine I measured the stock installed height at 1.68" and the springs only called for 1.7" installed height so he didn't have to take much off. Mainly had to take the guide down so the inner spring would clear. If you plan on going with a pretty big cam you may want to look into springs that are for a higher installed height like 1.8". That'll give you room for a pretty big cam.
 
You need to machine them to give the proper valve spring installed height that your springs call for. Find that spec from the spring manufacturer and take the heads to your machinist along with the retainers and locks and he should be able to figure it out easily enough. When he does it the guide gets cut down at the same time and you have to run poly lock valve seals. With mine I measured the stock installed height at 1.68" and the springs only called for 1.7" installed height so he didn't have to take much off. Mainly had to take the guide down so the inner spring would clear. If you plan on going with a pretty big cam you may want to look into springs that are for a higher installed height like 1.8". That'll give you room for a pretty big cam.


Thanks for the info, unfortunately I have no idea who makes the springs that are on my heads as I bought them complete, I do know he was going to run a .530 solid cam, there's a chance that my heads have already had some of this done as they have had various machine work done in the past, he just never got them ported as he was going to do the heads and intake at the same time, maybe I still have his number and I can find out more. THIS THREAD HAS BEEN VERY HELPFUL THUS FAR!!! THANKS FABO!!!!
 
Thanks for the info, unfortunately I have no idea who makes the springs that are on my heads as I bought them complete, I do know he was going to run a .530 solid cam, there's a chance that my heads have already had some of this done as they have had various machine work done in the past, he just never got them ported as he was going to do the heads and intake at the same time, maybe I still have his number and I can find out more. THIS THREAD HAS BEEN VERY HELPFUL THUS FAR!!! THANKS FABO!!!!

If there already on there you should be good to go but just to make sure they were set up correctly you can have your machinist look at them and he should be able to tell easily.

Good luck with the project.
 
If using inner springs, make sure the guides were cut so that they will properly locate the inner diameter of the inner spring and not exaggerate or weaken the spring pressure, as in the both inner/outter springs need to be sitting flush.
 
Don't open the bowl as wide as the seat!! it should be only about 75% of the valve size.

I open up the bowl 15 years a go. well past that!

With the 2.02 cut in, there is vary little bowl cut from the 75* stone. Just something i will have to live with, with these heads.The bowl area is over 2" right now!:read2: :angry7:
 
I open up the bowl 15 years a go. well past that!

With the 2.02 cut in, there is vary little bowl cut from the 75* stone. Just something i will have to live with, with these heads.The bowl area is over 2" right now!:read2: :angry7:

Post some pics, bowl size thats 90% of the seat is pushing it.jmo

80's% is fine.
 
Post some pics, bowl size thats 90% of the seat is pushing it.jmo

80's% is fine.

the 2" is from a mold that i made and cut up and then graft 2" csa.
will post up a coupe of picture in a but when i get home.

real would like you opinion on then good or bad!
 
the 2" is from a mold that i made and cut up and then graft 2" csa.
will post up a coupe of picture in a but when i get home.

real would like you opinion on then good or bad!

It took me so long because i had to figure something out. An that is the 2" is not 2" as when i cut my port mold up to measure, I didn't realize until to night that, that slice had some of the ssr in it. sliced the mold up a little higher so the ssr wasn't involved............
The choke is still in the bowl area but 1.81 bowl area compered to 1.87 seat area is much better then 2"
there may be hope for some bottom end power out of these heads on my 340 yet!!!!!

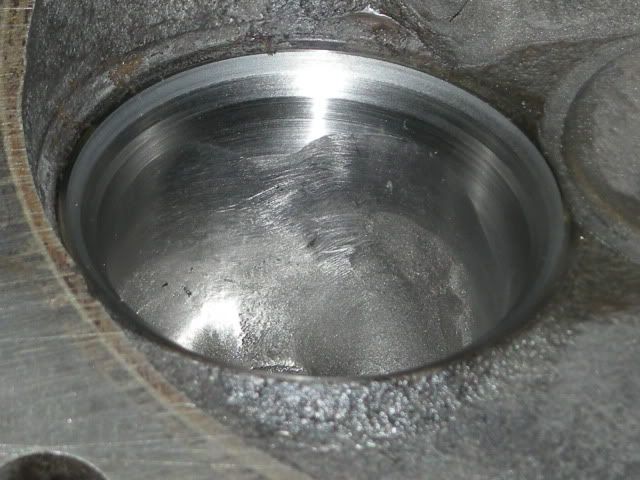
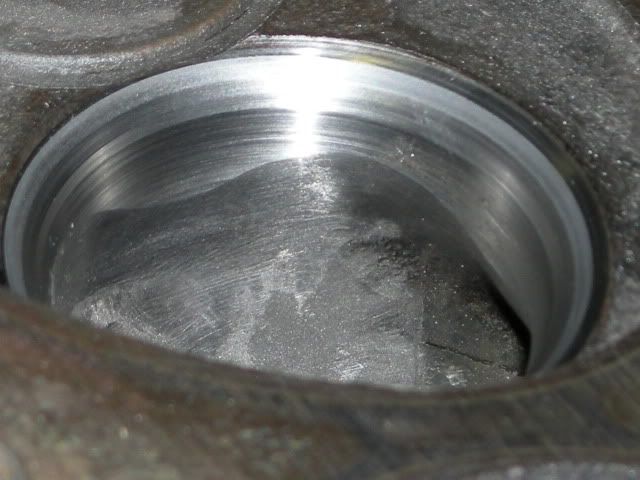
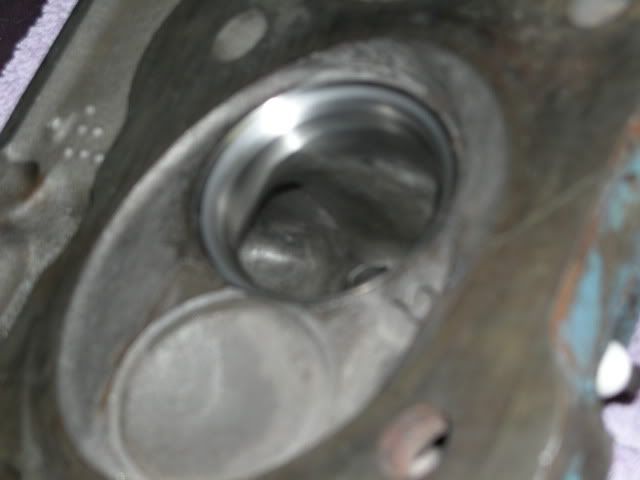
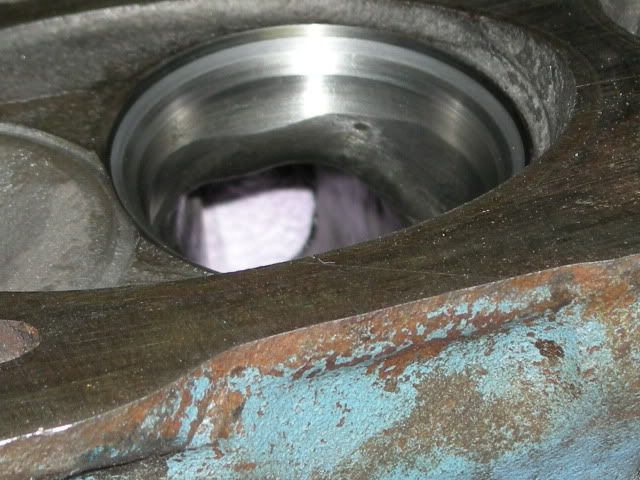
Below the valve, the csa is 1.87 not 2. ok here are the pictures.
RSCN1377.jpg

RSCN1375.jpg

DSCN1370.jpg

RSCN1372.jpg
 
being a porting greenhorn, I see shiny metal and say "yeap, looks good, they've been ported" . . . . . I don't know a whole lot about porting, this is why I made this thread which I feel has become pretty successful yay homerun! lol
 
Ok, you need to straighten out the wall into the short turn/bowl, you hardly touched it, I'm talking about the straight side wall that is siamese between intake ports.
Also roll the short turn a tid more midway to the top portion.

Skinny up the guide but don't shorten it any more.
 
Ok, you need to straighten out the wall into the short turn/bowl, you hardly touched it, I'm talking about the straight side wall that is siamese between intake ports.
Also roll the short turn a tid more midway to the top portion.

Skinny up the guide but don't shorten it any more.


Thank Justin, I haven't skinny up the guide boss to release the head bolt bump(as u have suggested) in the roof and want to do that first to see where the air changes with my fps probe.

I'm glad you thing i need to straighten that wall, as i think it need to go too (Had read somewhere that removing that bump in wall would kill flow)

I want to make sure i understand this,......once you have remove to much metal......well you have remove to much metal!
I should leave most of that 75*cut on the ssr alone?
I was going to radius it back from the seat area.........or does this affect the hole venturi idea?

Edit: Not layed back just rounded up to the seat.......NO???


Thanks again!!!
 
I open all my heads (bowls) to 88% of valve diameter, bikes too. Have for 20 plus years and they work very well with that. Some Pro stock head builders use as much as 93%. That doesn't leave much under the seat to support it, but they are torn down every week. I use 85% for dailey drivers. I have a Suzuki (16 valve) that I built in '97 and I opened the throats on that to 90% and it is still running strong. You can have your machinest use a 'bowl hog' to open your bowls to your specs. They do a great job and is a very inexpensive operation to have done while the seats are being freshened. Works for me , the flow bench likes it too. JMHO.

Terry
 
Thank Justin, I haven't skinny up the guide boss to release the head bolt bump(as u have suggested) in the roof and want to do that first to see where the air changes with my fps probe.

I'm glad you thing i need to straighten that wall, as i think it need to go too (Had read somewhere that removing that bump in wall would kill flow)

I want to make sure i understand this,......once you have remove to much metal......well you have remove to much metal!
I should leave most of that 75*cut on the ssr alone?
I was going to radius it back from the seat area.........or does this affect the hole venturi idea?

Edit: Not layed back just rounded up to the seat.......NO???


Thanks again!!!

Yes rounded/rolled.

I see the idea behind leaving the head bolt bump, if you you're looking at the port like it's a crooked sb chevy, but in this case the la port is fairly straight and if you open the pushrod pinch up you don't need to try and get the air to turn to the right or left cause you can get a good straight shot to the bowl.
 
When I port stock heads, I use a 1.94 chevy valve and keep the throat 86% of that.
That allows you to keep a venturi effect in the port. With the right porting, valve job and chamber mods you can easily get high 260's at .500 lift and with alot of work you can get it to flow up to .600 lift and usually 275 or so cfm.
The reason I don't recommend that much porting is stock heads are prone to cracking so it's possibly wasted money.

If you do it yourself, then it's just wasted time if they crack.
I don't have any pics of stock heads I've done, sorry but it's good to enlarge the pushrod pinch as much as possible without making holes and maximizing the chamber size around the valves and a good valve job.

Thanks.
when you trim the push rod pinch do you cut it straight, as compared to the port entrance or cut it at a angle to match the straightening affect of that wall?

I cut it in line with the straightening of the wall......................
 
Thanks.
when you trim the push rod pinch do you cut it straight, as compared to the port entrance or cut it at a angle to match the straightening affect of that wall?

I cut it in line with the straightening of the wall......................

Cut it straight....the only reason the #'s go up a lil is cause your doing the same thing the clay radius or radius plate does, but when the intake go's on poof go's the #'s, even if you open the intake up to the gasket on that side...it still has to then go around that 'speed bump' PR pinch.

It's not necessary to get the #'s.
 
-
Back
Top