Miller high frequency arc start

-
Not sure I'd pay that kind of money for that, given the overall price of some pulse tigs nowadays. You are nearly 1/3 of your way to the price of one, maybe more if you buy a used TIG

It depends on what you are going to do. I bought an old Century arc stabilizer pretty cheap, and already had an AC/ DC stick box, and a neighbor gave me a permanent loan of a bottle, so I got in pretty cheap

But here's the deal..........You don't really need an HF box to TIG steel.

Google up "scratch start"

And, one of these won't give you the fine control you need to weld light ga. aluminum.

Seems to me your 4 bills could be better spent
 
I'm familiar with scratch starting, never done it, but familiar. My dad has an ac/dc stick welder already, so I thought it could get me welding on the cheap. I'll be fine either way, I'm contemplating buying a century tig like user davebonds got. Just have to wait another month or so. More than anything I posted this to hopefully gain a better understanding of how people piece together a good working welder.

It seems like I've seen people hook a stinger lead to a torch, hook up the gas and go, not thAt I have any plans to do any such thing. It seems like a pedal is necessary for control or else why bother?

I thought the box in the above cl listing would be good since it had an included pedal and fine frequency control.
 
I ended up with an Everlast 185 PowerTIG.

You can use an AC/DC stick to tig weld with it, but you lose a lot of control, unless you mod it. It has more to do with how the machine starts and what you plan on doing with it, as to it's bells and whistles.

You use AC to tig aluminum. I see that the machine goes up to 100hz or so, which isn't bad, but from what I've played with on my AC with my machine, 60hz is insanely slow for what you want on a fine/ controlled arc so it doesn't wander, I like 100-150hz on aluminum.

DC on that machine will probably do just fine.

My welder came with a torch mounted trigger that I modded and made removable with velcro attachment, instead of zip ties, which is great for tac welding, even though you can tac with higher than needed amp setting and full pedal, sometimes its a pain to use a pedal to tac things, like in a cage or under a car with exhaust. Its nice to have both.

I sent you a message about the welder I have. Its a learning curve, getting used to the techniques to get nice, show quality welds from the tig on different types of joints and materials, but it was so worth it. I only wish I had done it sooner, but it takes a lot of research, working with different applications, because they all require variations of not just settings, but extremely different techniques, to achieve the best results.

One example; Right now, I'm playing with silicon bronze rod to attach copper to stainless steel and you don't heat the metal to weld/ melting point. The bronze melts quicker and you use it's lower melting point to make the braze. That requires a lower setting and finding the melt point on the amp control that flows the bronze without catching the stainless or copper.

I spent a lot of time cleaning tungsten tips with the grinder, learning not to touch it. Sharpen both ends. Saves time. I use 2% Thoriated on everything, because it holds up. You should wear long sleeves when using it, since thorium is radioactive, it sunburns when it is heated as fast, if not faster than torch welding.
 
The deal breaker on that Arc Start machine for me would be AC. You need to have a wave balance control. Frequency is important for arc stability, but you also need control of how much percentage of the alternating current travels in each direction, to get a good weld on aluminum.

Aluminum would melt at 1200° if the oxide layer didn't need penetrated, but it needs to be cleaned off beyond what you can do with wire brushes, even though that does help some. The arc direction does more cleaning in one direction and more penetrating in the other direction, so depending on the material thickness, series type and how old and/ or dirty a part is, like cast aluminum, you have to be able to control AC wave balance by percentage.

My machine has a knob for that. In addition to wave balance or also referred to as AC balance, some are more sophisticated and have AC and DC wave/ pulse controls to control the initial _ the rise / the high - and the drop time cycles \ of the wave _/-\_/-\_ etc and not just control the frequency of a complete wave ~

It really only helps to have pulse control on DC if you are lazy or want to have a machine do something for you, like a pipe or tubing joint on a lathe, maybe for production work all day, etc, which is way beyond the duty cycle of my welder, but I've never hit it's relay using it for what I do.

pulse on DC can be brought up to higher frequencies around 100hz to cut down on heat, though, which would be nice, but I seem to do just fine on lower settings, with sheet metal, keep the puddle moving and pulse with my foot. Way less distortion than a mig, which I was accustomed to planishing out, anyway, so as far as I'm concerned, it already made my job easier on steel sheet.
 
Thanks Dave and 67, sorry bout the century/everlast misquote, I appreciate your guys thoughts. I got set in my mind that if I was gonna buy a welder I should go ahead and get a tig for the versatility and cleanliness with less warping when patching panels in. Sometimes I see things like that box and wonder if I should just cheap out. Not going to though.

Dave did you end up making your own pedal after all? I'm glad the everlast is working out I think my needs and wants out of a welder are very similar to yours.
 
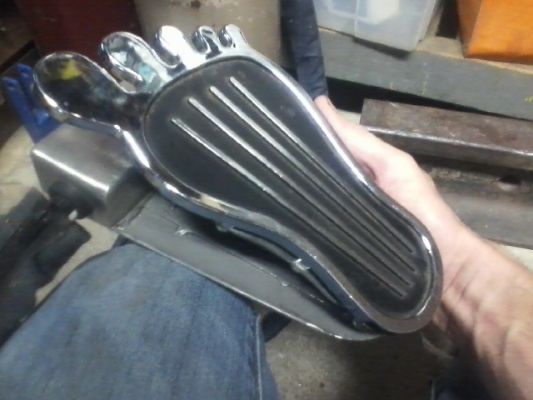
I did make my own pedal.

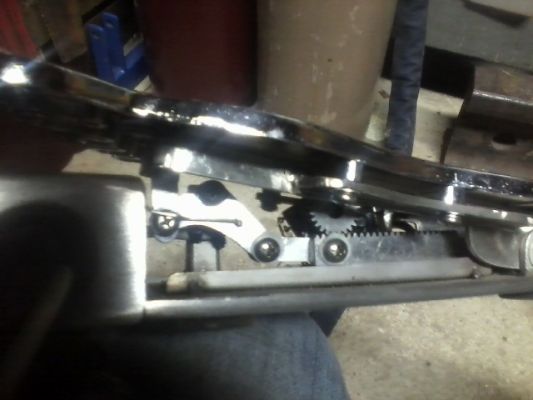
It's a bit overkill in design, but I wanted a few features that other pedals didn't offer.
874c28ce-1804-4c2d-8aa8-e634a5f07ebc_zps1f113408.jpg


61802761-4aa6-4429-b6d5-e0fa10f78f8d_zps2ee519df.jpg


9fdbc95a-d101-43c5-8c49-9d7f7128aa92_zpsbefbccee.jpg


7e0e724e-6600-4ae6-9c6d-8bb18e7fa513_zps34ad5322.jpg


So now, I have all of my lines running into the front casing of the pedal and the torch whip out of the pedal, with the ability to add a plug on the pedal for the trigger.

73ef4665-2024-40d4-bfc7-1580b0e8dc7e_zps30c775d5.jpg


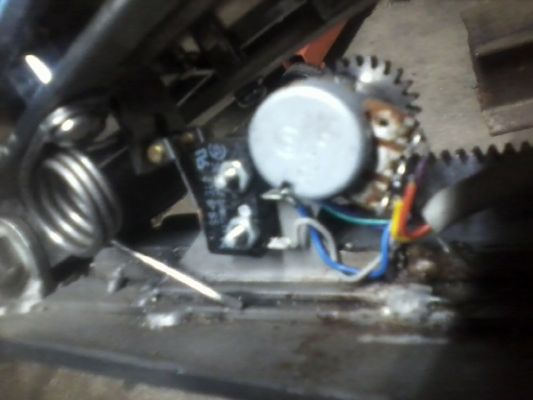
The welder that I have doesn't show amps on the machine, when a pedal is plugged into it, so I incorporated a microswitch on a roller to connect it to the machine, followed immediately by another microswitch that actuates the torch, followed by the potentiometer that moves the amps up and down.

a7b8244b-0151-4456-820f-e08e06c9c425_zps2dc2ae98.jpg


What the amp readout on the machine gives you, when the pedal is plugged in without any auxilary switch (like mine), is the active amp output, so when you are not on the pedal and its plugged in, it will display the lowest amp setting.

So, having a pedal that "plugs itself in" when you touch the pedal, before it engages the arc switch and begins moving up in amps, gives you the ability to glance at the machine and see the maximum set amps. The moment you touch the pedal, it displays the active amp output.

One way around this is to simply select the stick mode on the toggle switch on the machine to set your max amps with the dial, then flip it to tig mode. This way, it doesn't engage the gas and HF arc as you try to set it. My pedal bridges 6-7 pins when you touch the pedal, so when you are off of it, it doesn't detect the pedal and shows you the max amp setting.

The machine comes with a pinout for the pedal in the operator's manual and they have a really good support forum. There are seven pins, but you only need three plus a jumper from 6-7 if you don't want it switched like I made mine.

The weld quality coming from a tig has just as much to do with technique as it does its settings.

I tried welding an outside corner joint on .034" stainless sheet to make a tank and botched the first one. I found a number of problems with my attempt, based on what I researched. My speed was ok, but I was moving the filler rod too far away from the torch head, when I wasn't dipping it, allowing the rod end to oxidize and contaminate the weld. It still welded sound, it was functional but looked ugly;

896bd98d-87fc-4c1a-8c12-06f37d6b7866_zps8ea37e47.jpg


So I started over and made some minor adjustments to my technique, increased the torch gas nozzle size, reduced tungsten stickout length, increased gas flow and those few things ended up making a world of difference on the appearance, consistancy and quality of the weld;

df8030dc-998e-45b7-ac3d-4576d490e8f3_zps3a85aa99.jpg


Every material and the type of weld joint requires some research, but it is well worth the effort in practice. If it produces lousy welds, there is usually something to be done, usually minor changes made to something to get the best results and correct the deficiency.

I've found that running practice beads on a sheet of aluminum, with or without weld rod is a great way to get in good control practice with pedal pulse/ puddle bead width control, speed consistency, keeping in front of the heat and line control. I've probably run through a tank of gas just practicing on junk metal that I cleaned up a little and it made a lot of difference.

If I'm unsure about a material or joint type, I'll mock one up in scrap and try different things, research different techniques and practice them on the scrap until I am satisfied with the results on the scrap.

Tig welders love clean joints. no grinding/ cutoff flash, undercoat on the back side, etc. super clean welds come from tight fit up/ zero gap and good cleaning.
 
I did make my own pedal.

It's a bit overkill in design, but I wanted a few features that other pedals didn't offer.
874c28ce-1804-4c2d-8aa8-e634a5f07ebc_zps1f113408.jpg


61802761-4aa6-4429-b6d5-e0fa10f78f8d_zps2ee519df.jpg


9fdbc95a-d101-43c5-8c49-9d7f7128aa92_zpsbefbccee.jpg


7e0e724e-6600-4ae6-9c6d-8bb18e7fa513_zps34ad5322.jpg


So now, I have all of my lines running into the front casing of the pedal and the torch whip out of the pedal, with the ability to add a plug on the pedal for the trigger.
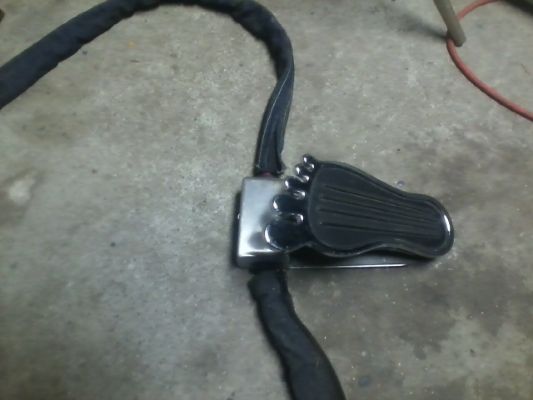
73ef4665-2024-40d4-bfc7-1580b0e8dc7e_zps30c775d5.jpg


The welder that I have doesn't show amps on the machine, when a pedal is plugged into it, so I incorporated a microswitch on a roller to connect it to the machine, followed immediately by another microswitch that actuates the torch, followed by the potentiometer that moves the amps up and down.
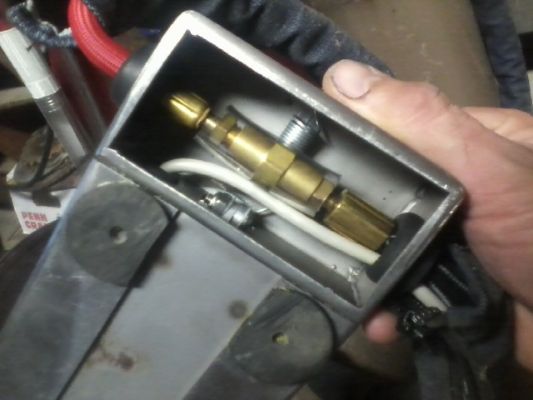
a7b8244b-0151-4456-820f-e08e06c9c425_zps2dc2ae98.jpg


What the amp readout on the machine gives you, when the pedal is plugged in without any auxilary switch (like mine), is the active amp output, so when you are not on the pedal and its plugged in, it will display the lowest amp setting.

So, having a pedal that "plugs itself in" when you touch the pedal, before it engages the arc switch and begins moving up in amps, gives you the ability to glance at the machine and see the maximum set amps. The moment you touch the pedal, it displays the active amp output.

One way around this is to simply select the stick mode on the toggle switch on the machine to set your max amps with the dial, then flip it to tig mode. This way, it doesn't engage the gas and HF arc as you try to set it. My pedal bridges 6-7 pins when you touch the pedal, so when you are off of it, it doesn't detect the pedal and shows you the max amp setting.

The machine comes with a pinout for the pedal in the operator's manual and they have a really good support forum. There are seven pins, but you only need three plus a jumper from 6-7 if you don't want it switched like I made mine.

The weld quality coming from a tig has just as much to do with technique as it does its settings.

I tried welding an outside corner joint on .034" stainless sheet to make a tank and botched the first one. I found a number of problems with my attempt, based on what I researched. My speed was ok, but I was moving the filler rod too far away from the torch head, when I wasn't dipping it, allowing the rod end to oxidize and contaminate the weld. It still welded sound, it was functional but looked ugly;
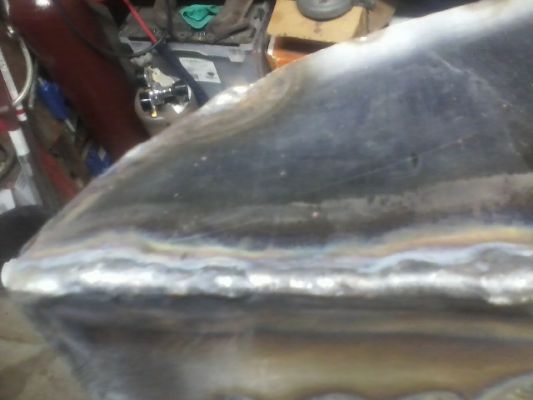
896bd98d-87fc-4c1a-8c12-06f37d6b7866_zps8ea37e47.jpg


So I started over and made some minor adjustments to my technique, increased the torch gas nozzle size, reduced tungsten stickout length, increased gas flow and those few things ended up making a world of difference on the appearance, consistancy and quality of the weld;
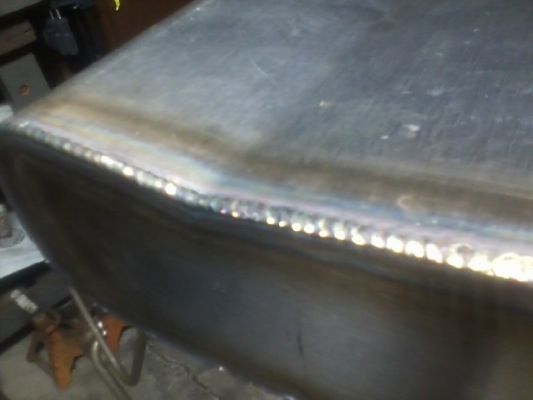
df8030dc-998e-45b7-ac3d-4576d490e8f3_zps3a85aa99.jpg


Every material and the type of weld joint requires some research, but it is well worth the effort in practice. If it produces lousy welds, there is usually something to be done, usually minor changes made to something to get the best results and correct the deficiency.

I've found that running practice beads on a sheet of aluminum, with or without weld rod is a great way to get in good control practice with pedal pulse/ puddle bead width control, speed consistency, keeping in front of the heat and line control. I've probably run through a tank of gas just practicing on junk metal that I cleaned up a little and it made a lot of difference.

If I'm unsure about a material or joint type, I'll mock one up in scrap and try different things, research different techniques and practice them on the scrap until I am satisfied with the results on the scrap.

Tig welders love clean joints. no grinding/ cutoff flash, undercoat on the back side, etc. super clean welds come from tight fit up/ zero gap and good cleaning.
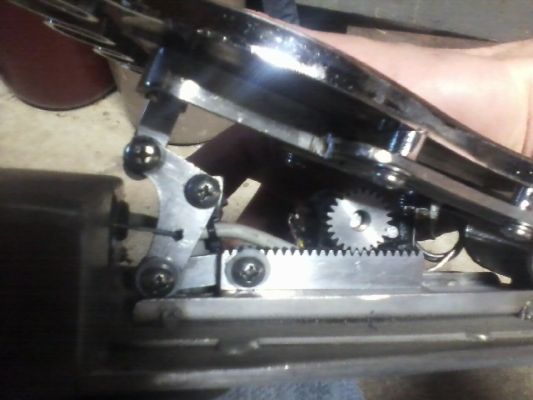
The "Hang 10 " pedal,is gorgeous, the spur/rack gear ,ingenious. Wowzers.
 
Thanks, Tim.

I had more time in that pedal than I care to admit. It was a bit of an engineering nightmare. Adjusting the spur on the rack so it didn't bottom out, but had minimal lash, adjusting the tangs on the roller microswitches to engage sequentially. The arm on top of the L linkage has a slotted hole to allow the pedal to come down before engaging the rack/spur, so it connects to the machine/ switches off max display and goes to low end display and engages the 2nd micro roller switch to start the arc on the very bottom of the amp range.

Because the torsion spring that lifts the pedal would pull that slotted link to its other end of the slot, it won't keep the rack/spur position as you start to lift up on the pedal to lower amps as you pulse. It would slack with that slotted hole, right as you went from down to up, so I had to put a second spring on the L linkage to keep tension between the pedal and the L link, so when you lift up on the pedal it didn't hesitate amp change and it didn't shut the arc switch off at the low end, prematurely.

I barely kept myself from pitching the idea out the window and caving to ebay.

The torch trigger is good for awkward tac weld positions, but because it gives max amps all the time, you can't feather back out of it and the weld puddle craters, because it cools before the arc lowers enough to relieve it. Its like throwing a rock into a pool of water and watching it freeze before the water calms. The pedal is critical.
 
Thanks, Tim.

I had more time in that pedal than I care to admit. It was a bit of an engineering nightmare. Adjusting the spur on the rack so it didn't bottom out, but had minimal lash, adjusting the tangs on the roller microswitches to engage sequentially. The arm on top of the L linkage has a slotted hole to allow the pedal to come down before engaging the rack/spur, so it connects to the machine/ switches off max display and goes to low end display and engages the 2nd micro roller switch to start the arc on the very bottom of the amp range.

Because the torsion spring that lifts the pedal would not keep the rack/spur position, as you start to lift up on the pedal to lower amps as you pulse, I had to put a second spring on the L linkage to keep tension between the pedal and the L link, so when you lift up on the pedal, it didn't shut the arc switch off at the low end, prematurely.

I barely kept myself from pitching the idea out the window and caving to ebay.

The torch trigger is good for awkward tac weld positions, but because it gives max amps all the time, you can't feather back out of it and the weld puddle craters, because it cools before the arc lowers enough to relieve it. Its like throwing a rock into a pool of water and watching it freeze before the water calms. The pedal is critical.

Wow... I appreciate your honesty & pressing, to get better. It's always, a learning curve.....
 
Most definitely. My welds looked like **** for the first few days. That botched attempt in the first pic was after I got comfortable with the welder and just didn't research how to manage stainless. It hates heat so you have to move and keep it shielded lots.

I learned quick that clean prep and tight fit up as well as proper gas shielding is half the battle. The other half is not touching that tungsten tip to the work, but getting it as close and as straight on as you can.

I spent more time cleaning metal off of the tungsten rod tips, resharpening them on the bench grinder, than I did welding for the first few days.

That reminds me, get a small bench grinder and put a diamond wheel of some kind on it to sharpen your tungsten tips. The tungsten will eat a regular grinder wheel. Don't use it on anything else, or you can contaminate the tip. If you touch the tip while its arc is on, it will take in some of the work metal and the arc will try to go around the forgein work metal. This changes the heat dynamic so that it spreads all over the work. You can see an immediate change in shape and color of the arc. Its like the difference between a lightning bolt hitting a tree vs a forest fire. If you contaminate the tip, you have to resharpen. Get 3-4 tungsten rods to start with and sharpen both sides, so when it happens, you can flip it around quickly and continue working.

You have to sharpen them with the grind pattern linearly, so hold the rod parallel to the direction of the wheel. you don't want the arc to travel in a spiral or off the side.
 
Most definitely. My welds looked like **** for the first few days.

I learned quick that clean prep and tight fit up as well as proper gas shielding is half the battle. The other half is not touching that tungsten tip to the work, but getting it as close and as straight on as you can.

I spent more time cleaning metal off of the tungsten rod tips, resharpening them on the bench grinder, than I did welding for the first few days.

That reminds me, get a small bench grinder and put a diamond wheel of some kind on it to sharpen your tungsten tips. The tungsten will eat a regular grinder wheel. Don't use it on anything else, or you can contaminate the tip. If you touch the tip while its arc is on, it will take in some of the work metal and the arc will try to go around the forgein work metal. This changes the heat dynamic so that it spreads all over the work. You can see an immediate change in shape and color of the arc. Its like the difference between a lightning bolt hitting a tree vs a forest fire. If you contaminate the tip, you have to resharpen. Get 3-4 tungsten rods to start with and sharpen both sides, so when it happens, you can flip it around quickly and continue working.

You have to sharpen them with the grind pattern linearly, so hold the rod parallel to the direction of the wheel. you don't want the arc to travel in a spiral or off the side.
Thanks. Remind's me to fix my bench grinder.
 
So, Dave, that's just insane.. Very cool. Think I'm gonna copy and paste all of the welder related posts you've made so I can re read later.
 
Anything that Jody from Weldingtipsandtricks.com has to say on youtube, as well as ChuckE2009 and Kevin Caron have to say on their youtube channels about tig welding is worth watching.

[ame="http://www.youtube.com/watch?v=VEEpikDY058"]TIG Welding Technique - Kevin Caron - YouTube[/ame]

That is a good video that demonstrates basic tig work. He's not pulsing the pedal or moving the torch up and down for filler rod, its just a basic weld performed. As you vary technique, it changes the appearance and heat control of the weld.

One thing that I pay attention to, as I pulse the pedal, is puddle width, each time I pulse. If I can allow each arc pulse on the pedal to melt each puddle to the same width, I end up with a very consistent stitch. I've also found that the more horizontal you feed the rod into the puddle, the less angle you need with the torch. You don't want more than 15° or so. As straight as you can is ideal.

Sometimes, if you've got enough material, you don't even need filler rod, like for a tac weld. You want to keep your tac welds smaller than the full pass and don't be afraid to tac frequently to hold your work pieces close, as you weld.
 
I just want to take a minute and let you know how much it is appreciated that you have taken the time it takes to put up the info and links on tig welding. It will be put to good use!!
 
Hey, any time.

I'm not exactly the tig king, but I try to refine everything I do and I'm always interested in telling people how much I suck, in hopes of getting info, as well. lol

And if I make a mistake that seems like it might be common practice, I'll share it with anyone who is traveling the same avenues.

There are a few rules to tig welding. One of them is 1 amp per .001" thickness, with the exception of stainless, which does well at .66 amp or 2/3 amp per .001" work material.

I think, even more than dirty material, the one thing that has fought me on some of my first attempts was loose fit up. It is not as forgiving as mig. If you can get a fusion weld out of your fitment, meaning both pieces will fuse without filler rod with slightly lower amp input, you have good fit up for full amp input with filler rod.

There are assortments of different diameter filler rods and tungsten tips. For automotive work, 3/32" rod works great on a variety of things. 1/16" would be better for sheet steel, but you can sharpen it to your liking with various angles to play with. 3/32" holds up well to the heat of steel and especially AC on aluminum.

The reason tig welding is more controlled in heat range, is because of the current direction. even with AC, your balance is skewed in percentage to travel more to the tip of the tungsten, than back into the work. The polarity is + on the work piece and - on the torch. The reason they use tungsten is because unlike other steels, instead of melting at around 2000°-2300°, it melts at around 6000°F, so it can take the heat from the positive charge and leave the work alone, with the exception of its most immediate contact area.

On clean work, it functions like a torch welder, ony without heat and oxygen spread, so you get no slag/ splash. So you can work near things that you could never do, with a mig, arc or torch. The immediate work area is hot, so insulation and other things need removed, its a good idea to be safe, but it won't do things like destroy glass or randomly catch things on fire a few feet away, like a mig. AC is a little loud, with the buzzing, but DC welding is extremely quiet.
 
-
Back
Top