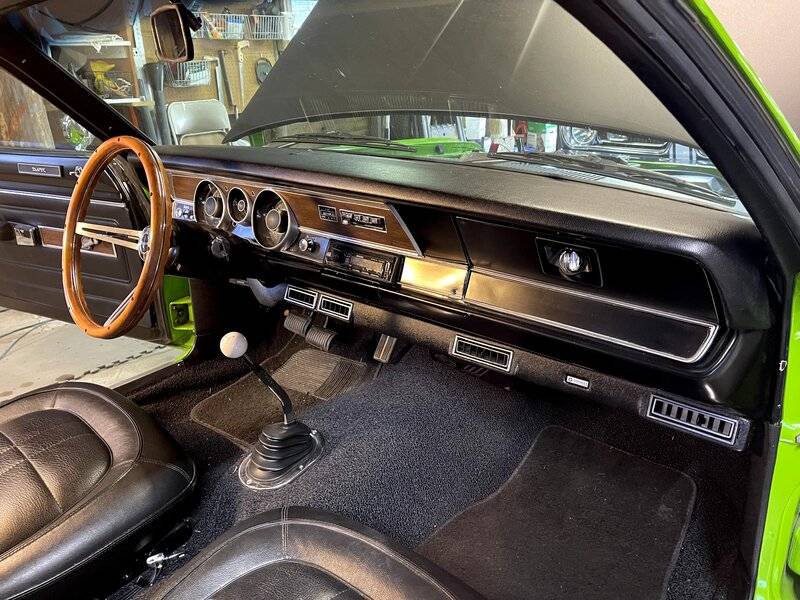
I have taken the two bolts underneath the dash that hold the steering column in place. It is now loose and moves up and down about an inch. This is not enough clearance for me to remove my very brittle instrument cluster so I’m looking for guidance on how to lower it down further. Pictures or illustrations would be helpful because I’m a rookie. I am also having a hard time reaching anything from below to disconnect, speedometer, cable, etc. once I get the steering column down far enough, will the instrument cluster pull out far enough for me to disconnect things behind the cluster?
You are using an out of date browser. It may not display this or other websites correctly.
You should upgrade or use an alternative browser.
You should upgrade or use an alternative browser.
Removing instrument cluster.
- Thread starter gnagrant
- Start date
-
Sometimes you have to take the front seat out, so you can get in there. Once disconnected and screws removed, it will come out. Just be careful. As I recall, the wiper switch was a little harder to get to.
I assume you have removed the trim under the column, and the clamp bolts. If you have a column auto, you will likely have to re-adjust the linkage, no big deal. Some can be reached over the fender. Remove the bolts in the floor flange, and you'll find (I don't remember the position) that a certain point in the steering coupler allows it to flex further, and you can drop the column pretty much down to the seat. Make sure the wiring is free or disconnected
You did not bother to post what you are working on, the speedo cable changed at some point. Older girls have a screw on nut ring on the cable, newer has a "clip" release. Make DARN SURE you disconnect the battery, and un bolt the two ammeter wires. THOSE ARE NOT FUSED AND BOTH THE BLACK AND RED are hot when wired up and battery connected. The black IS NOT ground.
CAREFULLY work the harness connector off.
Post up what all you are doing, as there are some things you ought to do while you have it out.
^^^^ You don't have to do the above. I have done it several times. The trim and 2 bolts are all you have to remove, and you won't break anything if you just carefully remove the cluster. 67Dart has given you another step, and a thought
doug 371
Well-Known Member
Remove the bolts holding it to the firewall should help
The cluster will not pull out enough to disconnect everything. This should be done before removal.
Woodys_Cuda
Ontario, Canada
This thread has a cluster removal in the instructions that should help as well.
 www.forabodiesonly.com
Project Notes from a Rallye Dash Overhaul including Gauges, LED Lighting Upgrade, & RetroSound Stereo Installation in a '71 Duster 340 4-speed AC car
A step-by-step documentation of how to remove a rallye dash from a '71 Duster (but applicable to any A body with a rallye dash), how to overhaul/restore the bezel and cluster, and then reinstall the assembly.
Blue tape on the column and other surfaces will help keep the scratches away when pulling it out.
What are you working on?
year
model
gauge cluster type Ralley, standard

red is the clip
blue is the retainer on the harness
Black is the harness
Magenta is what you DON'T want to happen as it will get trapped behind the clip
side view

end view

year
model
gauge cluster type Ralley, standard
- DISCONNECT THE BATTERY
- remove front seat / seats
- remove the steering column. ( I did my 67 Dart without removal and scratched things up and it was way harder than it should have been)
- carefully remove any connectors you can reach
- removing the radio and wiper and ignition switch might help (dash dependent)
red is the clip
blue is the retainer on the harness
Black is the harness
Magenta is what you DON'T want to happen as it will get trapped behind the clip
side view
end view
looks like its MUCH easier that 67-69 Dart
I got it out and replaced the fuel gauge and instrument bulbs that were out. While testing the new bulbs I inadvertently grounded the hot wire that 67 Dart warned about. The result was the hot wire under the hood fried at the connector block. Ugh. It’s a mess of brittle parts and wires right there.

You ain't done yet. There's really a few things you should do.
Examine the harness connector pins on the board. They are OEM sort of riveted or swedged in place. They get loose. Get a toothbrush size brass or stainless wire brush from a welding supply, or I think HD/ Lowes sells them. Clean up the pins/ board traces, flux them with ELECTRICAL compatible flux, NOT plumbing, and solder with lead based electrical solder.
Examine the gauge regulator /limiter "socket" the contact fingers get corroded/ loose and lose contact with the board traces. Clean and solder jumpers across
Add a grounding pigtail to a common ground point on the board. Usually one of the mounting screws is connected. Follow the PC board traces
Clean all the board areas where the lamps connect. Clean or replace the lamp sockets, and bend the contacts on the sockets for contact.
Loosen/ tighten the guage nuts 2-3 times to "scrub" the connections and be sure they are snug
Examine the ammeter CLOSELY for damage, and be sure the nuts are snug. Examing the black / red ammeter wire ends for damage
WE TOLD YOU??? to unhook the battery.
You are going to want to pop the bulkhead connector apart and examine the terminals for long term damage, oxidation, melt / heat damage. You can get those terminals. You may have blown the fuse link which is in that RED wire coming out into the engine bay from the connector.
You say it's a 74. That manual is not available "free" at MyMopar. I have one I'll be glad to send you, but the files are large. You will have to mail me a USB stick and provide a return mailer. No charge otherwise, PM me if you are interested.
Also you should examine the seat belt interlock box on the left fender apron to see if it has been bypassed, this is a small box like a horn relay with a reset button protruding. It will have two yellows wires, and you need to splice those together.
www.forabodiesonly.com
See post 17 & 18
bypassing interlock system
Also you should examine the seat belt interlock box on the left fender apron to see if it has been bypassed, this is a small box like a horn relay with a reset button protruding. It will have two yellows wires, and you need to splice those together.
1974 duster seat belt interlock module removal
I stripped all wiring from my duster and in the process of rewiring under dash and engine compartment, i removed the reset button on inner fender, but under dash module was bad corroded , found another, it was corroded also, searched web, tells you to disconnect under seat, all that wiring is...
See post 17 & 18
bypassing interlock system
I know I'm rubbing salt into the wound....inadvertently grounded the hot wire that 67 Dart warned about. The result was the
I know I messed up on this one. I did have the battery disconnected while positioning the cluster, but reconnected it to quickly check my bulbs while the hot wire side was partially hanging out. That’s where things went really sideways. I didn’t actually read about the black wire being hot as well as the red wire until after the damage was done. The hot wire inside the engine compartment did not have an in-line fuse. I’m afraid I’m going to have damage on both sides of the firewall.
70SwingerGuy
Long Haired Freaky Person
Those two wires can be confusing for sure, considering we are always told "red hot, black ground"; just picture one long wire with a gauge spliced into it and thats essentially what you have, except one side of the gauge is black, and the other is red, all hot. @Dana67Dart did mention that to you, but I wont harp on itI know I messed up on this one. I did have the battery disconnected while positioning the cluster, but reconnected it to quickly check my bulbs while the hot wire side was partially hanging out. That’s where things went really sideways. I didn’t actually read about the black wire being hot as well as the red wire until after the damage was done. The hot wire inside the engine compartment did not have an in-line fuse. I’m afraid I’m going to have damage on both sides of the firewall.
") , chalk it up to a learning experience and be glad nothing too major happened, ***** happens just make sure you get all damage fixed. Listen to these guys , they know what the hell they are talking about.
, chalk it up to a learning experience and be glad nothing too major happened, ***** happens just make sure you get all damage fixed. Listen to these guys , they know what the hell they are talking about.Keep calm and carry on
-
Similar threads
- Replies
- 12
- Views
- 742
- Replies
- 6
- Views
- 419
- Replies
- 3
- Views
- 685


