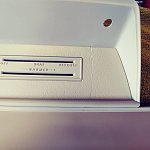
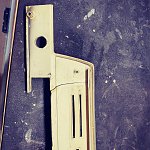
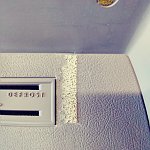
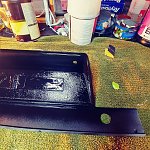
This bezel was pretty rough. I removed all paint and chrome via careful wet sanding and brushing. I heard brake fluid would have done the job overnight, oh well live and learn. I take small projects like this home and work a couple hours in the wee morning, then a couple hours on the car shell during the day while at work. As you can see, crack repair was necessary. I conducted bond tests with several adhesives including epoxy, Super type glues and E6000. E6000 had the best adhesion by far. The down side is, its flexible so be very neat if your joints are visible, this stuff is not sandable. Crack was glued and reinforced on the backside. I used a clear adhesion promoter before primer. After primer I tackled how to hide the crack in the texture field. After masking I used a plastic modeling putty that came in a squeezable tube to "fill" the low side of the area, after it set up a bit I duplicated the texture with an exacto knife making sure to span the crack itself with some new scores. I then lightly sanded before primer, ligthly sanded again before color. I also built a radio delete patch (not depicted) including the perimeter rail. I shaped the rail scallop detail by making a quick router table for my dremel. Upper half of bezel was then painted black
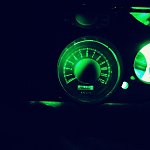
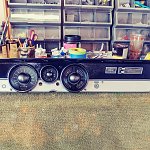
Mods= Bi-secting half round, convex gauge centers and high beam lens
I didn't like the back to back scalloped rail detail that separates the top half of the bezel from the bottom half so I shaped half round plastic rod (it's a gray plastic) and cemented into place for a simpler cleaner look. This bi-secting feature, All 3 instrument bezels and gauge centers were painted Dark Argent, which will also be one of the body colors
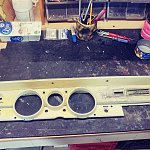
I decided I wanted convex gauge centerpieces vs concave. Found some plastic measuring spoons that were close in diameter so those were shaped down to fit. I drilled shallow holes along the mating edge for adhesion enhancement. When it came time to install these to the lens frame I pre-drilled the 3 attachment posts and used micro machine screws (with w-d 40 this old plastic is very brittle!) Originally, these and the lens frames themselves are plastic melt welded into place which I wanted to improve on during assembly.
Even though indicator lens kits are available, I decided to make my own high beam lens. I used modeling tape to lay out the high beam symbol on a clear lens I duped. I then sprayed background black. I pulled the tape and then shot the high beam shapes Crazy Cuda Green (another body color I will be using) I upgraded the dash lights to green LED as well, as you can see this color shines through very green even through the opaque factory blue light diffusers I chose to leave in place. The lower half of the bezel is finished with '05 Ram Silver and then catalyzed clear coated the entire piece.
I changed up some of the hardware, I went with tamper proof stainless for the lower attach bolts and wide diameter head furniture allens painted black for the top attach points. Gauge needles also Crazy Cuda Green. This project took me 4 weeks. Polishing the gauge lenses was probably the most frustrating part but I'm happy with the finished product, well worth the time.
Mods= Bi-secting half round, convex gauge centers and high beam lens
I didn't like the back to back scalloped rail detail that separates the top half of the bezel from the bottom half so I shaped half round plastic rod (it's a gray plastic) and cemented into place for a simpler cleaner look. This bi-secting feature, All 3 instrument bezels and gauge centers were painted Dark Argent, which will also be one of the body colors
I decided I wanted convex gauge centerpieces vs concave. Found some plastic measuring spoons that were close in diameter so those were shaped down to fit. I drilled shallow holes along the mating edge for adhesion enhancement. When it came time to install these to the lens frame I pre-drilled the 3 attachment posts and used micro machine screws (with w-d 40 this old plastic is very brittle!) Originally, these and the lens frames themselves are plastic melt welded into place which I wanted to improve on during assembly.
Even though indicator lens kits are available, I decided to make my own high beam lens. I used modeling tape to lay out the high beam symbol on a clear lens I duped. I then sprayed background black. I pulled the tape and then shot the high beam shapes Crazy Cuda Green (another body color I will be using) I upgraded the dash lights to green LED as well, as you can see this color shines through very green even through the opaque factory blue light diffusers I chose to leave in place. The lower half of the bezel is finished with '05 Ram Silver and then catalyzed clear coated the entire piece.
I changed up some of the hardware, I went with tamper proof stainless for the lower attach bolts and wide diameter head furniture allens painted black for the top attach points. Gauge needles also Crazy Cuda Green. This project took me 4 weeks. Polishing the gauge lenses was probably the most frustrating part but I'm happy with the finished product, well worth the time.