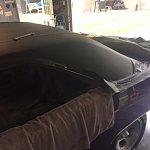
started with laying the top unfolded over a table in the full sun. helped more with the wrinkles. I then placed it on the top of the dart and lined up the seams by a measure from the drip rail to the seam on both sides of the front and from the drip rail about a foot back, then another foot etc. and this lines up the seams next to the back window also. i placed some heavy stones (on a rag) on the side of the top and folded over the top to expose the metal roof. i sprayed the 3m super glue (about 25.00 a can, took almost 2 cans) on the top and the metal being careful of the paint and the top on the other side. a movers quilt was good for this and some towels for the doors.

 started to push down, while keeping tension on the top, and rubbing down with my fingers away from me as i was standing on the side with the rocks. about an inch or two at a time keeping it tight pulling back if a wrinkle, working from front , pushing away from me (side ways, not from front to back.) and moving on down to the back window and then repeat as you get it further down. working out any issues as you go. i glued over to about where the seam is so as to stick the center before i get close to the drip rails.

 Then repeated the side with the heavy rocks and worked it over to the seams.
giving me all but about a foot down each side stuck and smooth. I went to the side and repeated the glue on both and pulled as i rubbed my hands to bond the two together. I found that a box end wrench about a 9/16 that was chrome and smooth worked excellent getting a bubble out and also pressing down into the drip rail.

Then on the back quarter panels area. the vinyl acts like it’s too stiff to pull over the reverse corners of the top around the rear window/1/4 panel, like trying to put compression socks on someone else! (keep working those bubbles) they will go away.


but worked them down a 1/2 inch at a time and keeping them a little warm helps. be careful with the heat gun. If not right, pulled back up a bit and worked again. You think there is no way it will make all those angles and turns, but sure did. I did the part across the trunk/under the window last. And it looked like it would never lay down but surprise surprise. Once it got in place I danced around the garage. (similar to when the dude on cast away when he made fire) Now on to the front. I chose to bring it all the way down the a pillars. That’s where the original one was. It’s a little tough to tuck into the channel where the seam is as it is 2x thick.
 But it holds enough to allow the chrome keep it in place or it gives up and conforms. I really waited to trim till I was sure ever thing was covered. Then when you get to the side of the drip rail, make sure it laps down the drip trough, and lays over the drip rail. I trimmed it a 1/16 of inch from the bottom of the drip rail, this way the chrome will cup over the top and will snap over metal on the bottom. Otherwise it won’t stay as the chrome is the same for vinyl and non vinyl tops and makes it a little easy to come off is the vinyl is too thick on the bottom half of the rail .
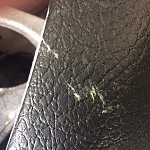
Back in the rear corner of the ¼ glass area leave a little extra to wrap around the area as the chrome only covers so much. Some cars had a little extra piece of chrome there but not on the later darts. Now the tough and scary part. Make sure the chrome that runs around quarter panel is in place. Its really tough to get it and top lined up as the chrome is so thin that you can ruin ever thing with a too short cut. It took me 3 tries, the 3rd being the last I could cut no more and got lucky. Something I also used was a metal bondo applicator, curved a little on the end to allow me to trim the top with razor blade. Later I found out I could have used a plastic one and accomplished the same probably. I still had a couple of nicks to touch up but lucky they were out of the way. Punched a very small nail in the clip holes to locate as several were lost or covered over. Also on the spot of glue on the top, I used the grease and wax remover, a little on a rag (like you use pre paint) and it removed the glue, no trusting it, I then used armor all to rub out the area just in case. Seemed ok.


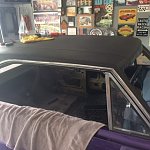
mabye a little better than the before pic???
giving me all but about a foot down each side stuck and smooth. I went to the side and repeated the glue on both and pulled as i rubbed my hands to bond the two together. I found that a box end wrench about a 9/16 that was chrome and smooth worked excellent getting a bubble out and also pressing down into the drip rail.
Then on the back quarter panels area. the vinyl acts like it’s too stiff to pull over the reverse corners of the top around the rear window/1/4 panel, like trying to put compression socks on someone else! (keep working those bubbles) they will go away.
but worked them down a 1/2 inch at a time and keeping them a little warm helps. be careful with the heat gun. If not right, pulled back up a bit and worked again. You think there is no way it will make all those angles and turns, but sure did. I did the part across the trunk/under the window last. And it looked like it would never lay down but surprise surprise. Once it got in place I danced around the garage. (similar to when the dude on cast away when he made fire) Now on to the front. I chose to bring it all the way down the a pillars. That’s where the original one was. It’s a little tough to tuck into the channel where the seam is as it is 2x thick.
Back in the rear corner of the ¼ glass area leave a little extra to wrap around the area as the chrome only covers so much. Some cars had a little extra piece of chrome there but not on the later darts. Now the tough and scary part. Make sure the chrome that runs around quarter panel is in place. Its really tough to get it and top lined up as the chrome is so thin that you can ruin ever thing with a too short cut. It took me 3 tries, the 3rd being the last I could cut no more and got lucky. Something I also used was a metal bondo applicator, curved a little on the end to allow me to trim the top with razor blade. Later I found out I could have used a plastic one and accomplished the same probably. I still had a couple of nicks to touch up but lucky they were out of the way. Punched a very small nail in the clip holes to locate as several were lost or covered over. Also on the spot of glue on the top, I used the grease and wax remover, a little on a rag (like you use pre paint) and it removed the glue, no trusting it, I then used armor all to rub out the area just in case. Seemed ok.
mabye a little better than the before pic???