340 Ultrasonic Wall Measurement Sanity Check

-

JedIEG

Well-Known Member
Joined
Feb 19, 2015
Messages
45
Reaction score
19
Location
Indiana
I measured my 340 block for wall thickness using an ultrasonic thickness tester I bought off of Amazon. It a cheap Chinese unit, but seems to work ok on cast iron. I dont have any delusions that this gauge will give my super accurate results, but it will at least give me an idea on thickness and core shift.
The results seem pretty good. It picked up that the thrust and anti thrust sides of the cylinders are thicker than the sides and core shift seems reasonable but it seems to be reading thicker than reality. I'm just wondering how far off my gauge is. Does anyone have experience with measured thicknesses on a stock bore 340? Based on Chrysler's literature it should be 0.140" nominally at the middle of the water jacket between the cylinders and 0.160" at the top/bottom.
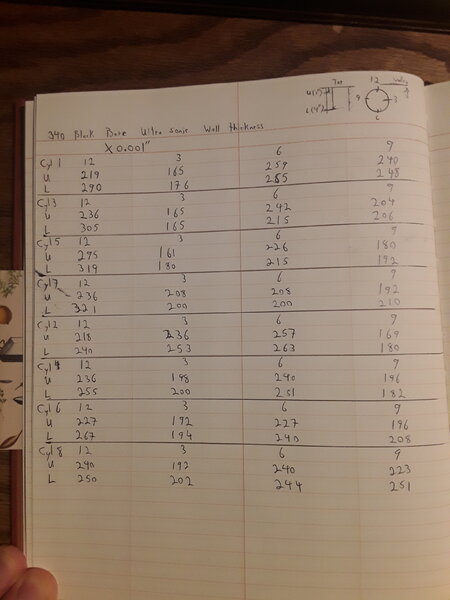
20240118_205811.jpg
 
None of those sonic testers come with the correct probe to measure grey cast iron. None of them. It takes a larger diameter probe. I did research for about a year before I bought mine. Talked to several machine shops north of here ans in the Atlanta area and that's what they all told me. So, when I got mine, I also got the larger probe for grey cast iron and it works very well. I've double and triple checked it on things I can also measure with a micrometer and it's spot on. You gotta have the correct probe.
 
I assume you have a probe with a radius on the face then? The one that came with mine is flat and about 10mm in diameter and was probably at the limit of being able to get a good reading with the 340s bore. If I measure a flat to flat and check it with a micrometer, it's usually within .010.
What probe did you upgrade to?
The radius isn't the critical part. It's the diameter and ferquency. I'd say a .010" variance is acceptable for something that doesn't cost a grand and up. I have a tic over 400 in mine including the extra probe. I cannot remember the diameter but it was specifically for cast iron. I think it's either 5/8" or 3/4". It's significantly larger than the probe that came with it.
 
I measured my 340 block for wall thickness using an ultrasonic thickness tester I bought off of Amazon. It a cheap Chinese unit, but seems to work ok on cast iron. I dont have any delusions that this gauge will give my super accurate results, but it will at least give me an idea on thickness and core shift.
The results seem pretty good. It picked up that the thrust and anti thrust sides of the cylinders are thicker than the sides and core shift seems reasonable but it seems to be reading thicker than reality. I'm just wondering how far off my gauge is. Does anyone have experience with measured thicknesses on a stock bore 340? Based on Chrysler's literature it should be 0.140" nominally at the middle of the water jacket between the cylinders and 0.160" at the top/bottom.

View attachment 1716194324
What is the casting date of your block?
Here is a testing Lab Sonic results for one of my stock bore 360's cast 11-9-72, I include it only for reference, I have never had another test as good IMO, meaning they are out there.

360 Sonic Test Moparts 360 11-9-72.jpg
 
The radius isn't the critical part. It's the diameter and ferquency. I'd say a .010" variance is acceptable for something that doesn't cost a grand and up. I have a tic over 400 in mine including the extra probe. I cannot remember the diameter but it was specifically for cast iron. I think it's either 5/8" or 3/4". It's significantly larger than the probe that came with it.
Rusty did you buy the probe on Amazon as well?
 
Rusty did you buy the probe on Amazon as well?
I did, from the same seller. I asked first if what they had was good for engine blocks like grey cast iron and they said while it would work, the larger probe was more accurate so I got that too.
 
The cast date I have written down is 6/18/67 so it's an early block.

My problem is with the interbore measurements with both our blocks- they are not possible in some locations. For example on your 360, #5-#7 depth B is .246 on one cyl and .247 on the other. Together that's. 0.493 worth of metal not including any core thickness. The maximum wall thickness between the bores on a 360 is 0.46 [= 4.46 (bore centers) -(2* 1/2* 4.00 bore diameter)]. That's reading .033 more metal than possible and no waterjack thickness. Same with my measurements- the sum total of the interbores come out to a number with little to no waterjack thickness possible. That leads me to think the probes are over estimating thickness a bit.
Rusty- with your probe are you getting something less than we are in the interbores?
My comparison won't be the same, since all I've done with mine is a slant 6 block. I didn't even write any of it down. All I did was measure the calibration plate on the tester to make sure it was correct and took some measurements on one cylinder. All I remember was the thickest spot was over .370" and the thinnest was like .325. This was only on one cylinder. I think your comparison is off because you have to remember, you're talking about opposing sides of the cylinder.
 
I assume you have a probe with a radius on the face then? The one that came with mine is flat and about 10mm in diameter and was probably at the limit of being able to get a good reading with the 340s bore. If I measure a flat to flat and check it with a micrometer, it's usually within .010.
What probe did you upgrade to?

You absolutely have to have a radius on the probe for accurate results-I just profiled mine on a belt sander until it fit semi-snugly on a 4"-ish bore. I haven't seen any mention of calibrating off of a known thickness of the block you are working on. You do this with the velocity adjustment. Example: You measure something directly with calipers or a micrometer like from a waterpump bolt hole to the deck--make a mark with a Sharpie exactly where you measured and then you place the probe there WITH ultrasound gel (which I didn't see mentioned) and you dial the velocity up/down until it reads the same as the caliper/mic measurement. This is to account for different material densities. You can measure just about anything as long as you can qualify it first with a direct measurement. There are probably hundreds if not thousands of different cast irons. BTW grey iron is very different than the usual cast iron used in engine blocks.

Also of great importance is the shielding gel--You MUST use a generous amount to get accurate and repeatable measurements. Also I take the intial few measurements 3 times till they all measure the same--too little gel will skew the results--too much costs extra money in waste. FWIW All G3 Hemi 5.7's will easily go to 4" with tons of thickness to spare--Oddly enough the BGE and Hellcat blocks aren't quite as beefy in cylinder wall thickness. Oh and I also taped my probe to a 5" long piece of TIG welding rod to make kind of a wand to reach into cylinders more easily. J.Rob
The belt sander is a good idea!
 
The cast date I have written down is 6/18/67 so it's an early block.

My problem is with the interbore measurements with both our blocks- they are not possible in some locations. For example on your 360, #5-#7 depth B is .246 on one cyl and .247 on the other. Together that's. 0.493 worth of metal not including any core thickness. The maximum wall thickness between the bores on a 360 is 0.46 [= 4.46 (bore centers) -(2* 1/2* 4.00 bore diameter)]. That's reading .033 more metal than possible and no waterjack thickness. Same with my measurements- the sum total of the interbores come out to a number with little to no waterjack thickness possible. That leads me to think the probes are over estimating thickness a bit.
Rusty- with your probe are you getting something less than we are in the interbores?
The testing lab that did my sonic check above was rather large, long established, and costly, and seemed unfazed by the requested procedure.
But I cannot dispute nor explain your math in reference to the reported figures.
Good Eye BTW.
 
-
Back
Top