426 Hemi

-

reckless

Member
Joined
Jul 12, 2009
Messages
5
Reaction score
0
Hiya guys
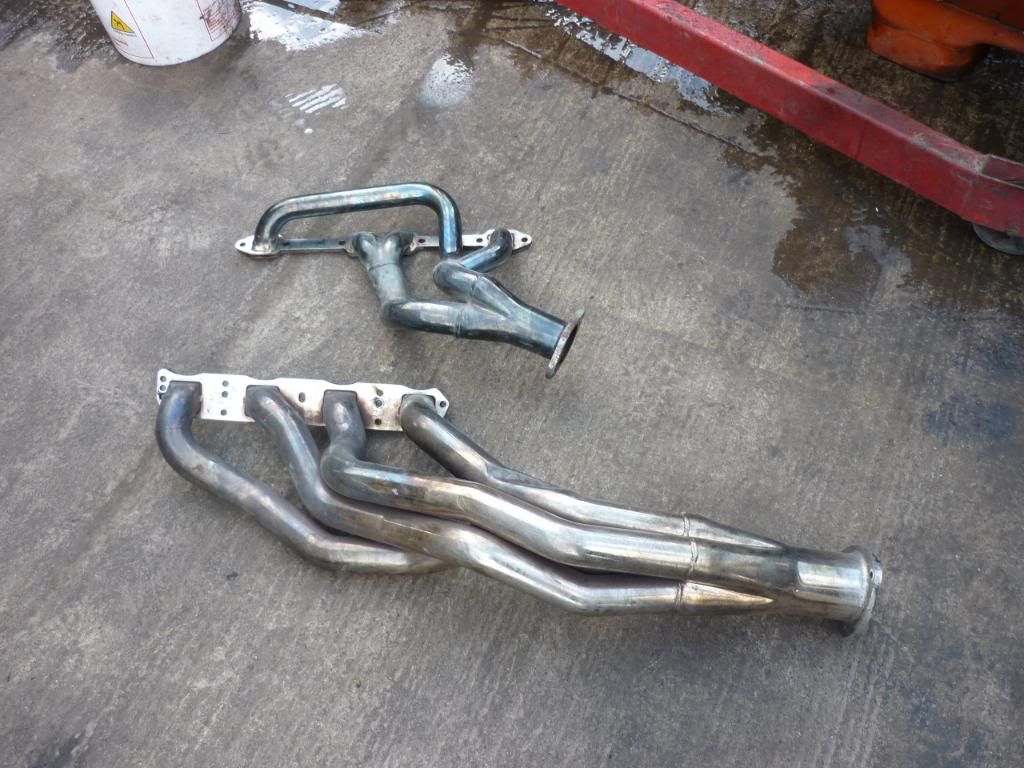
Long time since i've been on, busy at work and all the boreing stuff but know its time for the engine swap,but i have a couple question you guys might be able to help me with.First one why do some people put spacers between the chassis and the crossmember what bennifit would you gain from it also i will be mounting the engine with a motor plate what do you think my chancers are of getting these headers in and retaining the torsion bars they came off a 63 fury and are tti's.
Cheers john
ebaystuff076.jpg


ebaystuff074.jpg


moparnats2011020.jpg
 
i don't know about the spacer thing but put the headers on first then mount the motor plate and move the motor around to clear everything them cut the plate to fit the chassis.
 
The spacers were used to help Chrysler meet a "new" rule that was put in place to try and keep them from competing in the superstock classes with a Hemi car.

The rule stated something like, "...no engine nor engine parts shall extend above the stock hood line." The spacers were used to raise the body just enough to keep the carbs under the factory hood line. Of course, the rule was later rescinded, for being ridiculous and biased, but that's the history of K-member "spacers" in A-body cars.

As Bob noted, you won't know until you start positioning everything. You are probably ahead of the game however, since the early B body cars are narrower than the later models. Let us know how it works out.

I'm mounting a hemi in my 68 A body car right now, and I was lucky to find the now OOP Doug's headers designed specifically for the A-body Hemi swap.

Southernman
 
I thought that with a motor plate the spacers are not needed.....you can "adjust" where the motor sits with the plate......
 
Thanks for the info guys, i'll try and keep updated pics coming as and when i get something done. I've made a template motor plate up so i can get that right before i cut the real one..Rre the spacers... i was just interested to know the reasons behind them and what benefit if any you would gain
 
interesting story on the spacers...

I thouht the spacers were for clearance issues only....no idea they were to comply with a NHRA rule

Hey Reckless...click on the links below for my Hemi A-body build....you might enjoy it
 
I thought that with a motor plate the spacers are not needed.....you can "adjust" where the motor sits with the plate......

IJ, you are correct. The only reason you would want to use the spacers is in the event you were building a 100% clone of the old Super Stock cars. I got that "rule book" info from Greg Fernald and a few other guys that supply the hemi k-members, and built AF/X and SuperStock replicas. They also informed me that every hemi a body that left the factory had the passenger side shock tower 'modified' at the factory - using a 5 lb sledge hammer. I didn't know that either, but if you do a look up, you'll see the hammered shock tower on all of the original cars.

Of course, I"m still waiting to hear from my old buddy, hemidanny, on when he plans to 'launch his k-members ~{:>)

On the motor plate, Mancini sells them ready to bolt on and, unlike the older versions, his new units fit very nicely with a gear drive in place, and only require minimal trimming to get the engine positioned.

I hope this helps.

Southernman
 
IJ,

Of course, I"m still waiting to hear from my old buddy, hemidanny, on when he plans to 'launch his k-members ~{:>)


Southernman

on the launching pad...gettin fueled up right now

actually I'm working incognito with several FABO members sorting out the details on a upgraded k-frame platform with mounts for the 64-72 Hemi,small block, big block and new generation Hemi including the new stealth upper shock mount.
The 71-72 pinto rack, mustangII rack, manual and power are all available
 
IJ, you are correct. The only reason you would want to use the spacers is in the event you were building a 100% clone of the old Super Stock cars. I got that "rule book" info from Greg Fernald and a few other guys that supply the hemi k-members, and built AF/X and SuperStock replicas. They also informed me that every hemi a body that left the factory had the passenger side shock tower 'modified' at the factory - using a 5 lb sledge hammer. I didn't know that either, but if you do a look up, you'll see the hammered shock tower on all of the original cars.

Of course, I"m still waiting to hear from my old buddy, hemidanny, on when he plans to 'launch his k-members ~{:>)

On the motor plate, Mancini sells them ready to bolt on and, unlike the older versions, his new units fit very nicely with a gear drive in place, and only require minimal trimming to get the engine positioned.

I hope this helps.

Southernman
I had the shock tower sliced open and angled, just in case I decide to go with a HEMI...
 

Attachments

  • 100_0178.jpg
    64.5 KB · Views: 1,284
IJ, nice work on that beast. It looks like you also took a few slices out of your k-member. Your set is almost identical to how I'm setting mine up right now. I'm going with a 4spd however, and hope to be able to use the mechanical stuff. If not, I've got Wilwood hydraulic parts to convert it over. Anybody got an opionion on which is 'better' ?

Hemidanny, glad to hear you are making progress on your kits. That a body of yours absolutely rocks and I'm still drooling over how well everything lines up in that car. Do keep up posted !

Southernman
 
I had the shock tower sliced open and angled, just in case I decide to go with a HEMI...

I`d like to see a good pic of your k frame ,probably going to do that to mine, maybe take it just a little farther; but really can`t tell from the pic. your stuf looks iki a$$ !!
bob::thumbup:
 
I had the shock tower sliced open and angled, just in case I decide to go with a HEMI...

I`d like to see a good pic of your k frame ,probably going to do that to mine, maybe take it just a little farther; but really can`t tell from the pic. your stuf looks kik a$$ !!
bob::
 
I can't find the ones that I have, will bring the camera with me when I go outside.....
 
The K-member to front frame rail spacers were for additional header space and to allow for improved weight transfer. I'll have to check my old NHRA rule books to find a ruling on the "hood line" comment.

No, the Mancini motor plates only give you and approximate location. 99% of the time they have to be trimmed to achieve proper location.

The shock tower notch is nessesary to allow for ease of removing the valve cover for stock heads or in the case of aftermarket race heads allow for clearance. The "bashing "of the right shock tower is crude at best. And there is a shock brace under the apron that requires extensive reworking to properly align the front shock as to avoid binding.

I hope this helps.

sscuda
 

Attachments

  • 001.jpg
    74.5 KB · Views: 1,273
Here's a shot of a properly reworked shock tower on my '68. Count on at least 10 hours labour to do it right.
 

Attachments

  • Shock Tower.jpg
    32 KB · Views: 1,231
SSCUDA....you really pull that Hemi to the pass side....does the tunnel need a little massaging too?
 
SSCUDA....you really pull that Hemi to the pass side....does the tunnel need a little massaging too?


Hemidenny,


The Stage IV Millenium II Hemi heads dictate the need for the size of the notch. They are about 3/4 higher and a 1/2 inch wider than stock heads. The valve covers are taller and wider than stock too which adds to the problem. The Mopar Performance aftermarket aluminum block is a little wider than stock too so the stock steering box is jammed tight to the left frame rail on my '68. The wife's '69 is getting an alterkation unit and custom steering column after paint so that won't be an issue.

The trans tunnel area needs a lot of massaging due to engine set back. My '68 has a hand fabbed /removable trans tunnel which is taller and wider. The wife's '69 "street car" hasn't got that far yet but it will be hand fabbed (larger) and removable as well.

I now have a stock Hemi plastic mock up block (with valve covers) I use which helps out a lot as far as locating the motor. If I can stick my hands down between the shock tower and valve cover I know I'm good.


scuda
 
I didn't realize the stage V stuff was that much bigger....

what is it they say...oh yeah..

go big...or go home
 
I didn't realize the stage V stuff was that much bigger....

what is it they say...oh yeah..

go big...or go home


You are so right!!!! LOL!!!!

Yeah, and it's still tight in there!!!

I had to use a Lamb offset and master cylinder assembly to clear the valve covers on the driver's side of both cars because everything else wasn't going to do it.

And as you know everything you do with any Hemi costs big $$$$$$$$$$$

sscuda
:glasses7:
 
Back in the day, NHRA had restrictions on hood scoop size also for the cars. Looking at the pic the OP postedhis X-ram sits about 1/2-1in. above the hood line which means the carbs are at least 3-5ins. above that--too tall for NHRA (back then). The spacers allowed the motor sit further down into the chassis to alleviate that problem & maintain proper driveline alignment--remember engineplates were few & far between back than.
Nowadays builders put engines wherever thay want & build the driveline accordingly. For most guys trying to build a Hemi/A-body car they're best off not screwing with driveline alignment/phasing issues & just rely on how the factory did it. Any body, chassis, rollcage mods can be worked around the original engine location if they don't want to start from "square-one".......
 
Sorry it took so long to get the pictures, needed to wait until the car was pulled out of the corner, it is going on a road trip soon. As to the master cylinder, mine was moved over more than the normal. On my car the 2 bolts that are closest to the drivers side are no longer the outside bolts, they are now the inside ones, if that makes any sense. If pictures are needed just let me know. Fab guy took one of the lumps off of the firewall instead of grinding the back of the relocation block. Pictures might be necessary, be easier to understand....
 

Attachments

  • CIMG1217 (Medium).jpg
    69.6 KB · Views: 1,060
  • CIMG1216 (Medium).jpg
    59.1 KB · Views: 1,065
  • CIMG1215 (Medium).jpg
    79.2 KB · Views: 1,041
  • CIMG1214 (Medium).jpg
    68.6 KB · Views: 1,031
  • CIMG1213 (Medium).jpg
    76.1 KB · Views: 1,050
Master cylinder moved over....
 

Attachments

  • IMG_3529 (Medium).jpg
    58.4 KB · Views: 1,054
  • IMG_3530 (Medium).jpg
    64.2 KB · Views: 1,012
  • IMG_3531 (Medium).jpg
    90.6 KB · Views: 996
  • IMG_3532 (Medium).jpg
    87.7 KB · Views: 1,022
  • IMG_3533 (Medium).jpg
    91.7 KB · Views: 1,029
-
Back
Top