66 Dart electronic ignition issues

-

SassyGrass71

Well-Known Member
Joined
Apr 29, 2012
Messages
92
Reaction score
2
Location
Lusk, WY
Ok, I just read this thread and it answered some of my questions.

http://www.forabodiesonly.com/mopar/showthread.php?t=234343

I will make sure the little blue box has a good ground and retest for spark.

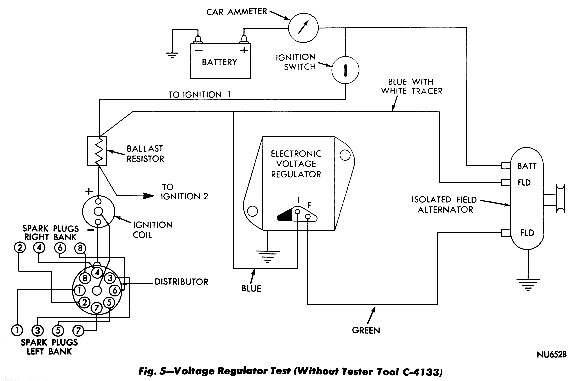
Here is what I have found with my latest purchase, someone put a later model 225 in and also converted it to electronic ignition. Here is a pic of my setup.

a_zps60220e76.jpg


What I have found is that the two wires coming from the little blue box, and going to the distributer have no power when the key is on. Wires going into the little blue box both have power when the key is on.


Also, on the alternator are two spades that show 12v when keyed. Is this correct?


Last, the green wire that plugs into the one spade goes across and connects into the little silver box located to the left of the little blue box. That wire shows ground and does not change when it receives 12v from the alt. It feels like its shorting out. I get good voltage at the coil with this wire unplugged, and low voltage when its plugged in. Again, is this correct or is the little silver box bad. I will also clean up its grounds and check it again. Both boxes had rusty screws and contact points.


I hope my descriptions make sense, and again, thanks in advace for the help.

Sam
 
Cleaned all of my grounds and still no spark. No power coming out of the little blue box and going into the dist.

So can anybody tell me if all the terminals on the alt are doing what they are supposed to do, and what is the little silver module next to the blue box? I dont know anything about this ign.system...


I took this off the mopar1 site it ain't mine but
I have done the conversion and it works
Below is a diagram showing how to install a 70's Voltage Regulator on a sixties mopar:
moparpost70.gif
dia. #3


Basically, a wire is added to the second Field brush on the alternator. On the orignal alternator, this brush is grounded to the case of the alternator, so you'll need to either change the alternator to a 1970 or new style, or adapt the newer brush set to the old alternator. The brush set costs about $5 at your local parts store. The second field wire is connected to the outside plug on the newer voltage regulator. (two plugs, one is in the middle, one is on the outside). The original field wire that ran to the "FLD" plug on the original regulator (green wire) needs to be connected with the wire that ran to the "IGN" side of the original regulator. This wire (both the old FLD and the old IGN) need to be connected to the center plug on the newer regulator as well. One other important thing is, the new regulator must have a good ground (-) signal to its case. Mount the new VR to a fender or the firewall and be sure to sand a little paint off the fender and the case so you have a good ground. If there isn't a good ground to the new regultor case, the charging system will not work properly!
Another wirning diagram.
elec.jpg


ok that was for the charging setup

now to find an ign conversion looking..........ok found it on fourforty site
[FONT=helvetica,arial]Troubleshooting[/FONT]

[FONT=helvetica,arial]Troubleshooting an electronic ignition system is fairly simple. Once it has been determined that there is no spark, there are a few quick checks that can be performed to determine the cause. A DC volt/ohm meter can be used to check the continuity of the pick-up coil. It can be checked at the leads as they leave the distributor, or on pins 4 and 5 of the ECU connector. When measuring the resistance across the two leads of the pick-up coil you should see a 150-900 ohm reading. Always flex the wiring leading to the distributor and to the ECU while checking the resistance to be sure that there are no breaks in the wiring. You should also check for 12 volts at pin 1 of the ECU connector when the ignition is in the "on" position. It is also important that the ECU be securely bolted in place and that bolts provide a good ground to the ECU housing. The only other lead that is connected to the ECU is the "-" lead to the coil, which can be checked to insure that it is not broken. [/FONT]
[FONT=helvetica,arial]
ignit1a.gif

Chrysler Electronic Ignition [/FONT]​
[FONT=helvetica,arial]The other important component of the electronic ignition system is the ballast resistor. It should be checked with an ohm meter and should have 1.2 ohms of resistance. Typically, a failure of the ballast resistor will result in the engine starting, but then dying as soon as the key is released from the start position. It is often handy to have a spare ballast resistor or ECU lying around to use for troubleshooting. [/FONT]
[FONT=helvetica,arial]Upgrading or replacing an existing system[/FONT]

[FONT=helvetica,arial]When replacing a points type system, you will need the wiring harness that goes with the electronic control unit. The installation is fairly simple and the only electrical connection that needs to be made is to the ignition "+" circuit. [/FONT]


hmm I'm going to want to keep that one.. since I haven't got mine wired up yet.

hope this helps
 
The wires that go to the distributor are very low voltage, so you won't read voltage there.
The little box next to your ignition module is the voltage regulator.

Make sure you have voltage at the ignition box, make sure it's grounded.
Still no spark?
Make sure the plug between the module and the distributor is contacting at both connections. (if your car has one)
If all this chks out then very possibly it's the ignition module itself.
Have you chked to see if the distributor rotor is turning when you crank it?

The charging system and alternator was covered pretty well already.
 
To add some to the above, making voltage or resistance checks without knowing what to expect is probably only going to confuse you

In the second diagram down, showing the regulator, essentially what you have there is:

Switched 12V ignition goes to BOTH the "I" terminal of the regulator and either field terminal of the alternator.

The green wire is "controlled to ground" by the regulator. That is, when charging, the regulator holds the green closer to ground for higher output. To put it another way, if you were to unhook the green from the alternator, ground that alternator field terminal, you would then have maximum field current, and should also have maximum charging output.

Normally, with key in "run" there should be full battery voltage at both the "I" terminal and the alternator blue field wire. With everything hooked up, the green terminal, backprobed, should show some low voltage, showing that it is "closer to ground" and thus drawing field current

===========================

It is absolutely IMPERATIVE that both the regulator and the ignition ECU are grounded not only to the body, but actually grounded to the battery. With key "in run" stab one meter probe directly into the top of the battery NEG post, and stab the other directly onto the case of the ignition box. You are hoping for a very low or zero reading, the lower the better. Over .3V is too much, and you need to improve grounding.

Regulator and other tests need to follow once it is running

Unhook the dist, check the resistance which is not critical, and hook your meter to the distributor connector on low AC volts. Crank the engine--it should generate about 1V AC

Wiggle all connectors repeatedly in/ out inspect for corrosion, and feel for "tightness"

Check the reluctor gap in the distributor, you can get a small brass feeler set at O'Really. .008", inches, not metric 'er somethin

Check the ballast for continuity. A quick trick is to hook a clip lead directly onto the coil + terminal, and the other end to a battery source, like the starter relay.

Crank the engine, see if you get spark. Check this right at the coil. At this point, it's really "what's cheapest" or "what you have." If you have a spare coil, try a coil, or the ECU.

=================================

Many of us have gone to HEI modules. I just use the simple 4 pin HEI, and no ballast with a factory coil. Easy and simple. We just had a thread picturing gutting a Mopar box and installing an HEI inside for a "factory" look
 
Ok,

ballast resistor checks out just fine, as does the voltage regulator. Keyed battery sources all check out correctly. I have a new ECU showing up tomorrow. If that does not take care of the problem, I will check the reluctor. I will also run ground wires to the battery from both boxes. What gauge wire would you recommend, 12 or 14?

Whoever did the conversion, used all the factory parts from whatever car they got the engine from, and did a very sanitary conversion.

Oh, and THANKS a BUNCH for the help.

Sam
 
Ground needs to be minimum of no10, and bigger is better.

Here's the deal on a "stocker." The massive current is of course the starter, so the main large cable should go directly from the battery to the engine block. On V8's (not familiar with slant bolt holes) I like to run a no 4 starter cable (ring to ring) from the rear area of the block/ head to one of the studs on the master cylinder.

In your case, I'd take some no 10, or maybe parallel a couple of no 10's and run from a handy bolt on the engine over to one of the bolts on your ECU, then run a short "jumper" no 10 from there to one of the bolts on the regulator. Scrape the front/ rear of both boxes bolt hole areas clean, scrape the fender clean around the bolt holes, and use star lock washers to re--mount. I guess those are "through" bolts and nuts? I'd use two per bolt--one under the fender and one on top of the ECU and regulator on each bolt, so total of 8 star washers

When you get it running, I want to direct you to a couple more tests, and you'll begin to see how important this stuff is.
 
Thanks for the tips. I will report back tomorrow after installing the new ECU and ground wires with star washers and bolted through the fender....(sigh) lol
 
Ok, new ECU is in, and we have fire !!! but...only in start position. As soon as the key is released, it dies. So NOW which wire is not hooked up right. lol
 
Either

bad connection at ballast resistor

dark blue "run" voltage is not getting to ballast

bad ballast resistor

Turn the key to "run" with engine stopped, put your meter / light and check both sides of the ballast resistor. If you have battery voltage on one side but not the other, check resistor and it's connections

If you have NO voltage on either terminal, check the bulkhead connector for bad connections, or any wiring splices that may have been made/ altered

Also check and see if the IGN terminal of the regulator has voltage, and the blue (switched ignition) field wire of the alternator has power

ALL THREE should all have power with key in "run"

If one or more does, but the ignition does not, the trouble is on the engine side of the bulkhead and in the harness -- some splice somewhere

If you DO NOT have voltage at any of those three points, check right where the dark blue IGN comes out of the bulkhead. If none there, the trouble is in the bulkhead connection, or under the dash, ignition switch, switch connector.

Do the warning lights / gauges work with key in "run?"
 
Sorry for dropping off the end of the earth. We were closing on our house and at the last minute we had to do a ton of repairs to make the lender happy and that was just the start of a nightmare three weeks, then my youngest son spilled a glass of water on my new laptop, then my oldest son had a relapse with his health, then company, then, then. Well, you get the picture.

So, we have spark with the new ECU, then we had no compression from sitting the last year. Compression plus spark made for vroom vroom !! Yay !!! Then had to run a new wire to the ignition switch, and put a new set of plugs in. Runs like a sweet sewing machine !!

A BIG thanks to all the help from everyone. Now I can get it licensed and insured, fix a couple tires and DRIVE IT !!!
 
-
Back
Top