'68 318 to carbed Magnum 5.2: Check my checklist

-
All issues sorted with the pump; wound up using the core from the '78 Lincoln with the piston from the '68 pump as-is (no shimming or other such modifications), though the vane is from the '78 as well. Housing remains the early '68 unit.

ekmbk0.jpg


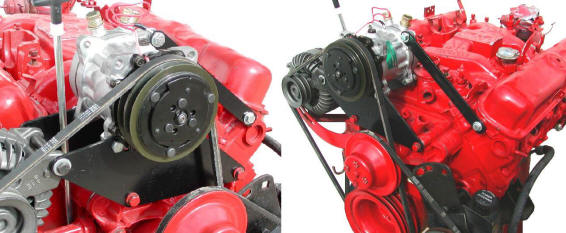
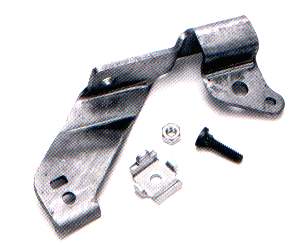
Fits nicely there on the '89 LA van bracket (only took two freakin' weeks). Still need to find a non-metric bolt for the top back bolt, which is presently a dual-ended stud.

I might hold off on doing the exhaust on this side and splurge on a Firm Feel steering gear. I want this car to be highway safe, and those stock PS boxes are probably the furthest thing from highway safe that I've ever known.

-Kurt
 
Looking good. Waiting to hear it run

Cranked over on the starter and test oil for the first time today, just to make sure the pushrods and rockers were playing nice (after running it by hand a few times). Took a quick video too, which will be part of a larger feature on both my Valiant and the Satellite:

[ame="https://www.youtube.com/watch?v=VeZ5ZxsXfN4"]https://www.youtube.com/watch?v=VeZ5ZxsXfN4[/ame]

As for sound - right now, it sounds like a Denso mini starter.

-Kurt
 
Not sure how much I'll get done over the weekend, as I have to take about 500 pounds of junk to the scrapyard this weekend (including the original block, heads, and '89 intake).

That said, I've been considering running Randy Bouchillon's Sanden bracket setup with the van's '87-89 style Chrysler alternator, which is made even more interesting by the 4-belt '89 crank pulley, as seen here, in comparison to the '68 3-belt (A/C equipped) setup:

awvlok.jpg


All things considered, it isn't that different, and I'm not really gaining any new positions, as the fourth belt groove is the furthest forward of the four, and would have driven the factory air pump (which wasn't even on the donor van to begin with, not that I would have used it at all).

Randy's brackets are designed for an original '62+ style Mopar alternator, but is designed so that the alternator sits back in the brackets quite a bit, requiring the use of the outer belt groove, as seen here:

BPE4725.jpg


However, the '87-89 alternator has a few things going for it, which might just work in its favor, depending on how I go about this. The pulley sits farther forward on the snout, so I might have a chance to align the inner groove with that of the Sanden, allowing me to keep the two-belt setup. I believe the Bouchillon bracket is supposed to be installed with washers/spacers against the water pump as well, so a bit of back-and-forth with the brackets and the compressor might yield the ideal result that will also work for the alternator. I might have to break out the MIG welder to offset the mounting studs for the Sanden on the rear bracket, but it may just work without any major modifications.

vra6uv.jpg


If nothing else, the mounting ears will let me mount it without any issue, and the roll pin will allow for some adjustment. We'll see if the back clears the head.

-Kurt
 
I'll say one thing right now: That Magnum exhaust manifold looks like it means business - even between the wider shock towers of a B-body. This is the #53006618 (RH) '92-3 Magnum manifold that everyone says flows like a header.

2znyhk6.jpg


Clearance is just shy of 1/2" to the shock tower. I don't expect the engine mounts to flex that far.

Going to hold off doing the other side until I can order the Firm Feel box - but in the meantime, I can re-gap all my spark plugs to 0.50 in preparation for the HEI conversion.

-Kurt
 
Some good, unexpected news - I don't need to get the Firm Feel box, which means lots of play money for the rest of the parts I need.

For those interested in the change of heart:

Until today, I had the (incorrect) belief that the Mopar power steering box is the direct cause of unbelievably skittish handling, courtesy of my '69 Valiant (my first Mopar, and a 22k mile car that is tight as a drum - hence, I have no reason to believe the P/S box to be worn). The Valiant presently has its original 13" rims with P185/70/R14 tires on it - about 2" smaller in diameter than the original factory 6.50x13" bias-plys - and I'd already installed offset control arm bushings and had the front end realigned to the specs given for radials online (not the old bias-ply specifications that have been pre-loaded into seemingly every shop alignment computer ever made).

That said, the tiny 13" rims have given very little options for me to put decent tires on it, so I recently acquired a set of mutt SBP rims (three 4.5" width, one 5.5") to experiment with, along with a pair of decent, unused P215/70/R14 tires from a garage sale. I wanted to get an idea of how much tire I could stick under the Valiant (answer = the P215's fit with room to spare) and whether I'd have to make significant adjustments to the torsion bar ride height:


zvrg5s.jpg

^Gasser Valiant!

After throwing the wheels on and doing nothing to the alignment, I took it around for a spin, just for fun. I didn't really expect anything different, but for the very first time, not only did the car track perfectly straight, I could feel it pull itself back to center after exiting both left and right turns.

"So THAT's how the stock steering is supposed to feel!"

I'm not sure if it is because the caster was increased with the back end on the ground, whether the larger sidewall deflects better, or if the control arms are in a sweet spot with the taller wheels. But having learned how to drive with 4-turn Saginaw slushbox steering gears in Fords (and driven virtually no other steering box since), I immediately felt right at home and comfortable with the now-correct steering feel.

With that said, I therefore expect the Satellite's box to feel no different than the Valiant on the P215's, provided the alignment is in spec. Hence, no need to spend an arm and a leg on the Firm Feel box - all I want is centering, not stiffness. Maybe I'll go for the fast ratio pitman arm in the future, but not now.

I didn't have an opportunity to photograph it yet, but the engine has both exhaust manifolds on it now. Looks impressive.

-Kurt
 
Bigger tires make a ton of difference in these little A-Bodies, in looks and in ride. The Satellite's coming right along!
 
The BPE brackets came in today. With the alternator mount where it is, there is no way to mount the '87-89 Mopar alternator to it due to clearance issues with the back of the alternator and the cylinder head. I could weld an extension to the bracket that would place the alternator higher up, but I'd only be asking for more trouble in the long run.

2j2daw6.jpg


dcq3ro.jpg


And this is why you always check what lies underneath factory wrapped cables. This is the positive battery-to-starter cable, and it took no effort for the insulation to peel right off the wire, but stay stuck firm to the weaved wrap:

141lchi.jpg


2eoblt1.jpg


Luckily, the van cable is perfectly designed for the Denso starter and is quite a bit longer. Soldering a new end onto it shouldn't be a problem at all.

In other news, my radiator shroud arrived. Turns out it's a huge 28" unit (3673819) for a 1973-4 Charger and won't even come close to sliding in the '68 B-body engine bay. I measured the mounting holes on the Chinese radiator, and measured the shroud mounting holes at 25.25" in width, and 12.25" in height. Ring any bells?

-Kurt
 
Good deal on the Valiant. I know bigger meats made a huge difference on mine. And the fact that we have a alignment shop in town where one of the guys knows old Mopars and gets the caster settings correct. Less bump steer and a car that wants to self center when coming out of turns. Makes a huge difference.

Loving watching the Satty come together. You'll really have to do a video when she runs :cheers:
 
Good deal on the Valiant. I know bigger meats made a huge difference on mine. And the fact that we have a alignment shop in town where one of the guys knows old Mopars and gets the caster settings correct. Less bump steer and a car that wants to self center when coming out of turns. Makes a huge difference.

I believe it - but what really surprises me is that even after realigning the suspension properly for radials (I OK'ed the caster and camber on the machine while it was adjusted), the small 13" tires completely negate the handling as if it were still set for bias-ply.

I don't know exactly the reason the P185's are screwing up the front end geometry, but they act as if the front end is still dialed in with positive camber. With the same alignment, the P215's feel properly in the negative camber range.

Loving watching the Satty come together. You'll really have to do a video when she runs :cheers:

You'll be pleasantly surprised. Video production is half hobby, half business, and I've put a lot of effort into a two-part episode featuring the Valiant and the Satellite. Can't release it until I have video of the Satellite running though - and I need more Valiant footage (and it takes a bit to sucker my camera-operating buddies to shoot footage over the weekend, for - unlike my work - I can't be behind the wheel and the camera at the same time).

-Kurt
 
What an evening.

I decided to try my hand again at soldering the ends back onto the old radiator for eBay. After failing a few times, I realized that I simply wasn't letting the solder cool. Once I figured that out, I had instant success - but first I had to clean it all up again to re-solder it correctly.

Then I hooked a bike tube up to the hose nipples and pressure tested the radiator; just to make sure I hadn't caused any leaks. I hadn't, but it turns out the lower radiator hose nipple is whistling air just a bit, right in the tightest spot to fix. After fighting with it for 15 minutes, I finally get it clean - and another 15 minutes later, I'm able to get solder on the joint.

So I pressure test it again, and it's leaking out one small pinhole in what I just soldered. Damn. Fire up the prop torch again and the bottom half of the radiator lit up like a broiler oven, nice even flame and all. Turns out I had spilled a bit of rubbing alcohol in there when I was cleaning up the joint. So I smothered it away...and two seconds later, it lights up again on it's own.

At that point, I say F it, and bring out the can of ABC and let it have it. I spend the next 15 minutes trying to get the damn extinguisher foam out of my mouth, and an hour cleaning the work area up of that same lousy yellow dust. Oh well, at least it didn't go down in flames.

Good thing that radiator is just for eBay.

Now, if that wasn't bad enough, my distributor from eBay has been waiting to be installed since I got home from work, but by now, it's too dark (and I'm too pissed) to start dragging tools out to find TDC and time it just right. Nope, not in the mood for that sort of accuracy. So I decide to just open the box and stare at my newfound purchase.

Bad idea.

I thought tasting the fire extinguisher $hit was bad enough. THE FOAM INSIDE THIS BOX SMELLED 10 TIMES WORSE. I took one whiff, reeled back, and proceeded to run outside, unpack that dizzy, and throw out that box faster than I put out the radiator fire. Then I realized the damn distributor has taken on the smell too, and was proceeding to take over the fire extinguisher stench for sheer stinky machismo.

For a moment, this irritated me - until I realized the distributor shaft was jamming when I turned it. "F*!)(#)#*$(@#*$!!!!!. More crap from FleaBay!" was my first inclination. Then I realized the distributor was rattling. Sure enough, on top of the mechanical advance weights was a small rock dancing the rumba. Four pebbles later, the problem was solved. But it still STINKS.

I threw it in the engine for now. Who knows where it is timed - all I care is that the distributor is not within the confines of the house. Hell, I'll consider myself lucky if a rat slithers into the engine bay this evening and takes a piss on it.

-Kurt
 
Good news today. Intake bypass nipple arrived and I had time to get the engine to TDC at the compression stroke, so both distributor and bypass hose have been installed.

That said, Felpro's master gasket kit had the wrong distributor O-ring in the kit. I couldn't get the distributor seated - not even with some light taps from a rubber mallet.

I happened to have a genuine Mopar distributor O-ring spare left over from my '98 Dodge Ram Van (the Magnum 3.9), and sure enough, the thickness of the Mopar O-ring is smaller. Small enough that the Felpro O-ring had a line cut around its entire diameter from my attempts to seat it.

By comparison, the Mopar O-ring allowed the distributor to slip in with no more than the light pressure one would expect. Feels nice and snug.

35b81ew.jpg


dep7bo.jpg


2nt8xmb.jpg


-Kurt
 
Kurt I damn near burnt down my Cordoba with starter fluid the other day. Scared the crap out of me. It got me to thinking what I would do if it had happened on my non running carninside the carport, which is attached to the house. Sheesh, very scary.

Hey, glad you have a video in the works. What type of video work do you do professionally? My father was a film writer. Worked formth gub-ment writing films for NIH and the Navy for 30 years. Neat stuff!

CE

PS. I'm really glad the parts I sent you didn't smell like rat piss,.....,,......:D
 
Ok, couple of updates. First off, a decent photo of the dizzy (which looks pretty nice considering its history) and its cap (which looks fantastic):

30bk2lk.jpg


A daylight photo of the engine, for once:

beacur.jpg


And here's where it gets interesting. Since I did not have any 1970+ style front accessories, given the 1968 and 1989 donors, I ordered (the cheapest) 1970 SBM alternator bracket I could find off of eBay.

I test-fitted it today, and found out one of those nagging compatibility issues that nobody tells you on Magnum swap pages ("...everything else fits!"), and you don't find out until it's too late.

The problem is that the Magnum head protrudes farther than the original heads (a known fact), but this causes interference problems with the one-piece bracket brace at the back:

2w71ta1.jpg


99i2cj.jpg


hsp8qb.jpg


It's no problem for me once I chop it shorter and put it back together with the MIG welder, but it's something you don't want to run into if you don't have access to welding equipment - or a friend who welds for beer.


Kurt I damn near burnt down my Cordoba with starter fluid the other day. Scared the crap out of me. It got me to thinking what I would do if it had happened on my non running carninside the carport, which is attached to the house. Sheesh, very scary.

Hey, glad you have a video in the works. What type of video work do you do professionally? My father was a film writer. Worked formth gub-ment writing films for NIH and the Navy for 30 years. Neat stuff!

CE

PS. I'm really glad the parts I sent you didn't smell like rat piss,.....,,......:D

Ugh. I don't care much for either-in-a-can for that very reason, though it does burn off quite quickly. The alcohol much less so - it's a very uneasy slow burn.

My video work is nothing much - glorified DSLR video work (strangely enough, for a non-profit in the injury promotion/health field; we've had an NIH grant before). You can see a portion of my favorite hand-held rig here. At the center of it is a rather mundane Canon EOS-M; my favorite run-and-gun camera for video: http://manwiththe5d.com/2015/02/canon-eos-m-anton-bauer.html

I also have some Blackmagic Cinema cameras, but they're really not suited to on-the-fly work - I used one to film the interior of the Valiant, but unless the shot is pre-planned, it's not suitable. Most of the video I shot was done with the EOS-M, a pair of GoPros (of which one Hero 4 Silver failed - it overheated and burnt its own sensor), and the junkyard footage with an iPhone 6 and 4. None of this will make much sense until you see the video.

I wish the YouTube Partnership Program would pay off on this video - a good enough return on it might actually justify making another video. I'd love to quit my job and do this Roadkill-esque stuff for a living.

-Kurt
 
Modifying the bracket went well, if a bit messier in the back:

2welyqw.jpg


n14coi.jpg


Very tempting to get a nozzle with a pointed tip for the MIG welder, if such a thing exists.

It fits nicely, considering the accuracy needed to make sure the alternator's bolt lined up through the entire curve of the bracket. I installed spacers after mocking it up here:

xqardl.jpg


30szfyr.jpg


However, I'm still not sure if this will work with the 1989 4-pulley setup. Again, have to wait for the Sanden to arrive before I can figure that out. If I deem it wise, I'll extend the BPE brackets to move the alternator mounting up and outwards away from the cylinder head.

In other news, the Magnum exhaust manifolds I bought had a bung for an air injection pipe on the passenger's side. While it was easy enough to buy a Steiger Performance blockoff plate for it, it was a pain to find the gasket, Mopar #53010000. It's available, but try to find it listed in any parts store catalog. It doesn't come up under EGR or exhaust parts.

However, one eBay seller thankfully cross-referenced the Mopar number, and apparently the gasket is best known as an EGR gasket on 2004-09 Nissan Quests with a 3.5L V6, Airtex part number 3F1078. Seller gave these alternate part numbers as well: 14719-4S100, VG179, 70-1150, EVG175, 3F1228, 779-2681, FE337, E879, 2-2580.

Not a great picture, but the gasket is installed:
9ptd7m.jpg


I also found out that I bought the a 727 inspection plate instead of one for the 904. Anyone want to trade?

if615j.jpg


I re-installed the plug wires. Looks like a spaghetti factory, and I'm a bit ticked that cylinder #4's wire is too short (no matter what the wire combo) and the others are a bit too long. That, and they're that bright freakin' red - but I figure the used 7.5mm wires stand a slightly better chance of preventing crossfire than stock 7mm's.

I have, however, cooked up a great idea to route thee wires in a classic way, using the stamped Magnum covers. We'll see if it works.

9iqyba.jpg


And an overview shot, for the sake of it:

9aakpu.jpg


-Kurt
 
Slow day, but I was able to get an M-body upper radiator hose to fit the KKS aftermarket radiator. I gave the parts store an '89 Diplomat w/318 as the source car.

Unlike a '70 Satellite hose, this one kinks downwards to meet the slightly shorter radiator. I did have to cut it short at the radiator end:

2s156o2.jpg


11c5kzq.jpg


Comes close to the BPE brackets, but not as close as it appears. An aluminum thermostat outlet (already ordered) ought to take care of it:

246noed.jpg


I've also figured on using a 1969-and-up one-piece power steering high-pressure hose instead of the ridiculous two-piece 1968 unit. The fitting on the P/S pump will probably need to be swapped, but that shouldn't be difficult - if I can find someone selling the flare-to-1/2" SAE adapter for less than a ridiculous $23 as a "Mopar" part.

-Kurt
 
Van starter and starting solenoid cable were cut to length, a new end soldered on, and the cables wrapped for looks and neatness. The starter end has both cables fused to match the mini-starter, so I figured it would do well. Torched the smaller wire a bit, but it'll do:

201jdy.jpg


At the solenoid below the bulkhead - the brown solenoid wire (from the van) was also soldered with a different connector:

2n7395w.jpg


In other news, my thermostat water neck arrived, but the thermostat sits in the thing loose. The designers of this thing can't expect me to mill the bottom of it to spec...or do they?

2efnocz.jpg


-Kurt
 
Annoying on the water neck. If it isn't too much to take off, varying grades of sand paper on a nice flat piece of glass will make quick work of the aluminum.
 
Annoying on the water neck. If it isn't too much to take off, varying grades of sand paper on a nice flat piece of glass will make quick work of the aluminum.

Bingo.

Funny how the last bits on this engine are becoming nothing short of a mission - and I haven't even started on the throttle linkage. There actually is a Mopar throttle clamp-and-pivot mount out there made for the Magnum intakes, but try to find one with a sane price for a piece of stamped steel (I'm still reeling from everyone trying to charge $30+ for a $5 pipe fitting for the steering pump).

EDIT: Linkage is P4876850. I'm not sure I even want to consider it with the Summit carb. Might be easier to just go Lokar and forget it:

magnumbkt.jpg


-Kurt
 
Success, for once:

After some Googling, I'm almost certain the steering gear box fitting is a $4 JIC (flare) x ORB (O-ring boss) hydraulic fitting adapter. Best Google term: "JIC x ORB".

DV_WebLarge_P_6388.jpg


The '68 power steering pump has 7/16" threads at the JIC end (which works out to 1/4" JIC, as JIC goes by pipe size) x 1/2" ORB. The '69+ is bigger at the JIC/flare end; Rock Auto says 5/16". Thus, 5/16" JIC to 1/2 ORB should work.

Even though the fitting is shown and said to be designed for an O-ring, the design is no different and can have a standard copper crush washer put in its place. Same thing.

All the Mopar parts sellers asking $25-30 for the same fitting can go home now.
 
My 1970-style power steering hose arrived - an Edelmann 70344 for a 1970 Coronet/Belvedere with a Saginaw pump. $18 and change from Amazon. I had to relieve one of the bends in the pipe a bit (probably because of the lower '89 PS bracket), but otherwise it'll be a perfect finished fit once the adapter arrives for the steering box end:

9rk484.jpg


-Kurt
 
At this point, I feel it's safe to put together a list of things one should expect to have to change in the process of doing a Magnum swap, regardless of Mopar platform:

Be prepared to replace and/or acquire:

  • Obvious due to being drilled into us in every discussion: Center oil pan and sump.
  • Also obvious due to repetition: 360 and 5.9s will require an aftermarket flexplate balanced for the specific engine you are using. LA 360s and 5.9s also use different plates between each other, plus keep in mind the smaller 904 torque converter size vs. the larger 727 when choosing. I won't go into detail, just make sure you look for one that matches the exact engine you have to the exact transmission you have, and beware of torque converters with weights added on them - search the forum for more on this.
  • You must get an air injection blockoff plate and matching gasket when using Magnum manifolds with air injection provisions (may not be applicable on A-bodies due to manifold options)
  • Be aware of your water pump intake location. Pre-1970 is on the driver's side. If you use 1970+ accessories or a Magnum pump, expect to change your radiator and fan shroud to that of your car's 1970+ bolt-in equivalent.
  • Magnum water outlets are offset to the passenger's side. You may have to get creative locating an upper radiator hose for your particular application.
  • Engine mount ears are as I mentioned earlier. Order yourself some longer, grade 8 mounting bolts in advance, or you'll use the ones from your starter and bellhousing, then wonder where the hell they went when you've got the engine lined up (I'll post the bolt length here soon as I'm under the hood again).
  • Transmission linkages and cables from the Magnum donor 46RH/RE trans have to be transplanted onto your 904 or 727 for the MPFI setups. I think. Don't go in here blind; research up before you go to the junkyard to save yourself a trip.
  • Your choice, but it's the perfect time to put in a 3.9L Magnum timing chain tensioner along with a roller chain in your engine, if you don't have either already.
  • New head bolts if you're putting Magnum heads on a roller LA to make a Maglay 318/360 (such as what I did).
  • If your Magnum engine came from a van, probably a new dipstick.
  • If your Magnum engine did not come from a van, a Ram Van power steering bracket, provided you maintain a serpentine belt.
  • Possibly a longer starter and starter solenoid cable for the mini starter.
  • Conventional oil pressure sender or plumbing for your needs.
  • Bypass hose nipple. Harder to find than you think. Don't forget bypass hose.
  • The transmission-to-engine braces are 9" long on most older engines. 360's became 10" on the left side in 1976, 318's were increased the same 10" in 1981 (thank you Doug Anderson for the info). To be safe, just make sure you get the braces that were already on your donor engine, because those 10" braces are less common and rarely listed correctly on eBay.

For those of you converting to V-belts from serpentine:

  • Mechanical fuel pumps are only possible with snout extenders on Magnum cams. If you find a roller-cam LA, chances are you'll have a long cam out of the box. If you plan on changing the cam on your Magnum, Lunati is one of the few companies that will listen to you when you ask for a grind to fit a Magnum block, but using a core with the long LA snout.
  • If you use an electric fuel pump, a blockoff plate IS available for the LA timing cover.
  • LA timing covers prior to 1970 have timing marks on the passenger's side or no timing marks and a bolt-on steel indicator. Keep this in mind, as your Magnum will be marked on the driver's side.
  • Power steering brackets for '70+ cars are completely different from 1969 and earlier due to the omission of the extra "ears" on the later water pumps. Your alternator bracket may be slightly different as well.
  • If you swap to a Saginaw pump from a Federal, be aware of different steering box fittings when ordering your hose. Pre-1969 cars used 1/4" NPT to the hose, 1969+ use 5/16 NPT, and the box itself is 1/2"-20tpi SAE with a crush washer. Various Mopar suppliers sell the alternate fitting.
  • Again, be aware of your water pump intake location. If you swap the offset, you obligate yourself to a replacement radiator. Most of these radiators are semi one-size-fits-all, and may require a different shroud and upper radiator hose (my aftermarket, Chinese KKS B-body compatible radiator is patterned after an M-body radiator, and is thus about 1-1/2" squatter than the original. It required an M-body upper radiator hose which kinks down to make up for the loss in height over the original radiator. If you've got a 26" radiator swap going in your A-body, your experience may be similar to mine).
  • On that note, make sure your brackets for either Saginaw or Federal match the era of the water pump, or you could be trying to mount an early bracket into thin air on a later water pump.
  • 1970-style, fixed lower alternator brackets will bolt to the water pump, but the bracket to the back will interfere with the Magnum head. You'll have to cut the bracket and weld it up.
  • Think out your arrangement for air conditioning in advance. If you have a 4-groove pulley like mine (in which case, you probably have a roller LA), you may find that most aftermarket setups are designed to work with 3-pulley systems found on pre-roller engines.

For carbureted conversions, add the following to the above list:

  • Intake manifold; make special note of thermostat outlet location and water bypass angle. Some M1 manifolds are set up for straight-out bypass hoses for use with Magnum water pumps (and thus the factory serpentine system), others are angled to meet up with LA pumps.
  • Magnum manifold alternate throttle bracket for 4-barrel applications, P4876314. Allows original hardware to be mounted on straight-up style Magnum intake bolt bosses.
  • Think out your ignition system in advance. Staying with Mopar electronic ignition? HEI? Your coil and ballast resistor may change or require modification with HEI. Read up on it so it doesn't slow you down needlessly.
  • Mopar connections on your carb. Just saying.

And of course, visit http://www.magnumswap.com/ before even reading through my list, because they cover some little bits that I haven't up here.

Might be more, but I can't think at midnight anymore.

-Kurt
 
Another "one step forward, one step back" sort of day. My Summit carb arrived, and seemed to bolt in fine - until I realized the throttle linkage was binding on the huge chunk of aluminum cast into the left side of the M1 intake.

5nknsn.jpg


The nub of the throttle cable on the inside seen here was contacting the squared off part of the M1 casting.

20z1i0n.jpg


I propped the carb up on that cheap 1" spacer shown in the pictures...for now. Rather than grind or hack anything, I ordered a 1/2" carb spacer. Should take care of the problem and not look too out of place.

-Kurt
 
-
Back
Top