'68 318 to carbed Magnum 5.2: Check my checklist

-
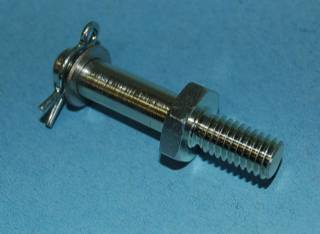
More fun with Dick and Jane tonight, courtesy of the Mopar Performance P4876850 Magnum conversion throttle bracket, at right:

2vi318l.jpg


Granted, seeing as anything associated with a Mopar kickdown that is not cable operated bearing the name "Lokar" is suspect, I should have known that I was walking into uncharted territories here (not to mention that there isn't any record online of anyone actually trying to use this bracket on their Magnum conversion).

That doesn't mean I'm going to knuckle under that quickly. Someone at MP designed this thing to work (we hope), and I'd like to put the part to its use.

Problem #1:
The P4876314 bracket has provisions for a bellcrank pivot stud, but the original stud is swedged to the throttle bracket. It's not serrated and press-fit - trust me, it's impossible to push the stud out and reinstall it with a hydraulic press (ask me, I tried).

The new bracket is obviously designed for a press-in or bolt-in piece, but I don't know the part number to find it, and Googling has been of no luck (nobody else references this part other than a few retailers).

Question is: Did MP ever issue a manual for this stinkin' little part? I bet they didn't, and I bet they forgot the stud too.

2us7sl2.jpg


k9dzyp.jpg


Now if the stud doesn't show up, I can always cut the swedged end off the stud and weld it into the MP bracket - which is probably the only option, but I'm not going to take guessing as an answer until I've exhausted all possibilities (yes, even sending an email to MP - bet that'll help! :banghead:).

Which brings me to problem #2, which is the reason I suspect a manual might actually exist for this thing:

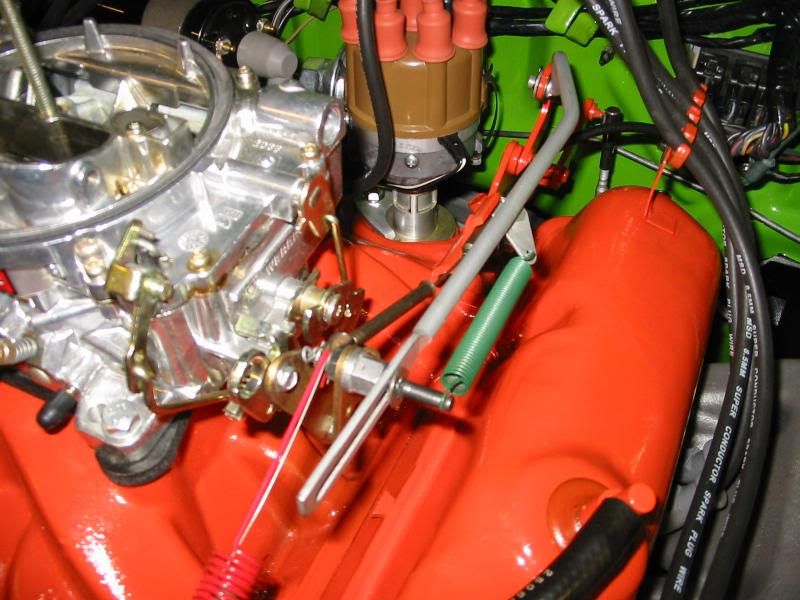
There is no indication which factory donor kickdown linkage (at the carb-to-bellcrank location) is supposed to be used with this piece. And, of course, this has been a black art mystery ever since Mopar ever invented the concept of designing a kickdown linkage that has a drawn reciprocation dingle arm built into it (I wonder if I got the optional turbo encabulation?). In short, I'm left wondering whether I need a 340 kickdown arm at the carb, or whether I can stick with the 318 unit.

My guess is the 340, just by virtue of the MP conversion bracket's design vs. the stock 318 bracket vs. the stock 340. Almost certain the 318 arm would interfere with the throttle cable if mounted to the conversion bracket:

318 2-barrel Carter:
j8obog.jpg


30uzewn.jpg


340 4-barrel Edelbrock/Carter:
faucetpics832.jpg


-Kurt
 
Couple of things tonight:

First, the BPE power steering fitting arrived today. Works well, and the setup looks as if it came from the factory. '70 Belvedere/Satellite hose is a nice clean fit, and reaches the lower 1989 Ramcharger/B-series Van P/S bracket without issue:

ifwdw1.jpg


2r4hfdx.jpg


And my M-body radiator shroud (#3869812) arrived. Apparently, I'm the only person on the internet talking about them, save for one thread at the FMJ forums:

14eb13s.jpg


2hwlbnl.jpg


And now comes to light some of the reasons why I may be the only one talking about them. Initial fit tests suggest this shroud is probably the only ideal one for the Chinese KKS aftermarket radiator and the van's substantial 20" 5-blade fan (EDIT: The hell it is. It won't fit.), but there are a few issues - some minor, others a complete PITA:

2vmy2xs.jpg


29ok5dl.jpg


First off, the mounting holes on the shroud are about an inch higher than the holes in the radiator. Looks like a good excuse to put some serrated bolts to use, seeing that I spent so much time researching them for the throttle bracket.

Second, the lower radiator hose binds. Apparently, M-bodies use a different hose that does a little dance around the shroud. Dayco C70483 is the solution. Looks like I've already worked my way through two sets of hoses.

2ajygc3.jpg


5191866_dap_c70483_pri_larg.jpg


Close quarters with the PS pump snout, but safe:

20tnxft.jpg


This is where I'm a bit ticked off. The fit at the upper hose is such that it's getting pinched. I can remove some material, but there will always be contact and a snug fit:

r2m63q.jpg


The 20" fan doesn't look like that much of a tight fit against the top, but once the lower radiator hose problem is solved, the clearance will be notably smaller:

6pqlxe.jpg


Also got the original valve covers back from hot tanking. Doubt if I'm going to use them, but they sure look a heck of a lot nicer now:

ezn1np.jpg


2ibhndd.jpg


And in other news, I'm convinced the 340/360-style 4-barrel kickdown lever is correct. I've been looking at a few photos of small blocks with Thermoquads, and the bellcrank positioning is the same. Can't hurt to try. Anyone have an upper kickdown rod for such an application?

-Kurt
 
On your upper hose, just trim the shroud some and cut a small section of old hose, zip tie it around where it may rub, this will protect the hose from getting a hole in it.
 
On your upper hose, just trim the shroud some and cut a small section of old hose, zip tie it around where it may rub, this will protect the hose from getting a hole in it.

Trimming the shroud is no problem - but there's not enough to shove another old hose in the gap where it may rub.

I'll re-fit it after the lower hose has been taken out. Might not need as much as I think.

-Kurt
 
On your upper hose, just trim the shroud some and cut a small section of old hose, zip tie it around where it may rub, this will protect the hose from getting a hole in it.

This is actually an OEM solution,to such a situation. GM has done it, I know of. ( Wouldn't doubt other manufacturer 's as well..).
 
Well, the M-body lower radiator hose won't work. I forgot that Mopar changed them to 1-1/2" from 1-3/4" at the lower outlet, which throws that idea out the window. Even if it did work, the shroud just doesn't fit right. Confirmed it when I pulled the lower hose this evening.

Looks like I'll have to go for the P2998326 shroud and simply use an 18" fan instead of the 20". Damn myself for selling off the original 7-blade. Might just grab the first nice-looking 18" that I can find in the junkyard that fits, and call it a day. Our junkyards stink though - prices sometimes rival that of eBay + shipping.

-Kurt
 
First - while looking for those radiator studs, I wound up finding a workable kickdown stud - a new repop of a Max Wedge crossram bellcrank stud:

MWPP.jpg


It's pretty much the same thing as the small block kickdown stud - with threads. Brewers Performance confirmed that the stud is 1-1/16" long (the same as the swedged SB piece) and should bolt right in the Mopar Performance Magnum bracket. If the threads are too small to fit snugly in the bracket, a captive bolt should center it.

As for actual work on the car:

1/2" carb spacer arrived today. The linkage clears the intake now, though the included carb studs were too short. Threw on these for the moment until I dig up a set in a suitable length:

2dm7fyo.jpg


And here's my little sacrilegious HEI unit beautifully hidden with a Designed2Drive heatsink adapter for Mopar distributors:

x639e.jpg


It looks great under the hood, in that it pretty much disappears!

6f369v.jpg


With a Ford E-core coil in place here (I hope to modify a Ford coil bracket to mount onto the original canister coil adapter), the HEI unit should be next to invisible:

35m19xy.jpg


2e0uzqa.jpg


-Kurt
 
I find it hard to believe that there is not enough clearance to do this to the hose.

5s5z91.jpg
 
I find it hard to believe that there is not enough clearance to do this to the hose.

Dan6XA.jpg

There isn't. The shroud is roughly 1/4" taller than the tanks on the radiator. When sitting level with the radiator, it touches both the inlet and outlet port.

The fan sits too deep in the M-body shroud anyway, and would probably introduce turbulence behind the blades as well. The repop E-body shroud should work.

-Kurt
 
A few proper daytime shots of the build:

2a7icsm.jpg


210fyvd.jpg


I took a hammer to the 318's original return spring bracket and reshaped it into something usable on the straight-up Magnum mounting boss:

b5mxhu.jpg


The MP conversion throttle bracket has been installed, seeing that the pivot pin should be a bolt-in:

208d66e.jpg


Mopar ECU wiring harness...

24q0qow.jpg


...meets HEI, the way I like it: Half-invisible.

2njc94j.jpg


The ballast resistor was cored out and a piece of wire soldered in its place:

s4cu1g.jpg


Reinstalled - and clocked properly, as the PO had pointed the leads straight down, interfering with the heater control valve. Not anymore.

14ikg7c.jpg


In preparation for the cooling system flush, I performed some athletic sanding of the mating surface on the problematic thermostat housing/water outlet. No longer a problem:

553x9c.jpg


-Kurt
 
Made a quick stop to the junkyard (not the one I got the engine from) today to scout out a few things. I must have gone by 30 Magnum 5.2's and 5.9's this time. Yard was CRAWLING with them, though every single one looked quite rough.

20rvati.jpg


I was able to pick up two really nice Magnum air cleaners (and could probably have come home with 20 more), which I quickly found out are useless to me. They sit comically high on the 4-barrel Summit carb (and probably all others), plus, the bottom of the pan hits the float needle adjustment screw due to the clearance needed for the small-diameter filter element.

Looks like I'll have to dig up a proper air cleaner off a 1970's 4-barrel application. Good luck to me, for there wasn't a single carbureted Dodge in the junkyard that would have yielded one cheap ($100+ for an air cleaner on eBay is BS in my book). Not even any pre-'92 TBI engines. And I'm sure as hell not putting one of those plastic Dakota lawn sprinkler ducts on top of this build.

2jcygp3.jpg


On the right is a Ford E-core coil bracket, which I intend to modify to mount onto the factory, small-block canister coil bracket. On the right is a little gem that I found on a 1992 Ram (oldest Dodge on the lot there) - a dual-row power steering cooler.

The dual-row power steering cooler looks much like the old single-row units on big block Mopars. It's just the ticket as a slightly over-the-top-looking power steering cooler that still looks period.

Unfortunately, it was designed to mount right on the block in the same spot my power steering pump is located. A bit of home-brew engineering would be needed here.

I wanted to use something that would look similar to the stamped steel bracket used on big block Federal pumps equipped with coolers, so I took the magnetic timing pickup bracket from the van, pressed it flat, and welded it to two pieces of curved steel cut out of the original 318 flexplate.

9uxh1c.jpg


2n6f1mv.jpg


The not-so-complete, but satisfying result by the end of the evening:

2e0qo45.jpg


2q34vex.jpg


The only SAE pump reservoir bolts I had from the PS pump rebuilds were studs - so I have two studs protruding from the back of the pump to mount and center the bracket, hence the curved shape. All works out rather well, I'd say.

By the time the whole thing is done, it should look something like this:

2cxf7mu.jpg


-Kurt
 
Making good progress.
Drill a 1/8" hole in the thermostat to allow for a coolant bypass if the thermostat would happen to stick, also it aids in burping the air out of the system.

Some of the higher priced thermostats have this feature built in to them.
 
Making good progress.
Drill a 1/8" hole in the thermostat to allow for a coolant bypass if the thermostat would happen to stick, also it aids in burping the air out of the system.

Some of the higher priced thermostats have this feature built in to them.

Fill me in on these better thermostats (Robert Shaw?). Never been keen on the Stant T-stats to begin with.

-Kurt
 
All you have to do is drill a 1/8" hole in the second recessed area from the OD, where the gasket sits.
Does this make sense?
 
Also boil the thermostat in hot water before you install it.
Check to make sure it opens, I have been getting quite a few lately that will not open.
 
All you have to do is drill a 1/8" hole in the second recessed area from the OD, where the gasket sits.
Does this make sense?

Also boil the thermostat in hot water before you install it.
Check to make sure it opens, I have been getting quite a few lately that will not open.

I'm familiar with the weep hole trick, but I'd also feel much more confident with a better thermostat - whether or not this one passes the hot water test. It's not as if the Stant units have a good rep to begin with.

Still a ways off though. Not really keen on flushing the radiator and P/S fluid until the exhaust is all buttoned up.

-Kurt
 
You are doing a fine job with the motor change, it will all come together shortly.
 
Not much progress tonight. Tried to solder the bracket to the power steering cooler fins with little success - the solder did not want to flow onto the fins.

Will give the fins a really good cleaning tomorrow and try again. By then, the coil should have arrived, so the coil bracket should be ready to fit and modify as well.

-Kurt
 
Bingo. Success is mine:

xba8lt.jpg


71pkif.jpg


And it looks even better under the hood:

2ls7hqe.jpg


2lc367q.jpg


Not bad for a junkyard cooler mashed up with a magnetic timing pickup bracket and a few pieces of flexplate. And it even wears a stamped Mopar part number on it - bet that'll drive someone on Moparts nuts in about 50 years.

I'm not 100% willing to rely on the solder though. I'm going to fabricate a pair of brackets to fit onto the original mounting tabs and MIG them at each end. I'll feel more confident that this thing won't one day melt itself off into the P/S pump pulley.

-Kurt
 
Looking great Kurt. Hey, why even keep the ballast?

I like the look of hiding all the little modifications or stealthy upgrading to newer parts that look like older parts. As a result, the whole enchilada looks entirely familiar - yet, it's completely different, requiring more than a few double-takes to figure out what kind of visual parts trickery is going on. It doesn't let in on how subtle it is until you give it a good look.

Take out the resistor, and that's just one less illusion, possibly betrayed further by the splice and solder required to join the factory terminals.

Packaging everything under the hood of a beater 4-door B-body is just icing on the cake. It may not be a real RK41 police Belvedere, but as a clone, I'm able to build it more as a Mopar fan's fantasy of what we really wish most police car packages to be - some kind of stealth, untouchable unicorn of a performance package, with a whole bunch of oddball goodies under the hood that look cool just by virtue of being out of the norm.

More often then not, most of these packages are not much different than their performance model equivalents, but the legend of factory go-fast bits in an unassuming plain white wrapper remains quite the emotional draw. That, and I'm sure that scoring performance bits cheap off a decommissioned car back in the day was the period equivalent of scoring some Trick Flow B/RB heads for nothing on eBay today: It's the thrill of the bargain-basement hunt.

Thus, if the real thing often falls short of our imaginations, might as well build something straight out of Jake and Elwood's Small Block Cop Car Performance Cookbook (on sale at all retailers, beginning the summer of '81), eh?

At any rate, a beat-up '69 CHP Polara with a 440 gets my attention faster than a HEMI-powered '69 Charger Daytona, and I'm sure I'm not the only weirdo who thinks like this.

There's a good possibility the 318's original valve covers may even work their way back onto this thing too. The clips keep the wires looking very nice and orderly, and I'm not sure I care for that plastic click-in-place oil fill port on the Magnum covers. Plus, it's a dead giveaway that there are Magnum heads on this thing (though, strangely enough, I don't mind advertising the fact with the Maggie covers).

-Kurt
 
I like what you're doing with it, as a fellow goofball I like those small details that make people scratch their heads!
 
From one Satellite 4-door-owning goofball to another, thank you!

Max Wedge bellcrank pivot stud (intended for a cross ram intake) arrived today:

153leyp.jpg


...and it fits perfectly. Makes you wonder why MP didn't put it in the kit in the first place, as they include it with their Max Wedge bellcrank kit.

160ess4.jpg


However, the pivot itself is about 0.5mm larger in diameter than the original, and the bellcrank wouldn't fit. Not until I put the bellcrank in the drill press, anyway. Now it fits perfectly:

21eh50.jpg


And so, a happy, over-complex, $20-more-than-it-should-have-cost solution to what should have been a non-issue in the first place. :banghead:

-Kurt
 
Power steering pump cooler is finally painted installed and plumbed. What a mission - the first paint job was a disaster. This thing is NOT easy to strip of paint, as can be imagined:

s3dovb.jpg


10frkvq.jpg


Fabricated my Ford E-core coil bracket too, mounts directly to the factory intake bolts. Best part? I found a bunch of NOS Accel spark plug ends and a few two-piece, hammer-together clamping tools in my Dad's old diesel parts stash, which gave me the opportunity to cut up a special short wire for the coil (temporary, until I have new wires for the whole thing):

2ike14x.jpg


And, possibly the biggest thing that I've kept mum about - I've painted the original covers (and the '89 cover bolts with captive spreaders). I just can't go through all the effort of making this engine look period, and blatantly give it all away with those Magnum covers. Plus, I've missed not having the spark plug wire guides. Like the power steering pump, I screwed up the first paint job on these and had to strip them this evening. Pain enough to do it once in the day, twice just stunk!

jr8pap.jpg


292wneq.jpg


-Kurt
 
-
Back
Top