76 Plymouth Valiant won't start

-

Mike70

Member
Joined
Oct 23, 2015
Messages
18
Reaction score
0
Location
Oklahoma
Hello All,

I'm having problems with my daughter's car and I don't know what else to do... It is a '76 Valiant with a slant 6 engine. As far as I can tell, the car is completely stock. It was her mother's, grandmother's car and she didn't drive it very often...

She went to start it and it started clicking like the battery needed charged and a little bit of smoke came up, off a wire. I hooked up the battery charger and it didn't help. I cleaned the battery connections and then went ahead and put new terminal connectors (cable ends?) on it and still didn't help. I put a new starter on it in Jan. of 2014 but I pulled it anyway and had it tested, after putting a spare battery in it, which was pretty new. Took her battery in and had it tested while I was at it and they (AutoZone) said it was the battery ($130.00) and the starter is fine. Installed new battery and get the same thing; car won't start and smoke puffs up from the area around the back of the brake master cylinder. Went back to AutoZone and got a "reducer" (?), cleaned all of the connections I could find and checked all of the grounds I could find. Installed it and I get the same thing... Getting really tired of throwing money away so I thought I would look for help before saying I'm done and take it to a real mechanic...

Oh, and the last time I tried to start it, she was watching for the smoke and said a wire glowed so I looked closer and I see bare wires so now I have to fix that as well and the wire goes in and out of wiring harnesses... If I need to submit pictures of the wires, let me know.

Mike
 
Hey Mike welcome to the forum.

Has the car sat for a long time? If so, I would recommend cleaning ALL of the chassis grounds, negative battery cable ground, any other ground, such as block to frame or firewall.

Post a pic of the wire, it "could" be a fusible link. It might be a wire to the ballast resistor, kinda hard to tell without seeing it.
 
Photos might help. First job is to get it to crank on the starter.

Is this a stick or auto? The firewall mounted starter relay is central in this part of the "deal."

starterrelay.jpg


More on that later.

First make ABsolutely certain the battery posts battery clamps and (you replaced the ends) are clean and tight and where they clamp to the cable strands.

Make certain the main ground from the battery is direct and tight to the engine block.

Next jumper across the starter relay shown above with a screwdriver. Jumper the two large bare terminals. Be sure the transmission is in park or neutral.

If this works, it might be a bad connection in the firewall / bulkhead connector, IE where the wiring all goes through the firewall. Again, a photo or two would help
 
It may be just overloading from the actual grounds not having good contact and completing the circuit.
 
Wow, I got one notice of a reply; that's a great welcome.

Bad Sport - No, this is her daily driver. And the first thing I noticed, when I popped the hood, was corroded battery cable connections. She isn't getting my messages of preventative maintenance so this is the usual; when the car doesn't start, she says something...
And it is definitely a "fusible link", as it has a tag, in several places, on the wire that says so.

67Dart273 - It is an auto. The last thing I did to it was take loose, clean and re-secure every connection I could find, including the bulkhead connectors.

Rapid Robert - I can't tell where the wire that got hot and melted some insulation off is grounded. It looks like the wire runs from the battery but it goes in and out of the wiring harness and changes from red to black and back to red and to black again! But it does have a tag with "fusible link" on it in several places, one is right near a bare spot.

I have some pics of the wires but it was too dark when I took them. I will take some more tomorrow afternoon, maybe with an actual camera, instead of a cell phone and post them.

Thanks for the quick replies guys.
Talk to you all tomorrow afternoon or should I say later, as I just noticed it is past midnight here...

Mike
 
The fusible link, is like a slow-blow fuse. The smoke is telling you that it is overloaded. The overload means there is excessive current passing through it.
Since it's only happening during "start mode",(right?), Something in that circuit is pulling a lot of juice. It cannot be the starter, cuz it's on the isolated side of the relay.That's a pretty basic circuit, so it shouldn't be hard to find.I say "shouldn't be", cuz with electrics, there are often surprises.
Dell will be along shortly to walk you through it.But in the meantime, I would check the back of the ballast resister block for a short to ground, as that seems to me, barring a bare or pinched wire, to be the most likely place for a short to occur in that circuit.
But if it also smokes in the "run" position, then there other things to check.
And, of course, the link will have to be replaced.
 
AJ/FormS - Thanks for the info. Yes, it is happening when we TRY to start it; we have yet to get it started, since I have started working on it.

And we replaced the ballast resister, right before the wire started glowing. The wire got hotter that time, as I was trying to start it and I didn't quit as fast as my daughter does...

67Dart273 - Tried to jump it across, as you said and it acts like a normal starting, with no smoke and no clicking. Also, I'm not sure it is getting gas. Shouldn't it be pumping gas into the carb? I had my wife watch it, while I was stomping the pedal and nothing...

My camera battery ius dead so I am trying to get my daughter to take some pictures while I point or move stuff. Hope to post some pictures soon...
 
You would see gas if the fuel bowls are full. If not, then no you would not see it.

It might be a good idea at this point to follow the fusible link, and uncover it in the harness so you can see if it has melted itself to other wires. If you see that, keep following it until you find good clean insulation.

Keep at it, you'll get it.
 
Smoking is never a good thing. Either a short somewhere, or a loose connection. How "electric savvy" are you?

I don't know of anywhere you can download a 76 shop manual for free. I do have a 76 "in paper" and can post some shots of parts of the wiring if need be

There is a lot of good info here.....

http://www.mymopar.com/index.php?pid=31

including these somewhat simplified "aftermarket" wiring diagrams

http://www.mymopar.com/downloads/1976/76ValiantA.jpg

http://www.mymopar.com/downloads/1976/76ValiantB.jpg

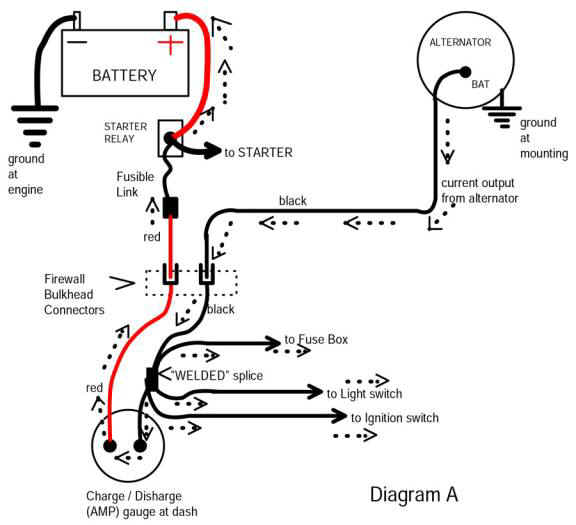
It APPEARS from that diagram that the old "full amperage" ammeter is still being used. So this overview might give you some ideas:

http://www.madelectrical.com/electricaltech/amp-gauges.shtml

Use the simplified diagram from that page to understand the primary / main power distribution. What is important is that power comes off the starter relay "big stud" and feeds through a fuse link INTO the bulkhead connector, into the interior of the car on the "road" to the ammeter. RIGHT THERE at the bulkhead connector is a big problem area. It would pay to release that connector and inspect it. Read the article.

Into the interior, to the ammeter, THE NEXT possible problem. However with lights on, etc, you can reach up under the panel and "wiggle" and see if there's any sparking, smoke, or heat.

Next "back out" into the engine bay on the black ammeter wire, back out through the bulkhead connector. This is the NEXT problem area.

Once again, read that article which gives a good overview. This might NOT be where the problem lies, but it's a good place to start

amp-ga18.jpg
 
Geeze, Long day... Had to take pictures myself as well...

Thought I would reply and then upload pictures...

Bad Sport - I've seen big blocks squirt a lot of gas into a carb but didn't think this little 6-banger would need that much gas... I have also tried starter fluid on it and got nothing.
Yes, I suppose I should do that <sigh>, even though it will be a Pain (stripping the insulation and checking the wires), it is a good idea. And my daughter couldn't argue with it...

67Dart273 - Thanks for all of that info; we have a Haynes book on it somewhere, which isn't much more than a manual that comes with the car. If you can tell me an ISDN # I will get one of those shop manuals or look online and buy one. But it looks like you gave me enough info to get a good start on it, Thanks.

As for electrical savvy, I have my own Professional soldering kit (with suction) and I have taken a 350 out of my '77 Monte Carlo and installed it into my wife's '78 Olds Delta 88, before I got lazy... :)

FYI, I think all of the lights are working. The interior light is for sure.

Now to deal with the pictures...
 
OK, Hope I do all of this correctly...

The first pic (605) is of the battery, right after I got it out of the car and before I decided to just replace the terminal connectors...

The 2nd (667) & 3rd (668) pictures are of the melted wire. It should be noted that the melted areas are on each side of the "fusible link" tag... Where exactly is the fusible link (in the tag or in the other rubber cover (4th pick, 666 above my finger) or both?)

The 5th (665) picture is the rest of the wire. It is red, then has, what I guess is an actual fusible link and then goes to black and has another fusible link... GEEZE, how many fusible links are there? And if you notice, the wire that is melted is black where it is melted and red where it goes back into the harness. There is another wire, on the left, that is the opposite (black where it goes back into the harness) and it has several fusible links on it. There is a wire coming off the battery 6th picture (663) that has an obvious fusible link but I can not find which of these wires is connected to it, until I take the harness apart... Is that where the wire changes from one wire to the three?

You will also notice in picture 665 that what I think is the ballast resister is at the top of the picture (tannish rectangular ceramic thingy with 4 contacts coming out of it and 2 plugs connected to it... and a 7/16th screw holding it onto the firewall). Right?

I should probably wait to ask this but here goes...
The car has had some idling issues and some automatic choke issues; I have used carb cleaner on it to no avail (BTW, not sure if I mentioned it but it has an auto choke (standard for that year?). Someone told me there isn't a lot you can do, as far as "fine" adjustment goes to the auto choke...
So what is this 6th picture of (669) and notice it has a connector missing, right where it says automatic choke... Is it supposed to be like that or is there a wire missing?

Also, when I took the breather assembly off, I found a vacuum line that was just laying on top of the intake, 7th picture (670) is where it starts. Can you tell me where that goes, because I looked EVERYWHERE!

And Geeze does the engine bay need cleaned but I am afraid to do it, as when you hit a mud puddle with the car, it stalls out. My guess is it needs a distributor cap or some waterproofing of the distributor cap...

My eye is twitching and I'm getting a headache...#-o
 

Attachments

  • IMAG0605.jpg
    94.2 KB · Views: 202
  • IMAG0667.jpg
    57.2 KB · Views: 179
  • IMAG0668.jpg
    63.7 KB · Views: 173
  • IMAG0665.jpg
    71.4 KB · Views: 224
  • IMAG0669.jpg
    89.1 KB · Views: 174
  • IMAG0670.jpg
    61.6 KB · Views: 184
OK, Hope I do all of this correctly... Where exactly is the fusible link (in the tag or in the other rubber cover (4th pick, 666 above my finger) or both?)

The fuse link "is" the wire with the marker tab on it in your finger

how many fusible links are there?

As vehicles get "later" in year, there are more, which is why in part you need the correct diagram / shop manual.

And if you notice, the wire that is melted is black where it is melted and red where it goes back into the harness.

Sorry cannot tell what that is. It MIGHT be the red ammeter infeed going into the bulkhead connector? Refer to the simplified diagram


... Is that where the wire changes from one wire to the three?

Again, I'm no help. I'll have to spend some time I BELIEVE I've got a manual for that here

...
You will also notice in picture 665 that what I think is the ballast resister is at the top of the picture (tannish rectangular ceramic thingy with 4 contacts coming out of it and 2 plugs connected to it... and a 7/16th screw holding it onto the firewall). Right?[/img]

Yes, ballast. Now this is where things get both sticky and sometimes simplified. The original ballast (you have) was designed for what is called the original "5 pin" ignition module, or ECU. "Sometime later" Ma redesigned the ECU into a "4 pin" which only needs a TWO terminal ballast. The only way to tell is to "ohm" the pins on the ECU and find out if the 5th pin is a dummy. This is NOT important for now, as you have a 4 pin resistor

The older 5 pin ECU REQUIRES a 4 pin ballast

The newer 4 pin ECU CAN use either a 2 or 4 pin ballast

Simplified diagram:

Ignition_System_5pin.jpg


The diagram above, the far top right wire going off the page represents the "switched ignition" or "ignition run." What is NOT shown is an additional brown wire going to the coil + side of the ballast. This provides ignition starting power (from the key) "in start" for "hot" battery voltage to the system

...
So what is this 6th picture of (669) and notice it has a connector missing, right where it says automatic choke... Is it supposed to be like that or is there a wire missing?[/img]

That is the auto choke electric heater control. "Not important" for now, if you have to, you can pull the choke open more quickly manually, or even wire it open if need be to figure out "what else" is going on

So far as a shop manual, I don't know "the best" places, you will have to Google including Efray. These manuals are generally available both used, "reprint" paper as well as "on CD."

In the meantime, use the electrical diagrams I posted, but "be leary."

Also you can get SOME info out of the 73 shop manual, which is free from MyMopar. There is two sections

http://www.mymopar.com/downloads/servicemanuals/1973_Dodge_Body_Service_Manual.zip

http://www.mymopar.com/downloads/servicemanuals/1973_Dodge_Chassis_Service_Manual.zip
 
Additional. I'll see if I can collect my 76 manual and see what all the additional fuse links go to.

The MyMopar "aftermarket" diagrams turned out to "not show them" "Big surprise" LOL
 
Just took a look at the 76 manual

Let's do this. Refer to the two MyMopar aftermarket diagrams........

http://www.mymopar.com/downloads/1976/76ValiantA.jpg

http://www.mymopar.com/downloads/1976/76ValiantB.jpg

(which are incomplete)

and I'll try and fill in corrections with partial shots out of the 76 paper manual I have.

MEANWHILE let's try some simple stuff

1...Make doubly sure the battery clamps and cables are clean and tight.

2...Pull the bulkhead connector(s) apart and try to repair them, refer to the MAD article earlier for reference. You don't need to modify anything, just try to get it 'workable'

++++++++++++++++++++++++++++++++++++++

THEN let's try and get it running.

You can crank the engine by jumpering the starter relay with a screwdriver

You can provide TEMPORARY test ignition power by simply connecting the coil + terminal to a battery source. Don't leave this hooked up any longer than necessary to test.

+++++++++++++++++++++++++++++++++++++++++++++++++

Try to determine if the smoking is from a "short" or maybe just a loose connection. Go around and make sure everything in the car is shut off.........trunk and dome light, headlights, radio, heater, everything.

Turn the headlights on, and see if they appear to be "normal." Shake and wiggle the bulkhead connector in the engine bay, and look for flickering or dimming of the headlamps. This will give you a clue if you have a problem there. Keep your nose and eyes open for smoke and "hot" smell.

Get under the dash, up under near the ammeter, and wiggle the wiring under there, same deal.

Post back if you 'get' any results with this.
 
I'm going to have to try and photo the factory diagram and post it up. The fuse link situation for that car is a mess, and has changed dramatically from 73, or from earlier.
 
I have had plenty of "light reading" today. Had other stuff to do and more on Monday so I hope to work on the car on Tuesday...
 
Hi Mike if you do not get a shop manual soon, I have scanned the paper '76 manual I have, that is, the A body wiring diagrams. A couple of us will get them reduced and posted.
 
CRAP, guess I should have edited those pictures some... Sorry

Nope, they're perfect.


I gotta say the red wire beyond the link looks good from here.

Also, when you put the battery back in, use a thin layer of grease on the posts, put the terminals on and tighten, then a thin layer all over the terminal. You won't get that lousy crusting anymore.
 
Hey again... Do you think the ballast resister I just got could be bad? It wouldn't be the first time... And they will have to order one, as we bought the last one they had.

67Dart273 - Thanks; I'd appreciate it. Getting my daughter to do anything is a pain. But in her defense she is a more than full time student and works 50 hpw.

Bad Sport - I did that, except for the outer layer (this time and last time); thanks for the heads up on that. I guess that's why the last one had so much crap on the outside of the terminals. I use the felt washers and the package of grease but never thought to cover the outside of the terminals...

And exactly how am I going to fix or replace the bad wire? It can't be as easy as just patching a wire in its place; it never is that easy for me... That's why I quit working on my own cars...

Also, the speedo is out, is it probably just the gear that goes into the tranny? The needle on the dash has "bounced" since she got the car. I have got to get my daughter to go to the part store AGAIN and get stuff so I need to make a list...
 
Hey again... Do you think the ballast resister I just got could be bad? It wouldn't be the first time... And they will have to order one, as we bought the last one they had.

For testing/trying, you can jump the two wires bypassing the ballast.

Bad Sport - I did that, except for the outer layer (this time and last time); thanks for the heads up on that. I guess that's why the last one had so much crap on the outside of the terminals. I use the felt washers and the package of grease but never thought to cover the outside of the terminals...

I would ditch the felt also, just use the grease, I have never had that crusty build up since I started doing it 30 or so years ago. I do it on every vehicle we own, mowers, tiller, any thing with a battery. It doesn't take anymore that a thin layer.

Regarding the wire, like I said, it doesn't look like (from here anyway) that it got into the red wire past the fusible link. I would however check it for piece of mind.
 
Once you get good battery cables on it and have a good clean battery and cable ends you can seal them with cheap hair spray. Yes HAIR SPRAY! Basically liquid vinyl that is water based. It works as well as and sometimes better than the stuff made for it....
 
The first time I tried to start the car (after replacing the battery & testing the starter) I was tracking the smoke and grabbed the red wire. I let go pretty quickly, as it was pretty warm. :)
 
Oh, I'll take the felt washers off and I just did the same to my wife's Jeep last month when the battery went out on it... I coated them with grease as well.

I don't have hairspray, even though I have two daughters. And I would never have thought of using that...

AND GEEZE mguner, are all those vehicles currently owned & running or is that a list of all of the Dodge/Plymouth vehicles you have owned?
 
-
Back
Top