Biohazard

-
VHT epoxy

More before / after. :)

The old brake assembly...


The new brake assembly...


Front and back of the brake backing plates...

 
Had to show this...the old slick brake shoes...


Thought this was interesting; on the old shoes, the braking material did not span the full width of the shoe. On the new ones, they do. So the new shoes are actually a tad wider than what was on there. Wider is better. Those are Centric brake shoes, btw.

Next event: My POR-15 ought to be here in a day or two. I want to paint the UCAs, the spindles, and the stabilizer links with it. Probably all that's going to happen this week.

The lower control arms are going to the blaster on Friday. I may have him do the K-frame if the price is right.
 
Stoppin fast can be more important than goin fast. Nice tip on the shoe width!
 
that POR 15 is some great stuff, you can put it on, and within an hour its just as shinny as a commercial paint job with no brush marks, let it dry for 12 hours though!
 
Yeah, I have no idea what the old shoes were. There are no distinguishing marks on them. As for going fast...not on the docket. Just going proper.

I have used POR15 before but it was on an engine block and transmission. Holding up very well there but not really subject to the sand and stone shower you get from Mr. Mudflaps in front of you.
 
Waiting sucks. Doesn't matter if it's paint shops, machinists, the mail or holidays. So...had to find something else to do to keep the momentum up.

 
I love your thread!
It's nice to see a properfreshening up on another Cuda. Hats off too ya.
I am restoring a 67 fastback Cuda myself. I only wish I was at the point where you are. take a look at my threads and my picture book some time if you get the chance. I will be subscribing too your thread and can't wait to see more of your work. Happy New Year!
 
I'm only at the point I'm at because I "lucked" upon such a great, rust-free shell. But, I just didn't realize in the beginning that every soft part on the car was toast and would have to be replaced. I've been pleasantly surprised as to how inexpensive these replacement parts have turned out to be but they do add up.

Multi-tasking is mine! I am concurrently working the suspension, the engine, and have paint on the way for the engine bay and interior. Also have another headliner being sewn up.
 
Heads dropped off today after I pulled the valvetrain out.
Getting hot-tanked, inspected, 3-angle valve job, and maybe a little port cleaning. Nothing fancy. I was pleasantly surprised at how snug the valve stems were in the guides. No need for new valves.
 
Techron couldn't stop it. SeaFoam wouldn't touch it. Scientists were unable to carbon-date it. It is the automotive archaeological find of our time.


Very happy with the shop I found. They're doing the aforementioned headwork and I'm going to put them down to bead-blast the intake manifold inside and out.

I think that goo used to be a triceratops!!!....
 
Techron couldn't stop it. SeaFoam wouldn't touch it. Scientists were unable to carbon-date it. It is the automotive archaeological find of our time.


Very happy with the shop I found. They're doing the aforementioned headwork and I'm going to put them down to bead-blast the intake manifold inside and out.

The good news is the valve seat area looks great, just carbon up from years of being run too easy with a leaking valve stem seal.
Seen lots of valves like that.
 
RE: Paint.

Sadly, no. The rep was out yesterday when I called. The current formula is uber close but needs to be made just a tad lighter and have 2 or 3 molecules of blue taken out. It's that close.

Taking my suspension parts to the blaster this morning. If I get lucky, it may be a while-u-wait job and I can actually apply the POR-15 this weekend.

As for the valves...yeah, the picture looks horrible but that stuff actually just about fell off. There was still a thinner layer of stubborn accumulations under the clumps of wet charcoal but nothing crazy. I hope the springs test with good pressure.

Money status: To date, I have 2k into this car over the original purchase cost.
 
Parts dropped off at the blaster. LCAs and sway bar mounts for blasting; K-frame for blast and powder. The price was right.

Now to go clean the rocker assemblies and pushrods.

Here's another look at some of the valves...

 
not to bad on the money!
If I would have paid someone to do the metal fab. I'd be broke. I am doing EVERYTHING myself. Sometimes I think it might be wiser not to, for sanity sake but for money sake I am. I origionally purchased my 67 Cuda F.B. for $1,200 but I think I have about three times that into materials and parts. I am pre-purchasing parts and shelfing them till they are needed. I am in the saving mode now though. L.O.L!!
 
**edit - - forgot to include the transmission work

The real count is $2,505. :(
The only things I haven't done 'myself' are the transmission, the headwork, and that little bit of sandblasting/coating. Still, 1700ish just in parts and pieces.

The tranny takes the top slot in terms of expense followed by the front end kit. Number three in my budget-build goes to the powder coater who is doing my K-frame. If these barracudas didn't let the whole world see their underneath stuff so easily, I might have been able to save some bucks here.

Luckily, I have already purchased a small stockpile of parts that I haven't even installed yet but the funny thing is that I was looking at this car being in need of an interior clean up and the only thing I've gotten for that area is a headliner. I still have to buy all the upholstery, door cards, and carpet. Ugh.
 
Referencing the pic below, I'd like to pose a question.

My Victor Reinz gasket kit has 2 kinds of valve stem seals; 8 short and 8 that are a bit taller. The seals I removed from the engine were all identical (and hard as a rock). Which is correct? Could someone have replaced the seals somewhere along the line and installed the wrong type of seal on half the valves? Not to mention, the new seals don't match any of the ones I pulled out.

The seal on the far right was removed from the engine.

 
I would guess the bigger ones are for the intake and the cupped ones are for the exhaust.Maybe call the parts store and have them show you some or describe them on the phone.
Great thread!Good thing you are not paying someone to do all the work for you.
 
Good thing you are not paying someone to do all the work for you.

This would be unpossible. Daddy's pockets don't go that far down. If I wasn't able to wrench, I wouldn't own this thing.

Solved on the valve seals: The larger ones are for the intake side. They offer better sealing because the intake side is under suction while that valve is open and the cylinder is inhaling. The exhaust side doesn't have to try so hard to keep oil out because as the cylinder is pushing out exhaust, it puts positive pressure around the valve stem. Looks like someone installed intake valve seals on all valves in my motor and, let me tell you, they are so hardened that they feel like black ABS plastic. I'm certain that they seal like crap.
 
Alas, I do not have a bead blaster. So .... nasty intake manifold with crudded-up intake passages was dropped off today for thorough cleaning.

Definitely got the project in drive, now.
 
Much to report:

Suspension
Got my lower control arms and swaybar mounts back from the blaster. He got right on these parts after I dropped 'em off. So I took the blasted parts and the stuff I cleaned myself and went at them with the POR-15. Damn they look nice!

I brought those parts indoors for painting due to the cold and high humidity outside but I had to wait for them to come up to room temp so, in the meantime, I got to scrubbing the steering box clean and now it, too, is ready for paint.

The next day (today) I get a text from the powdercoater and the K frame is not only blasted clean, but has been powdered and just taken out of the oven!


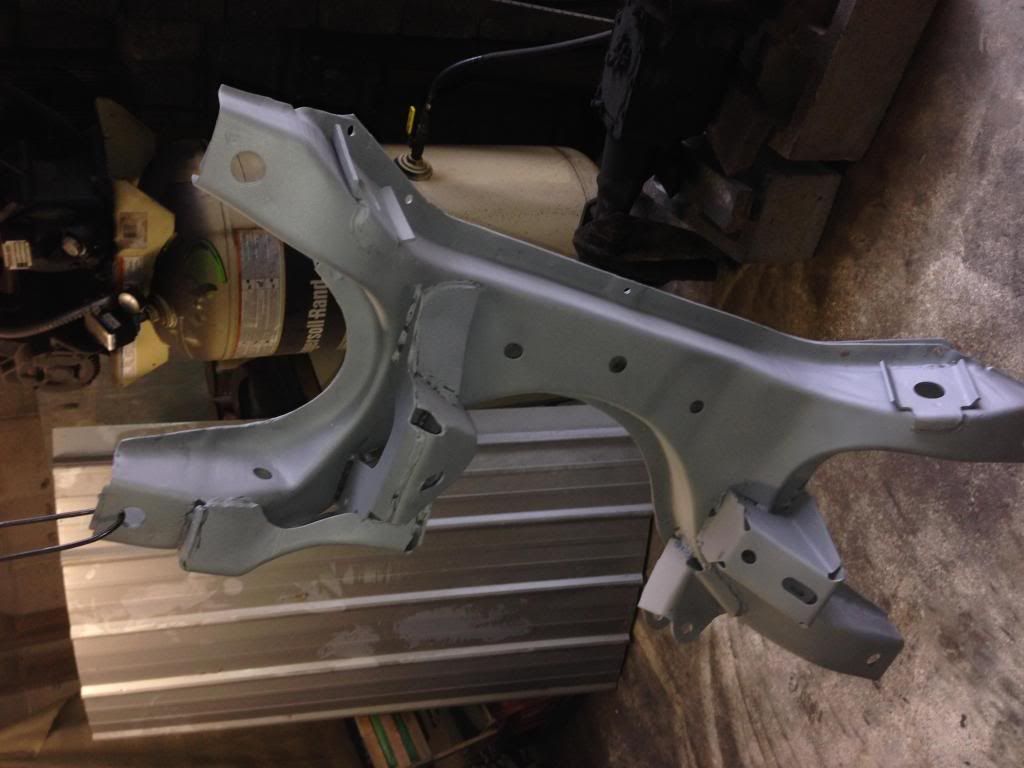
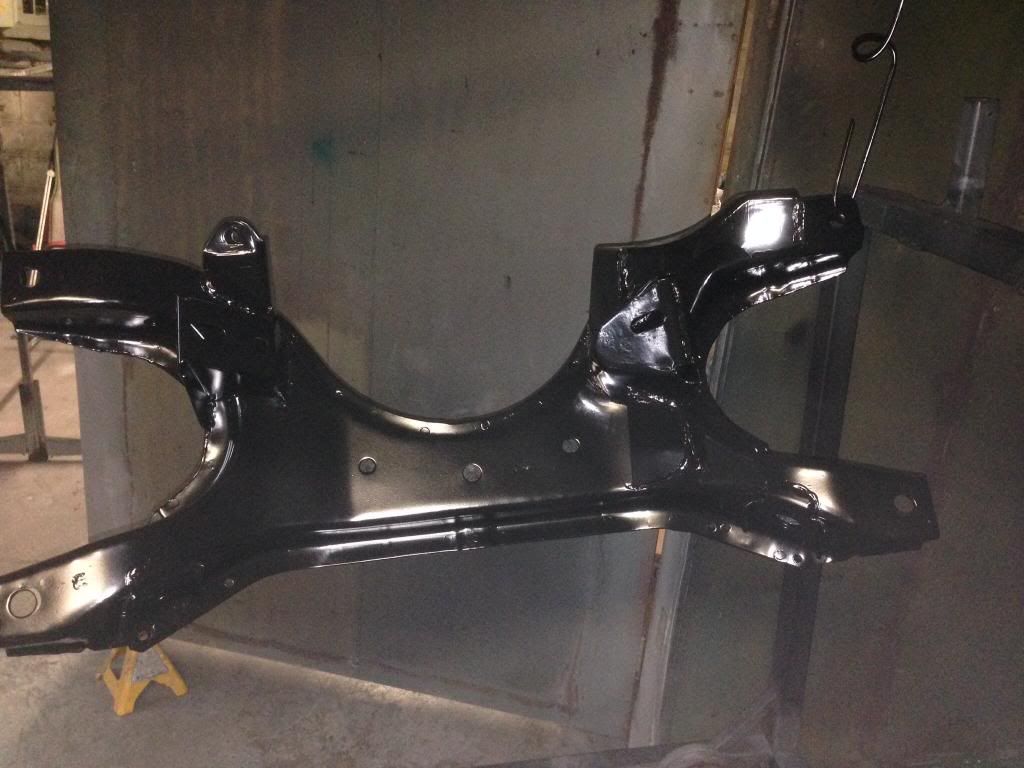
I still need to run this stuff to the shop and get the bushings pushed in but I should be able to wrench the front end back together this weekend!

Engine Work
Took my bottom end to the machine shop. On a quick inspection, it appears that the lifters and timing gear have been replaced not too long ago. Plan for the motor is: tear down the block, drop it in the vat, bore 20 or 30 over, new pistons & rings, new cam bearings, polish the crank and, of course, freeze plugs. I'm now looking for stuff to sell on Craig's.

My intake manifold has been blasted clean. Nicely prepped for paint but the true goal was cleared intake runners.
Heads got the valve job, some new exhaust valve guides, and they milled the mating surface. All the springs recorded a seat pressure of 85 lbs!

The cost of doing this engine work has effectively pushed the interior restoration back many many months. :( Anybody need a nice guitar amp?
 
-
Back
Top