Biohazard

-
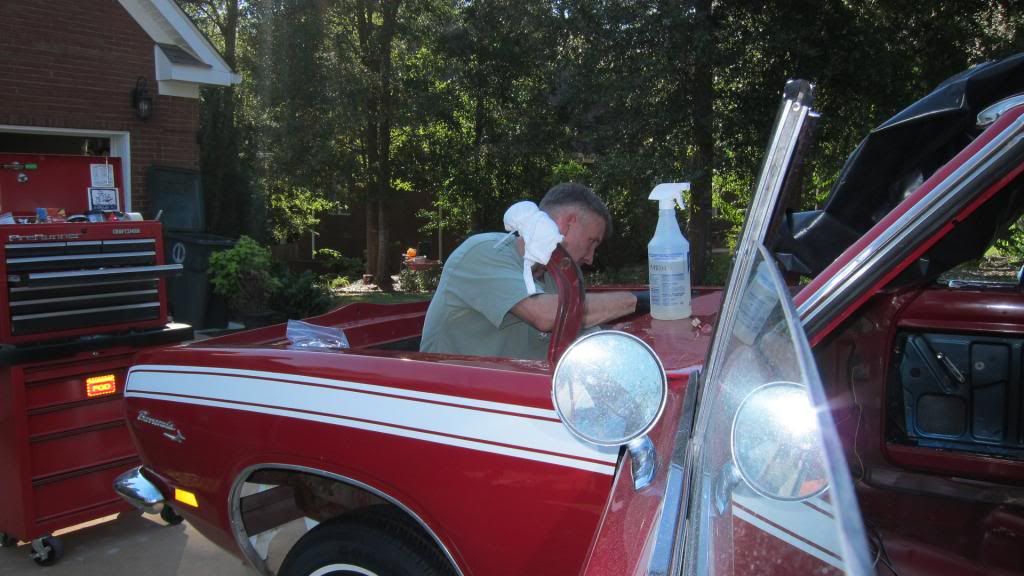
So, before I install my fresh and clean A/C assembly and all the new firewall gaskets for things like the accelerator pedal, master cylinder, and so on...I need to freshen up the paint on the engine compartment side of said firewall. Otherwise, I run the risk of getting icky overspray on all of those new seals and freshly painted or cleaned components.

Today's task was to clean the firewall in prep for painting.

Note the triangular blob of makeshift firewall grommet. Just some of the junk I had to scrape off with a plastic putty knife.


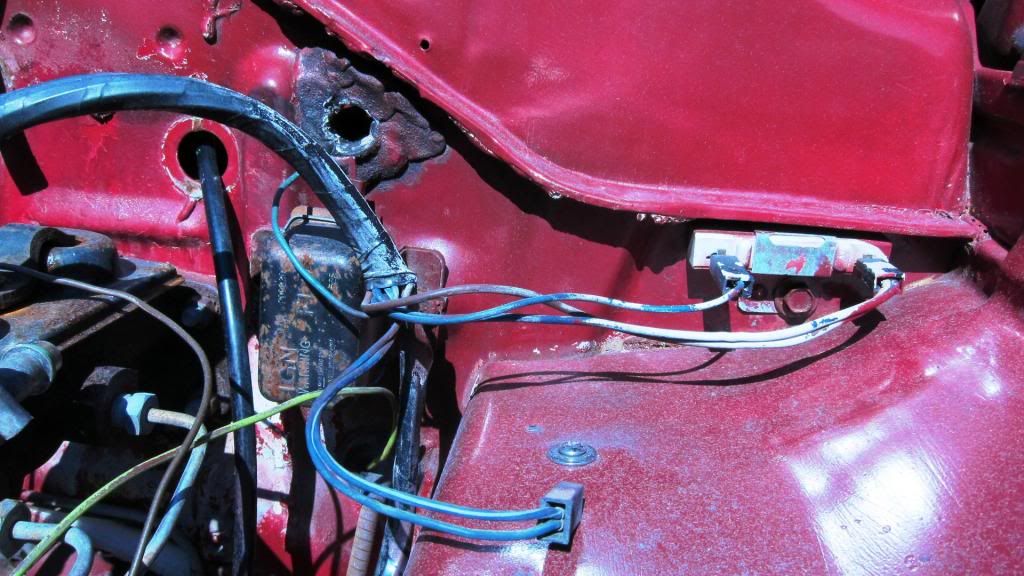
In the upper portion of this pic, you can see painted-over blobs of sealant. This just looks like crap so I elected to scrape it down since I was going to paint the whole wall anyway.


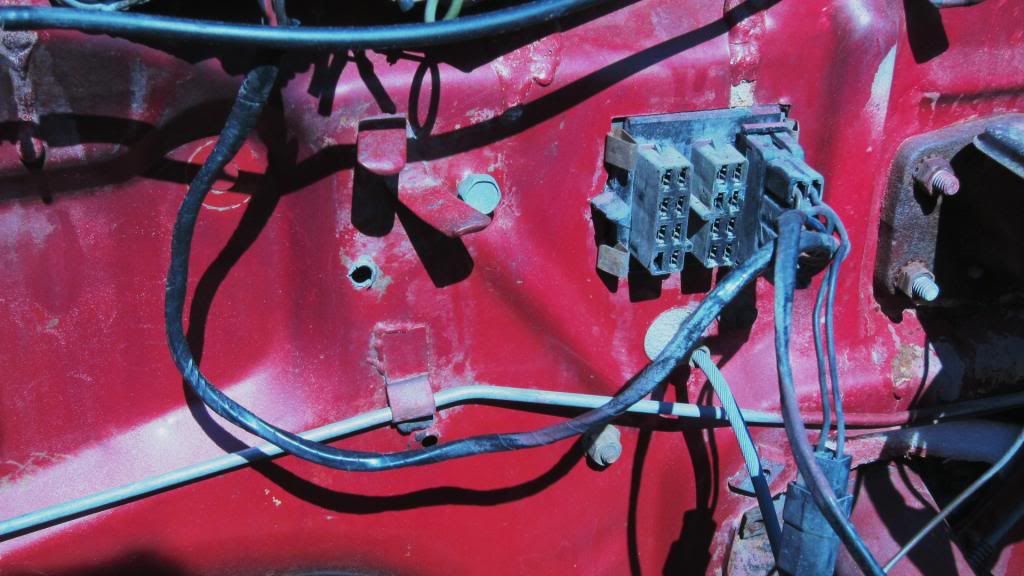
Anyone know the correct way to remove that electrical connector? I feel like I'm going to break it just pulling it straight off. Need to detach this valve body so I can better clean/paint behind it.


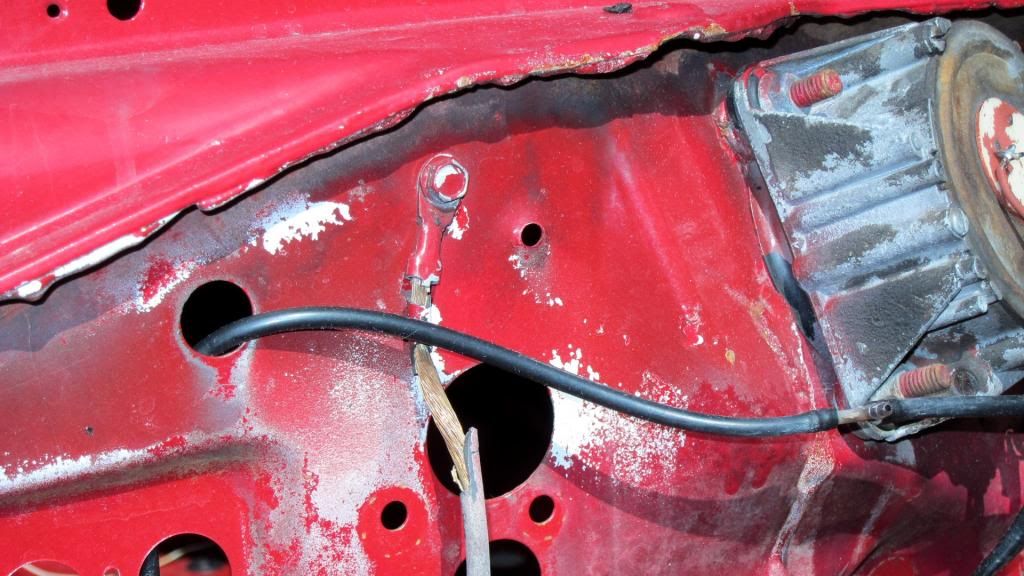
Just to remind me where the ground strap goes...when I get a new one.
You can also see more of that sealant oozing out from the panel joint.


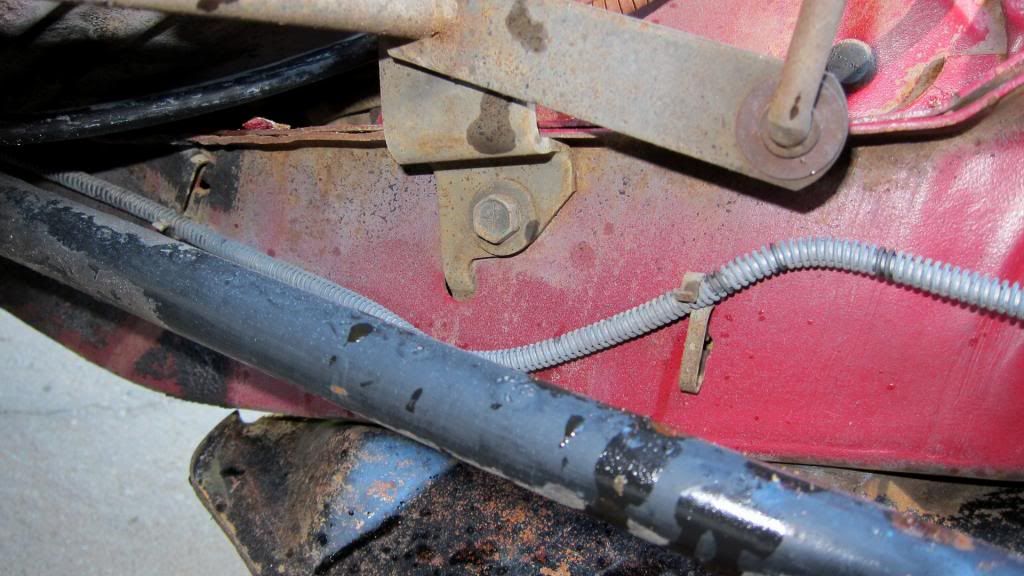
Still can't get over how solid the underside of the car is. Shot this in case I needed a reference for proper reinstallation of the trans linkage.


Getting it done with Marine Clean and a green scrubby pad. Submitted as proof I'm really doing all this myself :D


Ready to paint. That brake line going across got rubbed-down with the scrubby pad...cleaned up real nice but now I have to do them all.


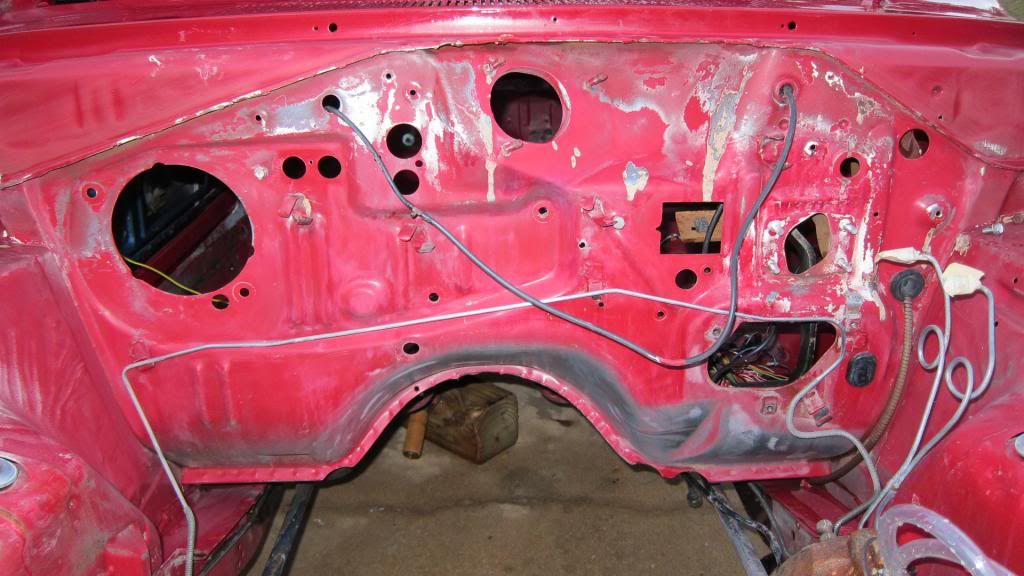
Now to prep the two inner fenders so I can paint it all at once.
 
I just read your entire build thread.

Your rebuild of the HVAC will come in handy when I get to my '66 to replace the heater core and like you I'll also be painting the engine bay.

I'll be replacing the carpet and underlayment also. So I might as well scrub the floor and check the seam sealer.

Dang, I need to replace the windshield and gasket , wiper and firewall seals , while I'm at it I might as well pull the dash and repaint it.

Gee's no wonder I haven't started that project. Along with rear axle driveline Trans & Engine, Disc Brake upgrade, front suspension rebuild.

Then theres the body work and paint ….

Well the '66 will have to wait, I'm doing an Airstream rebuild now and next in line is my '56 GMC "Cameo" or '57 GMC depending which one I decide to put the Chassis Project that is on hold under.

Keep up the Great Work :)
 
Hey GG, thanks for reading the thread...glad it's doing something for ya.

I finished prepping all 4 sides of the engine compartment. Degreased (again), scrubby-padded, washed with soapy water, sprayed with Prep N' Ready, and rinsed. To facilitate all this, I pulled the steering box and the A/C condenser along with the horns and all the stuff mounted to the firewall.

The driver's side inner fender.


The passenger's side inner fender.


The radiator support.


Engine compartment stuff. Just more things to clean and paint, lol.


The power steering box...which weighs as much as a truck battery.
One of the many things that'll get a fresh coat of black paint.


I must interject about how nice it is to work on the car without the funky stank.

I hope to get all of the necessary masking-off complete in the AM tomorrow. I have some briefings to attend at work, mid-day, and then I intend to shoot the R6 in the PM. The hitch: There be weather rolling in. I will be spraying the paint outside so I need warmth, low humidity, and light winds...I also need time. Time for the paint to cure before the foul conditions present themselves. But I am geeked to get the paint down!

Since I was cleaning and rinsing anyway, I soaked the windshield channel with Krud Kutter in an effort to clean out the goo that some novice used to install a windshield. It still needs work. I'm picky.


Keeping the fingers crossed for tomorrow.
 
We were supposed to get rain Friday...and we are...lots of it. But yesterday, the wind and humidity had already gone way up so I wrapped up the fish and put it all on hold till the air settles down and dries out.

I did manage to clean the power steering box and the innards of the master cylinder but I am kinda thinking a new master cylinder may be in order. Not something you wanna play around with.
 
73 degrees and 38% humidity when I started shooting the R6. Lovely.


And now....for something other than more cleaning.


Seems the basecoat is just a hair lighter or brighter than what's on the car presently. Still needs to be covered in clear gloss. Maybe that's all it needs??
 
Can you post a pic of the bolts that secure the a/c drier bracket? I have them but can't remember what they look like since my car has been apart for over a year now :). My Valiant also has the triangle hole pattern yours has for the cruise bracket but mine are closer to the firewall. I'm wondering if mine had it too and they removed it. I have gone through your build from beginning to now and it has helped me put mine back together ..:)
 
Time to start getting things back together. Going to focus, here, on the re-installation of the cabin-side of the firewall. Naturally, that's going to include the dash.

My dash frame was a bit on the nasty side...


Had to scrubby the rust off, thoroughly wash the frame, and then shoot some paint on the backside as a preservative.


Ran out of primer. Will finish tomorrow.
Going with a plastic glovebox liner...once and done.
Currently waiting on the liner, the correct paint color, new firewall seals, a clip for the A/C box, and new defrost vents and hoses. Gonna be like Christmas 'round here.
 
Sweet! Thanks! I painted the back of mine white in case I ever have to put a light back there to work on anything.
 
Looking good.
I would replace the steel brake lines with new ones while you are in there, Classic sells a stainless steel kit for all front lines for about $75.00
 
New goodies in the house.

-Plastic glovebox liner. Very nice looking piece; definitely solid.
-Dash vents and hoses (DMT) The hoses are really tough feeling!
-Tail light housing gaskets (DMT also).

In the last pic I posted, you can see the wiring channel is still unpainted; I took care of that so the entire dash frame has now been coated.

I had to send a test panel of the paint I used on my engine compartment to the company that mixed it so they can compare their paint's color to a factory color panel. They agreed that the match was not good. They mixed another batch with a different formula and sprayed another test panel. They've just mailed it out to me today so I can compare it to my car. If the match is good, they'll repackage and ship me a fresh batch but I'm worried about having enough warm days left to shoot paint outdoors before winter sets in, full on.

I tested the rear window defogger motor and it works just fine.
 
Took a week off to find somewhere else to live but...still waiting on paint.
Used cyber monday to order engine paint from Eastwood. Not going to use it for a while but I saved some bucks and it will be here when I'm ready for it.

I did completely scrub clean my A/C compressor. It had been sitting on the garage floor because I couldn't bring it inside the house un-sanitized. Now that's done and it is in a box in the basement. Putting the compressor back on the car is the LAST thing I will do so it needed to be prepped for long term storage.

If it takes much longer for the paint to come in, I'll have to drag the car to Florida just to spray it on.
 
Another paint sample...another no-go. This is frustrating me to death and I have to get some work done on this thing so...suspension, here I come.

Caught the 15% sale on front end kits from PST and, today, started pulling everything off the car. Holy cow, I cannot wait to post pics of the rubber bushings. "Shot" does not even begin to describe.

The biggest pain was getting the drum backing plates off the spindles and one of the torsion bars was a bit stubborn. I have a fork for the tie rod ends but I need a different one to separate the ball joints. Once I finish pulling all the moving parts, I'll drop the K to clean and paint it.

This was also my first look at the front brake innards. I think the drums will be ok after a turn but the shoes are toast. Pressure cleaning the brake assemblies will make me gleeful 'cuz its just nasty in there. Front brake rubber lines are dry-rotted, too.
 
Here's some more details needing attention: as you look at these toasted bushings, remember that this car was actually being driven like this.


Not sure what good these bushes were doing, lol.


I think the suspension rebuild kit purchase is justified.
 
Nasty brake assembly before getting pressure washed. Ordered everything to do all the brakes from rock auto. Talkin' shoes, slaves, springs and hardware and self-adjusters...hoses, too. Need to get the drums checked before I buy new ones.


Piling stuff up on the project table. And the project table is in the garage with the dehumidifier running. Its miserable down here this weekend.


Just time for another look at the car.


So, brakes and suspension kits on the way.
 
Wow what a clean car....

Well, that is the intent anyway. Or maybe you were referring to the condition of the car in the first place? Either way, what you should have seen was the crunk that came out of the one wheel cylinder I opened up. Lots of black fluid and chunks of I don't know what but probably rotted inner brake hose. After wiping with a rag, the cylinders didn't look too bad with only a slight amount of pitting at the very center - a good way away from where the seals and pistons would be. I wish I knew for sure if they were the original ones. There are numbers stamped on the bodies...anybody know how to decode?
 
Your bushings look like the ones I pulled from my dad power wagon when we got it torn apart they must be the original ones

Posted via Topify using iPhone/iPad
 
Story time.

So my PST suspension rebuild kit arrived this morning - very happy - and it even includes some bits that weren't specifically mentioned in the parts list so, it was like finding easter eggs. But anyway, putting new stuff in means getting the old stuff out first so off I went to my trusted local mechanic to see if he had the ability to press out all the old bushings from my front end components. I knew that the LCA pivot bushing would be the most difficult thing to get done.

My mechanic said he could take care of most of it but that he really had no idea about the LCA bushings. He then phoned a guy he knew who supposedly had started off life as a suspension tech some 40-odd years ago and was a Mopar guy, to boot. During the call, this guy was able to describe in detail the procedure for removing and replacing that bushing without even having the parts in front of him. My mechanic stopped him about half way and said, "do you have the time or interest in doing it?" and he responded "yes" rather enthusiastically. Maybe he was a little excited to do some work on an classic Cuda? He further stated that he had all the special tools to get it done including that socket to undo the upper ball joints. Awesome!

He is going to press everything out. I will then take my stripped parts and clean and paint them and bring them back to him to get the replacements reinstalled. All for an hour's labor. Today was a good day!
 
Today was too easy. Here are some pics of work done.

Upper control arm 1, ball joint removed.


Upper control arm 2, ball joint removed.


Lower control arms, pivot bushings removed.


Tip of the hat to hemi71x for encouraging me to not be lazy. Just a little bit o' networking and I got this done for $40. Having the PST stuff pressed back in...will be another $40. Can't beat it.

Merry Christmas, fellas! Gonna take a break, help with the cookin' and watch Ralphie five or six times.
 
So, for starters, the ol' project table now has more new or cleaned up parts on it than dead, filthy parts. Rock Auto has been THE place to go to for all of my brake rebuild bits.


The old ball joint assemblies were just disgusting. Naturally, beating them apart with a pickle fork just put them out of their misery and shredded what was left of the rubber boots.


I love before & after shots. Make me feel good about my progress. Old and new lower ball joints:


Had to clean up the lower control arm pivot rods since they were out. Here's another before & after:


Gonna start on the front brake assemblies next.
 
Front brake assembly rebuild.

While ordering replacement brake parts, I found some of the product descriptions to be a little vague so I went conservative with my purchasing. Now that I see what certain kits do and don't include, I know exactly what else I will need to order if I want to freshen up everything. The only parts I don't have new are the long brake shoe return springs. The originals do seem to be in fine shape, just a bit dirty.

Before I begin stacking the parts on, I decided to clean and coat the backing plates. I used VHT epoxy paint, gloss black, and baked them in the BBQ grill for 20 minutes at 300F. The VHT gets good reviews for corrosion protection and resistance to chips so my plates should continue to last.


Ah...clean!
 
-
Back
Top