Clay bar on original paint?

-

Flashback

Well-Known Member
Joined
Oct 27, 2010
Messages
116
Reaction score
4
Location
Ohio
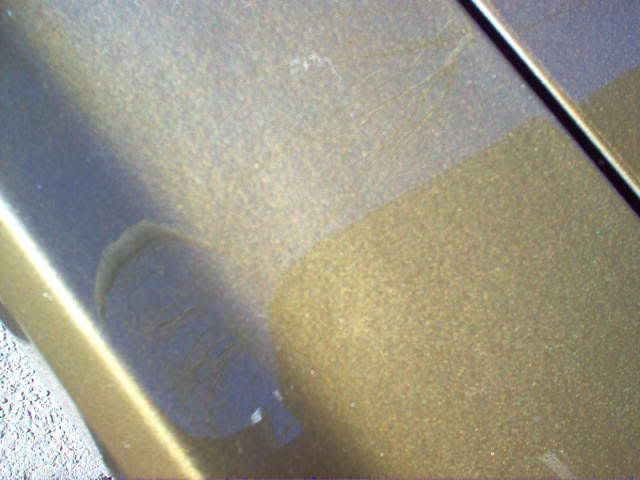
Paint guys I could use your guidance. My wagon has original paint and spent twenty years in the Texas desert...luckily, it was somewhat protected by a coating of Texas dust all that time.

Not surprisingly, it now has a "chalky" look and feel to it. I do think I can revive some luster though. My question is, would a clay bar and liquid be a good, safe approach to try and bring it back to life? I'm hesitant to go down the buffing route as I'm not well skilled at it and afraid the paint may be too thin.

Thoughts?

Thanks
 
I did the clay bar on this....
by3402.jpg


Dart001.jpg


The clay bar will not restore the finish, you will need to buff it. It's not hard, just keep moving and don't stop on edges. Start on flat surfaces and as you get more comfortable, move to curved sections.
 
Clay bar will remove surface contaminates in preparation for buffing. What could it hurt to learn on a car that has dead paint anyway? It's going to look better, even if you burn through in a couple spots.
 
Thanks guys.

Cracked, nice job on that car!! That' the same chalky look I mentioned. I figured the clay bar would if nothing else remove grit and tiny crud in the paint and would not hurt my efforts once I go to buffing. Your answer suggests I'm on the right path.

Thanks!
 
I did the clay bar on this....
by3402.jpg


Dart001.jpg


The clay bar will not restore the finish, you will need to buff it. It's not hard, just keep moving and don't stop on edges. Start on flat surfaces and as you get more comfortable, move to curved sections.


That looks great.

Another tip that I find helpful, is to get some 1/4 inch masking tape, and apply to all of the edges. It really helps me, then when I am done with the power buffing, I remove the tape and do the edges by hand.
 
Thanks.

You can also get one of those cheapy. non aggressive orbital style buffers to do the job. We used a HF variable polisher/grinder type set up. My friend burned through two spots because he was moving in a linear fashion at the edges. If you get close to the edges, move the buffer in an arc, sort of like the sun poking over the horizon. Move like the rounded shape of the sun and move quickly.

The tape on your edge is a great tip as well.
 
3M Super Duty with a wool pad will cut oxidation fast on single stage paint-probably too fast for a novice. I would try the Perfect-It II with a foam pad. It won't work as fast but the foam pad won't let it burn through as fast either. And it won't remove as much paint. Use the tips mentioned above and you should be fine. For even more gloss use a polish after buffing. Don't use the same pad as you used with compound, get the polishing pad. Then hand wax. You will be surprised how good it can look.
Dallas
 
I'm doing some restoration work on this car now. It sat in the same spot for about 22 years. It was under a carport, but not covered on the sides.

Here it is sitting where it did for 22 years. It looks a LOT better here than it was.

CHEVELLE2.jpg


Here it is in my shop after it was towed out to the house before my son cleaned it up.

CHEVELLE7.jpg


Another shot to show the oxidation. It was BAD.

CHEVELLE11.jpg


Here, this is after he washed it, clay barred it and then hand waxed it. We could have buffed it but did not.

CHEVELLE13.jpg


Another clean shot.

CHEVELLE12.jpg


I know. It's a Chevy. But it's a numbers matching one owner LS5 SS 454 that my friend bought new in 1970 from Dunlap Chevrolet in Macon, Georgia. It's a cool car. Oh, and while this is not the original paint, it IS a single stage enamel that is more than 30 years old. Were it not for some rust trying to come through under the rear window, it would still be very good. The clay bar works well.
 
Give it a real good wash first, Then clay slowly staying away from body lines. Make sure you kneed the clay often. It will still need a good buffing after though.

Heres my old Scamp, original paint

DSCF0038.jpg


IM000963.jpg


IM000960.jpg
 
Thanks.

You can also get one of those cheapy. non aggressive orbital style buffers to do the job. We used a HF variable polisher/grinder type set up. My friend burned through two spots because he was moving in a linear fashion at the edges. If you get close to the edges, move the buffer in an arc, sort of like the sun poking over the horizon. Move like the rounded shape of the sun and move quickly.

The tape on your edge is a great tip as well.
Good advice!

I burnt through a few paint jobs back when I was buying those cheap Montgomery Ward $35 buffers. A few years ago, I was finally able to swing a good Milwaukee unit. I think the size of the pad and quality of the bad has a large bearing on it as well.

I'm doing some restoration work on this car now. It sat in the same spot for about 22 years. It was under a carport, but not covered on the sides.

Here it is sitting where it did for 22 years. It looks a LOT better here than it was.


Here it is in my shop after it was towed out to the house before my son cleaned it up.


Another shot to show the oxidation. It was BAD.


Here, this is after he washed it, clay barred it and then hand waxed it. We could have buffed it but did not.


Another clean shot.


I know. It's a Chevy. But it's a numbers matching one owner LS5 SS 454 that my friend bought new in 1970 from Dunlap Chevrolet in Macon, Georgia. It's a cool car. Oh, and while this is not the original paint, it IS a single stage enamel that is more than 30 years old. Were it not for some rust trying to come through under the rear window, it would still be very good. The clay bar works well.
Wow, you made that Chevelle look great. I have a soft spot for those, my first new car was a 72 Chevelle. The Chevy dealer got me financed and the Chrysler dealer couldn't! (poor sailor) :D
 
-
Back
Top