denso alternator nightmare

-

glhx

Well-Known Member
Joined
Apr 24, 2009
Messages
694
Reaction score
51
Location
Middle Tennessee
http://home.roadrunner.com/~raffica/denso_swap.htm

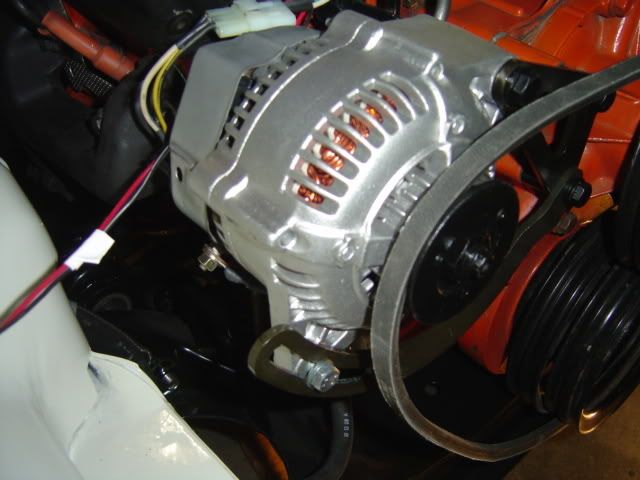
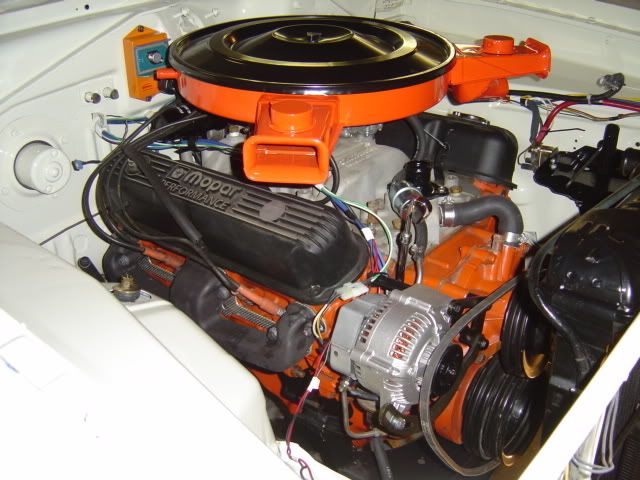
above is the directions on how to do the swap....my alternator is the same year from a dakota.....goes in a 68 318..just like the one in the tutorial...


and doesnt fit as you can see.....i cant tension it from the top like it is now due to it going part the tipping point and not tensioning

mine doesnt even come close to clearing the head...the belt lines up perfectly and the alternator caznt go any more forward than it is now and have any of the belts line up.....my output stud is already cut in half and the guard is gone.....what is up with this:banghead:
 

Attachments

  • alternator_nightmare003.jpg
    61.2 KB · Views: 680
  • alternator_nightmare006.jpg
    83.8 KB · Views: 725
  • alternator_nightmare007.jpg
    111.3 KB · Views: 759
  • alternator_nightmare008.jpg
    98.2 KB · Views: 734
  • alternator_nightmare011.jpg
    94.1 KB · Views: 675
  • alternator_nightmare009.jpg
    114.7 KB · Views: 679
there is no way that output stud can go any lower than it is right there in the picture...........in the tutorial its close but it fits.....with mine this far back the belts line up
 
i agree but look at the link above...he did exactly what im doing with the 68 water pump

i just dont see why his worked and mine wont
 
yes but look at his pictures, he used 2 nuts on the rear side of the alternator and 2 behind the bracket that bolts onto the water pump that holds the alternator on, as well as a different pulley. I noticed you spaced your bracket out but not nearly as far as his is
 
also if you had of spaced it out correctly you wouldn't of had to mangle your valve cover with a hammer. its all about attenion to detail
 
just have to figure it out from here....i have no idea what pulleys those are.....i do know....i dont have them.
 
just have to figure it out from here....i have no idea what pulleys those are.....i do know....i dont have them.

the first few pictures are the original serpintine belt, the other pictures with the single grove pulley looks to be the original (to the car) alternator pulley or one from a 1995-1999 dodge neon. simple to change only need an impact gun, the pulley is not pressed onto the shaft
 
looking closer, its the crank and water pump pulley causing the problem for me...they all look similar until you really compare them...i dont think my pulleys are from an original 68....that being said..i dont know what year my pulleys are from....
 
at this point i might be able to go this route...if i can figure out how he did the lower bracket...the top is a mr gasket piece
 

Attachments

  • 318.jpg
    75.9 KB · Views: 669
Is this along the same lines? Here is the bracket I used, along with a toyota 120amp DENSO alternator...

http://www.arengineering.com/alternatorbracket/ND_bracket/denso.html

DSC08107.jpg

DSC08105.jpg
 
im doing this to have more amps.....all my lights flicker, heater and probably everything else run by the current alternator... and the stock alternator is junk at low rpm. It doesnt put out even near what it does at high rpm....this alternator runs 50amps at idle and 120 above idle. It replaces chryslers older design. The process was supposed to be bolt on and easy....i looked at the picture and went to the shop to get it done...and it wasnt just bolt on and go like i thought it would be...its going on the car no matter what. If i have to make a longer bracket for it to work with my pulleys i will do that. I was up all night trying to get it to work and didnt sleep so i did get pretty impatient with it and didnt pay attention to detail...ill sleep on it and work on it later today...its an upgrade to go with the head light relay upgrade.....i was also under the impression that my pulleys were 68 like in the tutorial...it was an assumption i made that was
inaccurate. So now i have this alternator that i have to make fit.....
 
so right now with my current pulley system i cannot move this thing forward.....i have it where the pulleys line up perfectly...all i can really do is either move it out towards the passenger side fender like the poly 318 picture above or possibly run a tensioning idler pulley

i did not expect that when i put it where i did....i would go past the tipping point where i would travel and not tension...but i am playing with about 1" where it stands and half of that wont tension because it is past the tipping point
 
im doing this to have more amps.....all my lights flicker, heater and probably everything else run by the current alternator... and the stock alternator is junk at low rpm. It doesnt put out even near what it does at high rpm.....

My point is that you may have other problems besides just automatically "throwing" a larger output alternator at the problem

Are you still running stock wiring? Have you read about the Mad Electrical ammeter bypass scheme, and are you running the stock ammeter?

Have you pulled your bulkhead apart to check for damage, or upgraded the wiring sizes in the charging circuit?

What I can see of the photos appears that you have a fairly stock installation. Unless you have added some huge electrical loads you are getting aggravated and disturbed by the "wrong end of the problem."

Just something to think about. I run a stock alternator with sealed beam halogen lights and MY lights don't flicker
 
bypassed the ammeter and ran 4 gauge welding cable direct to starter relay and then 4gauge to the battery....cleaned and re wired all the bulkhead connectors and replaced some.....cleaned all grounds.....im getting lots of voltage drop to the headlights....replaced the switch so im going with relays....as well as relay for all ignition switch wires....ive done about everything i can think of except run the relays yet....so i decided i wanted more amps...want to go with a large electric fan....defroster..better stereo system and i think ill need more amps to run the higher power accessories....plus the h4 halogens...if the 120 amp alternator and headlight relays dont fix it...i will source more where the voltage drop is coming from....i do know the stock alternator is bad for low rpm amps...its fine for the higher rpm....so a 60 amp alternator is probably a 25 amp alternator at idle..its not enough for future upgrades
 
OK. sound like you are on track. MUCH of this stuff is problems in the bulkhead connector. Headlight relays never a bad idea. You might also use a relay to run the ignition system/ regulator. There was a thread the other day---I ended up using a relay / fuse center out of a Voyager in mine

http://www.forabodiesonly.com/mopar/showthread.php?t=170781

Can't offer specifics for your mounting, though.
 
Do you have any loads going ground ie: starter, fuel pump or alternator? Is your battery going dead when the car is not in use for long periods of time? Have you put a meter between the positive battery post and batter cable?

While I agree a bigger alternator is nice when there bigger electrical demands, the light flicker needs to be corrected first, you might prevent a fire or burning up your wire harness.
 
no, the battery stays charged....i would source a short before anything...they drive me nuts.....the voltage reg and the coil will be a 30 amp relay run powered by ignition switch...im guessing that is getting lower power at idle too...i just chant see that stuff flicker. I see what everyone means by the chrysler wiring having problems in many places from too small wires to the basically non waterproof bulkhead with the ridiculous contacts going to an ammeter that was acting like a resistor for the whole cars electrical system.....i put sun pro volt meter guts where the ammeter used to be....i am getting voltage drop but is not because of a short. its old wiring that will be running relays instead of full power and an autozone remanufactured alternator......this upgrade will help a lot of things....as long as the 4 gauge going to the battery is protected by a 125 amp fuse that will be ok
 
Looks like you have quite a large pulley on that thing. I'd put like a 3" on it for starters.
 
-
Back
Top