Early A floor repair options?

-

dodgedartgt

Well-Known Member
Joined
Dec 2, 2006
Messages
215
Reaction score
19
Hi guys

What are the siurces for early A floor pans? Also, is there a full one piece pan available?

Thnx, Mike in FL
 
Autobody Specialties is where I got my front pans, good fit and price. Holes are not drilled for seatbelts or seat tracks. It is a doable job even for a novice with a MIG welder.
 
Hey, Mike in FL. Layson's offers early A floor pans. I bought three of the four quarter pieces for my '64 Valiant. Good quality steel, but the fronts at least do need to be modified a little on the edges to fit. (I think they were based on later A body floors.) The ridges are different too, but if you're replacing most of the floor, that's not really noticeable.

Here's what mine looked like after they'd been welded in and fiberglass filled.

blogger-image--1899317434.jpg


And here it is primed. I think it turned out ok for something that won't be seen. If you're an original purist though, you're gonna need to find a rust free out west car to chop up. I was more interested in structural integrity over originality, so these worked great for me.
e881db502c9411e3b6f822000a1f8cdf_8.jpg


Where are you in FL?

Chuck in FL
 
Hi Chuck,

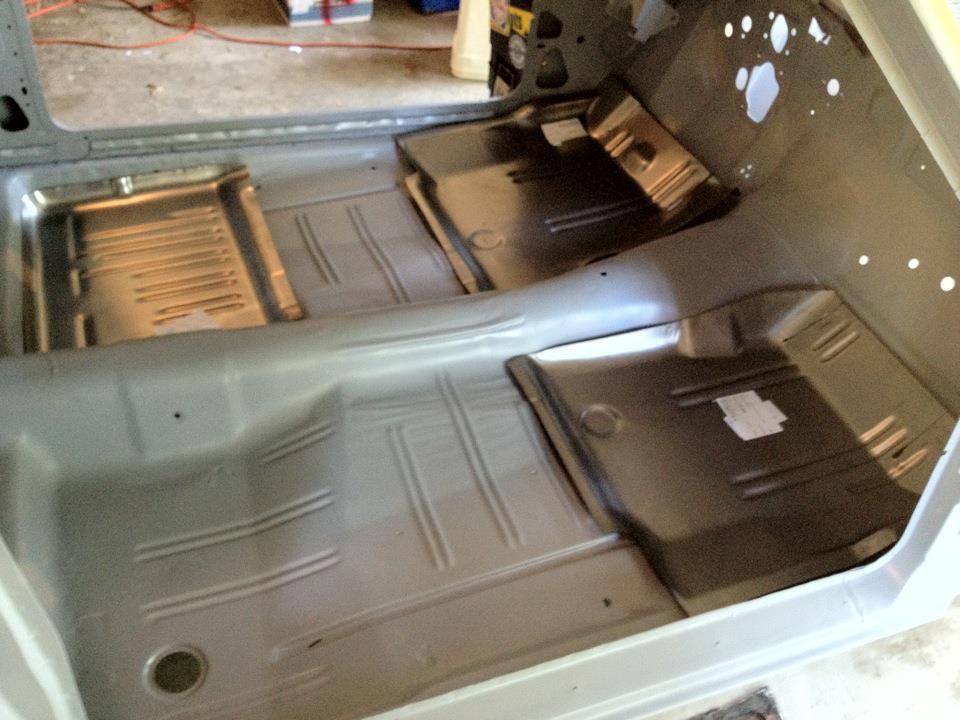
I'm in Sarasota Co, just off I-75. I don't believe I've ever even pulled off an exit in G;ville on my way north or south... jeez! Your floor pics look good. I know all about rust free western cars. I lived in OR for umpteen yrs before moving here in '05. I do miss finding rust free rollers for $100 or less, eh?

This '64 GT I'm working on is rough, REALLY rough. But it is what it is, considering I found it for $200 locally. Ex Texas car, but I'm sure it was the TX Gulf coast. Basically, I'm putting it back together so I can have a solid starting point to cut it up for my future plans. I'm cutting the floors out now, but need to know if I have to save the tunnel or not.

Did the pans from Laysons cover the full length from toeboard seam to rear seat shelf? I see you trimmed them to fit, though.

Thnx, Mike in FL
 
Thanks, Mike! I was born and raised in Sarasota County. I'll be there this weekend to visit family, actually. I know there's another guy down there restoring a rough '64 Valiant named Tom. Never met him though. Told him over the phone he needs to join FABO though! Hopefully we'll see him around.

I was able to find a pic of what the pans looked like before cutting and installing. Please note the outside edge of the front floor pans and how they kick up near the front. The regular floor pans don't do that, but it's easy to score the pan and pound it down.

I would save the tunnel if at all possible. I think someone makes full or half pans for the early As, but I would highly recommend saving the tunnel if you can.

Nice to meet another FABO Floridian! Look forward to seeing more of your work.

Floor+pans.jpg
 
i got mine off ebay and they sucked. they fit like hell. i had to cut em up like jig saw puzzle pieces to get them to fit but in the end they filled the hole.


Do not cut the floor till you have pans in hand. You also can add the weld in sub frame connectors at this time also, they help with getting rattles out. US Car Tools is what I used. I also used BB Chevy Iron heads to weight down the pans or a anvil.
 
Cool, a good use for Chevy something... but I digress! :grin:

Looking at those pans, and my floor, I probably do need the full length halves.

So what vendors do each of you have experience with, good, bad, ugly???

Thnx, Mike in FL
 
i got mine off ebay and they sucked. they fit like hell. i had to cut em up like jig saw puzzle pieces to get them to fit but in the end they filled the hole.


X2 got em in and was disgusted, I can make that in my shop. Go with auto body specialties.
 
66 Barracuda Right side Autobody Specialists
 

Attachments

  • 08-27-2012-3 right side bolted down.jpg
    57.3 KB · Views: 477
rockauto, $55. + shipping. Had to massage with a rubber mallet to curve better near the tunnel. I cleaned and painted the sub-frame insides before installing the new floor. I had trouble w/ burn-thrus with my cheap wire-fed HF welder. If I do again, I'll lap-weld instead of butt. After these photos, I covered the seams w/ fiberglass matt.
 

Attachments

  • new floor pan.jpg
    32.7 KB · Views: 471
  • overall.jpg
    77.7 KB · Views: 484
  • floor repair - small.jpg
    107.8 KB · Views: 475
still have RR footwell pan and trans tunnel in this 64 four door, if anyone needs them. front pans had three layers of shag carpet stapled over them so they are rusted and pin holed.

Chuck, how is your car going? thought you would like to see this new arrival at the el paso yard. probably overall cleaner than the four door.
would have bought it whole if i had more money to spend on cars to flip.
 

Attachments

  • 100_3082.jpg
    68.1 KB · Views: 473
  • 100_2009.jpg
    62.7 KB · Views: 481
  • 100_2208.jpg
    74.7 KB · Views: 447
  • 100_2209.jpg
    55.7 KB · Views: 490
  • 100_1674.jpg
    51.9 KB · Views: 467
  • 100_2254.jpg
    74.7 KB · Views: 464
Hey, David! It's going great, thanks. You can see the patches I made from the parts you sent me in my build thread link in my signature. Almost done with the welding part of my car. Getting past the underside welding was the hardest so far. I can't believe Bill did butt welds on his floors. That's very impressive. I did very slight lap welds on mine and welded it top and bottom, then covered it all with Evercoat short-hair fiberglass filler.
 
If you have some sheet metal, they're really not hard to make. A more skilled metal worker may have been able to make these in less pieces than I did, but they turned out O.K. A bead roller will give you a more factory appearance. These are made from an old filing cabinet. I made my own much cheaper, and probably better quality than some of the aftermarket stuff. You could get an old deck lid or something from a salvage yard for cheap sheet metal. I used large watercolor paper for patterns. I'm not a pro or anything, just a do-it-your-selfer like most others on this site. Some of the metal work on my car is my first go-around. Don't be afraid of it!!
 

Attachments

  • pass floor welded in.jpg
    47.2 KB · Views: 432
  • rh primed floor sm.jpg
    66.3 KB · Views: 421
  • lh floor primed sm.jpg
    68.3 KB · Views: 426
Do not cut the floor till you have pans in hand.

I understand what you're saying, but fact is I needed to determine the complete extent of the rust damage.

In the front both sides are rusted through almost up to the seam across the top of the toeboard. It looks like on the driver's side I can use front and rear patch pans. On the passenger side though, I'll need a full length pan. Not only that, but the section behind the rear footwell seam, where it curls from the floor up to the seat pan in rotted through.

So who does sell full length pans?

Thnx, Mike in FL
 
To the best of my knowledge. ....,,,
No company reproduces a full floor with tunnel.
No floor under front seats
No floor under back seats
Some sell a generic section for the rear floor section where back seat passengers put their feet.

if i remember correctly..... rear floor in valiant/ barracuda is slightly different than dart
 
I bought a used bead roller on Ebay and made my own patches. I butt welded them and ground the welds. Here it is right before carpet.


Wow! That's incredible! Very impressive.

Mike, sounds like you might need a patch from a donor car or make your own. I'm pretty sure there's a patch for the area below the rear seat on eBay right now, but it's from a Valiant and I think the rear parts of the floor were different. You could probably fab something with steel panels, but it all depends on how original you're going for. I used truck bed liner all under my car, so I wasn't too worried about some slight weld welts.
 
Thnx for all the responses.

Chryfat, nice work, looks good! What did you paint thefloor with? I took your clue and was searching for bead rollers, have a couple of call to make later this morning.

Chuck, I found the item. I don't need the whole pan as pictured, just from the existing front edge of that piece, to the next seam 6" back from there.

Mike in FL
 
-
Back
Top