Electric fan install help.

-
To those that have contributed, goldduster and 72blunblu in particular, thank you for a very useful thread. I've been pondering cooling my project and in fear of doing it wrong.

So, I have a 360, like the OP... Mine might be a little more difficult to cool, dyno'd at 555hp. I would like to use the same setup as goldduster. I'll use the parts list in his pdf and give it a shot. I know zero about wiring. This is my first build. And I was thinking of using a Griffin rad but now, not sure......

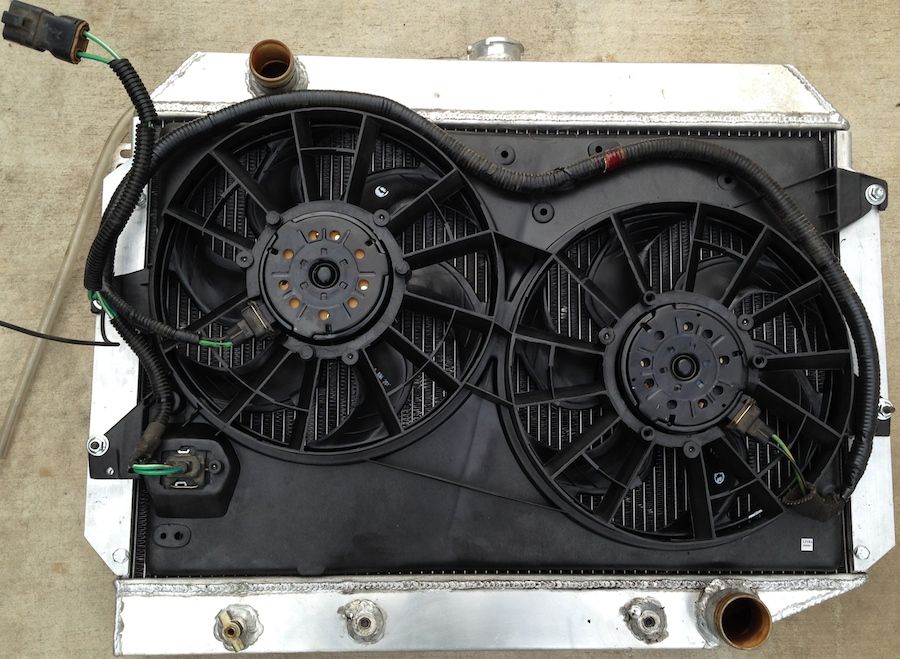
Mine makes 470hp and like I said only uses the LOW speed. So there's more left there. If you feel better with a griffin or ron davis or whatever, use it! If it's a roughly 26" radiator, the fans should still fit well.

The wiring is pretty easy. If you pull the wiring harness from a contour, you literally only have to hook up 3 wires outside of the ones for the relays. One for high power, one for low power, and one for ground.
 
Not sure which controller you are using goldduster but the derale was easy as pie.
 
THe radiator came today, I'm looking at how to mount the fan unit to it. Anybody feel like taking some pics of the mounts you used? Sure would be appreciated.
 
Gold duster I looked at your pics and as far as I can see Magic is holding it on. The install is so clean I can't even see any mounts.
 
Gold duster I looked at your pics and as far as I can see Magic is holding it on. The install is so clean I can't even see any mounts.

1/8" x 1 aluminum bar stock. To bolt it to the radiator, use some pan head screws and some J-clips. Then you basically just use some additional pan head screws, drill holes through the shroud tabs, and bolt it on with some washers. I'm kind of a nut about this stuff. Most people thought it was some high dollar fan lol

I think others weren't so into trimming stuff like I am and used wider aluminum stock and had it stick out past the edges of the radiator.
 
I know it's a pain, but could you take a couple pics please. I understand what your getting at, but the layout is a little hard to picture just from an explanation. I'm going with pretty much all your advice here.
 
I used 2" wide, 1/8" thick aluminum bar stock. I used the existing holes in the mount on my 26" Champion radiator and then drilled the holes for the fan shroud. You can see 3 of the bolt heads that hold the bar stock to the radiator, the 4th is underneath the top right fan mount. And of course the hardware holding the fan to the bar stock is easy to see. This is what mine looks like.

IMG_1558_zps3b79216a.jpg


IMG_1557_zps622fc079.jpg
 
THanks so much 72, that would be easier, but I have the 22 inch radiator which means I have to cut off the tabs from the fan unit, so totally different.
 
I know it's a pain, but could you take a couple pics please. I understand what your getting at, but the layout is a little hard to picture just from an explanation. I'm going with pretty much all your advice here.

I didn't do the 22" radiator one. You may have to contact kybatman for that one.

I did the 26" radiator. But it would be roughly the same idea.
 
I saw this controller on another thread and ordered one.
http://www.entropyrad.com/lsx-series/parallel-dual-speed-dual-fan-programmable-fan-controller.html
I wanted one the was sealed and could be mounted under the hood rather than having to run wires all the way inside the pass compartment. With the Dakota controller I would have all that wiring because they don't recommend mounting in the engine bay, I would have to buy another $30 relay and another $30 temp sender. So Dakota $110, extra wiring and connectors $15, extra relay $30, temp sensor $30, total $180.00 and two year warranty.
The Entropy controller= Waterproof, everything included, lifetime warranty + $150.

I think that's going to work quite differently. You won't use the diode/resistor pack at all with that.

The dakota controller has a ridiculous amount of settings. Like controlling them down to 1 degree increments. It doesn't give you that much info on that. Let us know how it works.
 
I saw this controller on another thread and ordered one.
Series/Parallel Cooling Fan Programmable Fan Controller - (Powered by CubeCart)
I wanted one the was sealed and could be mounted under the hood rather than having to run wires all the way inside the pass compartment. With the Dakota controller I would have all that wiring because they don't recommend mounting in the engine bay, I would have to buy another $30 relay and another $30 temp sender. So Dakota $110, extra wiring and connectors $15, extra relay $30, temp sensor $30, total $180.00 and two year warranty.
The Entropy controller= Waterproof, everything included, lifetime warranty + $150.

Looks to me like most of the functions of that controller only work when it's controlled by another PCM. In stand alone mode it only has 8 dip switches to control the fan settings, and it only says you can control the temperature setting for turning the fan on for low and high speed. No mention of being able to set the "fan off" temperatures or an A/C input in standalone mode.

I actually like that the Dakota Digital controller is in the cabin. I keep mine under my dash with velcro, so I can pull it down and reprogram it whenever I like. And the wires that run to the controller just run to the relays and the temp sender, its not heavy gauge wire like from the relays to the fans. Plus it allows you to control both the fan on and off temperatures for both low and high speed settings.

Here's the inside of the Entropy controller, showing the 8 dip switches. Would be nice if it had the instructions posted somewhere so you could get a better idea of what it would do in standalone mode.

***Update***

I found this response on another forum regarding the entropy controller, straight from "Tony" at Entropy

Any of them can work with a LSX PCM - either a factory PCM or a Fast/BigStuff/Holly/etc. system. The PCM can control the fan ON/OFF or you can use the sensor included with the controller. When you order one of our LSX radiators with a wiring harness, we automatically weld in the bung and install the sensor in the radiator for you. We pre-set the controllers to come on at 180F for FAN1 or the low speed and 190F for the second FAN2 or high speed. The fan ON/OFF temps are staggered to prevent from hammering the alternator with 60 amps of in-rush current at once. You can of course set the FAN ON/OFF temps to any temp you like from 150F -215F in 5 degree increments using the DIP switches inside the box.

Here's the page Nova radiators - Page 4 - Chevy Nova Forum

So, sounds like you can only control the on/off temperatures down to 5* increments with that box. Also, I think you'd have to wire both fans to come on at "low" speed (FAN1 setting) and use the FAN2 setting for high speed. Ford didn't run the fans independently of each other anyway, so that shouldn't be an issue.

DSC02870.jpg
 
Last edited:
I did talk to Tony before purchasing, I'm a complete novice with this, but what I get is from talking to him is that the fans will ramp up to low and then if needed go to high to prevent a high spike of off to hammering the voltage to high, which would be nice in our fragile systems. Also it looks like the harness will just need the fan connections changed, but I'm sure thats to good to be true so I may end up using the Cougar harness anyway. Two big things for me is, one- weatherproof, this runs off the alternator so no wiring going to the pass area just to come back to the front of the car, and two- everything included, no shopping for extra parts, relays,wiring, fuses. I will definately keep updating to let you guys know what I find, I do know since I found the link here someone else is running it. Anyway it should be interesting, maybe it's a great solution, maybe not, but we shall see.
 
Forgot to mention that Tony stated when the AC cycles it will run the fans at high for better cooling. Not sure if it will still RAMP up, hopefully or that would be a big oversight.
 
That was an interesting read. Not sure if mine is correct but it seems to work fine. The tech involved in it anymore is out there. lol. I ran a relay and diodes, the radiator has a temp sensor that will activate the fan and the knee knocker unit will also activate the fan when the compressor is cut on. Idling temp is 180 with fan running, running temp right now, ambient temp is around 60 degrees, it stays less than that. I did upgrade radiator to an 3 core Aluminum due to puncturing the other radiator will installing the condenser and fan. lol
 

Attachments

  • IMG_1669.jpg
    50 KB · Views: 289
  • IMG_1667.jpg
    60.5 KB · Views: 272
  • IMG_1680.jpg
    58.2 KB · Views: 263
  • 20160106_170526.jpg
    23.8 KB · Views: 269
  • 20160106_170358.jpg
    42.5 KB · Views: 268
I did get it installed today, it looks great. It fits very good but that fan assembly is only about a half inch from the bolts on the water pump pulley. I think that is plenty seeing how any torque on the motor will be up down, if I had forward back movement we would have a whole new discussion. I can see why Champions website states this radiator does not fit my 71 Scamp, they have cutouts on the flanges that mount to the car for where there are existing bolts, but I had to just shave a little it on the driver side, no big deal at all. On the pass side the bottom hole does not line up and a new one will have to be drilled, again this is very minor. Champion must be real sticklers about saying it will fit, and that's great for people that want to just drop in, but they should note that this does fit with minor modification. They could so very easily move the cutouts a half inch and drill one extra hole and call this a direct replacement for the Scamps. I won't get the controller till next week so I will update when that's installed.
 
I fired the fans up, they are very smooth, nicely balanced, and they move ALOT of air. Very happy with these so far. The controller comes tomorrow, I can't wait to see this little piece of art, hopefully I will have it in this weekend. I gotta say it is very wierd hearing the same electric fan sounds coming out of my 71 Scamp as my modern Avalanche, sounds just like it, but turn and look, and it's a classic! Very cool.
 
I got the Entropy controller tonight. Very happy I went this way the quality is fantastic. I'm trying to post pics, we'll see if it works. The first one is the box, I had no idea this company was this big, I expected generic packaging. Second one is open with contents and after that just some pics to give you an idea off the quality. Even the instructions are done very nicely.
 

Attachments

  • image.jpg
    16 KB · Views: 461
All weather pac connecters, even at the box its sealed with an oring and the connecters going in, so it's basically as waterproof as an engine compartment would be in a modern car.
 
I'm not knocking Dakota, but there is no way I could have paid $120 for ther controller and wired it up with this kind of quality for the $150 I paid for this, it has ten gauge power wire, comes with the temp sensor, not a cheap sending unit, a sensor. Also this has lifetime warranty. Now if it works as well as it looks, which I have no dought it will...
 
I'm not knocking Dakota, but there is no way I could have paid $120 for ther controller and wired it up with this kind of quality for the $150 I paid for this, it has ten gauge power wire, comes with the temp sensor, not a cheap sending unit, a sensor. Also this has lifetime warranty. Now if it works as well as it looks, which I have no dought it will...

Water temp "sensor"

hly-534-10_w_ml.jpg


Water temp sending unit

smp-ts17_w_ml.jpg


If you noticed they look exactly the same, you would be correct. Both measure temperature the exact same way. They receive a voltage input, put it across a material whose resistance changes with temperature, and output a voltage. The only difference between a "sending unit" and a "sensor" is that one is connected to an ECU, the other is connected to a gauge. The ECU tends to be more accurate because it can monitor the input voltage and make corrections based on its programming, while the gauge calibration just assumes you're sending the right voltage to the sender. But the hunk of metal sitting in the water jacket is pretty much the same.

So, if you hook a sending unit to an ECU (like the Dakota Digital controller), it works the same way a sensor does. The controller performs the computation on the return voltage. Which is why the temperature that my Dakota Digital controller displays doesn't always match the temperature shown by my cheap autometer temp gauge. The temp gauge has an error that increases as the temp climbs because it's calibration isn't perfect. The controller doesn't have that problem, and reads more accurately. They both work off of the same sending unit on my car.

I'm not knocking the other controller, but the temp sensor it supplies isn't some kind of magic. It's exactly the same thing as a sending unit. And in the case of the Entropy controller and the Dakota digital controller, neither are hooked to a full ECU, the controller is doing the computations. Same thing, different package.
 
-
Back
Top