Front suspension woes

-

67bluefish

Active Member
Joined
Jan 9, 2006
Messages
36
Reaction score
2
Location
Baltimore
I recently picked up a PST polygraphite front suspension kit for my '67 fastback, and have been slowly going about replacing the various bushings, etc., that haven't been touched in 40+ years.... (I asked about some tie rod end removal info a week or so ago - thanks for the help!)

So, here are the problems:
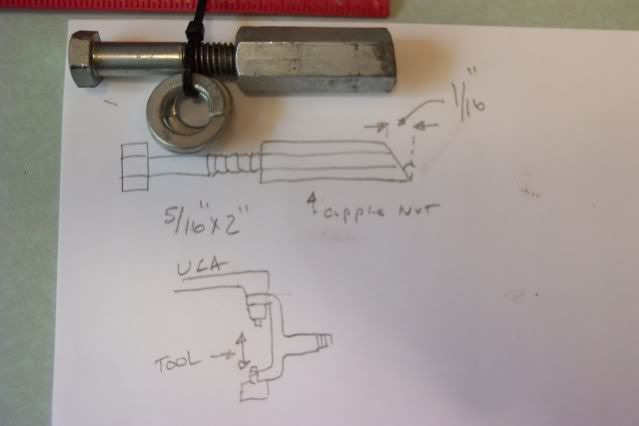
1: Upper control arm cam bolt removal! Managed to get the front, driver's side cam bolt out, after releasing several years worth of frustration with a BFH. Managed to get the cam washer off the rear driver's side bolt, but the bolt itself won't budge. :banghead: I've been reading about Kroil, and am planning to pick some up tomorrow; I want to stay away from cutting or heat if I can.... any other suggestions?

2: Steering knuckle removal - I've got one bolt holding the driver's side (DS) steering knuckle on (bottom right, when looking in from the outside) that won't budge. Have also applied liberal amounts of BFH, to no avail. :banghead: Thoughts?

3: Lower ball joint removal: I've got the castellated nut released, but this is the same steering knuckle as described above, so of course it is being as difficult as possible. :mumum: Someone mentioned that having the steering linkage connected might help, as it will give me something solid to bang against. I'm open to that, just wondering if there are any other suggestions out there.

Thanks for the help, folks! This is one of the few times this year that I'll be able to work on the car (living in a different state) so I'm trying to get as much done this week as I can.
 
Hi 67,

I am also in the process of removing the front end for new bushes and hardware. The key to it is , "The right tool for the right job".
(In the case of 46 year old components , Heat and some good quality corrosion inhibitor is your friend and will make your job a lot easier)
I'm assuming the BFH means Big F$ck*&g hammer? lol, Using heat in the proper way will = Less BFH and more :)

Use heat to remove the top control arm bolts and bushes, you are going to replace them all anyway.
If that rear bolt is seized- again use heat , and try to move the bolt with your wrench , a long handle one will work best, you should be able to work it loose and then tap it out.

For ball joints. after the arm is removed , hold it in the vice, Heat it up a little and use a rattle gun and ball joint socket.
After its all apart , you really need to make sure its all really clean before you start putting in the new bushes. I usually sand blast the components and then give them a wash and some new paint.:D

You can usually get all this done in a weekend if you are cruising along by yourself and have the right tools
 
Thanks for the words of advice, formulaS. You are correct on the pronunciation of BFH, by the way.

I'll give the heat a try tomorrow; the rear bolt is now somewhat loose L to R, but still won't budge front to back.

And now I have a reason to get some more tools! Won't my wife be happy about that....
 
Here is a tool I made per FSM to pop upper and lower ball joints free from steering knuckle. Remove castle nut of joint needing replacement, flip it over and re install flush with end of treaded ball joint stud. Place tool in line with and between booth upper and lower nuts and expand tool with two wrenches until it will no longer turn, then smack knuckle eye with hammer where tapered stud is held. It should pop apart

100_1264.jpg
 
wjajr, that looks oddly familiar.... quite similar to the tool the service manual describes to release the upper ball joint. I'll see if I can fab that up tomorrow and put it to use. Incidental question: I've already gotten the upper ball joint out - I'll have to see where I can expand the tool in order to get the lower ball joint to release.

Still haven't had much luck with the rear, driver's side cam bolt on the UCA. Used some PB Blaster and managed to get the cam bolt to slide as if you were adjusting camber/caster, but no luck in actually removing the darn thing. Moving on to some C-clamps and other tools tomorrow!

This must be fun otherwise we wouldn't do it, right?!
 
Pull any cotter pins if present.
Heat the nut, take it off.
Use a pickle fork to remove the joint.
Kroll is really good penetrating oil if you let it set for a while, but it smells really bad...
 
Well, things went from bad to worse. Got one cam bolt off, peeked in behind the shock and saw some metallic swiss cheese. Beyond my capabilities, so it's off to the frame shop to have some welding/repair done. An unfortunate turn of events, to be sure.

Still no luck on removing the other cam bolt, or the steering knuckle; I hate to pay some one to do something I wanted to do, but that seems to be the way things are going.
 
The best way i found is to use a pickle fork, Bang it in so it's tight then take your BFH and wack the side of the spindle where the ball joint goes through, Usually only takes a couple hit's to free it up,Oh and spin the castle nut on a few threads.
 
Show some pics of what you're working on.

The UCA cam bolts are pretty much removed LAST, after you've disconnected the spindle balljoints.
The cam bolts should just slide in or out after the nut has been removed.

You have the car on supports and the torsionbar-adjusters loosened up all the way?
 
Hmmm this bolt came out easily for me. Just loosened the rear nut, used lots of lube and tapped it forward enough so the cam washer is exposed. Next use a long pry bar to lever the bolt out.
 

Attachments

  • image.jpg
    39 KB · Views: 396
any updates?

I had that issue with the upper control arm bolt-- (no torch) if you can turn the bolt -- keep moving it back & forth, I finally had to use a sawzall to cut off a portion of the bolt.(inside the frame mount)

as for the steering knuckle-- that should be released b4 any tension has been released from the suspension.

have you tried the 2 hammer method?(2 ball peins)
place a hammer on the joint-- smack the snot out of it with another hammer, move around the joint & when you hit it just right the joint separates.

same thing for the lower ball joint.
Lawrence
 
Those bolts will slide right out for some and be cut out with a torch by others. Just depends on how much rust. The torch will set the rubber on fire and it STINKS !
Once the rubber is burned away there is a lot more wiggle/movement allowing you to focus the cut. In the end you'll find burning the rubber away should have been the first step.
 
All good points above, the only thing I will add is I agree with pickle fork! Not expensive, and I have had mine for over 20 years. Also for penetrating oil..maybe try some home made stuff...1/2 acetone and 1/2 tranny fluid...members on here swear by it!
 
All good points above, the only thing I will add is I agree with pickle fork! Not expensive, and I have had mine for over 20 years. Also for penetrating oil..maybe try some home made stuff...1/2 acetone and 1/2 tranny fluid...members on here swear by it!

I have had to disassemble my front end several times, using the bolt & coupler nut tool saves having to replace rubber dust boots with after market junk that does not last any time. Pickle fork is great to use if old parts are not being re used.
 
A typical size pickle fork may not damage the typical tie rod ends boot. It may damage the upper ball joint boot.
It will destroy a lower ball joint boot.
 
I just did mine upper control arm bushings, now we must fab something up I have a little more rust than I care to so its time to fix it.
 
Unfortunately, I ran out of time. The car is at my folks' place, a 10 hour commute away... thanks to all for the helpful advice.

The proper order of operations is one thing the Service Manual is only sort-of helpful with. Replacing all of the front suspension bushings, for instance!

Oh well - perhaps the next time I'll have more luck. The next project is either a brake rebuild or a dash/instrument rebuild... or maybe both at the same time!

Thanks again, folks.
 
As a rust breaker, I heartily endorse Kroil.

Using the BFH in tight places can be problematic. Sometimes there's not enough room or the application requires a more accurate strike than I can manage at the moment. If I can get a socket on it, I use a 4 foot-long "cheater" bar. I got mine in the plumbing section at Home Depot. Sometimes that is not enough, then I use a 6 foot-long piece donated by a chain link fence on an abandoned demolition site.

Use the cheater bar as a sleeve over the handle of the breaker bar socket drive. If used over a ratchet handle, the mechanism could be damaged or the head of the handle could break.

For steering joint removal, I use a small gear puller (3 inch jaw). I especially don't like the idea of swinging the BFH around the steering box.
 
Is it OK to use anti-seize lube on the mating surfaces on reassembly?
 
I would use something else like bearing vasoline. Other good stuff for reassembly is tar from pine trees, prevents rust and holds bolts just enough to not come loose themselves.

And when using anti sieze lube give it couple of days time
 
-
Back
Top